# Sahi Pro Documentation (full text) --- # Welcome to Sahi Pro Automate functional tests of web, Rest API, mobile, Windows desktop, Java and SAP GUI applications, all from one platform. :::tip[Sahi Pro v12.0.0.10 is here] See [what's new in Sahi Pro v12.0.0.10](https://resources.sahipro.com/docs/release-notes/v12-0-0-10/). ::: Sahi Pro is a mature, business-ready test automation platform for UI-heavy applications. Built on 20 years of automating complex enterprise applications, it lets anyone on your team build reliable tests without code. Sahi waits for pages and retries steps on its own, so tests are quick to build, easy to maintain and reliable to run.
Sahi Pro
No-code automation for complex enterprise applications. Handles dynamic pages, frames, deep tables and large suites, and runs tests reliably release after release.
Sahi Pro Atlas
Sahi Pro's AI. Describe how your application should behave in plain language, and Atlas creates the tests and keeps them up to date. In the Controller, AI Suggest reads the page and authors the keyword for you.
## Sahi Pro Engines and Tools
Sahi Pro Web Engine
Sahi Pro Web Engine helps automate functional testing of web applications. It supports web application and Rest API automation. Sahi Pro Web Engine is well suited for cross-browser/multi-platform testing of complex web 2.0 applications with lots of AJAX and dynamic content.
Sahi Pro Desktop Engine
Sahi Pro Desktop Engine adds support for automating Windows desktop applications (Win32, WPF, WinForms, .NET SilverLight, XBAP, Universal Windows Platform (UWP)), Java Desktop Applications, Java Applets and Java Web Start applications.
Sahi Pro Mobile Engine
Sahi Pro Mobile Engine adds support for mobile applications. It supports automation for Native, Web and Hybrid applications on iOS and Android.
Sahi Pro SAP Engine
Sahi Pro SAP Engine adds support for automation of SAP GUI. It has been available since Sahi Pro v9.0.0.
Sahi Pro Visual Assist Engine
Sahi Pro Visual Assist automates applications using on-screen text and image recognition, automating with what's actually visible on screen rather than relying on the underlying DOM or object model. Available since Sahi Pro v10.0.0.
Sahi Pro Runner
Sahi Pro Runner can be used with Continuous Integration and build systems as both master and worker, and as a central database for reports.
## Key Capabilities ### No-Code
01No-Code That Scales Like Code

Build tests in the No-Code Test Editor by putting together keywords named after the steps of your business process, such as Login or Create Order. Like well-written code, each part of a test has its own place, so tests stay easy to modify and maintain in the long run, which is 90% of the work in test automation.

  • Scenarios describe what a test does. A test case is made of keywords, so anything you build once can be reused in other tests from day one.
  • Keywords hold how each step works. They are kept separate from the scenarios that use them, so one change updates every test that uses the keyword.
  • Elements, such as buttons and fields, are stored once in the Accessor Repository. When an element changes in the application, you update it in one place.
  • Test data lives in .csv files or your existing Excel sheets. Parameterize tests with variables, so the same test runs for different data-based scenarios.
  • The same structure works for every technology. Web, Windows Desktop, Java and Mobile tests are all built from scenarios, keywords and the Accessor Repository, so a team learns one way of working and it scales across all its applications.
02Business-Driven Test Automation, Built In

In many teams, automation can only start once the application is ready, so tests fall behind every release. Sahi Pro is built for Business-Driven Test Automation (BDTA): you write a test in the language of the business first, and automate its steps when the application is ready. Most of the work happens before the application is built.

Before the application exists, you can:

  • Write the tests. List the business steps as keywords, such as Login, Add Books and Logout, as soon as the feature is defined.
  • Add parameters to keywords, and plan the test data each test needs.
  • Organize scenario files into test suites, and tag test cases so you can choose what to run.
  • Review the tests with the business. Scenarios read like plain test cases, so subject matter experts and managers can check them, and testers can use them as manual test cases until they are automated.
  • Let Sahi Pro Atlas write them. Describe how the application should behave, and Atlas turns it into scenario files, test cases and keywords, ready for your review. Atlas is in beta.

When the application is ready, record each keyword's steps in the Controller, or let AI Suggest author the keyword for you.

  • Write in your team's language. Keywords can be in English, German, Dutch, Chinese (Traditional) and other languages.
  • Learn more in Business-Driven Test Automation.

03Simple, Yet Powerful and Robust Object Identification
  • For web applications, Sahi does not use XPaths or CSS selectors. It has its own wrappers around the JavaScript DOM, which are simple to use and easy to maintain. Sahi also supports HTML5 custom tags, and uses similar technologies for Mobile and Desktop Automation.
  • Elements often have no IDs, and finding one inside a table or a tree usually means writing loops. Sahi identifies elements by where they sit relative to others, using relational functions like _in, _near, _under, _leftOf and _rightOf, so no looping logic is needed for tables, tree nodes and similar structures.
  • Sahi automatically traverses across frames, iframes and Shadow DOMs.
  • Supports browser popups and modal dialogs
  • For complex BFSI or B2B applications and edge cases, Visual Assist Engine allows Image Recognition and Optical Character Recognition (OCR)
04Automatic Waits

For web applications, Sahi automatically waits for pages to load and for data that loads in the background. Further, on failure, Sahi automatically retries the step a few times. In 95% of cases there is no need to add wait steps. This cuts the number of steps in a test by 50% compared to other tools, and keeps tests robust yet easy to maintain. Similar mechanisms used for mobile, desktop, Java and SAP.

05Controller and Object Spy

A Controller for the age of AI. With AI Suggest, the Controller reads the page and authors the keyword for you, so you don't have to fill in each step by hand. Build tests the same way for every kind of application: the Controller and object spy work on Chrome, Firefox, Internet Explorer, Safari, Opera (and any modern browser), Mobile (iOS, Android) and Desktop applications (Windows, Java etc.).

06An Editor for Everyone

One web-based editor for the whole team. Subject matter experts can view scenarios to check that they match the business, testers can write scenarios and tests, and engineers can work on keywords in code. Intelligent auto suggestions and refactoring make tests easy to modify and maintain. A Rest API editor is built in for working with Rest APIs and Web Services.

07Powerful Set of Built-in Functions
  • Object Identification functions for browsers, mobile, desktop and SAP GUI applications
  • Event Trigger functions for browsers, mobile, desktop and SAP GUI applications
  • Functions to work with database, Excel or CSV file for data-driven testing
  • Can directly invoke Java code from test steps. This is used to access databases, read PDF files, connect to another machine via SSH etc.
### Ready for the Enterprise
08One Test Across Web, Desktop and Mobile

In large companies, one business process often crosses several applications: an order starts in a web portal, is processed in a Windows desktop application and is approved on a mobile app. Sahi Pro stitches these together, so one test covers the whole flow without switching tools.

  • Move between Web, Windows Desktop, Java and Mobile applications within the same test.
  • Desktop and mobile come through the Desktop Engine and Mobile Engine, and work the same way as web.
09Built for Enterprise Customization

Enterprise applications always have complex, domain-specific scenarios that no-code alone can't cover. Sahi Pro has handled them for enterprises for years, and Sahi Script is always there as an escape hatch: no-code handles most of the work, and code handles the rest.

  • Sahi Script is based on JavaScript. Write keywords in it and use them in your no-code scenarios like any other keyword.
  • Call Java code from Sahi Script when you need it, for example to access databases, read PDF files or connect to another machine over SSH.
  • All automation files are plain text files, so your tests stay fully in your control. Unlike many other tools, there is no tool lock-in and no costly exit.
10Version Control with Git
  • All test files are plain text files, so every change can be tracked and reviewed.
  • Git support is built in: connect a repository, check in and check out changes, and see each file's history without leaving Sahi Pro.
  • Reports can show the Git commit details of the tests that ran.
11Integrate Easily with Continuous Integration Systems like Jenkins
  • Sahi can be configured to run tests on the Jenkins machine itself or on multiple machines in a master/slave configuration
  • Sahi need not be installed on Jenkins machine. The Sahi Pro master can be on a different machine and suites can be triggered from Jenkins. Results and reports will be sent to the Jenkins machine.
  • Sahi's execution reports can be synced to a central database where you can perform historical analysis of reports
  • Email notifications of execution status is possible at the end of execution or periodically during execution
  • Editor automatically creates the necessary Ant target for configuring the above options. This Ant target can be triggered from Jenkins.
12Secure AI with Sahi Pro Atlas

Enterprises want AI in their testing without sending their data outside. Sahi Pro Atlas supports Bring Your Own Key (BYOK), so it works within your security rules.

  • Connect Atlas to your own AI provider with your own keys.
  • Deploy Atlas in your own infrastructure, so your application data stays inside your network.
  • Learn more in Sahi Pro Atlas.
13Offline Reports for Review and Audit

Enterprises need test evidence they can review, share and keep for audits. Sahi Pro saves detailed reports as offline files, with every step, error and screenshot of a run.

  • Save reports as offline files in formats like HTML, XML, JUnit and Excel.
  • Share them with reviewers who don't use Sahi Pro, and keep them as a record of what was tested and when.
### Run and Report
14Batch Suite Runs via Data Driven Suites

A full regression run can mean thousands of tests, each with its own data and its own place in the order. Data-driven suites (.dd.csv files) list them all in one sheet and run them as a single batch.

  • Run thousands of tests in one batch. List your tests, scenario files and other suites in a data-driven suite, and Sahi runs them all in one go.
  • Suites can run other suites. Group tests into smaller suites, for example one per module, and run them from a parent suite. Tags, the start URL and data given to the parent suite carry down to every suite and test inside it.
  • Pass data to any suite or test. Each column in the suite becomes a variable in the test, such as $username and $password, so the same test runs with different data on each row.
  • Tag tests and suites, and run only what you need. Add tags such as smoke, high or admin, then run only the tests with matching tags, for example just the smoke tests before a release.
  • Learn more in Data Driven Suites.
15Parallel and Distributed Suite Runs

A large suite can take hours when its tests run one after another. Sahi runs tests in parallel on one machine and across many machines, so the same suite run finishes in a fraction of the time.

  • Run tests in parallel on one machine. Set how many tests run at once, and Sahi opens that many browsers side by side.
  • No need to keep the browser in focus. Tests keep running in the background while you use the machine for other work.
  • Spread a suite across machines. In a distributed suite run, one machine shares out the tests in a suite to the other machines and collects all the results in one place.
  • Send each test to the right machine. Prerequisites in a data-driven suite, such as a browser, Android or a machine tag like windows10, make sure a test runs only on a machine that can run it.
  • Not just for the web. Parallel and distributed suite runs also work for mobile, desktop and SAP GUI applications.
  • Rerun failed tests automatically (Auto Retry). Tests sometimes fail because of the environment or a browser crash, not a real bug. Sahi creates a suite of only the failed tests, for example admin_failed_chrome.suite, and can rerun it before failing the build.
  • Learn more in Run Tests from the Command Line.
16Inbuilt Rich Detailed Reporting

When a suite run fails, you need to see quickly what broke and why. Sahi creates a detailed report for every run automatically and keeps it, so you can go from a summary of all runs down to the exact failing step.

  • Drill down step by step. Start from the history of suite runs, open a suite, then its scenarios and tests, and click a step in the report to reach the exact line where the test failed.
  • Screenshots on failure. Sahi takes a screenshot whenever a step fails or an error occurs, so you see the state of the application at that moment.
  • Reports in the formats you need. Download reports as HTML, XML, JUnit or Excel, or send them by email. You can also add your own fields to suite reports.
  • History in a central database. All report data is stored in a database, so you can compare runs over time. Reports can also be stored in MySQL, MS SQL Server, Oracle or PostgreSQL.
  • Network activity (optional). Show the network activity of a web application during test runs.
  • JavaScript code coverage (optional). See how much of your web application's JavaScript code your tests ran.
  • Learn more in Reports.
## Supported Applications and Engines
TechnologyWebEngineDesktopEngineMobileEngineSAPEngine
Data and services
DatabaseSupportedSupportedSupportedSupported
FilesystemSupportedSupportedSupportedSupported
Rest APIs and web servicesOAuth2 needs the Web Engine.SupportedSupportedNo OAuth2SupportedNo OAuth2SupportedNo OAuth2
Web
Web applicationsAcross browsers and operating systemsSupportedNot supportedNot supportedNot supported
Web applications on mobile browsersNeeds the Web and Mobile Engines together.SupportedTriggered from the deviceNot supportedNot supportedNot supported
Chromium Embedded Framework (CEF) applicationsSupportedNot supportedNot supportedNot supported
Flex applicationsSDK 3.4 onwardsSupportedNot supportedNot supportedNot supported
Desktop
Windows desktop applicationsWPF, Win32, WinForms, .NET, SilverLight, XBAP and other applications targeting .NET Framework 2.0 onwards; applications built with the Microsoft Foundation Class libraryNot supportedSupportedNot supportedNot supported
Java applicationsSwing, AWT and SWT, Java 1.8 onwardsNot supportedSupportedNot supportedNot supported
Java Web Start applicationsSwing, AWT and SWT, Java 1.8 onwardsNot supportedSupportedNot supportedNot supported
Java appletsSwing, AWT and SWT, Java 1.8 onwardsDetailsNot supportedSupportedNot supportedNot supported
Oracle Forms12.x onwardsDetailsNot supportedSupportedNot supportedNot supported
Mobile
Native apps on iOS and AndroidAndroid SDK 18 onwards (Android 4.3.x onwards); iOS 9.3 onwards with Xcode 9.2 onwardsNot supportedNot supportedSupportedNot supported
Hybrid apps on iOSNot supportedNot supportedSupportedNot supported
Hybrid apps on AndroidNeeds the Web and Mobile Engines together.Not supportedNot supportedPartlySome apps are identified nativelyNot supported
SAP
SAP GUI for Windows6.2 onwardsNot supportedNot supportedNot supportedSupported
## Browser Support Sahi supports any browser which runs javascript and allows setting a proxy. This covers almost all desktop and mobile browsers. | Browser | Versions | | --- | --- | | Google Chrome | 6+ | | Mozilla Firefox | 2+ | | Safari | 5+ | | Internet Explorer
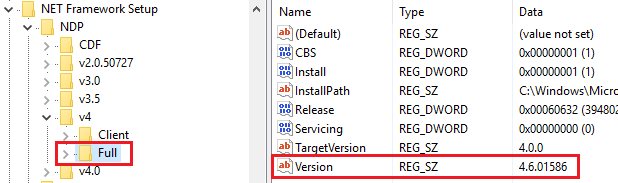
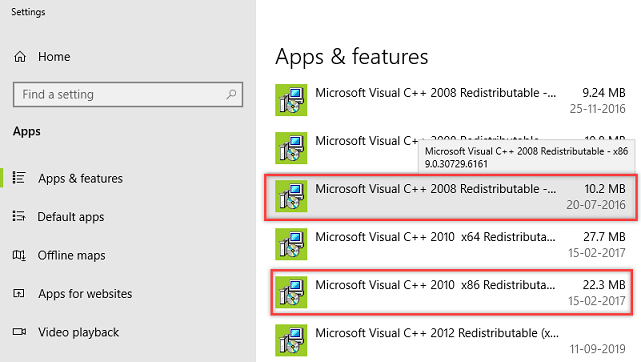
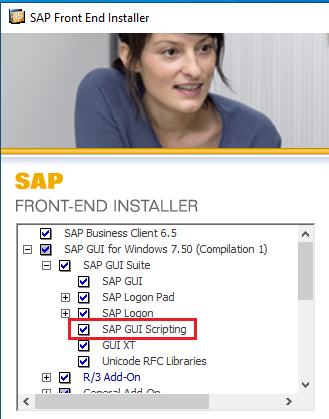
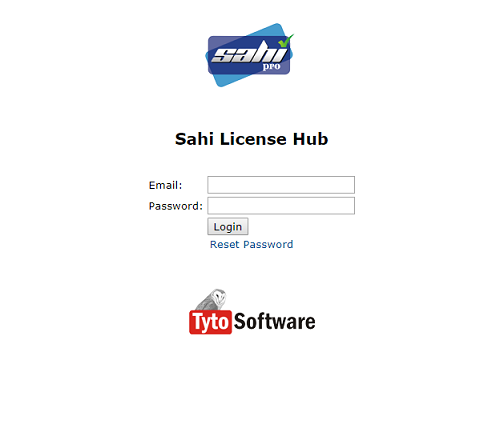
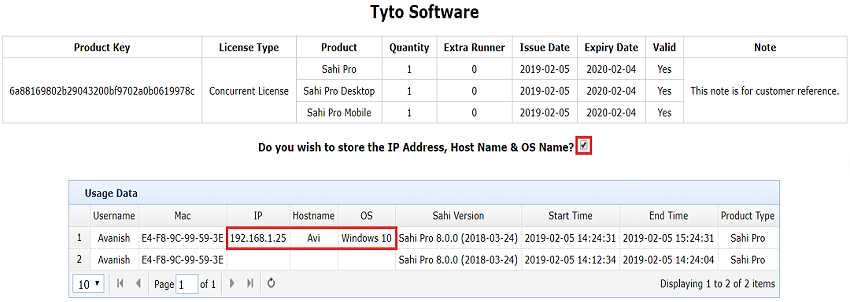
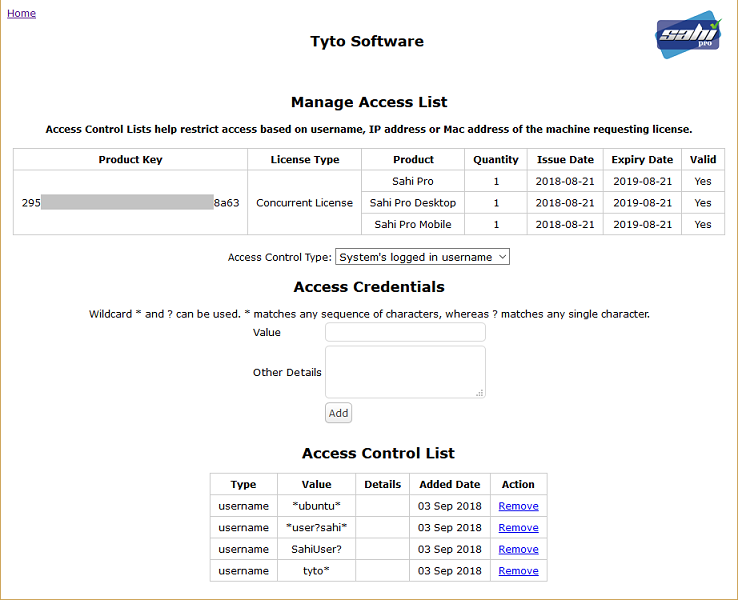
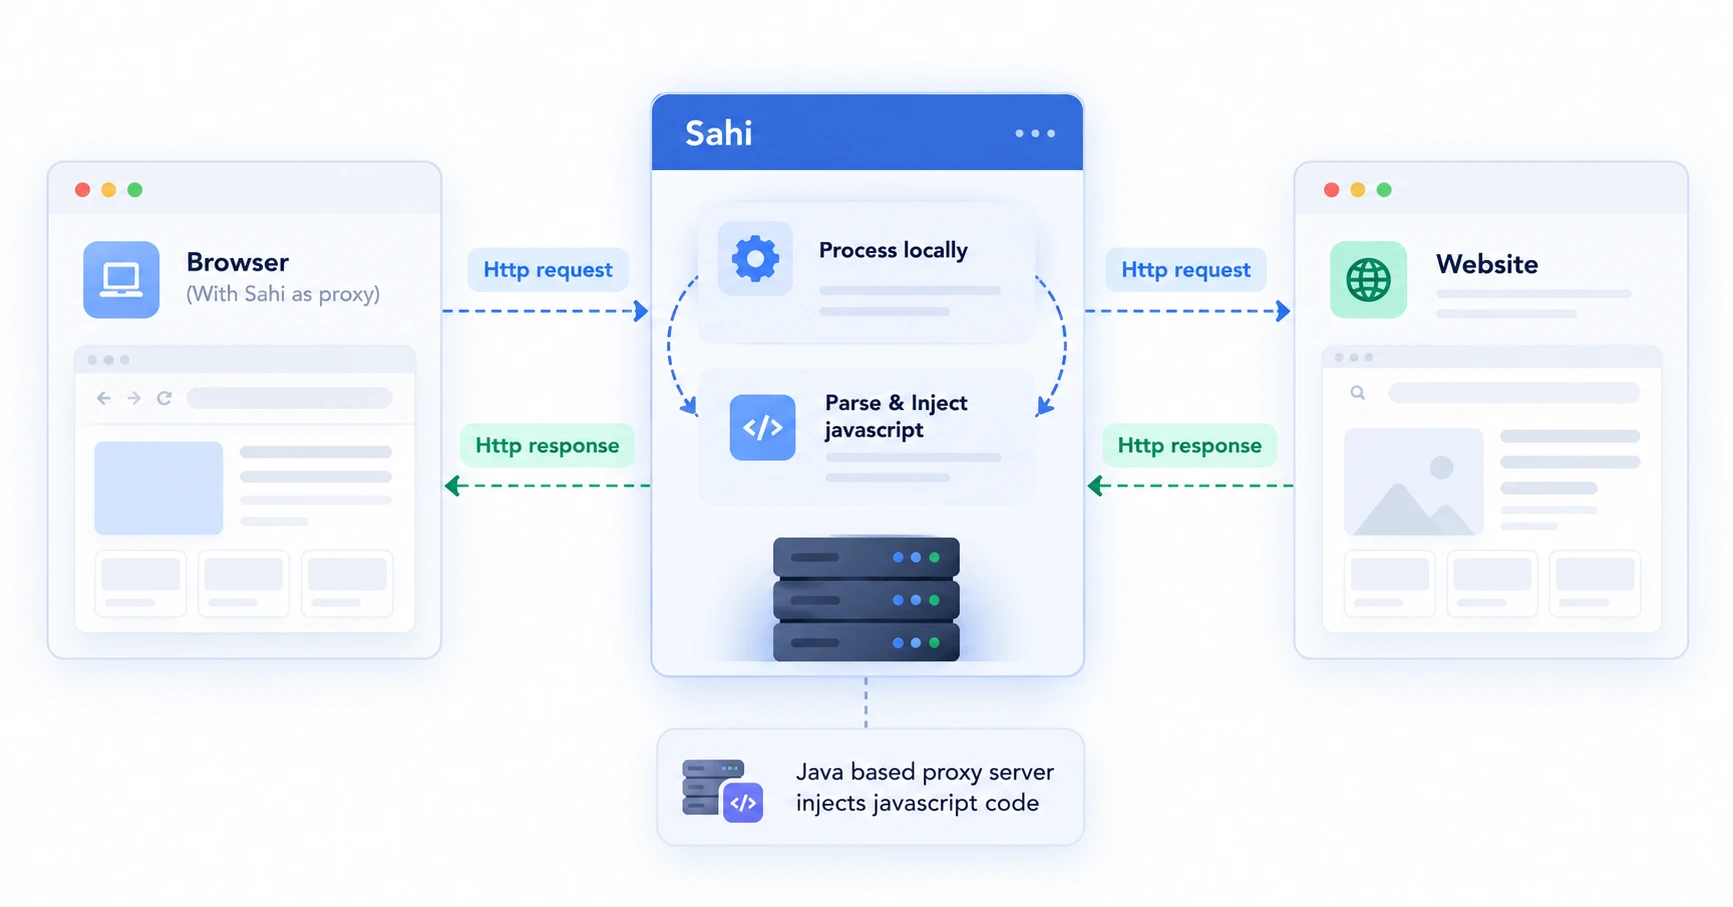
([IE mode on Microsoft Edge](https://resources.sahipro.com/docs/faq/evaluation-questions/#can-sahi-work-with-ie-mode-on-microsoft-edge)) | 8+ | | Opera | 9+ | | PhantomJS | 1.9+ | | Microsoft Edge | 25+ | | Microsoft Edge New | All | | Brave | All | ## Why the name Sahi? *Sahi* (सही, said *sa-hee*) is Hindi for **right**, **correct** or **apt**, and in everyday speech it also means **cool**, as in *sahi hai!* ("that's great!"). The name is also what the tool is built to do: check that an application behaves right, without making testers fight the tool. - **Right elements, simply.** Sahi finds elements through its own wrappers around the page, not brittle XPaths or CSS selectors, and relational functions like `_near` and `_under` work even when elements have no ids. - **Right timing, automatically.** Sahi waits for page loads and AJAX activity, and retries a failing step a few times before reporting it, so scripts rarely need wait statements. - **The Right Job.** Sahi takes care of the repetitive checking and rechecking, so testers can spend their time on the creative, exploratory part of testing. See [Architecture](https://resources.sahipro.com/docs/introduction/architecture/) for the goals behind its design. --- # Sahi Pro Atlas Sahi Pro Atlas, in beta preview, turns how your application should behave into reviewed, ready-to-run Sahi Pro tests. Sahi Pro Atlas is Sahi Pro's AI tool for creating and maintaining tests. Writing tests by hand takes time, and keeping them up to date takes even more as the application changes. With Atlas, you describe how the application should behave, and Atlas creates the Sahi Pro tests. When the behaviour changes, it updates them. AI is used only to understand what you describe. The tests are generated by fixed rules, so you get the same tests every time, and nothing changes until you approve it. Your team spends less time writing and fixing tests, and more time on the testing that needs their judgement. ## What Atlas Gives You - **Tests from how your application should behave:** type the behaviour in, upload a document, or explain it in a chat, even from your own editor's AI using the Atlas MCP server. Atlas plans and writes the tests, so nobody has to write them by hand. - **Tests before the application exists:** Atlas works from how the application should behave, not from the application itself. Describe a feature before it's built, and Atlas writes its scenario files, test cases and keywords in Sahi Pro's [business-driven](https://resources.sahipro.com/docs/using-sahi/business-driven-test-automation/) form. When the application is ready, you add the steps to the new keywords in Sahi Pro, by recording them or with AI Suggest. - **Same behaviour, same tests:** Ask an AI tool the same thing twice and you can get two different answers. Atlas uses AI only to understand the behaviour, and fixed rules generate the tests, so the same spec always gives the same tests. - **Tests that keep up:** when the behaviour changes, Atlas first shows you the difference to approve. If a behaviour is new, Atlas writes new tests for it. If a behaviour has changed, Atlas updates the existing tests instead of rewriting them. :::note[Why this matters] Sahi Pro tests are built from keywords, reusable building blocks shared across tests. For new behaviour, Atlas chains keywords that already exist in other tests to build the business flow, and creates only the keywords that are missing. For changed behaviour, it updates the tests that already cover it. Every keyword your team has recorded and refined goes on working, so you don't rebuild what already works, and each change takes far less effort than writing the tests again. ::: - **Thorough coverage:** a test for every path, error and access rule, plus each real combination of choices that affect each other, the edge cases that are easy to miss by hand. :::note[Example] For a loan form, Atlas plans tests for approved and rejected loans, missing fields, a clerk who can't approve, and each loan type with each repayment term. You describe how the form should behave once, and Atlas works out every one of these cases. ::: - **You stay in control:** you decide how each behaviour is defined as rules, and which rules go in and which stay out. Atlas suggests, and you have the final say. - **Tests you own, run by Sahi Pro:** Atlas writes Sahi Pro tests that your team can open, edit and keep, with or without Atlas. They run on the Sahi Pro engine like any other Sahi Pro test, with no AI involved at run time, so runs are fast, repeatable and free of AI costs. - **Faster over time:** every keyword you add, recorded or authored by AI Suggest, joins your keyword library. The bigger the library grows, the more of each new test Atlas can build from keywords you already have. - **Your data stays yours:** bring your own AI key, deploy Atlas inside your own network, or use self-hosted or local models, so you decide where your application data goes. To see each stage in detail, read [How Atlas Works](https://resources.sahipro.com/docs/using-atlas/how-atlas-works/). ## Getting Atlas Atlas is available as a standalone app, with entry points inside Sahi Pro. To join the beta preview, [get started here](https://sahipro.com/get-started/). :::caution[Beta Preview] Atlas is a beta preview in Sahi Pro v12.0.0.10: - It works with web applications for now. - Features and behaviour may change before general release. - We want your feedback. Send it to Sahi Pro support. ::: --- # Sahi Pro Web Engine Sahi Pro Web Engine automates functional testing of web applications and Rest APIs, across browsers and operating systems. Modern web applications load data in the background, change pages without reloading, and behave differently from one browser to the next. Web Engine handles this for you, so the same test runs on any browser and operating system. It also automates Rest APIs, so web and API tests live side by side. Web automation is part of Sahi Pro itself. The [Desktop](https://resources.sahipro.com/docs/introduction/sahi-pro-desktop-engine/), [Mobile](https://resources.sahipro.com/docs/introduction/sahi-pro-mobile-engine/), [SAP](https://resources.sahipro.com/docs/introduction/sahi-pro-sap-engine/) and [Visual Assist](https://resources.sahipro.com/docs/introduction/sahi-pro-visual-assist-addon/) Engines are installed on top of it. ## Features - **No-code test authoring.** Build web tests in the No-Code Test Editor, and use the Controller to author steps as you work with the application. - **Simple, robust object identification.** Sahi does not use XPaths or CSS selectors: it has its own wrappers around the JavaScript DOM, which are simple to use and easy to maintain. HTML5 custom tags are supported too. - **Elements without IDs.** Relational functions like `_in`, `_near`, `_under`, `_leftOf` and `_rightOf` identify elements uniquely, with no looping logic for tables, trees and similar structures. - **Frames, iframes and Shadow DOMs.** Sahi automatically traverses them, and supports browser popups and modal dialogs. - **Automatic waits.** Sahi waits for page loads and for data that loads in the background, and retries a failed step a few times before reporting it. Wait statements are not needed in most cases. - **Rest APIs and web services**, including OAuth2. - **Cross-browser test runs** on any operating system. ## Browser Support Sahi supports any browser which runs JavaScript and allows setting a proxy. This covers almost all desktop and mobile browsers. See [Browser Support](https://resources.sahipro.com/docs/introduction/#browser-support) for the versions. ## Quick Start - [Getting Started](https://resources.sahipro.com/docs/using-sahi/quick-tutorial/) - [Sahi Controller](https://resources.sahipro.com/docs/using-sahi/sahi-controller/) - [Run Tests](https://resources.sahipro.com/docs/using-sahi/playback/) - [Rest API Editor](https://resources.sahipro.com/docs/using-sahi/rest-api/getting-started/) - [Accessor Basics](https://resources.sahipro.com/docs/sahi-script/functions/accessor-basics/) --- # Sahi Pro Rest API Test Rest APIs from the Editor: build an API call, check its response and save it as a test step. Most applications depend on services behind Rest APIs, and checking the screen alone doesn't show whether those calls work. The Rest Client, a window in the Editor, lets you build an API call, send it and check the response, then save it as a step in a keyword, with checks on the response and values that later steps can use. Rest API steps run with the rest of the scenario, and their results appear in Reports. ## Features - **Requests** with the methods `GET`, `POST`, `PUT`, `DELETE`, `PATCH` and `QUERY`, with parameters, headers and a JSON, XML, form-urlencoded or plain-text body. - **Authorization** with Basic credentials, OAuth 1.0 or OAuth 2.0. The OAuth 2.0 wizard can get a token by running or recording a consent script, or from a refresh token. - **Import and history.** Import requests from Postman or from a HAR file, and reuse previous requests from History. - **Responses.** See the status, response time, size, body (as a tree, raw or rendered HTML) and headers of each response. - **Assertions and variables.** Hover over any value in a response to assert it, with eight checks such as Equals, Contains Text and Matches Regex, or to store it in a variable for later steps. - **Results in reports.** Assertion results, Passed or Failed, in the Inspector and in PDF and Excel reports. ## Quick Start - [Rest Client – Getting Started](https://resources.sahipro.com/docs/using-sahi/rest-api/getting-started/) - [Build a Request](https://resources.sahipro.com/docs/using-sahi/rest-api/build-a-request/) - [Authorization](https://resources.sahipro.com/docs/using-sahi/rest-api/authorization/) - [Read the Response](https://resources.sahipro.com/docs/using-sahi/rest-api/read-the-response/) - [Assertions and Variables](https://resources.sahipro.com/docs/using-sahi/rest-api/assertions-and-variables/) - [Rest API Steps in Reports](https://resources.sahipro.com/docs/using-sahi/rest-api/reports/) --- # Sahi Pro Desktop Engine Sahi Pro Desktop Engine adds automation of Windows desktop and Java applications to Sahi Pro. Enterprise business processes often run through Windows desktop and Java applications as well as the web. Desktop Engine automates them with the same tests, suites and reports you use for the web. :::caution[Important] Install Sahi Pro first, then install Desktop Engine in the same directory. ::: ## Features - Automation of Windows desktop applications: Win32, WPF, WinForms, .NET, Silverlight, XBAP, Universal Windows Platform (UWP). - Automation of Java applications (Swing, AWT), Java applets, Java Web Start applications, Oracle Forms and applets, on any operating system. - Use web and desktop applications in the same test - Run multiple tests in parallel - Distribute the tests in a suite across multiple machines ## License Desktop Engine needs its own license, separate from Sahi Pro. For a 14-day free trial, [book a demo](https://sahipro.com/get-started/) and we'll set up your trial, or email sales@sahipro.com. ## Prerequisites 1. Java 1.8 or above is needed for running Sahi. 2. Microsoft .NET framework v4.5+ required for Windows Desktop Automation. To check the installed version of Microsoft .NET framework: - On the Start menu, choose Run. - In the Open box, enter `regedit.exe` - In the Registry Editor, open the following subkey: `HKEY_LOCAL_MACHINE\SOFTWARE\Microsoft\NET Framework Setup\NDP\v4\Full` .NET Framework version in the Registry Editor ## Quick Start - [Automating Windows Desktop Applications](https://resources.sahipro.com/docs/using-sahi/windows-desktop/) - [Automating Java GUI Applications](https://resources.sahipro.com/docs/using-sahi/java-application/) - [Automating Java Web Start Applications](https://resources.sahipro.com/docs/using-sahi/javaws/) - [Automating Java Applets](https://resources.sahipro.com/docs/using-sahi/applet-new/) ## Sahi Pro Desktop Engine Runner Sahi Pro Desktop Engine can also be installed over Sahi Pro Runner, which runs tests but doesn't author them. ## Version Information Sahi Pro Desktop Engine was introduced in Sahi Pro 7.0.0. --- # Sahi Pro Mobile Engine Sahi Pro Mobile Engine adds automation of Android and iOS applications to Sahi Pro. Many business flows end on a phone: an approval, a notification, a field update. Mobile Engine automates native Android and iOS apps alongside your web tests. :::caution[Important] Install Sahi Pro first, then install Mobile Engine in the same directory. ::: ## Features - Automation of Android applications - Automation of iOS applications - Run multiple tests in parallel - Distribute the tests in a suite across multiple machines ## License Mobile Engine needs its own license, separate from Sahi Pro. For a 14-day free trial, [book a demo](https://sahipro.com/get-started/) and we'll set up your trial, or email sales@sahipro.com. ## Quick Start 1. [Download and Install Sahi Pro Mobile Engine](https://resources.sahipro.com/docs/using-sahi/mobile-engine/) 2. [Get started with Android Automation](https://resources.sahipro.com/docs/using-sahi/android-getting-started/) 3. [Get started with iOS Automation](https://resources.sahipro.com/docs/using-sahi/ios-getting-started/) ## Sahi Pro Mobile Engine Runner Sahi Pro Mobile Engine can also be installed over Sahi Pro Runner, which runs tests but doesn't author them. ## Version Information Sahi Pro Mobile Engine was introduced in Sahi Pro 7.5.0. --- # Sahi Pro SAP Engine Sahi Pro SAP Engine adds automation of SAP GUI for Windows to Sahi Pro. Many enterprises run core business processes in SAP GUI, and testing them by hand is slow and error-prone. SAP Engine automates SAP GUI for Windows alongside your web and desktop tests. :::caution[Important] Install Sahi Pro first, then install SAP Engine in the same directory. ::: ## Features - Automation of SAP GUI for Windows, version 6.20 and later - Run multiple tests in parallel - Distribute the tests in a suite across multiple machines ## License SAP Engine needs its own license, separate from Sahi Pro. For a 14-day free trial, [book a demo](https://sahipro.com/get-started/) and we'll set up your trial, or email sales@sahipro.com. ## Prerequisites 1. Java 1.8 or above is needed for running Sahi Pro. 2. Microsoft Visual C++ Redistributable 2008 x86 or Microsoft Visual C++ Redistributable 2010 x86. Verify the installed version of Microsoft Visual C++ Redistributable as follows: - Open Add and Remove Programs and look for Microsoft Visual C++ Redistributable. - The installed versions will be listed there. Visual C++ Redistributable in Apps & Features 3. Microsoft .NET framework v4.5+. Verify the installed version of Microsoft .NET framework as follows: - On the Start menu, choose Run. - In the Open box, enter `regedit.exe` - In the Registry Editor, open the following subkey: `HKEY_LOCAL_MACHINE\SOFTWARE\Microsoft\NET Framework Setup\NDP\v4\Full` .NET Framework version in the Registry Editor 4. SAP GUI scripting interface must be installed. Also, scripting must be enabled for SAP GUI client and server both. To enable it, see [Start SAP GUI Automation](https://resources.sahipro.com/docs/using-sahi/sap-gui-getting-started/#start-sap-gui-automation). SAP GUI scripting enabled in options ## Quick Start - [Getting Started with SAP GUI Automation](https://resources.sahipro.com/docs/using-sahi/sap-gui-getting-started/) ## Sahi Pro SAP Engine Runner Sahi Pro SAP Engine can also be installed over Sahi Pro Runner, which runs tests but doesn't author them. ## Version Information Sahi Pro SAP Engine was introduced in Sahi Pro 9.0.0. --- # Sahi Pro Visual Assist Engine Sahi Pro Visual Assist Engine uses computer vision and machine learning to add Image Recognition and Optical Character Recognition (OCR) to the Web, Desktop and Mobile Engines. Some elements can't be identified through the application's structure, especially in complex BFSI or B2B applications and edge cases. Visual Assist Engine identifies them by how they look and the text they show. :::caution[Important] Install Sahi Pro first, then install Visual Assist Engine in the same directory. ::: ## Features - **Image Recognition:** identify an element by its image on screen. - **Optical Character Recognition (OCR):** identify an element by the text it shows on screen. ## License Visual Assist Engine needs its own license, separate from Sahi Pro. For a 14-day free trial, [book a demo](https://sahipro.com/get-started/) and we'll set up your trial, or email sales@sahipro.com. ## Prerequisites - Java 8 Update 361 or above is required. ## Quick Start To automate your first test with Visual Assist, see [Visual Assist Automation – Getting Started](https://resources.sahipro.com/docs/using-sahi/visual-assist-getting-started/). ## Sahi Pro Visual Assist Engine Runner Sahi Pro Visual Assist Engine can also be installed over Sahi Pro Runner, which runs tests but doesn't author them. --- # Sahi Pro Runner Sahi Pro Runner is a lean version of Sahi Pro that only runs tests, built for CI servers and automated builds. Sahi Pro Runner is recommended for [Continuous Integration (CI)](https://resources.sahipro.com/docs/using-sahi/integrate-with-jenkins/) and build systems, as the master or as a node, and as a [central database](https://resources.sahipro.com/docs/using-sahi/sahi-syncdb/) for reports. On a CI server or build machine, you only need to run tests, not author them. Runner has no Controller or Editor, and a limited Dashboard. Each concurrent license includes two free Sahi Pro Runner licenses, and you can buy more. For example, 5 concurrent licenses come with 1 product key that runs up to 10 instances of Sahi Pro Runner. :::note A user license can't run Sahi Pro Runner. You need a concurrent license. ::: With a concurrent license, you can [download](https://resources.sahipro.com/docs/introduction/installers/) Sahi Pro Runner and use it on multiple machines. :::caution[Important] You can't launch browsers from the Runner Dashboard. It shows the available browsers as disabled buttons. ::: ## Engines on Sahi Pro Runner There is no separate Runner version of the Engines. Install them over Sahi Pro Runner, and it runs their tests too: - Sahi Pro Desktop Engine - Sahi Pro Mobile Engine - Sahi Pro SAP Engine - Sahi Pro Visual Assist Engine --- # Sahi License Hub Sahi License Hub is where your organization views its Sahi Pro product keys, manages leases and MAC addresses, and controls who can get a license. Every organization that buys Sahi Pro gets a Sahi License Hub login, where admins see all their product keys and share them with the team. If you haven't received yours, email sales@sahipro.com. Anyone who installs Sahi Pro enters a product key the first time they start it. They get the key from their admin, who shares it from License Hub. Sahi Pro then checks the key with License Hub: a user license is matched to the machine's MAC address, and a concurrent license takes one of the available leases. Product keys can be of two types: User or Concurrent. - **User license:** tied to one machine, with a unique key for each user. It can't run Sahi Pro Runner. - **Concurrent license:** not tied to a machine, but only a fixed number of people can use it at the same time. A team usually shares one key, and each concurrent license includes two free Sahi Pro Runner licenses. ## Manage Product Keys When logged into the License Hub, the admin can see 1. All product keys (future, current and expired keys) 2. Leases against each product key 3. Usage report for each product key For concurrent licenses, the admin can see all leases and revoke any lease if needed (in case any machine has crashed).\ For user licenses, the admin can bind it to another MAC address if the end user's machine has changed. ## Access Sahi License Hub Web Interface 1. Open [Sahi License Hub](https://license.sahipro.com/login.jsp). License Hub sign-in page You will need a registered email and password to sign in to Sahi License Hub. If you do not have any registered email or password yet, you can contact us at sales@sahipro.com for any query related to Sahi License Hub. 2. After a successful login user will get a list of licenses with all its details. List of licenses after signing in 3. A user can perform the following actions: [Change MAC Address](https://resources.sahipro.com/docs/introduction/sahi-license-hub/#change-mac-address), [Manage Leases](https://resources.sahipro.com/docs/introduction/sahi-license-hub/#manage-leases), [License Usage Report](https://resources.sahipro.com/docs/introduction/sahi-license-hub/#view-license-usage-reports) or [Manage Access List](https://resources.sahipro.com/docs/introduction/sahi-license-hub/#manage-access-list). ## Change MAC Address For User Licenses, a user's registered MAC address can be changed. To check the system's MAC address from the command line: 1. Open a command prompt and cd to `Sahi/userdata/bin`(or click on the "Bin" link on the Sahi Dashboard). 2. Run `license_util.bat` or `license_util.sh` to see the MAC address. Now you can use this MAC address in Sahi License Hub. :::note A user license runs only one Sahi Pro at a time. ::: ## Manage Leases This link will bring up a page that lists all the Product Keys. Manage Leases page listing product keys To view Lease details, click on `View Details` under Action column. Lease details with the option to revoke a lease ## View License Usage Reports This shows the Sahi Pro License Usage Reports in graphical and tabular format. ### Graphical Representation - The first graph shows the monthly usage of licenses as per the selected month. Month can be selected from Date Picker or clicking on the month shown in the left panel. By default, it displays reports for the current date. - `Distinct` and `Concurrent` Users: Suppose users A & B worked in the morning and users C, D, & E worked in the afternoon. So total distinct users are 5. But maximum of 3 users have concurrently used licenses, so total concurrent users are 3. This will help you understand your usage pattern and plan how many licenses to buy. **Light Blue colored bar:** Displays distinct users count. **Dark Blue colored bar:** Displays concurrent users count. - The second graph shows the daily usage of license data as per the selected date. Date can be selected from Date Picker or clicking on the Light/Dark blue colored bar shown in the first graph. Graphical License Usage ### Show Data - This shows the Sahi Pro Usage and Sahi Pro License Denied List in tabular format. - **Sahi Pro Usage List:** This will show the list of Sahi Pro users who got a license from Sahi License Hub successfully. - **Sahi Pro License Denied List:** This will show the list of Sahi Pro users who were unable to get a license from Sahi License Hub. - The image below shows the list of Sahi Pro users who got a license from Sahi License Hub successfully. Usage Data :::note By default, user's details like IP address, Host Name, OS Name are stored in Sahi License Hub for your convenience. If you wish to avoid storing these details, the check box shown in the above image can be unchecked. ::: - Possible errors while getting a license from Sahi License Hub: ```text 4001 - Invalid product key. 4002 - User is not allowed to access product key. 4003 - Issued product key will start from future dates. 4004 - Product Key Expired. 4005 - Product key is not issued for all the Sahi products. 4006 - Please use product key from registered mac address. 4008 - Could not obtain lease. All leases are issued. 4009 - User license can not use Sahi Pro Runner. 4010 - Time difference between the License Hub and the System is more than the allowed time difference. ``` - Sahi Pro Usage List and Sahi Pro License Denied List can be downloaded in CSV format by clicking on `Download CSV` link. ## Manage Access List Access Control Lists help restrict access based on username, IP address or Mac address of the machine requesting license. - Sahi Pro users who are added in the `Access Control List` can only access the Sahi License Hub and get a license. - Adding Sahi Pro users to access list: - **Set Access Type:** Select either `none` or `System's logged in username` or `IP Address` or `MAC Address`. - `none` : No access type is set. Everyone will be allowed to get a license. - `System's logged in username` : Username of the logged in system where Sahi Pro is installed. - `IP Address` : IP Address of the logged in system where Sahi Pro is installed. - `MAC Address` : MAC Address of the logged in system where Sahi Pro is installed. - **Access Credentials:** Set the value based on the Access Type selected above (**Example:** `System's logged in username:` sahi, `IP Address:` 192.168.1.1, `MAC Address:` 00-0C-29-CC-11-10) **NOTE:** Access Credentials value can be a regex pattern also. Wildcard \* and ? can be used. \* matches any sequence of characters, whereas ? matches any single character. **Example 1:** If the **Access Type** is `IP Address` and **Access Value** is `192.168.1.*` Then all the Sahi Pro users whose `IP Address` is from `192.168.1.0` to `192.168.1.255` can access Sahi License Hub and get the license. **Example 2:** If the **Access Type** is `IP Address` and **Access Value** is `192.168.1.?` Then all the Sahi Pro users whose `IP Address` is from `192.168.1.0` to `192.168.1.9` can access Sahi License Hub and get the license. - **Access Control List:** Lists all the added Sahi Pro users based on the selected Access type. `Remove:` Click to remove the access for that particular Sahi Pro user. Sahi Pro License Access ## Version Information Sahi License Hub was introduced in Sahi Pro 8.0.0. Sahi Pro 8.0.0 and later versions work only with licenses from Sahi License Hub. --- # Architecture The design goals behind Sahi, and how its architecture meets them. ## User Goals Testing has two parts: the exploratory work that needs a tester's judgment, and the repetitive checking and rechecking of what already works. Sahi automates the repetitive part, so testers spend their time where judgment matters. That sets three goals: 1. **Testers can automate without being developers.** Building and maintaining a test shouldn't need programming skills. Code should be an option for the cases that need it, not a requirement. 2. **Tests describe the business flow, not the plumbing.** A test should hold only the steps and checks that matter to the business. Waiting for pages, handling frames and popups, and finding elements should be the tool's job. 3. **Running and reporting at scale are part of the tool.** Running large suites, in parallel and across machines, and reporting the results shouldn't need a separate framework built around the tool. ## Technical Goals ### Handling New Browsers and Operating Systems Testing web applications on browsers can be painful. There are a multitude of browsers on different operating systems and each one has its own quirks. The tool should take care of these differences. Browsers are also available on mobile devices, but mobile devices may not be able to install and run full testing tools. So the tool should: - Work the same way on any browser and operating system - Work on mobile browsers without installing anything on the device - Support new browsers and new browser versions without changes to tests, and with minimal changes to the tool :::note Sahi works through a proxy that injects JavaScript into each page, and that JavaScript records and runs tests. To use any browser with Sahi, set its proxy to Sahi (localhost:9999). Every browser supports proxies and JavaScript and keeps them backward compatible, so Sahi works with any browser that runs JavaScript and lets you set a proxy. ::: ### Object Identification Existing methodologies of using IDs, XPaths and CSS Selectors have proven to be woefully brittle and complex. When a test breaks, the first suspect is normally the test and how it identifies elements rather than the actual application. This adds a lot of waste into the testing cycle. So the tool should: - Identify elements in an easy way, and record them automatically as the user works with the application - Avoid libraries like jQuery, which the application under test may also use and conflict with - Use identifiers that relate to what the user sees on screen - Use identifiers that work across browsers :::note Sahi uses its own wrappers around the JavaScript DOM to find elements. Its built-in functions read an element's DOM attributes, for example a button's value, name, id, CSS class or index. Relational functions like _near, _in, _under, _leftOf and _rightOf find one element by where it sits relative to another. All of them work the same way across browsers. ::: ### Event Simulation - Event simulation should simulate the end user actions correctly across browsers. - Should not need browser to be in focus, to allow parallel test runs and reduce brittleness of tests - Should not force users to do implicit actions like scrolling into view. :::note Sahi predominantly uses JavaScript based events to simulate user actions. These work in 95% of cases. In some very special cases, where JavaScript events are ineffective, Sahi falls back on native events. Sahi tries to keep native events to a minimum since the browser needs focus in these cases. Needing focus leads to brittle tests and prevents parallel test runs. ::: ### Scripting Most tests shouldn't need code. When a test does need custom logic, the scripting language should be one the team already knows. - JavaScript is common to all web projects no matter what the back end technology may be. Using JavaScript as the scripting language makes sure that expertise is always available in a web team. - Reporting should be taken care of automatically - Scripting should allow easy reuse of existing libraries to do non-browser tasks :::note Sahi Script, the default language used by Sahi, is an extension of JavaScript. Sahi Script uses the same constructs of JavaScript, but adds capability to interact with the browser efficiently, and also perform system actions like read from file system, access database, call Java etc. ::: ### Agile - Tests should be version-controllable and easy to compare - Tests should break minimally when user interface changes - Suites should allow being triggered from build and Continuous Integration systems :::note Sahi tests are plain text files which can be version controlled, and Git support is built in. Sahi's built-in functions are robust and can withstand peripheral UI changes. Sahi suites can be triggered from Ant, batch files, shell scripts, from Java code or just as simple URL calls. ::: ## Architecture Sahi uses a proxy to inject JavaScript into web pages. The browser sends HTTP requests to Sahi, a Java-based proxy server, which forwards them to the website. On the way back, Sahi parses the response and injects JavaScript before returning it to the browser. The injected JavaScript - adds event handlers for recording - adds Sahi's built-in functions for event simulation - mocks some window dialogs like alert, prompt, confirm, print so that test runs aren't interrupted --- # Sahi Script What Sahi Script is, what a script looks like, and how Sahi runs it. Sahi Script is Sahi Pro's scripting language, for the complex, domain-specific scenarios that no-code can't cover. It has the same syntax as JavaScript, except that variables start with a `$` sign. ## A Sample Script A login-and-checkout test in Sahi Script: **sample.sah** ```js _setValue(_textbox("user"), "test"); _setValue(_password("password"), "secret"); _click(_submit("Login")); _setValue(_textbox("q"), "2"); _setValue(_textbox("q[1]"), "1"); _setValue(_textbox("q[2]"), "1"); _click(_button("Add")); _click(_cell("Rs.200[1]")); _assertExists(_textbox("total")); _assert(_isVisible(_textbox("total"))); _assertEqual("1150", _textbox("total").value); _click(_button("Logout")); ``` The same test, split into a test file and a library of reusable functions: **sample.sah** ```js _include("library.sah"); login("test", "secret"); addBooks(2, 1, 1); verifyTotal(1150); _click(_button("Logout")); ``` **library.sah** ```js function login($username, $password){ _setValue(_textbox("user"), $username); _setValue(_password("password"), $password); _click(_submit("Login")); } function addBooks($numJava, $numRuby, $numPython){ _setValue(_textbox("q"), $numJava); _setValue(_textbox("q[1]"), $numRuby); _setValue(_textbox("q[2]"), $numPython); _click(_button("Add")); } function verifyTotal($total){ _assertEqual($total, _textbox("total").value); } ``` ## How Sahi Script Runs Sahi parses each script and automatically adds reporting, waiting, language translation and error recovery. The result is fully valid JavaScript, which runs in a Rhino JavaScript engine inside Sahi's proxy, in its Java Virtual Machine (JVM). Only the statements that act on the browser are sent to the browser. Everything else runs in Rhino. So Sahi Script can [call Java code](https://resources.sahipro.com/docs/sahi-script/calling-java/) directly: any Java code on Sahi's classpath. Rhino passes variables between Java and JavaScript automatically. ## See Also - [Function Reference](https://resources.sahipro.com/docs/sahi-script/functions/) - [Sahi Scripting Basics](https://resources.sahipro.com/docs/sahi-script/sahi-scripting-basics/) --- # Download Center Download the installers for Sahi Pro, Sahi Pro Runner and the Engines, for the latest release and earlier versions. Each installer needs a product license or a trial license. To start a free trial, [get started here](https://sahipro.com/get-started/). ## Latest Release
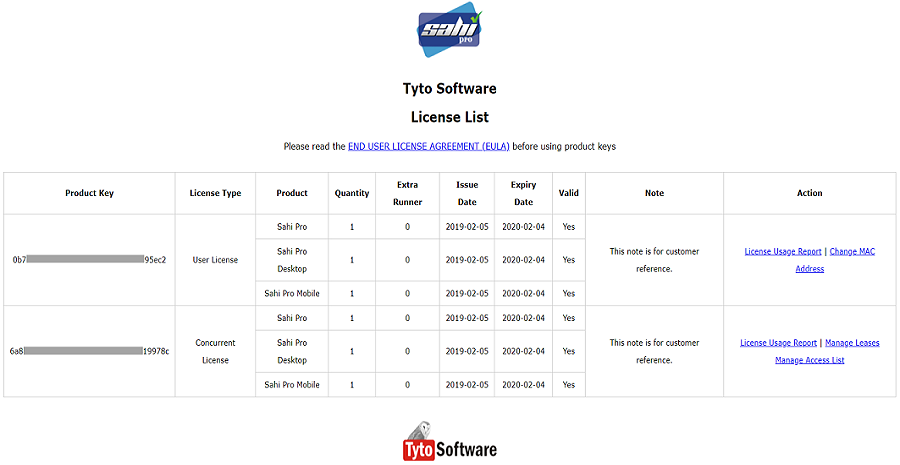
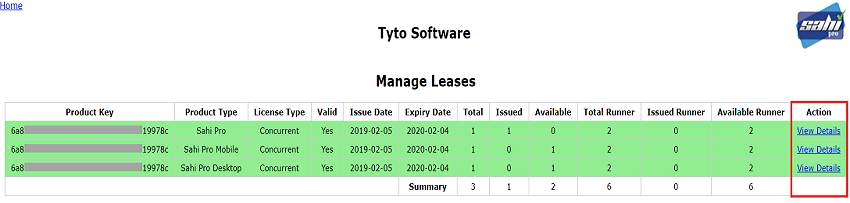
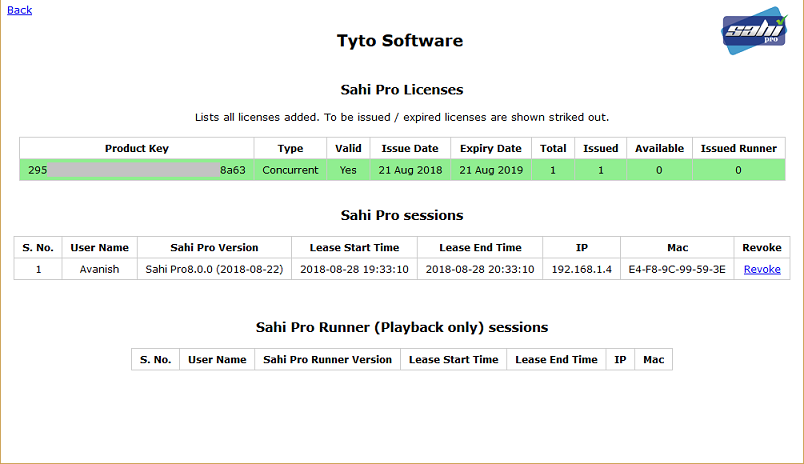
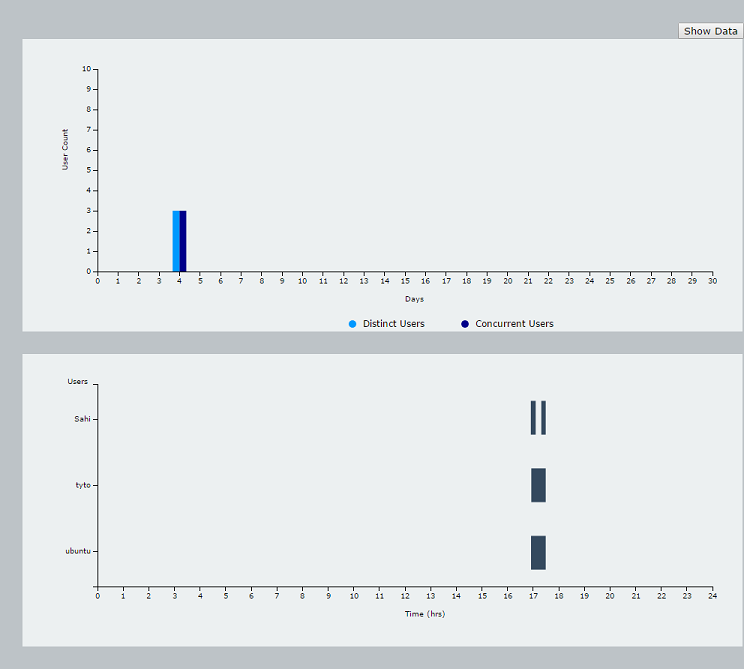

Sahi Pro v12.0.0.1017 Nov 2026 · Release Notes
Web & Rest APIsDownload Sahi Pro v12.0.0.10 installer
## Earlier Versions
Sahi Pro v11.5.02 Jan 2026 · Release Notes
Sahi Pro v11.2.021 Mar 2025 · Release Notes
Sahi Pro v11.0.128 Jun 2024 · Release Notes
Sahi Pro v11.0.013 May 2024 · Release Notes
Sahi Pro v10.0.031 May 2023 · Release Notes
--- # Sahi Pro Documentation (Previous Versions) Links to the documentation of earlier Sahi Pro versions, including the documentation as it was before this site, for users who have not moved to the new version yet. :::tip[Still on an earlier version?] If you have not moved to the new version of Sahi Pro yet, keep using the documentation as it was before this site: Sahi Pro v11.5.0.0 documentation. ::: - Sahi Pro v11.5.0.0 (documentation before this site) - Sahi Pro v11.2.0.0 - Sahi Pro v11.1.0.0 - Sahi Pro v11.0.1.4 - Sahi Pro v11.0.0.8 - Sahi Pro v10.0.0 - Sahi Pro v9.7.0 - Sahi Pro v9.5.0 - Sahi Pro v9.2.1 - Sahi Pro v9.2.0 - Sahi Pro v9.1.2 - Sahi Pro v9.1.1 - Sahi Pro v9.1.0 - Sahi Pro v9.0.2 - Sahi Pro v9.0.1 - Sahi Pro v9.0.0 - Sahi Pro v8.0.0 - Sahi Pro v7.5.0 - Sahi Pro v7.0.1 - Sahi Pro v7.0.0 - Sahi Pro v6.3.2 - Sahi Pro v6.3.1 - Sahi Pro v6.3.0 - Sahi Pro v6.2.1 - Sahi Pro v6.2.0 - Sahi Pro v6.1.0 - Sahi Pro v6.0.1 - Sahi Pro v6.0.0 - Sahi Pro v5.1.2 - Sahi Pro v5.1.1 - Sahi Pro v5.1.0 --- # Release Notes What changed in each release of Sahi Pro, its engines and add-ons, newest first. Engine and add-on notes are listed next to the Sahi Pro release they shipped with. ## v12 - **v12.0.0.10**: [Sahi Pro](https://resources.sahipro.com/docs/release-notes/v12-0-0-10/) ## v11 - **v11.5.0.0**: [Sahi Pro](https://resources.sahipro.com/docs/release-notes/v11-5-0-0/) - **v11.2.0.0**: [Sahi Pro](https://resources.sahipro.com/docs/release-notes/v11-2-0-0/) - **v11.1.0.0**: [Sahi Pro](https://resources.sahipro.com/docs/release-notes/v11-1-0-0/) - **v11.0.1.4**: [Sahi Pro](https://resources.sahipro.com/docs/release-notes/v11-0-1-4/) - **v11.0.0.8**: [Sahi Pro](https://resources.sahipro.com/docs/release-notes/v11-0-0-8/) ## v10 - **v10.0.0**: [Sahi Pro](https://resources.sahipro.com/docs/release-notes/v10-0-0/) · [Desktop Add-on](https://resources.sahipro.com/docs/release-notes/v10-0-0/desktop-engine/) · [Mobile Add-on](https://resources.sahipro.com/docs/release-notes/v10-0-0/mobile-engine/) · [SAP Add-on](https://resources.sahipro.com/docs/release-notes/v10-0-0/sap-engine/) · [AI Assist Add-on](https://resources.sahipro.com/docs/release-notes/v10-0-0/ai-assist-add-on/) ## v9 - **v9.7.0**: [Sahi Pro](https://resources.sahipro.com/docs/release-notes/v9-7-0/) - **v9.5.0**: [Sahi Pro](https://resources.sahipro.com/docs/release-notes/v9-5-0/) - **v9.2.1**: [Sahi Pro](https://resources.sahipro.com/docs/release-notes/v9-2-1/) - **v9.2.0**: [Sahi Pro](https://resources.sahipro.com/docs/release-notes/v9-2-0/) - **v9.1.2**: [Sahi Pro](https://resources.sahipro.com/docs/release-notes/v9-1-2/) - **v9.1.1**: [Sahi Pro](https://resources.sahipro.com/docs/release-notes/v9-1-1/) - **v9.1.0**: [Sahi Pro](https://resources.sahipro.com/docs/release-notes/v9-1-0/) - **v9.0.2**: [Sahi Pro](https://resources.sahipro.com/docs/release-notes/v9-0-2/) - **v9.0.1**: [Sahi Pro](https://resources.sahipro.com/docs/release-notes/v9-0-1/) - **v9.0.0**: [Sahi Pro](https://resources.sahipro.com/docs/release-notes/v9-0-0/) · [Desktop Add-on](https://resources.sahipro.com/docs/release-notes/v9-0-0/desktop-engine/) · [Mobile Add-on](https://resources.sahipro.com/docs/release-notes/v9-0-0/mobile-engine/) · [SAP Add-on](https://resources.sahipro.com/docs/release-notes/v9-0-0/sap-engine/) ## v8 - **v8.0.0**: [Sahi Pro](https://resources.sahipro.com/docs/release-notes/v8-0-0/) · [Desktop Add-on](https://resources.sahipro.com/docs/release-notes/v8-0-0/desktop-engine/) · [Mobile Add-on](https://resources.sahipro.com/docs/release-notes/v8-0-0/mobile-engine/) ## v7 - **v7.5.0**: [Sahi Pro](https://resources.sahipro.com/docs/release-notes/v7-5-0/) · [Desktop Add-on](https://resources.sahipro.com/docs/release-notes/v7-5-0/desktop-engine/) · [Mobile Add-on](https://resources.sahipro.com/docs/release-notes/v7-5-0/mobile-engine/) - **v7.0.1**: [Sahi Pro](https://resources.sahipro.com/docs/release-notes/v7-0-1/) · [Desktop Add-on](https://resources.sahipro.com/docs/release-notes/v7-0-1/desktop-engine/) - **v7.0.0**: [Sahi Pro](https://resources.sahipro.com/docs/release-notes/v7-0-0/) · [Desktop Add-on](https://resources.sahipro.com/docs/release-notes/v7-0-0/desktop-engine/) ## v6 - **v6.3.2**: [Sahi Pro](https://resources.sahipro.com/docs/release-notes/v6-3-2/) - **v6.3.1**: [Sahi Pro](https://resources.sahipro.com/docs/release-notes/v6-3-1/) - **v6.3.0**: [Sahi Pro](https://resources.sahipro.com/docs/release-notes/v6-3-0/) - **v6.2.1**: [Sahi Pro](https://resources.sahipro.com/docs/release-notes/v6-2-1/) - **v6.2.0**: [Sahi Pro](https://resources.sahipro.com/docs/release-notes/v6-2-0/) - **v6.1.0**: [Sahi Pro](https://resources.sahipro.com/docs/release-notes/v6-1-0/) - **v6.0.1**: [Sahi Pro](https://resources.sahipro.com/docs/release-notes/v6-0-1/) - **v6.0.0**: [Sahi Pro](https://resources.sahipro.com/docs/release-notes/v6-0-0/) ## v5 - **v5.1.2**: [Sahi Pro](https://resources.sahipro.com/docs/release-notes/v5-1-2/) - **v5.1.1**: [Sahi Pro](https://resources.sahipro.com/docs/release-notes/v5-1-1/) - **v5.1.0**: [Sahi Pro](https://resources.sahipro.com/docs/release-notes/v5-1-0/) ## Sahi OS - [Sahi OS v5.0](https://resources.sahipro.com/docs/release-notes/sahi-os/v5-0/) --- # What is new in Sahi Pro v12.0.0.10 Sahi Pro v12.0.0.10 introduces the No-Code Test Editor, a redesigned Controller and Reports, and Sahi Pro Atlas as a beta preview. Sahi Pro v12.0.0.10 is a major release. It rebuilds Sahi Pro's no-code test automation on one modern interface, and makes it AI-ready with Sahi Pro Atlas, introduced as a beta preview. All existing tests keep running as they are, and teams can move to the new editor whenever they're ready. :::note[Flowcharts is retired] Sahi Pro Flowcharts is retired as a way to build tests. New tests are built in the No-Code Test Editor. Your Flowcharts tests won't be left behind. We're building a way to move them into the No-Code Test Editor, and we'll let you know as soon as it's ready. Until then, your existing Flowcharts tests keep running. ::: ## Key Features ### No-Code Test Editor - Build tests from scenarios, test cases and keywords, with keyword suggestions as you type. - **Parameterize** any step, keep data in the **Test Data Sheet**, and **Data Drive** a test case. - **Data Generators:** give a variable a Data Generator, and when no test data is supplied, it gets generated data instead of running empty (null). You can add one to a cell in a test data file (`.csv`), and also to a parameter you define when you parameterize a step. - **Pass objects and flat values together:** when parameterizing, a keyword can now take several objects along with flat parameters in the same call. Earlier versions didn't allow this. - **Setup and teardown at every level:** add setup and teardown steps - globally, once for the whole scenario file - for all test cases, so they run around each one - inside a single test case, for that test case only - **Projects:** each team in your organisation can keep its tests in a project of its own, separate from other teams' work. - **Scenario and implementation side by side:** open a keyword and its `.sah` implementation appears next to the scenario that uses it. You read, edit and maintain tests in one view, without switching between files and tabs. ### API Automation Automate Rest APIs in the new **Rest Client** editor, built into the Editor. - **Send requests and verify the responses**, asserting on any value they return. - Add requests as steps in a keyword. - Store the entire response, or a specific value from it, in variables to use in later steps. ### Controller - **Launch from a keyword:** open the Controller from the keyword you're working on. Everything you record is saved automatically to the right file, and authoring follows the flow of the scenario. - Records and runs in every mode: Browser, Android and iOS apps, Windows Desktop and Java applications (including Java Applets), and SAP GUI. - **AI Suggest (Beta Preview):** powered by [Sahi Pro Atlas](#sahi-pro-atlas-beta-preview), it reads the page and authors a new keyword for you. Recording the keyword yourself works as always. - Evaluate Step, Diagnose, History and parent/child element navigation, in the new interface. - Visual Assist Engine Image Recognition and OCR capture work as before. ### Reports - **New information architecture:** move quickly through the sub-suite, scenario file and script hierarchy, and see previous runs in the same navigator to compare them. - **New Reports home**, listing All Reports, Suite Reports and Scenario / Script Reports. - Auto-heal markers, the step Inspector, Setup / Test Body / Teardown grouping, PDF export and Sync to central server all have the new interface. ## Improvements ### Also in the New Interface - **Running tests:** the same options, restyled: Run Configuration, Export Run Config (as an Ant target, a testrunner command or a Jenkins stage), Run up to a keyword, Schedule Run, Cloud VM nodes, Sahi code coverage, the Logs Info editor and the data-driven suite editor. - **Editor tools:** Find in Files, Create Suite and Accessor Repository from selected files, and Image Viewer. - **Source Control:** Git configuration, staging, commit, compare and history, restyled. - **Settings:** the same settings, restyled and reorganised into groups: Configuration, Browsers and Devices, SSL and Certificates, Page Load, Integrations, Recording and Script APIs, Code Coverage, and Access. - **Engines:** the Desktop, Mobile, SAP and Visual Assist Engines work in the new interface. ### Renamed Add-ons and Functions - The Desktop, Mobile and SAP Add-ons are now the [Desktop Engine](https://resources.sahipro.com/docs/introduction/sahi-pro-desktop-engine/), [Mobile Engine](https://resources.sahipro.com/docs/introduction/sahi-pro-mobile-engine/) and [SAP Engine](https://resources.sahipro.com/docs/introduction/sahi-pro-sap-engine/). - The AI Assist Add-On is now the [Visual Assist Engine](https://resources.sahipro.com/docs/introduction/sahi-pro-visual-assist-addon/), for Image Recognition and OCR. - Sahi APIs are now called Sahi functions, so they aren't confused with REST APIs. They're listed in the [Function Reference](https://resources.sahipro.com/docs/sahi-script/functions/). ### Other Improvements - **Localization:** [`_setLanguage`](https://resources.sahipro.com/docs/sahi-script/functions/multi-language/#_setlanguage) now reads `.xaml` resource files, alongside `.properties` and `.resx`. You can test applications that keep their translations in `.xaml` files without converting them first. - **Excel reports:** reports exported to Excel are now generated in the `.xlsx` format. ## Upgrading from Older Versions Existing scripts, suites and files run as before, with full support for existing users. Move to the new No-Code Test Editor when you're ready. ## Bug Fixes - **REST API:** Requests with an empty body no longer fail. - **Reports:** With the test case wise report on, test cases with `|` in their name now download. - **Scenario files:** Assert Equal now works when one cell holds two arguments. - **Scenario files:** Some JavaScript methods that didn't work now do. ## Sahi Pro Atlas (Beta Preview) Sahi Pro Atlas is Sahi Pro's new AI tool for creating and maintaining tests. Writing tests by hand takes time, and keeping them up to date takes even more as the application changes. With Atlas, you describe how the application should behave, and Atlas creates the Sahi Pro tests. When the behaviour changes, it updates them. AI is used only to understand what you describe. The tests are generated by fixed rules, so you get the same tests every time, and nothing changes until you approve it. Your team spends less time writing and fixing tests, and more time on the testing that needs their judgement. ### What Atlas Gives You - **Tests from how your application should behave:** type the behaviour in, upload a document, or explain it in a chat, even from your own editor's AI using the Atlas MCP server. Atlas plans and writes the tests, so nobody has to write them by hand. - **Tests before the application exists:** Atlas works from how the application should behave, not from the application itself. Describe a feature before it's built, and Atlas writes its scenario files, test cases and keywords in Sahi Pro's [business-driven](https://resources.sahipro.com/docs/using-sahi/business-driven-test-automation/) form. When the application is ready, you add the steps to the new keywords in Sahi Pro, by recording them or with AI Suggest. - **Same behaviour, same tests:** Ask an AI tool the same thing twice and you can get two different answers. Atlas uses AI only to understand the behaviour, and fixed rules generate the tests, so the same spec always gives the same tests. - **Tests that keep up:** when the behaviour changes, Atlas first shows you the difference to approve. If a behaviour is new, Atlas writes new tests for it. If a behaviour has changed, Atlas updates the existing tests instead of rewriting them. :::note[Why this matters] Sahi Pro tests are built from keywords, reusable building blocks shared across tests. For new behaviour, Atlas chains keywords that already exist in other tests to build the business flow, and creates only the keywords that are missing. For changed behaviour, it updates the tests that already cover it. Every keyword your team has recorded and refined goes on working, so you don't rebuild what already works, and each change takes far less effort than writing the tests again. ::: - **Thorough coverage:** a test for every path, error and access rule, plus each real combination of choices that affect each other, the edge cases that are easy to miss by hand. :::note[Example] For a loan form, Atlas plans tests for approved and rejected loans, missing fields, a clerk who can't approve, and each loan type with each repayment term. You describe how the form should behave once, and Atlas works out every one of these cases. ::: - **You stay in control:** you decide how each behaviour is defined as rules, and which rules go in and which stay out. Atlas suggests, and you have the final say. - **Tests you own, run by Sahi Pro:** Atlas writes Sahi Pro tests that your team can open, edit and keep, with or without Atlas. They run on the Sahi Pro engine like any other Sahi Pro test, with no AI involved at run time, so runs are fast, repeatable and free of AI costs. - **Faster over time:** every keyword you add, recorded or authored by AI Suggest, joins your keyword library. The bigger the library grows, the more of each new test Atlas can build from keywords you already have. - **Your data stays yours:** bring your own AI key, deploy Atlas inside your own network, or use self-hosted or local models, so you decide where your application data goes. To see each stage in detail, read [How Atlas Works](https://resources.sahipro.com/docs/using-atlas/how-atlas-works/). ### Getting Atlas Atlas is available as a standalone app, with entry points inside Sahi Pro. To join the beta preview, [get started here](https://sahipro.com/get-started/). :::caution[Beta Preview] Atlas is a beta preview in Sahi Pro v12.0.0.10: - It works with web applications for now. - Features and behaviour may change before general release. - We want your feedback. Send it to Sahi Pro support. ::: ## Engine Updates ### Desktop Engine v12.0.0.10 Assertion steps now appear in the Evaluate Expression section when you use an existing AR file in Java mode. ### Mobile Engine v12.0.0.10 No changes in this release. ### SAP Engine v12.0.0.10 Right-click now works on SAP tree nodes. ### Visual Assist Engine v12.0.0.10 The AI Assist Add-On is now the Visual Assist Engine. - New: [\_visualImage](https://resources.sahipro.com/docs/sahi-script/functions/visual-assist-accessors/#_visualimage), [\_visualText](https://resources.sahipro.com/docs/sahi-script/functions/visual-assist-accessors/#_visualtext), [\_getVisualText](https://resources.sahipro.com/docs/sahi-script/functions/visual-assist/#_getvisualtext) - Deprecated: [\_aiImage](https://resources.sahipro.com/docs/sahi-script/functions/visual-assist-accessors/#_aiimage-deprecated), [\_aiText](https://resources.sahipro.com/docs/sahi-script/functions/visual-assist-accessors/#_aitext-deprecated), [\_getTextAi](https://resources.sahipro.com/docs/sahi-script/functions/visual-assist/#_gettextai-deprecated) --- # What is new in Sahi Pro v11.5.0.0 Sahi Pro v11.5.0.0 is a minor release with significant feature additions and modifications. :::note[Renamed] The Desktop, Mobile and SAP Add-ons are now the [Desktop Engine](https://resources.sahipro.com/docs/introduction/sahi-pro-desktop-engine/), [Mobile Engine](https://resources.sahipro.com/docs/introduction/sahi-pro-mobile-engine/) and [SAP Engine](https://resources.sahipro.com/docs/introduction/sahi-pro-sap-engine/), and the AI Assist Add-on is now the [Visual Assist Engine](https://resources.sahipro.com/docs/introduction/sahi-pro-visual-assist-addon/). ::: ## Key Features ### Call Path This feature allows one path to invoke another. By adding a [Call Path](https://resources.sahipro.com/docs/flowcharts/flowchart-paths/#call-path) node, you can create a hierarchical structure in which paths reference and invoke other paths, thereby promoting reusability and modular design. In the example below, `Create Coupon` path invokes the `Create Product` path, since a product must be created before a coupon can be generated. ![Call Path - Product Coupon](https://resources.sahipro.com/docs/assets/images/flowcharts/branching/product-coupon-callpath.webp) ### Prerequisites During distributed playback, different nodes may have varying capabilities. Consequently, a path that requires a specific capability, such as `ANDROID` mode, might be assigned to a node that does not have the Mobile Add-on or its license. This will result in failure because the required capability is not available on that node. To avoid such issues, you can specify [prerequisites for a path](https://resources.sahipro.com/docs/flowcharts/types-of-run/#prerequisites-at-path-level) to ensure that the path runs only on a node with the required capabilities. Similarly, you can specify [prerequisites for a flowchart](https://resources.sahipro.com/docs/flowcharts/types-of-run/#prerequisites-at-flowchart-level). ![Execution Order Table](https://resources.sahipro.com/docs/assets/images/flowcharts/common/run/execution-order-table-flowchart-prerequisites2.webp) ### Suite Analysis The Suite Analysis page consolidates all executed flowcharts, making it easier to trace errors to specific steps. It is designed to help identify and quickly fix the steps that cause the most failures during flowchart execution. In addition, the [Suite Analysis](https://resources.sahipro.com/docs/flowcharts/suite-analysis/) page displays historical results for flowcharts that failed in earlier runs, providing valuable insights into recurring issues. ![Suite Analysis](https://resources.sahipro.com/docs/assets/images/flowcharts/suite-analysis/suite_analysis_tree.webp) ### Test Case Node A [Test Case](https://resources.sahipro.com/docs/flowcharts/testcase/) node is used to mark the beginning and end of a test case within a path. This enables the creation of multiple test case blocks within a single path, improving organization and readability. ### Callbacks Callbacks are user-defined keywords that can be automatically triggered at different stages during the execution of a path. They can be executed at the end of a path, when an error occurs, or when an assertion fails. Callbacks can be specified for an entire [project](https://resources.sahipro.com/docs/flowcharts/callbacks/#project), a specific [flowchart](https://resources.sahipro.com/docs/flowcharts/callbacks/#flowchart), or for an individual [path](https://resources.sahipro.com/docs/flowcharts/callbacks/#path). ## Improvements - Lightning Web Components in Salesforce like lightning-button, lightning-input-field, etc. are now available by default in Sahi Pro. [Salesforce Accessor APIs](https://resources.sahipro.com/docs/ui-elements/salesforce-accessor-apis/) lists all such salesforce web components. Explore how Sahi Pro simplifies [Salesforce Test Automation](https://resources.sahipro.com/docs/flowcharts/salesforce/). - Identification of HTML elements such as input, select, and textarea has been improved. Sahi Pro now automatically associates these elements with the nearest span, table cell, or label when identifying them. This enhancement ensures more accurate element identification and reduces the need for manual adjustments during automation. - Now, you can easily create Gradle tasks to execute automation artifacts. These tasks can be generated automatically in both Groovy and Kotlin. Later, these tasks can be configured to run within your CI/CD pipeline using tools like Jenkins, GitLab, etc. Refer [Playback via Gradle](https://resources.sahipro.com/docs/flowcharts/playback-via-gradle/) for details. - A provision has been added to list and delete unused artifacts in a project. The **Unused Artifacts** feature identifies artifacts that can be safely removed without affecting the project's functionality. - Performance Improvements - Pages and dialogs will now respond faster across Flowcharts UI especially for larger projects. - Significant improvements are made to overall script execution time by optimizing execution startup time and reducing delays between script executions. - Flowcharts and Projects when run with **Tags** will start executing faster than earlier. This is because the script generation time has been reduced for such cases. - DRun playback performance is now made better by optimizing zip file creation of suite files. - Generated scripts folder and zip file were not being deleted even after the execution completes for flowcharts as well as for projects. This is now fixed. - **Run From Next**: Provision to execute all Keywords that follow the current Keyword in the execution flow. - **Run Selected Steps**: Provision to select and execute specific, contiguous steps within a Keyword - The **Run This** action now offers additional control over data-driven execution for nodes with attached datasets. - Steps in the Keywords will now be displayed in plain english to improve readability. - HTML elements inside \ elements can now be identified. - Request body can now be specified from UI as well for GET and DELETE HTTP request methods. - Automating localhost URLs is now allowed. For example, URL `http://localhost:8088/home.html` is now inherently supported on all modern browsers. - Sub-Label Grouping value can be viewed in Table View. - Improvements in Reports - **PDF Reports** : Reports can now be downloaded in PDF format. - Reports are now compatible with Java version 24 and above. - Script Report page will now load faster than earlier for large reports. - Suite Report page will now load faster even when there are many sub-suites present. - Added Start and End Time for test cases in Reports. - Switching between different modes is easily possible using **Set Mode** action. This switch is now indicated prominently in Reports. - The **Edit Step** dialog is now made more intuitive. - Now you can create another copy of a flowchart directly from the project page. - Added a provision to disable a node to skip the node in a path. - When running flowcharts from outside a dataset loop, all rows of the node's attached dataset will be executed. Earlier, only the selected row (first row if not selected) was executed. ## New Actions - [Dimensions](https://resources.sahipro.com/docs/flowcharts-actions/fetch-apis/#dimensions): This action gets the width and height as an array for the specified element. ## Modifications - Microsoft once had two Edge versions: Legacy (EdgeHTML) and Chromium-based. Only Chromium-based Edge remains today. Thus, browser type 'edge new' has been renamed to 'edge'. Also, **Is Edge New** action is deprecated. Instead, use [Is Edge](https://resources.sahipro.com/docs/flowcharts-actions/fetch-apis/#is-edge) action. - [Type Native](https://resources.sahipro.com/docs/flowcharts-actions/action-apis/#type-native): Added `$isEncrypted` parameter to allow encrypted text in the `$text` parameter. - Resource XML file i.e `.resx` file type is now supported as properties file in [Set Language](https://resources.sahipro.com/docs/flowcharts-actions/multi-language/#set-language) API. - Password will now be stored in encrypted form by default in [Set Password](https://resources.sahipro.com/docs/flowcharts-actions/action-apis/#set-password) action. ## Bug Fixes - Fixed: Unable to select option in a drop down using **Select Option** action in Internet Explorer 7. - Fixed: Unable to open a specific web page due to a content security policy restriction. - Fixed: Browser crashes when logging into the Facebook application. - Fixed: Unable to identify on web pages for 'login.microsoftonline.com' when opened in Microsoft Edge browser. - Fixed: Action [Is Visible](https://resources.sahipro.com/docs/flowcharts-actions/fetch-apis/#is-visible) returns false for elements on a specific page in the Salesforce application. - Fixes to Controller - Embedded Flowcharts Controller would hide when navigating to another page. Also, it could open only after refreshing the page. This is fixed. - Fixed: Run step not working from Flowcharts Controller for Java mode and Android mode. - Fixed: In the classic Controller, changing the script directory does not reflect in the script directory dropdown. - Fixed: Assertion fails in Flowcharts Controller when values contain special symbols (e.g. `$+`). - Fixed: Long steps are not fully visible when increasing the width of the Flowcharts Controller. - Fixes in Diff-Merge - Fixed: Multi-line project description is not readable. - Compare With operation is now made simpler. - Fixed: Ant playback is not working for projects with merge conflicts or when any other project has unresolved conflicts. - Fixed: **Compare With** dropdown does not appear for project names containing special German characters. - Fixed: Unable to resolve node add/remove differences under condition nodes. - Fixed: Deleted nodes under dynamic conditions are not shown in Flowchart Diff-Merge view. - Fixed: Yes and No branches of condition nodes interchange after resolving merge conflicts. - Fixed: Clicking `Use All Right` button in flowcharts does not work as expected. - Fixed: If `depends` is modified but it is not present in either Local or Remote branch, it does not display this in gray in Table View. - Fixed: Dataset name appears in the Data Tab even when datasets are missing from the DataSource during merge conflicts. - For environment-based datasets, under each data source, merge conflicts will now be shown separately for each environment. - Fixed: If flowchart project itself is the Git repository, then resolving the changes of any artifact moves it to resolved state instead of merged state. - Fixed: Syntax error occurs when storing a keyword's return value to a variable. - Fixed: Flowchart names containing a backslash do not display any warning when deleting them. - Fixed: When the save operation fails, alert does not stay open to enter the flowchart name. - Fixed: Check action step does not execute if **Has Value** checkbox is checked and **Checked** parameter passed from dataset is false. - Fixed: Unable to edit path tags and change dataset from Truth Table and Execution Order tab if name contains double quotes or backslashes. - Fixed: External variables with special character gets converted to a different character in Ant playback. - Fixed: Custom function does not execute with **Run Step** from Add Step dialog. - Fixed: Variable and entity data does not persist correctly across different interactive run modes like Run This, Run Till Here, Run From Here, Run Selected, and Run Step from Add Step dialog. - If **Take Page Screenshot** action is unable to capture screenshot, Sahi Pro captures a screenshot as fallback using **Take Screenshot** action. This screenshot as a fallback was captured earlier in BMP format. Now, the image format for this fallback screenshot can be configured using a property `sahi.screenshot.placed_pattern.debug.image.format`. The default value for this property is `png`. - Fixed: Offline report is generated for formats that are not selected. - Fixed: Flowcharts fail to load after copying and pasting when the dataset attached to a node is not present. - Fixed: Path names containing a colon (':') with sub-label grouping cause the `depends` function to not work correctly. - Fixed: ANT run fails when project or flowchart names contain a special character. - Fixed: The keyword is incorrectly highlighted as unimplemented when there is no space before entity name(e.g., `Register$user`). - Fixed: Lengthy flowchart name is not displayed correctly on flowchart page, in truth table and execution order table. - Fixed: Unable to read dataset from data sources having non-alphabetic and non-numeric characters in their filename. - Fixed: Incorrect keyword selection in left pane of automate dialog when the same keyword is used multiple times in the path. - Fixed: Unable to attach dataset to a node at the end of a dataset boundary. - Fixed: If some of the parameters in a step are not specified, then parameters to the right are shifted over it, resulting in wrong value being picked for remaining parameters. - Fixed: For large flowcharts, undo/redo does not work. - Fixed: In REST step's parameterized body, if `isFile` parameter is set to true, then updating the parameters keeps re-encoding the file path. - Fixed: On renaming a keyword, nodes with different entity instances are not renamed correspondingly. - Fixed: Node is allowed to convert to condition or dynamic condition node, even if that node has more than two branches, leaving the flowchart in an invalid state - Fixed: Nodes are allowed to connect in a cyclic manner. - Fixed: When executing using **Run Till Here**, and some node before the selected node has a dataset, keyword color does not update correctly on keyword failure. - Fixed: If column header is empty, values from corresponding column are still picked up in execution. - Fixed: Scripts with Non-ASCII characters are not saved correctly in Sahi Pro Classic Editor. - Fixed: In Scenario Editor, if `[Return Value]` is specified in a data drive, then instead of saving the return value of previous step in the variable, it is picking the value from data drive. - Fixed: In Scenario Editor, if a number is provided as an argument in European decimal format, it is not parsed correctly. - In the data generator type Text, the minimum value must always be less than the maximum value. Also, the text will be generated only within the specified minimum and maximum range. - Fixed: Path information does not update as expected when nodes are added or deleted. - Fixed: The run step does not work when an entity attribute is specified in JS Mode, or inside Raw Script, or when an entity object is passed to a Custom Function. - Fixed: Automate Dialog does not load details when a dataset is attached to a navigation node. - Fixed: Data Loop does not run when attached to a node with flowchart login syntax. - Fixed: Flowchart not saving properly in some cases. - Fixed: AutoHeal not working from ANT run, when isAutoHealEnabled is set to true in the XML file. - Fixed: New keywords appear as undefined when tests are triggered from Jenkins/Ant after pulling the latest Git changes. - Dynamic conditions not functioning as expected in certain cases.. - Fixed: Incorrect JS Syntax Error appears on UI for Raw Step when the step ends with a semicolon. - Fixed: Pasted nodes sometimes do not update in the UI immediately (visible after refresh). - Fixed: Distributed playback does not work on port other than 9999 when run is triggered from UI. - Fixed: Issue where `\n` is not un-escaping when attribute values are passed from node or path-level datasets. - Fixed: Automate Dialog loads slowly if branching has more than 20 in single path. - Fixed: **Depends** warning appears in the console even when no dependencies are defined. - Fixed: Issue where runs failed with ReferenceError: CustomFunctionName is not defined when a step overridden in a keyword with call custom function step. - While recording actions on a web application, if Controller is launched, an unnecessary `Double Click` step gets recorded. This is now inherently avoided. Consequently, this will cause `Alt + Click` and `Alt + Double Click` actions to not be recorded. To allow recording these actions, enable userdata property `recorder.record.controller_hotkey_click`. ## What is new in Sahi Pro Desktop Add-on v11.5.0.0 **Bug Fixes** - Fixed: Unable to identify inner elements of a specific Toolbar element. - Fixed: Unable to identify inner elements of a specific Pane element. ## What is new in Sahi Pro Mobile Add-on v11.5.0.0 **Bug Fixes** - Fixed: Connect device is not working for Android on Java 21 onwards. - Fixed: Android and iOS execution are not starting on `AWS Device Farm`. ## What is new in Sahi Pro SAP Add-on v11.5.0.0 **Improvements** - Action [Select Rows](https://resources.sahipro.com/docs/flowcharts-actions/sap-apis/#select-rows-in-a-sap-gui-table) now supports tree elements. - Tree node paths now support 0-based identifier indexing for repeated node texts. For example, if a tree has three nodes with same visible text 'Documents' under the same node hierarchy, node path "Verticals/BFSI/Insurance/Documents\[2\]" will refer to the third 'Documents' node under 'Insurance' node. - Click actions on tree nodes and tree node items will now be recorded. ## What is new in Sahi Pro AI Assist Add-on v11.5.0.0 **Bug Fixes** - Fixed: Unable to capture image from Controller after changing directory in `scripts.dir` property. --- # What is new in Sahi Pro v11.2.0.0 Sahi Pro v11.2.0.0 is a minor release with features and improvements primarily in Sahi Pro Flowcharts. :::note[Renamed] The Desktop, Mobile and SAP Add-ons are now the [Desktop Engine](https://resources.sahipro.com/docs/introduction/sahi-pro-desktop-engine/), [Mobile Engine](https://resources.sahipro.com/docs/introduction/sahi-pro-mobile-engine/) and [SAP Engine](https://resources.sahipro.com/docs/introduction/sahi-pro-sap-engine/), and the AI Assist Add-on is now the [Visual Assist Engine](https://resources.sahipro.com/docs/introduction/sahi-pro-visual-assist-addon/). ::: ## Key Features ### Resolve Merge Conflict in Flowcharts It is prudent to version control your automation artifacts, thus facilitating collaboration. However, at times you also need to resolve Merge Conflicts. Sahi Pro's Diff and Merge UI provides an intuitive user interface to visualize differences between automation artifacts as well as enabling users to easily resolve [Merge Conflicts in Flowcharts](https://resources.sahipro.com/docs/flowcharts/version-control/#merge-conflict-in-flowcharts). ### Environment based Datasets You would want to verify your application in multiple software environments like Quality Assurance, Staging, User Acceptance Testing, Production Environment, etc. Consequently, you would want to run a flowchart/project with different data for different environments without modifying this flowchart/project for each environment. You can achieve this by using [Environment based Datasets](https://resources.sahipro.com/docs/flowcharts/dataset/#environment-based-datasets) to override datasets and use different data based on the execution environments. ### Controlling Branch Flow with Sub-Label Grouping Now, a new provision [Sub-Label Grouping](https://resources.sahipro.com/docs/flowcharts/flowchart-paths/#controlling-branch-flow-with-sub-label-grouping) is introduced to control the branch flow without adding a condition. Sub-label groups are used to ensure that paths follow specific branches only. Sub-label groups are useful when a flowchart branches, converges and then branches again. ### Dependency at Flowcharts Level When running a Project, you may need a specific flowchart to run successfully before running another flowchart. For example, in a shopping cart application, you would want the "Create Product" flowchart to run successfully before running the "Checkout" flowchart. For this, you can now define a dependency between different flowcharts using the [Flowchart Dependency](https://resources.sahipro.com/docs/flowcharts/types-of-run/#depends---flowchart-dependency) feature. ### Add Data / Loop Boundary on Node You can now data drive multiple nodes together by attaching a Dataset. For this, you can define the start and end boundaries for the Dataset at the Node level. This will facilitate running all the Keywords within this start and end boundaries in a loop for all rows of the dataset. Refer [here](https://resources.sahipro.com/docs/flowcharts/dataset/#dataset-loop-boundary) for details. ## Improvements - At node level, the Data source and Dataset can be dynamically set by using an external variable. You can also define a variable inside another dataset to specify the Data source and Dataset at the node level. Refer [here](https://resources.sahipro.com/docs/flowcharts/dataset/#node-level) for details. - Additions to Flowcharts Controller - Clicking on `List Properties` button on the Controller, lists all the properties of the UI Element. Now, you can also create a UI element by selecting any one of the listed properties as identifier for this element. Refer [here](https://resources.sahipro.com/docs/flowcharts/flowcharts-controller/#controller-functionality) for details. - Added `Get Text`, `Get Value`, `Exists` and `Is Visible` actions in Quick Actions of Flowcharts Controller - Now, Sahi Pro also detects blob URL based file downloads, and automatically saves them. The downloaded files can be worked upon using actions for [File Download](https://resources.sahipro.com/docs/flowcharts-actions/action-apis/#file-download). - Application server may specify the name of the file to be downloaded in the `Content-Disposition` response header. If this file name is specified as percent-encoded, now Sahi Pro will percent-decode it before saving the file to the file system. - Improvements in Add Step dialog - Double-clicking a step parameter in the `Add Step` dialog enables String / Code mode. - Added `Has Value` checkbox in Add Step dialog to execute step only if value step parameter has non-empty data. - Fixed: The auto-suggestion list for Actions in the `Add Step` dialog fails to populate custom functions following a metadata refresh. - Improvements in Scenario files - On failure of a scenario running from dd.csv, you would want to run the complete scenario in the failure suite run. You can do this by disabling userdata property `suite.retry_only_failed_testcases_for_scenario`. - While using Data Drive in Scenario, now data file and data label can be set from variable as well. - Performance improvements for scenario files and data files in Scenario Editor - In browser automation, now [Native Events based actions](https://resources.sahipro.com/docs/flowcharts-actions/action-apis/#native-events) will also work on systems with more than 100% screen scaling. - Modified [Custom Function](https://resources.sahipro.com/docs/flowcharts/existing-sahi/#calling-custom-sahi-functions) behavior to pass only attribute data when an entity object is used as a parameter, removing unnecessary entity metadata. - Improved performance of opening project, flowchart and automate dialog. - Added `.gitignore` and `.gitattributes` files in project folder while creating a new project in-order to handle line ending for json and csv files for different operating system. - Fixed: Unable to load a specific project with errors in artifacts. - Auto-suggested Entity and Attribute names based on UI Element under `Extract To` column in Quick Extract dialog. - Sahi Pro automatically waits for page loads and ajax activity. Thus, Sahi Pro also waits for the URLs that match the patterns added to `\userdata\config\streaming_urls.txt` and `\userdata\config\passthrough_ws_ssh_domains.txt`. - To bypass a specific URL from Sahi Pro's automatic waiting mechanism, use action [By Pass Wait Mechanism](https://resources.sahipro.com/docs/flowcharts-actions/script-execution-control-apis/#by-pass-wait-mechanism) - To bypass streaming URLs from Sahi Pro's automatic waiting mechanism, enable userdata property `sahi.auto_wait.bypass_streaming_urls`. - To bypass passthrough domains from Sahi Pro's automatic waiting mechanism, enable userdata property `sahi.auto_wait.bypass_passthrough_domains`. ## New Actions - [Key Press Native](https://resources.sahipro.com/docs/flowcharts-actions/action-apis/#key-press-native): It simulates a native keypress event. - [Skip Screenshots](https://resources.sahipro.com/docs/flowcharts-actions/screenshot-apis/#skip-screenshots): Screenshot capturing can be skipped using this action. - [Skip Screenshots Comparison](https://resources.sahipro.com/docs/flowcharts-actions/screenshot-apis/#skip-screenshots-comparison): Screenshot comparison can be skipped using this action. - [Set Authentication](https://resources.sahipro.com/docs/flowcharts-actions/action-apis/#set-authentication): Adds credentials to authenticate user for the specified HTTP authentication scheme and realm. ## Modified Actions - [Style](https://resources.sahipro.com/docs/flowcharts-actions/fetch-apis/#style): Added `$pseudoEl` parameter to fetch style attributes from pseudo-elements like `::before`, `::after`, etc. ## Bug Fixes - Fixed: `Run Till Here` and `Run This` failed on keywords following dynamic conditions when the `else` branch was empty. - Fixed: Unable to use `Run Till Here` when automating Java applications. - Fixed: Step and keyword overrides were not applied when running tests from the Flowchart or Project level. - Fixed: When running from Project or Flowchart level, custom functions fail to execute if a keyword is reused across multiple paths within the Flowchart. - Fixed: Node operations `add, remove, paste` are causing path data to be lost. - Fixed: When validations are disabled, both positive and negative validation flows still execute for a path during an Ant run. - Fixed: If artifact name or its content contains special character then its Flowcharts UI is getting distorted. - Fixed: The positions of JSON attributes are getting interchanged in the JSON file after updating artifact. So JSON files show unnecessary changes in Git. - Fixed: Empty values at end of dataset row is not picking up while running path from Automate dialog. - Fixed: UI Element is not visible correctly in Screen and Entity if UI Element identifier has single quote. - Fixed: Step with `Is Check` api and Assert step type is failing if assertion value is passed from Dataset. - Fixed: Unable to automatically download files on clicking specific HTML link elements containing **download** attribute. - Fixed: The script generated from the Rest Client is missing the request body when an XML body is provided. - Fixed: Tests are not executing on specific node configured with node tag, when tag is provided in prerequisites - Fixed: Unable to set value in a specific text box that accepts only numbers. - Now, action [Is Enabled](https://resources.sahipro.com/docs/flowcharts-actions/fetch-apis/#is-enabled) will fail if the specified element does not exist. ## What is new in Sahi Pro Desktop Add-on v11.2.0.0 - No changes. ## What is new in Sahi Pro Mobile Add-on v11.2.0.0 - No changes. ## What is new in Sahi Pro SAP Add-on v11.2.0.0 - No changes. ## What is new in Sahi Pro AI Assist Add-on v11.2.0.0 **Improvements** - AI Assist Add-on now supports automating on ARM based macOS systems. --- # What is new in Sahi Pro v11.1.0.0 Sahi Pro v11.1.0.0 is a minor release with features and improvements in Sahi Pro Flowcharts. :::note[Renamed] The Desktop, Mobile and SAP Add-ons are now the [Desktop Engine](https://resources.sahipro.com/docs/introduction/sahi-pro-desktop-engine/), [Mobile Engine](https://resources.sahipro.com/docs/introduction/sahi-pro-mobile-engine/) and [SAP Engine](https://resources.sahipro.com/docs/introduction/sahi-pro-sap-engine/), and the AI Assist Add-on is now the [Visual Assist Engine](https://resources.sahipro.com/docs/introduction/sahi-pro-visual-assist-addon/). ::: ## Key Features ### Artificial Intelligence for Mobile Automation [Sahi Pro AI Assist Add-on](https://resources.sahipro.com/docs/introduction/sahi-pro-visual-assist-addon/) is now available for Mobile automation. This Add-on already supports automating browsers, desktop applications, etc. Now, it can also be used to automate Android and iOS applications. ### Import from Postman Now, you can easily import your REST API requests created in the Postman API Platform to your Flowcharts. Click [here](https://resources.sahipro.com/docs/flowcharts/rest-api/#import-from-postman) for details. ### Keyword and Step Override Let's say your Application is evolving from an older UI to a newer UI. Actions to be performed on both these user interfaces are similar except they could differ for specific steps. Also, an entire keyword may need to be overridden for the new UI. Refer [Keyword and Step Override](https://resources.sahipro.com/docs/flowcharts/overrides/#keywordstep-override) for details. ## Improvements and Bug Fixes - Script generation for flowcharts is now faster. This reduces the time it takes to start the execution when running a Project. - Now, [Variable Templates](https://resources.sahipro.com/docs/flowcharts/variable-templates/) are also available in the Data Generator and the UI Elements. - Validations can also be enabled from the Truth Table View and Execution order dialogs. - Improvements for a node in Flowcharts - Now, autocomplete in the node content will also look for partial match. - Fixed: When renaming a keyword generated from node with multiple lines of content, the usage not coming correctly. - Improvements in Automate Dialog: - When we run a path from the Automate dialog, the keywords having a dataset attached will be shown in blue color during the run. - Keywords inside the corresponding if/else block are now correctly displayed in the Keywords tab on the Automate dialog. Also, common keywords are listed after the if/else block. - Fixed: After closing, unsaved attribute changes still remain in the Automate dialog. - Fixes in Reports: - Columns 'Origin Machine' and other custom columns(if any) will now be available in the consolidated report for the Suites list. - Fixed: On the Comparison Suite page, graph for Statistical view is missing. - Fixed: Expand and Collapse buttons are not working on the Comparing Screenshots page. - Fixed: When Click action added from Flowcharts Controller is run, in the Reports a second argument "null" is shown for this Click action. - Prohibitions: - Now, name for entity attributes, screens, keywords cannot begin with a number. - Now, special characters are not allowed while renaming keywords and screen names. - In a Datasource file, the dataset names should be unique. Also, a dataset must be associated with a non-empty name. These restrictions are now also necessary when editing the raw data rows. - In the Project page, 'Created on' and 'Last Modified' information is now removed for the Flowcharts. - Empty node will not be allowed. - If steps in a keyword contain references from multiple entities/screens, renaming any one of the entity/screen will now update only the references of that specific entity/screen, not those of the other entities/screens. - Fixed: Run Step is not working for actions Set Value and Assert Text Equals, if UI Element value is empty in the Flowcharts Controller. - Fixed: Unable to upload a file using \_setFile3 API for a specific application. - Fixed: Issue in shortcut created for Sahi Pro on Mac desktop shortcut issue. - Fixed: Unable to identify on a web application as Sahi's pinging did not work. - Fixed: Failure on 'Run Step' when step parameters are extracted to entity attributes. - Fixed: Quick Extract not working for Assert action. - Fixed: Unable to send XML content as body in a REST API Call. - Fixed: Sahi Pro Dashboard does not render correctly on Mac OS. - Fixed: External scripts directory does not load on startup. - Fixed: Circular dependency in entity attributes was being allowed. - Fixed: When renaming a keyword generated from dynamic condition node, the usage is not populated. ## What is new in Sahi Pro Desktop Add-on v11.1.0.0 ## Improvements - #### Windows Application - To automate a Windows application, you would start recording actions on the application. However, Windows automation allows you to automate on the entire system screen. Thus, actions performed on other applications, Taskbar, Windows Start Menu, etc. also get recorded. To ignore such actions and restrict recording to a specific application process, a new provision is added. Refer [here](https://resources.sahipro.com/docs/flowcharts/windows-desktop/#restricted-identificationrecording) for details. #### Java Application - Fixed: For \_jvJComboBox element, Flowcharts Controller is generating wrong steps for actions Set Value & Assert Text Equals. ## What is new in Sahi Pro Mobile Add-on v11.1.0.0 - Fixed: Execution for iOS does not work if start mode is generic. ## What is new in Sahi Pro SAP Add-on v11.1.0.0 - No changes. ## What is new in Sahi Pro AI Assist Add-on v11.1.0.0 ## Improvements - AI Assist Add-on is now available for automating Android and iOS mobile applications. - AI Assist Add-on now supports automating on intel based macOS systems. --- # What is new in Sahi Pro v11.0.1.4 Sahi Pro v11.0.1.4 is a minor release with features and improvements in Sahi Pro Flowcharts. :::note[Renamed] The Desktop, Mobile and SAP Add-ons are now the [Desktop Engine](https://resources.sahipro.com/docs/introduction/sahi-pro-desktop-engine/), [Mobile Engine](https://resources.sahipro.com/docs/introduction/sahi-pro-mobile-engine/) and [SAP Engine](https://resources.sahipro.com/docs/introduction/sahi-pro-sap-engine/), and the AI Assist Add-on is now the [Visual Assist Engine](https://resources.sahipro.com/docs/introduction/sahi-pro-visual-assist-addon/). ::: ## Key Features ### Execute in Sahi Pro Flowcharts via Ant Now you can easily create Ant targets for Playback in Sahi Pro Flowcharts. These Ant targets can be configured to run in your CI/CD pipeline using tools like Jenkins, GitLab, etc. Refer [Playback via Ant](https://resources.sahipro.com/docs/flowcharts/playback-via-ant/) for details. ### Reference variables inside string parameters You can now mention variables inside the string parameters in a Step as well as a REST API Call. Entity Attributes as well as External Variables can be passed inside the string parameters. During execution, the referenced variables will be resolved and replaced with its current value. Refer [Variable Templates](https://resources.sahipro.com/docs/flowcharts/variable-templates/) for details. ### Avoid skipping dependent paths Enable **Avoid Skipping** setting in **Advanced Run Settings** to prevent skipping the dependent paths during execution. This ensures that the dependent paths are executed in the intended order, even if the parent path did not run successfully. ## Improvements - Your scripts present in the Sahi Pro scripts directory contains Sahi Pro Classic Functions. These can now be included as Custom Functions while creating/editing a Project. Click [here](https://resources.sahipro.com/docs/flowcharts/existing-sahi/) to integrate Sahi Pro Flowcharts with Existing Sahi Pro Classic Codebase. - Quick Extract will now be available only for steps that contain a UI element. - Timestamp can now be appended to a text Data Generator Type. - Below provisions are added to the Flowcharts Controller: - List Properties of a UI Element - Show X,Y position of the mouse pointer - Enable Windows mode - Diagnose slowness for Browser mode ## Bug Fixes - Fixes in Sahi Pro Flowcharts - Dialogs for `Launcher Settings` and `Run Settings` will be rendered correctly on the Safari browser. - Entity name when specified in a node is automatically converted to lowercase. However, this was not happening when there were multiple entities in a keyword. This is fixed. - In the Path dialog, the color of the Keyword's text will now correctly show its execution status. - Fixed: Browser stays open after executing with **Run Sequentially in Single Browser Session** setting. - Fixed: Data not picked from dataset for **Run This**. - Fixed: In the **Run Settings** dialog, settings are not remembered on switching from **Run Distributed** option to **Run in Parallel** option. - In the **Add Step** dialog, when specifying a custom function in the **Action** field, its JSDoc information will appear as tooltip in the AutoComplete list. - Few bug fixes for using Custom Functions in Sahi Pro Flowcharts. - Script data will now be visible on hover when a script passes in Reports. - Raw Add Step dialog UI is improved for better readability. - Fixed: Embedded controller remains open even after popping out the controller. - Fixed: In flowcharts with multiple paths, clicking on path links in the table view doesn't automatically focus the corresponding highlighted path. - Fixed: User can't get info of skipped path, until they expand. - Action **Set File** will now be recorded. Also, Action **Set File** now supports uploading multiple files. - Fixed: If we run with the tags, the flowcharts which aren't matched, are shown in the graphs as skipped. - Fixed: On switching the Scripts directory from the Projects list page, the button to open the Flowcharts directory does not work correctly. - Fixed: Assertion not working for action **Compare Images**. - Fixed: On renaming a keyword which is written in a non-english language like German, Chinese, etc., the **Usage** section in the **Search / Rename** dialog is incorrect. - Fixed: Negative validations not working when a Keyword is invoked from another Keyword. - Fixed: In Add Step dialog, if a Entity and Screen have same name then the details for both Entity and Screen are visible even when only Screen or Entity is selected. - When running Negative Validations, an exact match will be expected for the error message specified. - Fixed: Data Source selection not remembered on clicking cancel button on the Edit Dataset dialog. - An error occurs for Sahi Pro database on updating due to a SQLSyntaxErrorException. This issue is noticed on MySQL, Oracle, PostgreSQL, MSSQL and H2 databases. This is fixed. - Your application server must send the downloaded file's name in the **Content-Disposition** header as per RFC 2231. However, some servers may use RFC 2047. Thus, RFC 2047 is also handled. ## What is new in Sahi Pro Desktop Add-on v11.0.1.4 **Bug Fixes** - Avoid recording steps that were executed from the **Evaluate expression** in the Sahi Pro Controller. - Fixed: A specific application popup does not open while automating Oracle Apps. ## What is new in Sahi Pro Mobile Add-on v11.0.1.4 **Improvements** - Added support for the latest Android SDK for Android Automation. **Bug Fixes** - Fixed: Script name is not coming as test name on AWS DeviceFarm for iOS Automation. - Fixed: Unable to connect to iOS simulator if the property `ios.use.sahi.common_domain` is enabled. - Fixed: If script name contains space then script is not running on AWS DeviceFarm. ## What is new in Sahi Pro SAP Add-on v11.0.1.4 **Bug Fixes** - Avoid recording steps that were executed from the **Evaluate expression** in the Sahi Pro Controller. ## What is new in Sahi Pro AI Assist Add-on v11.0.1.4 - No changes. --- # What is new in Sahi Pro v11.0.0.8 Sahi Pro v11.0.0.8 is a major release with introduction of Flowcharts, bug fixes and improvements. :::note[Renamed] The Desktop, Mobile and SAP Add-ons are now the [Desktop Engine](https://resources.sahipro.com/docs/introduction/sahi-pro-desktop-engine/), [Mobile Engine](https://resources.sahipro.com/docs/introduction/sahi-pro-mobile-engine/) and [SAP Engine](https://resources.sahipro.com/docs/introduction/sahi-pro-sap-engine/), and the AI Assist Add-on is now the [Visual Assist Engine](https://resources.sahipro.com/docs/introduction/sahi-pro-visual-assist-addon/). ::: ## Instructions to Install/ Upgrade using Installer :::caution[Important] - If you're installing Sahi Pro for the first time or want to install Sahi Pro v11.0.0.8 from installer in a new location, then please refer [Sahi Pro - Getting Started](https://resources.sahipro.com/docs/flowcharts/install-sahi-pro/) page. - If you wish to upgrade from an older version of Sahi using installer, refer to [Upgrade Sahi Pro](https://resources.sahipro.com/docs/using-sahi/upgrade/) for details. ::: ## Instructions for updating through Web UI :::caution[Important] - If you are using Sahi Pro v9.7.0 or below version on Linux OS or MAC OS, a pre-setup must be installed. Kindly follow below steps to install the pre-setup. 1. Open Configure page from the Sahi Pro dashboard. 2. Click on 'Update Sahi Pro' link in the Sahi Pro's Configure page. 3. Copy below URL and paste in 'Install patch from URL'. Click on 'Apply Patch' button.\ `https://resources.sahipro.com/pre_setup/v10/pre_setup_MacAndLinux.zip` 4. Alternately, download the pre-setup from [here](https://resources.sahipro.com/pre_setup/v10/pre_setup_MacAndLinux.zip). Choose the downloaded file in 'Install patch from file'. Click on 'Apply Patch' button. 5. Sahi Pro will restart automatically after installing this pre-setup. - You can easily update to Sahi Pro v11.0.0.8 through [Update Sahi Pro](https://resources.sahipro.com/docs/using-sahi/check-for-updates/) web UI. ::: ## Key Features ### Sahi Pro Flowcharts Sahi Pro Flowcharts is a new module introduced in Sahi Pro 11. Sahi Pro Flowcharts is a no-code, visual way of representing and automating test flows. Sahi Pro Flowcharts is for anybody in a tester role who wants to automate repetitive checks for faster releases. You could be a Manual Tester, Exploratory Tester, Automation Engineer, Business Analyst, Delivery Manager or anyone in a testing role.\ Refer [Introduction to Sahi Pro Flowcharts](https://resources.sahipro.com/docs/flowcharts/introduction-to-flowcharts/) for details. ## Improvements - Unveiled a next-generation dashboard interface, delivering a powerful user experience. - Sahi sets a third-party cookie to maintain browser session. This is necessary for browser automation. However, browsers may not allow third party cookies in the future. Thus, a new provision is added to address this. If your browser blocks third party cookies, add property `sahi.browser.session.by_useragent.enabled=true` in `userdata.properties`. - Javascript's Fetch API is now handled in Web automation. During playback, Sahi will now automatically wait for the fetch requests in your application to be processed. - Now, while identifying elements from Sahi Pro Controller, the identified elements will be highlighted on the application screen. - You can pass the encrypted password in APIs [RESTRequest.setCredentials](https://resources.sahipro.com/docs/sahi-script/functions/rest-api/#restrequestsetcredentials) and [RESTRequest.setAuthCredentials](https://resources.sahipro.com/docs/sahi-script/functions/rest-api/#restrequestsetauthcredentials). Added `isEncrypted` argument to these APIs. - If configured, Sahi automatically regenerates Kerberos ticket on every start. However, to regenerate the ticket periodically without restarting Sahi, add the property `java.kinit.delay_between_regeneration` in `userdata.properties`. This property allows users to specify the number of hours between automatic Kerberos ticket regeneration, eliminating the need for Sahi restarts. Refer [here](https://resources.sahipro.com/docs/sahi-script/401-authentication/#handling-401-authentication-page-for-negotiate-or-kerberos-scheme) for details. - A performance improvement has been added to reduce the time it takes to open and view large reports for suites and scripts. - Sahi Pro and Sahi Pro Runner will create a desktop shortcut on Mac. ## Bug Fixes - API `_scriptStatus` returning success status when `_fail` is called from scenario (directly or from inside a keyword function). - Fixes in Reports: - Suite report does not show hours in Time Taken. - Error count not available on comparison suite. - Added a provision. Now, in the report, any **ERROR** status should be considered and logged as **FAILURE** if this property `reports.log_error_as_failure` is enabled. - Fixed: Not able to identify the elements on a Iframe for a specific page. - Fixed: A specific page becomes unresponsive during execution. - Introduced a property `scenario.external_data.null_as_object`. It can be used to consider value as null if specified in an external data file. Earlier it was considered as string 'null'. - Fixed: In Editor, a scenario was failing for a empty commented line in testcase. - In `.xlsx` file if the `[documentation]` cell is replaced with an empty cell. From controller, it does not execute. - In an external data file, define a variable (`ex: $username`) as data and assign value to this variable from `.sah` script. When the test is executed `$username` will be evaluated to the assigned value. Property `scenario.external_data.allow_variable` can be used to change behaviour. - Property `system.prevent_standby.keycode` can be used to change key for Sahi's 'Prevent standby' feature. The default key is `F15`. - To prevent interference from the `application's XHR wrapping`, Sahi now uses the original `browser's XHR` to open and send. - Upgraded openssl.exe for Windows OS from version 0.9.8 to version 1.1.1w. ## What is new in Sahi Pro Desktop Add-on v11.0.0.8 ## Improvements - Now users can mention element types (`e.g button`) in custom JSON to identify, record, and execute Windows automation for 'Full Description'. - Provision to ignore hidden and/or disabled elements in windows automation. Refer [Additional Configurations](https://resources.sahipro.com/docs/using-sahi/windows-desktop/#additional-configurations) for details. ## Modified APIs - [\_launchJavaApplication](https://resources.sahipro.com/docs/sahi-script/functions/java/#_launchjavaapplication): Added argument `$applicationType` to specify the type of java application. ## Bug Fixes - `Control + Shift + Hover` will now give the current absolute position of the mouse pointer on the Controller. ## What is new in Sahi Pro Mobile Add-on v11.0.0.8 ## Improvements - A feature has been implemented to refresh the Android viewer automatically at the end of a test run initiated from the controller. - Updated the testing framework to include support for Android 14. - Enhance the experience of Android & iOS Viewer. ## Bug Fixes - Resolved problems while running tests on the AWS Device Farm. ## What is new in Sahi Pro SAP Add-on v11.0.0.8 ## Improvements - Automation for SAP GUI 800 is now supported. ## What is new in Sahi Pro AI Assist Add-on v11.0.0.8 ## Modified APIs - [\_aiText](https://resources.sahipro.com/docs/sahi-script/functions/visual-assist-accessors/#_aitext): Added argument `$props` to specify Additional properties. This will facilitate identifying a text at word or line or paragraph level. --- # What is new in Sahi Pro v10.0.0 Sahi Pro v10.0.0 is a major release with significant feature additions and modifications. The following summarizes features and enhancements in Sahi Pro v10.0.0. :::note[Renamed] The Desktop, Mobile and SAP Add-ons are now the [Desktop Engine](https://resources.sahipro.com/docs/introduction/sahi-pro-desktop-engine/), [Mobile Engine](https://resources.sahipro.com/docs/introduction/sahi-pro-mobile-engine/) and [SAP Engine](https://resources.sahipro.com/docs/introduction/sahi-pro-sap-engine/), and the AI Assist Add-on is now the [Visual Assist Engine](https://resources.sahipro.com/docs/introduction/sahi-pro-visual-assist-addon/). ::: ## Instructions to Install/ Upgrade using Installer :::caution[Important] - If you're installing Sahi Pro for the first time or want to install Sahi Pro v10.0.0 from installer in a new location, then please refer [Sahi Pro - Getting Started](https://resources.sahipro.com/docs/using-sahi/quick-tutorial/) page. - If you wish to upgrade from an older version of Sahi using installer, refer to [Upgrade Sahi Pro](https://resources.sahipro.com/docs/using-sahi/upgrade/) for details. ::: ## Instructions for updating through Web UI :::caution[Important] - On Linux OS or MAC OS, a pre-setup must be installed. Kindly follow below steps to install the pre-setup. 1. Open Configure page from the Sahi Pro dashboard. 2. Click on 'Update Sahi Pro' link in the Sahi Pro's Configure page. 3. Copy below URL and paste in 'Install patch from URL'. Click on 'Apply Patch' button.\ `https://resources.sahipro.com/pre_setup/v10/pre_setup_MacAndLinux.zip` 4. Alternately, download the pre-setup from [here](https://resources.sahipro.com/pre_setup/v10/pre_setup_MacAndLinux.zip). Choose the downloaded file in 'Install patch from file'. Click on 'Apply Patch' button. 5. Sahi Pro will restart automatically after installing this pre-setup. - If you are using Sahi Pro v9.0.1 or above version, you can easily update to Sahi Pro v10.0.0 through [Update Sahi Pro](https://resources.sahipro.com/docs/using-sahi/check-for-updates/) web UI. ::: ## Key Features ### Artificial Intelligence Infused Sahi Pro is now equipped with artificial intelligence via Sahi Pro AI Assist Add-on. Sahi Pro AI Assist Add-on provides capabilities to automate applications using computer vision and machine learning algorithms. It employs 'Image Recognition' and 'Optical Character Recognition' to automate an application. Refer [Sahi Pro AI Assist Add-on](https://resources.sahipro.com/docs/introduction/sahi-pro-visual-assist-addon/) for details. ### BDTA Is Now Multilingual Since Sahi v9.0.0, [Business Driven Test Automation (BDTA)](https://resources.sahipro.com/docs/using-sahi/business-driven-test-automation/) allows you to create the business scenarios first, even before the application is ready or has a UI. Earlier, you could write your scenarios only in English language. Now, BDTA supports all business languages namely English, Spanish, German, Dutch, etc. Thus, you can easily carry out your Business Driven Test Automation in your own language. ### Reports Are Now Revamped We have redesigned the [Reports](https://resources.sahipro.com/docs/using-sahi/sahi-reports/) in Sahi. Now, the reports feature modern and responsive design, improved navigation. The reports are now more intuitive, making it easier for you to find the information you need. This will deliver a rich user experience and add business value as well. ### Enhanced Applet Automation Earlier, both Browser and Desktop capabilities were necessary to automate applets. Now, applets can be automated using only Desktop Add-on. For this, the Applet elements need to be automated using JAVA mode while the elements on browser need to be automated using WINDOWS mode. This approach facilitates easy and more stable testing for Oracle Apps. Refer [here](https://resources.sahipro.com/docs/using-sahi/applet-automation-using-desktop-automation/) for details. ### Performance Improvement In Windows Automation Desktop Add-on now contains 64-bit executables for Windows automation. This provides significant performance improvement when automating a 64-bit Windows application on a 64-bit machine. ## Improvements - [Automating Browser Extensions](https://resources.sahipro.com/docs/using-sahi/automate-browser-extensions/) is now possible with Sahi. - Now, Sahi can automatically use certificate(s) installed on your system for [Client Certificate Authentication](https://resources.sahipro.com/docs/sahi-script/client-certificate-authentication/). - Web applications having Content Security Policy(CSP) are now fully supported in Sahi. Automatic handling of CSP related HTTP headers is available since Sahi v9.2.0. Now, Sahi also automatically handles if CSP is configured for your application using meta HTML tag. - Web applications having Cross-Origin-Embedder-Policy (COEP) are now automatically supported in Sahi. - Now, Microsoft Edge browser is also supported on Linux and MAC. - Introduced provision to create directory from the Navigator pane in [Sahi Editor](https://resources.sahipro.com/docs/using-sahi/sahi-script-editor/#navigator). - For recording a Keyword in your [Business Driven Test Automation (BDTA)](https://resources.sahipro.com/docs/using-sahi/business-driven-test-automation/), the script files included in the scenario file will be automatically suggested. ## New APIs - [\_aiImage](https://resources.sahipro.com/docs/sahi-script/functions/visual-assist-accessors/#_aiimage): This is an Accessor API to identify an image using Image Recognition technology. - [\_aiText](https://resources.sahipro.com/docs/sahi-script/functions/visual-assist-accessors/#_aitext): This is an Accessor API to identify a text using Optical Character Recognition technology. - [\_launchBrowserForApplet](https://resources.sahipro.com/docs/sahi-script/functions/java/#_launchbrowserforapplet): Launches a browser for applet and opens the specified URL. - [\_jvCanvas](https://resources.sahipro.com/docs/sahi-script/functions/java-accessors/#_jvcanvas): This is an Accessor API to identify a Canvas element in a JAVA application. ## Bug Fixes - Fixes for browser updates - Playback is slow on Google Chrome version 102 and later versions. This is fixed in Sahi v10.0.0. To fix this in Sahi v9.7.0 and below versions, refer [here](https://www.sahipro.com/post/how-to-fix-slow-playback-in-chrome-version-102-and-later). - Playback is slow on Firefox version 98.0 and later versions. This is fixed in Sahi v10.0.0. To fix this in Sahi v9.7.0 and below versions, refer [here](https://www.sahipro.com/post/how-to-fix-slow-playback-on-firefox-version-98-and-above). - Fixed: Issue in Playback on the upcoming Microsoft Edge version 114 (Beta release). - Fixes for APIs - Fixed: With [\_setFile3](https://resources.sahipro.com/docs/sahi-script/functions/actions/#_setfile3) API, file gets uploaded with the current date instead of the file's modified date. - Fixed: Unable to select an option in a customized drop-down on a specific web page using [\_setSelected](https://resources.sahipro.com/docs/sahi-script/functions/actions/#_setselected) API. - Fixed: If a test case failed with an error, API [\_testcasesInfo](https://resources.sahipro.com/docs/sahi-script/functions/script-suite-info/#_testcasesinfo) returns SUCCESS instead of ERROR in BROWSER mode. - Fixed: If API [\_scriptStatus](https://resources.sahipro.com/docs/sahi-script/functions/script-suite-info/#_scriptstatus) is invoked inside a Keyword defined for a scenario file then it returns Failure even when the script has passed. - Fixed: Images are not visible in in Offline Reports for API [\_assertSnapShot](https://resources.sahipro.com/docs/sahi-script/functions/screenshots/#_assertsnapshot). - Fixed: Unable to capture a full page screenshot on a specific web page using API [\_takePageScreenShot](https://resources.sahipro.com/docs/sahi-script/functions/screenshots/#_takepagescreenshot). - Fixed: Argument 'offset' not working for [\_aboveOrUnder](https://resources.sahipro.com/docs/sahi-script/functions/relations/#_aboveorunder) API. - Fixed: API [\_isChrome](https://resources.sahipro.com/docs/sahi-script/functions/fetch/#_ischrome) returns true for Chromium based Microsoft Edge browser. - Fixed: Unable to automate elements on the 'about:blank' page. - Fixed: Rest request is not automatically following redirects. - Fixed: Unable to get the access token for OAuth 2.0 from [REST Editor](https://resources.sahipro.com/docs/using-sahi/rest-api/getting-started/). - Fixed: Unable to load a web page on a specific application that required NTLM and JSON Web Token based authentications. - Fixed: Unable to detect if the browser window is loaded on a specific web page. - Fixed: Unable to identify elements on a specific web page having content security policy restrictions. :::note **Following web pages are not compatible with Internet Explorer(IE) browser.** - Editor - Reports - Configuration ::: :::caution[Important] **Refer [What's new in Sahi Pro Desktop Add-on v10.0.0](https://resources.sahipro.com/docs/release-notes/v10-0-0/desktop-engine/) for features in Sahi Pro Desktop Add-on v10.0.0.** ::: :::caution[Important] **Refer [What's new in Sahi Pro Mobile Add-on v10.0.0](https://resources.sahipro.com/docs/release-notes/v10-0-0/mobile-engine/) for features and enhancements done in Sahi Pro Mobile Add-on v10.0.0.** ::: :::caution[Important] **Refer [What's new in Sahi Pro SAP Add-on v10.0.0](https://resources.sahipro.com/docs/release-notes/v10-0-0/sap-engine/) for features and enhancements done in Sahi Pro SAP Add-on v10.0.0.** ::: :::caution[Important] **Sahi Pro AI Assist Add-on has been introduced in Sahi v10.0.0. Refer to [Sahi Pro AI Assist Add-on](https://resources.sahipro.com/docs/introduction/sahi-pro-visual-assist-addon/) page for details.** ::: --- # What is new in Sahi Pro Desktop Add-on v10.0.0 Sahi Pro Desktop Add-on v10.0.0 is a major release with significant feature additions and modifications. The following summarizes features and enhancements in Sahi Pro Desktop Add-on v10.0.0. :::note[Renamed] The Desktop, Mobile and SAP Add-ons are now the [Desktop Engine](https://resources.sahipro.com/docs/introduction/sahi-pro-desktop-engine/), [Mobile Engine](https://resources.sahipro.com/docs/introduction/sahi-pro-mobile-engine/) and [SAP Engine](https://resources.sahipro.com/docs/introduction/sahi-pro-sap-engine/), and the AI Assist Add-on is now the [Visual Assist Engine](https://resources.sahipro.com/docs/introduction/sahi-pro-visual-assist-addon/). ::: :::note Note: Sahi Pro Desktop Add-on requires a different license than that of Sahi Pro. ::: Refer to [Sahi Pro Desktop Add-on](https://resources.sahipro.com/docs/introduction/sahi-pro-desktop-engine/) page for details. ## Key Features 1. - Earlier, both Browser and Desktop capabilities were necessary to automate applets. Now, applets can be automated using only Desktop Add-on. For this, the Applet elements need to be automated using JAVA mode while the elements on browser need to be automated using WINDOWS mode. This approach facilitates easy and more stable testing for Oracle Apps. Refer [here](https://resources.sahipro.com/docs/using-sahi/applet-automation-using-desktop-automation/) for details. - Desktop Add-on now contains 64-bit executables for Windows automation. This provides significant performance improvement when automating a 64-bit Windows application on a 64-bit machine. :::note Note: On a 32-bit machine, 32-bit executables will be installed for Windows automation. ::: ## New APIs - [\_launchBrowserForApplet](https://resources.sahipro.com/docs/sahi-script/functions/java/#_launchbrowserforapplet): Launches a browser for applet and opens the specified URL. - [\_jvCanvas](https://resources.sahipro.com/docs/sahi-script/functions/java-accessors/#_jvcanvas): This is an Accessor API to identify a Canvas element in a JAVA application. ## Bug Fixes and Improvements ### Windows Application 1. - Fixed: APIs[\_setCell](https://resources.sahipro.com/docs/sahi-script/functions/windows/#_setcell) and [\_typeCell](https://resources.sahipro.com/docs/sahi-script/functions/windows/#_typecell) are not working on Microsoft Office 365 version 2212. - Fixed: Unable to get text of a [\_titlebar](https://resources.sahipro.com/docs/sahi-script/functions/windows-accessors/#_titlebar) using [\_getText](https://resources.sahipro.com/docs/sahi-script/functions/fetch/#_gettext). ### Java Application 1. - Fixed: API [\_setSelected](https://resources.sahipro.com/docs/sahi-script/functions/actions/#_setselected) is not deselecting already selected items for a multi-select [\_jvOrVTList](https://resources.sahipro.com/docs/sahi-script/functions/oracle-applet-accessors/#_jvorvtlist). :::caution[Important] **Refer [What's new in Sahi Pro v10.0.0](https://resources.sahipro.com/docs/release-notes/v10-0-0/) for features and enhancements done in Sahi Pro v10.0.0.** ::: :::caution[Important] **Refer [What's new in Sahi Pro Mobile Add-on v10.0.0](https://resources.sahipro.com/docs/release-notes/v10-0-0/mobile-engine/) for features and enhancements done in Sahi Pro Mobile Add-on v10.0.0.** ::: :::caution[Important] **Refer [What's new in Sahi Pro SAP Add-on v10.0.0](https://resources.sahipro.com/docs/release-notes/v10-0-0/sap-engine/) for features and enhancements done in Sahi Pro SAP Add-on v10.0.0.** ::: :::caution[Important] **Sahi Pro AI Assist Add-on has been introduced in Sahi v10.0.0. Refer to [Sahi Pro AI Assist Add-on](https://resources.sahipro.com/docs/introduction/sahi-pro-visual-assist-addon/) page for details.** ::: --- # What is new in Sahi Pro Mobile Add-on v10.0.0 Sahi Pro Mobile Add-on v10.0.0 is a release with significant bug fixes. :::note[Renamed] The Desktop, Mobile and SAP Add-ons are now the [Desktop Engine](https://resources.sahipro.com/docs/introduction/sahi-pro-desktop-engine/), [Mobile Engine](https://resources.sahipro.com/docs/introduction/sahi-pro-mobile-engine/) and [SAP Engine](https://resources.sahipro.com/docs/introduction/sahi-pro-sap-engine/), and the AI Assist Add-on is now the [Visual Assist Engine](https://resources.sahipro.com/docs/introduction/sahi-pro-visual-assist-addon/). ::: :::note Note: Sahi Pro Mobile Add-on requires a different license than that of Sahi Pro. ::: Refer to [Sahi Pro Mobile Add-on](https://resources.sahipro.com/docs/introduction/sahi-pro-mobile-engine/) page for details. ## New APIs ### iOS Application 1. - [\_setStrictVisibilityCheck](https://resources.sahipro.com/docs/sahi-script/functions/script-execution-control/#_setstrictvisibilitycheck): This API can be used to strictly look for only visible elements and ignore elements which are not visible. ## Bug Fixes - Physical iOS devices were not being detected on MacOS 13 Ventura. This is fixed. The devices will now appear correctly in Editor and iOS Viewer. - Fixed: Unable to connect to physical devices having version Android 11+ (SDK 30+). - Fixed: Unable to open Android viewer from Sahi Dashboard on Kali Linux. :::caution[Important] **Refer [What's new in Sahi Pro v10.0.0](https://resources.sahipro.com/docs/release-notes/v10-0-0/) for features and enhancements done in Sahi Pro v10.0.0.** ::: :::caution[Important] **Refer [What's new in Sahi Pro Desktop Add-on v10.0.0](https://resources.sahipro.com/docs/release-notes/v10-0-0/desktop-engine/) for features and enhancements done in Sahi Pro Desktop Add-on v10.0.0.** ::: :::caution[Important] **Refer [What's new in Sahi Pro SAP Add-on v10.0.0](https://resources.sahipro.com/docs/release-notes/v10-0-0/sap-engine/) for features and enhancements done in Sahi Pro SAP Add-on v10.0.0.** ::: :::caution[Important] **Sahi Pro AI Assist Add-on has been introduced in Sahi v10.0.0. Refer to [Sahi Pro AI Assist Add-on](https://resources.sahipro.com/docs/introduction/sahi-pro-visual-assist-addon/) page for details.** ::: --- # What is new in Sahi Pro SAP Add-on v10.0.0 Sahi Pro SAP Add-on v10.0.0 is a release with significant bug fixes. :::note[Renamed] The Desktop, Mobile and SAP Add-ons are now the [Desktop Engine](https://resources.sahipro.com/docs/introduction/sahi-pro-desktop-engine/), [Mobile Engine](https://resources.sahipro.com/docs/introduction/sahi-pro-mobile-engine/) and [SAP Engine](https://resources.sahipro.com/docs/introduction/sahi-pro-sap-engine/), and the AI Assist Add-on is now the [Visual Assist Engine](https://resources.sahipro.com/docs/introduction/sahi-pro-visual-assist-addon/). ::: :::note Note: Sahi Pro SAP Add-on requires a different license than that of Sahi Pro. ::: Refer to [Sahi Pro SAP Add-on](https://resources.sahipro.com/docs/introduction/sahi-pro-sap-engine/) page for details. ## Bug Fixes - Fixed: Unable to uncheck a checkbox using [\_uncheck](https://resources.sahipro.com/docs/sahi-script/functions/actions/#_uncheck) API. - Fixed: Error in [\_launchSAPGUI](https://resources.sahipro.com/docs/sahi-script/functions/sap/#_launchsapgui) API if an already opened SAP GUI logon pad was closed. :::caution[Important] **Refer [What's new in Sahi Pro v10.0.0](https://resources.sahipro.com/docs/release-notes/v10-0-0/) for features and enhancements done in Sahi Pro v10.0.0.** ::: :::caution[Important] **Refer [What's new in Sahi Pro Desktop Add-on v10.0.0](https://resources.sahipro.com/docs/release-notes/v10-0-0/desktop-engine/) for features and enhancements done in Sahi Pro Desktop Add-on v10.0.0.** ::: :::caution[Important] **Refer [What's new in Sahi Pro Mobile Add-on v10.0.0](https://resources.sahipro.com/docs/release-notes/v10-0-0/mobile-engine/) for features and enhancements done in Sahi Pro Mobile Add-on v10.0.0.** ::: :::caution[Important] **Sahi Pro AI Assist Add-on has been introduced in Sahi v10.0.0. Refer to [Sahi Pro AI Assist Add-on](https://resources.sahipro.com/docs/introduction/sahi-pro-visual-assist-addon/) page for details.** ::: --- # What is new in Sahi Pro AI Assist Add-on v10.0.0 Sahi Pro AI Assist Add-on (now renamed to Sahi Pro Visual Assist) v10.0.0 marks its first major release. :::note[Renamed] The AI Assist Add-on is now the [Visual Assist Engine](https://resources.sahipro.com/docs/introduction/sahi-pro-visual-assist-addon/). ::: :::note Note: Sahi Pro Visual Assist Add-on requires a different license than that of Sahi Pro. ::: Refer to [Sahi Pro Visual Assist Add-on](https://resources.sahipro.com/docs/introduction/sahi-pro-visual-assist-addon/) page for details. --- # What is new in Sahi Pro v9.7.0 Sahi Pro v9.7.0 is a minor release with bug fixes and improvements. :::note[Renamed] The Desktop, Mobile and SAP Add-ons are now the [Desktop Engine](https://resources.sahipro.com/docs/introduction/sahi-pro-desktop-engine/), [Mobile Engine](https://resources.sahipro.com/docs/introduction/sahi-pro-mobile-engine/) and [SAP Engine](https://resources.sahipro.com/docs/introduction/sahi-pro-sap-engine/). ::: ## Instructions for updating through Web UI :::caution[Important] - If you are using Sahi Pro v9.0.1 or above version, you can easily update to Sahi Pro v9.7.0 through [Update Sahi Pro](https://resources.sahipro.com/docs/using-sahi/check-for-updates/) web UI. - For updating from Sahi Pro v9.0.0, please follow the instructions below. 1. On Linux OS, after upgrading through [Update Sahi Pro](https://resources.sahipro.com/docs/using-sahi/check-for-updates/) web UI please grant permission for the `/userdata/bin/verify_ssl_root_cert_linux.sh` file.\ Eg: chmod 755 verify\_ssl\_root\_cert\_linux.sh 2. On Windows OS, when using any DB apart from H2, the Update feature stops working.\ You need to update at least once from Sahi Pro 9.0.0 version in this manner to ensure all future updates work fine. **Resolution:**\ You will need to temporarily switch your database to H2 > Perform the Update and then Switch back to your current database settings.\ For more information about using different databases for reports please see the document for **Use a Different Database** in **Using Sahi**. **Steps:** 1. Take a backup of your existing database. (It may be "mysql", "mssql", "postgresql", "oracle" etc.) When upgrading Sahi Pro and reverting your database back to your current one, your db will also get updated. So, in order to avoid losing any data, taking a backup is a must before proceeding to the below steps. 2. Switch your database settings to H2 database. 3. Perform update through [Update Sahi Pro](https://resources.sahipro.com/docs/using-sahi/check-for-updates/) web UI. 4. Now Switch back to your original DB settings. 3. Delete the Firefox profiles directory `/userdata/browser/ff/profiles` and restart Sahi. ::: ## Bug Fixes and Improvements - Now you can easily [Interact with Telnet server from Sahi](https://resources.sahipro.com/docs/sahi-script/working-with-telnet-from-sahi/). - Improvements for Deleting DB reports - DB reports can now be deleted based on `Time Taken`. Refer [here](https://resources.sahipro.com/docs/using-sahi/customize-reports/#delete-old-reports) for details - Parameters IS\_LARGE\_DB, DELETE\_FILES, BATCH\_DURATION are introduced in the file `delete_reports.bat`(or `delete_reports.sh`) present in `/userdata/bin` directory. If an error occurs while deleting reports from a large database, use these parameters and delete reports in batches. - Fixes for Firefox browser updates - Fixed: Firefox version 94.0.2 and later crash during Parallel Playback causing scripts to abort randomly. - Fixed: Unable to type underscore, equal, and colon characters in a Scenario file if Editor is opened in Firefox version 94.0.1 and later. - While recording a Keyword using the [Run/Record](https://resources.sahipro.com/docs/using-sahi/getting-started/first-test-scenario/#record-the-first-keyword) feature, now Data Drive is supported for executing the already implemented Keywords. - Autocomplete suggestions were not appearing on pressing shortcut (ctrl + space) in [Script Editor](https://resources.sahipro.com/docs/sahi-script/script-view/). It is fixed. - Fixes for [Integration with Git](https://resources.sahipro.com/docs/using-sahi/git-sahi-integration/) - In Git Configuration, Remote Path URLs not ending with `.git` are now supported. - Fixed: Editor does not open if the specified Git Configuration values are incorrect. - Fixed: If Sahi is integrated with Git, the Offline Reports are not created in the specified directory. - Fixed: API [\_disableInfoLogging](https://resources.sahipro.com/docs/sahi-script/functions/logging/#_disableinfologging) does not disable INFO messages logged by [\_log](https://resources.sahipro.com/docs/sahi-script/functions/logging/#_log) API. - Fixed: On MacOS 12, physical iOS devices were not appearing in the iOS Device list of Playback Properties window and iOS Viewer. - Installers for Sahi Pro, Sahi Pro Desktop Add-on, Sahi Pro Mobile Add-on, and Sahi Pro SAP Add-on are now compatible with Java 16 and later versions. - Sahi automatically resolves SSL errors by adding an appropriate system property for Java in the `/config/java_ssl.properties` file. Now, a new property `sahi.auto_resolve_ssl_error` is introduced in `userdata.properties` with default value as true. If this property is set as false, the automatic resolving of SSL error will be disabled. ## What is new in Sahi Pro Desktop Add-on v9.7.0 **Modifications** - Windows Application - Actions click, right-click, and double-click on a [\_pane](https://resources.sahipro.com/docs/sahi-script/functions/windows-accessors/#_pane) element will now be recorded with [\_xy](https://resources.sahipro.com/docs/sahi-script/functions/actions/#_xy) API.\ For example, clicking inside a pane at 10px from left and 20 pixels from top will now be recorded as `_click(_xy(_pane("View"), 10, 20));` **Bug Fixes** - Java/Applets Application - Fixed: Unable to check/uncheck a [JCheckbox](https://resources.sahipro.com/docs/sahi-script/functions/java-accessors/#_checkbox--_jvjcheckbox) element using [\_click](https://resources.sahipro.com/docs/sahi-script/functions/actions/#_click) API in Java 17 and later versions. - Fixed: Unable to expand/collapse a [JTreeItem](https://resources.sahipro.com/docs/sahi-script/functions/java-accessors/#_jvjtreeitem) element using [\_doubleClick](https://resources.sahipro.com/docs/sahi-script/functions/actions/#_doubleclick) API in Java 17 and later versions. - Fixed: Unable to click on a specific [JList](https://resources.sahipro.com/docs/sahi-script/functions/java-accessors/#_jvjlist) element. ## What is new in Sahi Pro Mobile Add-on v9.7.0 **Bug Fixes** - Fixed: Unable to create device binary to `Connect Session` in iOS 14 and above. **Known Issue** - Unable to automate on iOS devices with iOS 14 and above. :::note To fix this: - Add property `ios.use.sahi.common_domain=true` in `/userdata/config/userdata.properties` - Start Sahi on a system. Ensure that system and mobile device are on the same network. - Find the IP of this system. - Configure proxy settings of the mobile device with proxy host as system's IP and port as 9999. ::: ## What is new in Sahi Pro SAP Add-on v9.7.0 - No changes. --- # What is new in Sahi Pro v9.5.0 Sahi Pro v9.5.0 is a major release with significant feature additions. :::note[Renamed] The Desktop, Mobile and SAP Add-ons are now the [Desktop Engine](https://resources.sahipro.com/docs/introduction/sahi-pro-desktop-engine/), [Mobile Engine](https://resources.sahipro.com/docs/introduction/sahi-pro-mobile-engine/) and [SAP Engine](https://resources.sahipro.com/docs/introduction/sahi-pro-sap-engine/). ::: ## Instructions for updating through Web UI :::caution[Important] - If you are using Sahi Pro v9.0.1 or above version, you can easily update to Sahi Pro v9.5.0 through [Update Sahi Pro](https://resources.sahipro.com/docs/using-sahi/check-for-updates/) web UI. - For updating from Sahi Pro v9.0.0, please follow the instructions below. 1. On Linux OS, after upgrading through [Update Sahi Pro](https://resources.sahipro.com/docs/using-sahi/check-for-updates/) web UI please grant permission for the `/userdata/bin/verify_ssl_root_cert_linux.sh` file.\ Eg: chmod 755 verify\_ssl\_root\_cert\_linux.sh 2. On Windows OS, when using any DB apart from H2, the Update feature stops working.\ You need to update at least once from Sahi Pro 9.0.0 version in this manner to ensure all future updates work fine. **Resolution:**\ You will need to temporarily switch your database to H2 > Perform the Update and then Switch back to your current database settings.\ For more information about using different databases for reports please see the document for **Use a Different Database** in **Using Sahi**. **Steps:** 1. Take a backup of your existing database. (It may be "mysql", "mssql", "postgresql", "oracle" etc.) When upgrading Sahi Pro and reverting your database back to your current one, your db will also get updated. So, in order to avoid losing any data, taking a backup is a must before proceeding to the below steps. 2. Switch your database settings to H2 database. 3. Perform update through [Update Sahi Pro](https://resources.sahipro.com/docs/using-sahi/check-for-updates/) web UI. 4. Now Switch back to your original DB settings. 3. Delete the Firefox profiles directory `/userdata/browser/ff/profiles` and restart Sahi. ::: ## Key Features ### Git Integration Now you can easily [Integrate Sahi Pro with Git](https://resources.sahipro.com/docs/using-sahi/git-sahi-integration/) and work with your Git repository directly from the Sahi Pro Editor. Following Git operations are available in the Sahi Pro Editor. 1. [Git Configuration](https://resources.sahipro.com/docs/using-sahi/git-sahi-integration/#git-configuration): Git configuration values like URL for the remote Git repository, remote branch name, author details, authentication details etc. can be saved. 2. [Git Commit](https://resources.sahipro.com/docs/using-sahi/git-sahi-integration/#git-commit): Changes can be checked in to the remote Git repository. Also, latest changes can be checked out from the remote Git repository. 3. [Git History](https://resources.sahipro.com/docs/using-sahi/git-sahi-integration/#git-history): List of all commits made in the remote repository can be viewed. File changes in every commit are visible in detail. Git History can also be viewed for a specific file or directory. 4. [Git Compare](https://resources.sahipro.com/docs/using-sahi/git-sahi-integration/#git-compare): There is a provision to compare and show the differences between two versions of a file. Local version and the Head version of a file can be compared. Local version of a file and the version of that file in a specific commit can also be compared. Two commits can also be compared. ## Modifications - HTML Script Report: Functionality to update expected images with actual, where image assertion failed. ## Bug Fixes and Improvements - Since Sahi Pro v9.0.0, IP addresses can be configured to [Restrict Remote Access to Sahi](https://resources.sahipro.com/docs/using-sahi/restrict-remote-access/). On accessing Sahi from a restricted IP address, a browser's error page used to appear. Now a custom Sahi error page will be shown instead. - KeyboardEvent.initKeyEvent is removed in Firefox Release 93. It causes API \_setValue to fail. This is now fixed. ## What is new in Sahi Pro Desktop Add-on v9.5.0 - No changes. ## What is new in Sahi Pro Mobile Add-on v9.5.0 - No changes. ## What is new in Sahi Pro SAP Add-on v9.5.0 - No changes. --- # What is new in Sahi Pro v9.2.1 Sahi Pro v9.2.1 is a minor release with bug fixes and modifications. :::note[Renamed] The Desktop, Mobile and SAP Add-ons are now the [Desktop Engine](https://resources.sahipro.com/docs/introduction/sahi-pro-desktop-engine/), [Mobile Engine](https://resources.sahipro.com/docs/introduction/sahi-pro-mobile-engine/) and [SAP Engine](https://resources.sahipro.com/docs/introduction/sahi-pro-sap-engine/). ::: ## Instructions for updating through Web UI :::caution[Important] - If you are using Sahi Pro v9.0.1 or above version, you can easily update to Sahi Pro v9.2.1 through [Update Sahi Pro](https://resources.sahipro.com/docs/using-sahi/check-for-updates/) web UI. - For updating from Sahi Pro v9.0.0, please follow the instructions below. 1. On Linux OS, after upgrading through [Update Sahi Pro](https://resources.sahipro.com/docs/using-sahi/check-for-updates/) web UI please grant permission for the `/userdata/bin/verify_ssl_root_cert_linux.sh` file.\ Eg: chmod 755 verify\_ssl\_root\_cert\_linux.sh 2. On Windows OS, when using any DB apart from H2, the Update feature stops working.\ You need to update at least once from Sahi Pro 9.0.0 version in this manner to ensure all future updates work fine. **Resolution:**\ You will need to temporarily switch your database to H2 > Perform the Update and then Switch back to your current database settings.\ For more information about using different databases for reports please see the document for **Use a Different Database** in **Using Sahi**. **Steps:** 1. Take a backup of your existing database. (It may be "mysql", "mssql", "postgresql", "oracle" etc.) When upgrading Sahi Pro and reverting your database back to your current one, your db will also get updated. So, in order to avoid losing any data, taking a backup is a must before proceeding to the below steps. 2. Switch your database settings to H2 database. 3. Perform update through [Update Sahi Pro](https://resources.sahipro.com/docs/using-sahi/check-for-updates/) web UI. 4. Now Switch back to your original DB settings. 3. Delete the Firefox profiles directory `/userdata/browser/ff/profiles` and restart Sahi. ::: ## New APIs - [\_isBrave](https://resources.sahipro.com/docs/sahi-script/functions/fetch/#_isbrave): It identifies Brave browser. ## Modifications - Below modifications have been introduced for [\_setFile3](https://resources.sahipro.com/docs/sahi-script/functions/actions/#_setfile3) API. - Argument `$fileElement` is added. - Sahi Recorder will automatically record file upload operations as `_setFile3`. - Email template file `email_template.xsl` is moved from `/userdata/config` directory to `/config` directory. To use an email template with custom changes, place the customized `email_template.xsl` file in the `/userdata/config` directory. ## Bug Fixes and Improvements - Added support for Brave browser. - Fixed: Scripts playback issue in IE10 and lower versions of IE. - Fixed: UI element(s) not loading in few scenarios. - Fixed: Alternatives with index is not coming in controller when identifying element with [\_near](https://resources.sahipro.com/docs/sahi-script/functions/relations/#_near) or [\_in](https://resources.sahipro.com/docs/sahi-script/functions/relations/#_in) API. - Fixed: [\_testcaseInfo](https://resources.sahipro.com/docs/sahi-script/functions/script-suite-info/#_testcasesinfo) API is not returning the correct testcase information. - Fixed: Script Report UI not rendered correctly for Scenario file having `XLSX` file extension. - Fixed: Spreadsheet's cell is getting in editable mode periodically in editor when `system.prevent_standby.enabled` property is set to `true`. - In Scenario files, it is not recommended to write a function name next to a Test Case name in the `Key Word` column as this place is reserved for the `[Documentation]` keyword. When such Scenario files got aborted during playback, then incorrect test cases count was shown in logs. This issue is now fixed. Refer to this [link](https://resources.sahipro.com/docs/using-sahi/getting-started/first-test-scenario/#create-a-scenario-file) to create a Scenario file. - Fixes for Firefox - Mozilla Firefox 91 has introduced an `HTTPS by Default` feature in Private Browsing. If the website supports HTTPS, Firefox will automatically upgrade from HTTP to HTTPS connection in a private browser window. This automatic re-navigation is now disabled for Mozilla Firefox browser windows launched by Sahi. - Fixed: Unable to identify elements in Firefox due to content security policy restrictions. - Firefox displays below warning for sending information from a secure to an insecure connection. This warning is now disabled in Sahi. :::caution[Important] ![](https://resources.sahipro.com/docs/assets/images/releases/ff_warning_submit_info_secure_to_insecure.webp) ::: ## What is new in Sahi Pro Desktop Add-on v9.2.1 - No changes. ## What is new in Sahi Pro Mobile Add-on v9.2.1 **Bug Fixes** - Fixed: API [\_mActivateApplication](https://resources.sahipro.com/docs/sahi-script/functions/mobile-common/#_mactivateapplication) not working correctly on Android 11. - Fixed: API [\_takePageScreenShot](https://resources.sahipro.com/docs/sahi-script/functions/screenshots/#_takepagescreenshot) not working correctly on Android. - Fixed: Android Emulator having version Android 11 (SDK 30) when connected from Android Viewer does not show a screenshot of the emulator. - Fixed: Script aborts randomly on AWS DeviceFarm even after the Android device launched successfully. ## What is new in Sahi Pro SAP Add-on v9.2.1 - No changes. --- # What is new in Sahi Pro v9.2.0 Sahi Pro v9.2.0 is a minor release with bug fixes and modifications. :::note[Renamed] The Desktop, Mobile and SAP Add-ons are now the [Desktop Engine](https://resources.sahipro.com/docs/introduction/sahi-pro-desktop-engine/), [Mobile Engine](https://resources.sahipro.com/docs/introduction/sahi-pro-mobile-engine/) and [SAP Engine](https://resources.sahipro.com/docs/introduction/sahi-pro-sap-engine/). ::: ## Instructions to Install/ Upgrade using Installer :::caution[Important] - If you're installing Sahi Pro for the first time or want to install Sahi Pro v9.2.0 from installer in a new location, then please refer [Sahi Pro - Getting Started](https://resources.sahipro.com/docs/using-sahi/quick-tutorial/) page. - If you wish to upgrade from an older version of Sahi using installer, refer to [Upgrade Sahi Pro](https://resources.sahipro.com/docs/using-sahi/upgrade/) for details. ::: ## Instructions for updating through Web UI :::caution[Important] - If you are using Sahi Pro v9.0.1 or above version, you can easily update to Sahi Pro v9.2.0 through [Update Sahi Pro](https://resources.sahipro.com/docs/using-sahi/check-for-updates/) web UI. - For updating from Sahi Pro v9.0.0, please follow the instructions below. 1. On Linux OS, after upgrading through [Update Sahi Pro](https://resources.sahipro.com/docs/using-sahi/check-for-updates/) web UI please grant permission for the 'SahiBaseDir/userdata/bin/verify\_ssl\_root\_cert\_linux.sh' file.\ Eg: chmod 755 verify\_ssl\_root\_cert\_linux.sh 2. On Windows OS, when using any DB apart from H2, the Update feature stops working.\ You need to update at least once from Sahi Pro 9.0.0 version in this manner to ensure all future updates work fine. **Resolution:**\ You will need to temporarily switch your database to H2 > Perform the Update and then Switch back to your current database settings.\ For more information about using different databases for reports please see the document for **Use a Different Database** in **Using Sahi**. **Steps:** 1. Take a backup of your existing database. (It may be "mysql", "mssql", "postgresql", "oracle" etc.) When upgrading Sahi Pro and reverting your database back to your current one, your db will also get updated. So, in order to avoid losing any data, taking a backup is a must before proceeding to the below steps. 2. Switch your database settings to H2 database. 3. Perform update through [Update Sahi Pro](https://resources.sahipro.com/docs/using-sahi/check-for-updates/) web UI. 4. Now Switch back to your original DB settings. ::: ## New APIs - APIs [\_dataList](https://resources.sahipro.com/docs/sahi-script/functions/browser-accessors/#_datalist), [\_datalistFilter](https://resources.sahipro.com/docs/sahi-script/functions/fetch/#_datalistfilter), [\_setValueFromList](https://resources.sahipro.com/docs/sahi-script/functions/actions/#_setvaluefromlist) are added to support datalist Html element. - [\_scriptInfo](https://resources.sahipro.com/docs/sahi-script/functions/script-suite-info/#_scriptinfo): Returns script information as an associative array. - [\_addToScriptInfo](https://resources.sahipro.com/docs/sahi-script/functions/script-suite-info/#_addtoscriptinfo): Appends custom fields in Script Info. - [\_setClientCertificate](https://resources.sahipro.com/docs/sahi-script/functions/actions/#_setclientcertificate): Sets the certificate to be used for client certificate authentication. ## Modifications - [\_setValue](https://resources.sahipro.com/docs/sahi-script/functions/actions/#_setvalue): API will not set value in hidden elements. - [\_click](https://resources.sahipro.com/docs/sahi-script/functions/actions/#_click): API now supports touch events for mobile browsers. - [\_dragDrop](https://resources.sahipro.com/docs/sahi-script/functions/actions/#_dragdrop): API now automatically scrolls the page while finding the drag element and drop element. - [\_assertSnapShot](https://resources.sahipro.com/docs/sahi-script/functions/screenshots/#_assertsnapshot): API now supports Headless Chrome. - [\_getOptions](https://resources.sahipro.com/docs/sahi-script/functions/fetch/#_getoptions): API now supports datalist Html element. - [\_getSessionId](https://resources.sahipro.com/docs/sahi-script/functions/utilities/#_getsessionid): Argument `$windowIdentifier` now supports window name and window URL as well. - [\_copyFile](https://resources.sahipro.com/docs/sahi-script/functions/files/#_copyfile): API now supports copying files having a size of more than 2 GB. ## Bug Fixes and Improvements - Additions to Report - Introduced [Intermediate Statuses](https://resources.sahipro.com/docs/using-sahi/sahi-reports/#intermediate-statuses) in Script Report. - Error status will be visible for Scripts and TestCases. - Statuses ABORTED and ABORTED\_TIMEOUT will be visible for test cases on the Suites List page. - Healed Report will be available on the Suite Analysis page. - The browser version is added to Script Report. - The graph will also be shown for scripts in running status. - Url containing IPv6 address is now supported. - Content Security Policy is now supported. - Add-ons can be uninstalled from Sahi's Configuration page. - Now Rollback feature is also available for add-ons and patches. - Data drive headers will now be automatically suggested in the Controller while recording a scenario. - Argument names will now appear in PascalCase for functions created in Editor. - Fixes in Playback - Chromium project based browsers namely Google Chrome, Microsoft Edge, etc. employ `WebContent Occlusion` feature. With this feature, the browser hides the content of a window that is not in use. Consequently, playback with Sahi fails on such windows having no content. This feature is now disabled for Google Chrome and Microsoft Edge browser windows launched by Sahi. To disable this feature for other Chromium based browsers, refer [here](https://resources.sahipro.com/docs/troubleshooting/chrome-issues/#test-runs-fail-randomly-on-popup-windows). - Fixed: Steps to be performed on a cross domain non-top iframe are skipped during playback. - Fixed: Steps are not executing on popup if window name contains multiple lines. - If a URL contains invalid characters, it is encoded by Sahi. Such an encoded URL was being rejected by few website servers. This is now fixed. - Syntax error occurs in some cases where array index is computed at run time. For example - \_getText($totalRows\[$i+1\]). This is now fixed. - Fixed: Error message occurs while asserting arrays with [\_assertEqual](https://resources.sahipro.com/docs/sahi-script/functions/assertions/#_assertequal) and [\_assertEqualArrays](https://resources.sahipro.com/docs/sahi-script/functions/assertions/#_assertequalarrays). - Fixed: [\_assertEqualImages](https://resources.sahipro.com/docs/sahi-script/functions/assertions/#_assertequalimages) returns `[Object object]` when executed as a snippet from controller. - Fixed: API [\_setXHRReadyStatesToWaitFor](https://resources.sahipro.com/docs/sahi-script/functions/script-execution-control/#_setxhrreadystatestowaitfor) not working correctly. - Fixes in Report - Fixed: Offline XML report is not generated for retry run. - Commented functions of a scenario file appear in red color instead of grey color in the report. This happens when a step fails with 90 second error. This is now fixed. - Fixed: In an excel report for a distributed run, the status color is not set for methods of a test case. - Fixed: JS code coverage directory is not synced while synching 2 suite reports if the first suite report does not have JS code coverage. - Fixed: Screenshot is missing from logs if the script file path contains spaces. - Fixed: Aborted timeout count is not updated correctly while running a long suite with sub suites. - Fixed: In few cases, the script was failing with 90 second error and the script status was being set as ERROR instead of ABORTED. - Fixed: Popup index increases after page reload in IE. - Fixed: Unable to apply a patch URL containing spaces in IE browser. - Fixed: Bug in Configuration page for managing external jars. - Fixed: Files android\_devices.xml and ios\_devices.xml necessary for configuring AWS device farm are not present in Sahi's userdata directory. - Fixed: Exception occurs while creating a data drive for a newly created scenario that is not saved yet. - Fixed: In a long scenario file, focus changes on switching tabs in Editor. - Fixed: Unable to refresh navigator in Editor if multiple Scripts directories are specified. - Fixed: Internal value 'sahi-xhr-sid' is unnecessarily being sent to web server in 'Access-Control-Request-Headers' request header. - Internal request header 'sahi-xhr-sid' will not be added for a cross domain XHR if the domain matches an entry in `passthrough_ws_ssh_domains.txt`. - Updated Firefox profiles to allow internal 'sahisid' cookie to be accessible across domains. - Avoided connecting to `:` from `Sahi proxy server` as they both are same. - Attachment of type 'application/x-protobuf' will not be downloaded to `SahiBaseDir/userdata/temp/download` directory. ## What is new in Sahi Pro Desktop Add-on v9.2.0 **Bug Fixes** - Fixed: Incorrect window index for apps like Remote Desktop Login and TeamViewer. ## What is new in Sahi Pro Mobile Add-on v9.2.0 **New APIs** - [\_call](https://resources.sahipro.com/docs/sahi-script/functions/actions/#_call): This is a generic API to directly call javascript on the DOM. **Modifications** - [\_setValue](https://resources.sahipro.com/docs/sahi-script/functions/actions/#_setvalue): Added `triggerKeyEvents property`. This property triggers keyboard events while setting the value. - Deprecated: Property `aws.devicefarm.enabled` for iOS Automation with AWS Device Farm. **Bug Fixes** - Fixed: Element index is different in recording and playback for some elements in Android. - Fixed: Stacktrace is not shown in the report in case of a step error in Android. - Fixed: FileAccessException occurred when connecting to an android device. - Fixed: API [\_setValue](https://resources.sahipro.com/docs/sahi-script/functions/actions/#_setvalue) not working correctly when passing integer/float value in iOS. - Fixed: API [\_takeScreenShot](https://resources.sahipro.com/docs/sahi-script/functions/screenshots/#_takescreenshot) not working correctly in Android Webview mode. - Fixed: API [\_takePageScreenShot](https://resources.sahipro.com/docs/sahi-script/functions/screenshots/#_takepagescreenshot) not working correctly in Android Webview mode. ## What is new in Sahi Pro SAP Add-on v9.2.0 **New APIs** - [\_closeSAPGUI](https://resources.sahipro.com/docs/sahi-script/functions/sap/#_closesapgui): Closes SAP GUI logon pad. **Bug Fixes** - Fixed: Unable to click on Tab element. - Fixed: Unable to double click on tree node item. - Fixed: Combo box action not recorded. --- # What is new in Sahi Pro v9.1.2 Sahi Pro v9.1.2 is a minor release with performance improvement and bug fixes. :::note[Renamed] The Desktop, Mobile and SAP Add-ons are now the [Desktop Engine](https://resources.sahipro.com/docs/introduction/sahi-pro-desktop-engine/), [Mobile Engine](https://resources.sahipro.com/docs/introduction/sahi-pro-mobile-engine/) and [SAP Engine](https://resources.sahipro.com/docs/introduction/sahi-pro-sap-engine/). ::: ## Instructions to Install/ Upgrade using Installer :::caution[Important] - If you're installing Sahi Pro for the first time or want to install Sahi Pro v9.1.2 from installer in a new location, then please refer [Sahi Pro - Getting Started](https://resources.sahipro.com/docs/using-sahi/quick-tutorial/) page. - If you wish to upgrade from an older version of Sahi using installer, refer to [Upgrade Sahi Pro](https://resources.sahipro.com/docs/using-sahi/upgrade/) for details. After upgrading to v9.1.2, follow the instructions below. 1. Add following patterns to 'SahiBaseDir\\userdata\\config\\donot\_download\_urls.txt'. - .\*threatListUpdates.\* - .\*chrome-variations\\/seed.\* - .\*edgedl.\* - .\*openh264\[.\]org.\* 2. Open 'SahiBaseDir\\userdata\\config\\browser\_types.xml'. Append below line to options element in browser types for 'chrome' and 'edgenew'. - \--disable-renderer-backgrounding --disable-background-networking --disable-component-update ::: ## Instructions for updating through Web UI :::caution[Important] - If you are using Sahi Pro v9.0.1 or above version, you can easily update to Sahi Pro v9.1.2 through [Update Sahi Pro](https://resources.sahipro.com/docs/using-sahi/check-for-updates/) web UI. - For updating from Sahi Pro v9.0.0, please follow the instructions below. 1. On Linux OS, after upgrading through [Update Sahi Pro](https://resources.sahipro.com/docs/using-sahi/check-for-updates/) web UI please grant permission for the 'SahiBaseDir/userdata/bin/verify\_ssl\_root\_cert\_linux.sh' file.\ Eg: chmod 755 verify\_ssl\_root\_cert\_linux.sh 2. On Windows OS, when using any DB apart from H2, the Update feature stops working.\ You need to update at least once from Sahi Pro 9.0.0 version in this manner to ensure all future updates work fine. **Resolution:**\ You will need to temporarily switch your database to H2 > Perform the Update and then Switch back to your current database settings.\ For more information about using different databases for reports please see the document for **Use a Different Database** in **Using Sahi**. **Steps:** 1. Take a backup of your existing database. (It may be "mysql", "mssql", "postgresql", "oracle" etc.) When upgrading Sahi Pro and reverting your database back to your current one, your db will also get updated. So, in order to avoid losing any data, taking a backup is a must before proceeding to the below steps. 2. Switch your database settings to H2 database. 3. Perform update through [Update Sahi Pro](https://resources.sahipro.com/docs/using-sahi/check-for-updates/) web UI. 4. Now Switch back to your original DB settings. ::: ## Bug Fixes and Improvements - Performance improvements in Sahi Playback - During playback, it is necessary to identify inactive browser windows. Earlier a separate thread was created per browser session for this activity. Now, a single thread will suffice for all the browser sessions. - Optimized processing of HTTP requests. - Cached and reused regex patterns. - Avoided downloading browser and system updates to Sahi's download directory. - Introduced property `testcase.restart_browser_if_aborted` to restart the browser for an aborted test case in a scenario file during playback. - Introduced property `drun.auto_rerun_scripts_if_internal_aborted` to configure re-execution of the script if communication between Sahi Master and node is lost while the execution is in progress. If the property is enabled Script will be set to `INTERNAL_ABORTED_RETRY` status and will try to execute again. If the property is disabled, Script will be set to `INTERNAL_ABORTED` status. - Improvement in [\_dragDrop](https://resources.sahipro.com/docs/sahi-script/functions/actions/#_dragdrop) API to support drag-drop better. - Fixed: Issue in ping from IE8 browser. - Fixed: Issue in JS code coverage for ECMAScript 6 code(Partial fix). - Fixed: Base window gets identified as a popup in Firefox version 86 when navigated to a different domain. - Fixed: Issue occurs in identifying a popup after the latest browser update. - Fixed: Issue occurs in [\_closeWindow](https://resources.sahipro.com/docs/sahi-script/functions/actions/#_closewindow) API after the latest browser update. ## Modifications - [\_dragDrop](https://resources.sahipro.com/docs/sahi-script/functions/actions/#_dragdrop): In versions before Sahi v9.1.0, \_dragDrop API would drag from the top left of draggable and drop at the top left of droppable. However in few applications, this top-left position did not facilitate drag-drop operation. So in v9.1.0, \_dragDrop API was improved and it dragged from the center of draggable and dropped at the center of droppable. But using center position caused a few existing \_dragDrop API statements to fail. To support such \_dragDrop API statements written in versions before v9.1.0, the following changes have been introduced for \_dragDrop API in v9.1.2 : - By default, \_dragDrop API would use the center position. If any \_dragDrop API statement has [\_xy](https://resources.sahipro.com/docs/sahi-script/functions/actions/#_xy) API for the drag/drop element, then the top-left position will be used for that drag-drop statement. - A new property `sahi.browser.dragdrop.top_left` is introduced in `userdata.properties` with default value as false. If this property is set as true, then the top-left position will be used for ALL drag-drop operations. ## What is new in Sahi Pro Desktop Add-on v9.1.2 ### Bug Fixes - Windows Application: Fixed a bug in identifying elements for systems having display language as Turkish. ## What is new in Sahi Pro Mobile Add-on v9.1.2 - No changes. ## What is new in Sahi Pro SAP Add-on v9.1.2 - No changes. --- # What is new in Sahi Pro v9.1.1 Sahi Pro v9.1.1 is a minor release with bug fixes and modifications. :::note[Renamed] The Desktop, Mobile and SAP Add-ons are now the [Desktop Engine](https://resources.sahipro.com/docs/introduction/sahi-pro-desktop-engine/), [Mobile Engine](https://resources.sahipro.com/docs/introduction/sahi-pro-mobile-engine/) and [SAP Engine](https://resources.sahipro.com/docs/introduction/sahi-pro-sap-engine/). ::: ## Instructions to Install/ Upgrade using Installer :::caution[Important] - If you're installing Sahi Pro for the first time or want to install Sahi Pro v9.1.1 from installer in a new location, then please refer [Sahi Pro - Getting Started](https://resources.sahipro.com/docs/using-sahi/quick-tutorial/) page. - If you wish to upgrade from an older version of Sahi using installer, refer to [Upgrade Sahi Pro](https://resources.sahipro.com/docs/using-sahi/upgrade/) for details. ::: ## Instructions for updating through Web UI :::caution[Important] - If you are using Sahi Pro v9.0.1 or above version, you can easily update to Sahi Pro v9.1.1 through [Update Sahi Pro](https://resources.sahipro.com/docs/using-sahi/check-for-updates/) web UI. - For updating from Sahi Pro v9.0.0, please follow the instructions below. 1. On Linux OS, after upgrading through [Update Sahi Pro](https://resources.sahipro.com/docs/using-sahi/check-for-updates/) web UI please grant permission for the 'SahiBaseDir/userdata/bin/verify\_ssl\_root\_cert\_linux.sh' file.\ Eg: chmod 755 verify\_ssl\_root\_cert\_linux.sh 2. On Windows OS, when using any DB apart from H2, the Update feature stops working.\ You need to update at least once from Sahi Pro 9.0.0 version in this manner to ensure all future updates work fine. **Resolution:**\ You will need to temporarily switch your database to H2 > Perform the Update and then Switch back to your current database settings.\ For more information about using different databases for reports please see the document for **Use a Different Database** in **Using Sahi**. **Steps:** 1. Take a backup of your existing database. (It may be "mysql", "mssql", "postgresql", "oracle" etc.) When upgrading Sahi Pro and reverting your database back to your current one, your db will also get updated. So, in order to avoid losing any data, taking a backup is a must before proceeding to the below steps. 2. Switch your database settings to H2 database. 3. Perform update through [Update Sahi Pro](https://resources.sahipro.com/docs/using-sahi/check-for-updates/) web UI. 4. Now Switch back to your original DB settings. ::: ## Bug Fixes and Improvements - Fixed: Bug in identifying cross-origin requests when sent to the same domain but different port. - Fixed: Cookie request header with empty value causes HTTP 400 error while loading a web page. - Fixed: Password is visible when [\_setPassword](https://resources.sahipro.com/docs/sahi-script/functions/actions/#_setpassword) fails with a 90 seconds error. - Fixed: Base window gets identified as a popup window if the window name is being set from the Html page. - Fixed: Bug in [\_closeBrowser](https://resources.sahipro.com/docs/sahi-script/functions/actions/#_closebrowser) while closing a browser window having non-Html content - Fixed: Script report logs appear jumbled when long nested arguments are passed to a function. - Fixed: Unable to scroll dropdown values for `Test Case`, `Android Device`, `iOS Device` in Playback Properties window. - Fixed: Bug in [\_selectRange](https://resources.sahipro.com/docs/sahi-script/functions/actions/#_selectrange) and [\_selectTextRange](https://resources.sahipro.com/docs/sahi-script/functions/actions/#_selecttextrange) APIs when trying to place the cursor at the end. - Fixed: A minor bug in deleting reports. - A warning message is shown in logs if an XHR took too long to complete. Due to a bug, Sahi was warning even for a completed XHR. This is now fixed. - While recording, a assert statement is automatically appended when an alert/prompt/confirm box appears. If a click action launches the box, the assert statement is appended after this click action. However a bug caused this assert statement to be appended before the click action. It is now fixed. ## Modifications - [\_sendHTMLResponseAfterFileDownload](https://resources.sahipro.com/docs/sahi-script/functions/actions/#_sendhtmlresponseafterfiledownload): Argument `$headers` is added. - Entry for `googleapis.com` is removed from `passthrough_ws_ssh_domains.txt` to provide a minor performance improvement with the Google Chrome browser. - Default location for Google Chrome in `browser_types.xml` is changed from `$ProgramFiles (x86)` to `$ProgramFiles`. ## What is new in Sahi Pro Desktop Add-on v9.1.1 - No changes. ## What is new in Sahi Pro Mobile Add-on v9.1.1 - No changes. ## What is new in Sahi Pro SAP Add-on v9.1.1 - No changes. --- # What is new in Sahi Pro v9.1.0 Sahi Pro v9.1.0 is a minor cumulative release that includes v9.0.1, v9.0.2 and bug fixes with modifications. :::note[Renamed] The Desktop, Mobile and SAP Add-ons are now the [Desktop Engine](https://resources.sahipro.com/docs/introduction/sahi-pro-desktop-engine/), [Mobile Engine](https://resources.sahipro.com/docs/introduction/sahi-pro-mobile-engine/) and [SAP Engine](https://resources.sahipro.com/docs/introduction/sahi-pro-sap-engine/). ::: ## Instructions to Install/ Upgrade using Installer :::caution[Important] - If you're installing Sahi Pro for the first time or want to install Sahi Pro v9.1.0 from installer in a new location, then please refer [Sahi Pro - Getting Started](https://resources.sahipro.com/docs/using-sahi/quick-tutorial/) page. - If you wish to upgrade from an older version of Sahi using installer, refer to [Upgrade Sahi Pro](https://resources.sahipro.com/docs/using-sahi/upgrade/) for details. ::: ## Instructions for updating through Web UI :::caution[Important] - If you are currently using Sahi Pro v9.0.1 or Sahi Pro v9.0.2, you can easily update through [Update Sahi Pro](https://resources.sahipro.com/docs/using-sahi/check-for-updates/) web UI. - For updating from Sahi Pro v9.0.0, please follow the instructions below. 1. On Linux OS, after upgrading through [Update Sahi Pro](https://resources.sahipro.com/docs/using-sahi/check-for-updates/) web UI please grant permission for the 'SahiBaseDir/userdata/bin/verify\_ssl\_root\_cert\_linux.sh' file.\ Eg: chmod 755 verify\_ssl\_root\_cert\_linux.sh 2. On Windows OS, When using any DB apart from H2, Update feature stops working.\ You need to update at least once from Sahi Pro 9.0.0 version in this manner to ensure all future updates work fine. **Resolution:**\ You will need to temporarily switch your database to H2 > Perform the Update and then Switch back to your current database settings.\ For more information about using different databases for reports please see the document for **Use a Different Database** in **Using Sahi**. **Steps:** 1. Take a backup of your existing database. (It may be "mysql", "mssql", "postgresql", "oracle" etc.) When upgrading Sahi Pro and reverting your database back to your current one, your db will also get updated. So, in order to avoid losing any data, taking a backup is a must before proceeding to the below steps. 2. Switch your database settings to H2 database. 3. Perform update through [Update Sahi Pro](https://resources.sahipro.com/docs/using-sahi/check-for-updates/) web UI. 4. Now Switch back to your original DB settings. ::: ## Key Features 1. **Sahi Pro v9.1.0** - No changes. 2. **Sahi Pro v9.0.2** - Added support for passing index with window identifier in [Popup Windows](https://resources.sahipro.com/docs/sahi-script/functions/popup-windows/) APIs to identify the browser window if the base window and popup window have same identifier. - Support for new versions of Chrome (>83) and Firefox (>78) which have third party cookie restrictions and modified behaviour of popup windows. 3. **Sahi Pro v9.0.1** - Support for [data drive using database](https://resources.sahipro.com/docs/using-sahi/test-data-files/) in Business Driven Test Automation (BDTA). ## Bug Fixes and Improvements 1. **Sahi Pro v9.1.0** - Fixed: [\_takePageScreenShot](https://resources.sahipro.com/docs/sahi-script/functions/screenshots/#_takepagescreenshot) not capturing proper screenshot when the system scale and layout value is other than 100% in Display Settings. - Fixed: If the browser window selected using [\_selectWindow](https://resources.sahipro.com/docs/sahi-script/functions/popup-windows/#_selectwindow) or [\_popup](https://resources.sahipro.com/docs/sahi-script/functions/popup-windows/#_popup) does not exist, then it fails with '90 second' error instead of failing with 'Window/Domain not found' error. - Fixed: [\_assertSnapShot](https://resources.sahipro.com/docs/sahi-script/functions/screenshots/#_assertsnapshot) API is not giving expected results when the value for 'mode' property is 2. - Fixed: [\_setValue](https://resources.sahipro.com/docs/sahi-script/functions/actions/#_setvalue) resulting in an error when the domain is added to Compatibility View settings of IE. - Fixed: Specified client certificate is not employed when Apache Client is enabled. - Fixed: Unable to save a file after downloading if the file name contains tab character. - Fixed: If the system display language is not English, SSL root certificate verification fails. Consequently, Sahi prompts to install the root certificate even when the root certificate is already installed. - Fixed: Rest request with Post method but no content gives incorrect response code when Apache Client is enabled. - Fixed: If the `Argument` in `Scenario` is a computation that uses the output of a function, then this function is not invoked. - Fixed: Steps and function calls are not shown for some specific cases on the script report page. - Fixed: Page containing Recaptcha does not load. - In the case of multiple cross-domain nested iframes, the `window popup index` shown was incorrect. It is now fixed. - Improvements in [\_dragDrop](https://resources.sahipro.com/docs/sahi-script/functions/actions/#_dragdrop) API to support drag and drop better. - Introduced functionality to toggle `window popup index` feature for cases where an index is used with window identifier in [Popup Windows](https://resources.sahipro.com/docs/sahi-script/functions/popup-windows/) APIs. :::note To disable this, set `sahi.window_popup_index.enable=false` in `/userdata/config/userdata.properties`. Note that disabling this setting may cause scripts to fail randomly when the base window and popup window have the same identifier. ::: 2. **Sahi Pro v9.0.2** - Fixed third-party cookies being blocked when Secure and SameSite="None" attributes are not set in latest Chrome and Firefox. :::caution[Important] If you are using Chrome version 83 and above and getting 'step did not complete in 90 sec' issue, please delete the Chrome profiles folder at SahiBaseDir/userdata/browser/chrome/profiles and restart Sahi ::: :::caution[Important] If you are using Mac OS and Firefox, please delete the Firefox profiles folder at SahiBaseDir/userdata/browser/ff/profiles and restart Sahi ::: - Java 12 performance issues on controller and editor are fixed. - Fixed incorrect data is coming if blank cells are present and `getData` function is used to get data from excel(.xlsx) file. - Fixed 'Could not acquire browser instance' issue when multiple suites are trigger. 3. **Sahi Pro v9.0.1** - Fixed Bugs for incorrect logs where native APIs failed. - Fixed bugs for JUnit logs. - Fix for external data drive file is not found while executing scenarios on Linux OS. - Fix for BDTA data file does not sync from Mac to Linux system in Drun. - Fix for newly written '\[Keyword\]' in keyword column does not allow to edit any cell in scenario in editor. - Fix for blank parameter is passed as function argument in scenario then it fails scenario playback execution. - Performance improvements for HAR in script reports. - Modified \_dataDrive API to stop the execution for next set of data if the step fails because of browser/ window not responding. - Fixed Function details popup horizontal scroll issue in Chrome caused by Chrome update. - Sync add-ons with installed version of Sahi Pro. - Preserve shell script executable property in update feature. - Providing information about changes that will occur in the application when user wants to rollback to last install version. - Storing separate backup for patches. - Fix for update feature on Windows OS, When using any DB apart from H2. - Fix for third-party cookies being blocked in Chrome 83 version. :::caution[Important] If you are using Chrome version 83 and getting 'step did not complete in 90 sec' issue randomly, please delete the Chrome profiles folder at SahiBaseDir/userdata/browser/chrome/profiles ::: ## Modifications 1. **Sahi Pro v9.1.0** - [\_getWindows](https://resources.sahipro.com/docs/sahi-script/functions/popup-windows/#_getwindows): Argument `$includeIframes` is added. - [\_takePageScreenShot](https://resources.sahipro.com/docs/sahi-script/functions/screenshots/#_takepagescreenshot): In capturing screenshot of elements, this API now supports horizontal scroll also. The default value for property `trim` is changed to false. - [\_assertSnapShot](https://resources.sahipro.com/docs/sahi-script/functions/screenshots/#_assertsnapshot) : The default value for property `trim` is changed to false. 2. **Sahi Pro v9.0.2** - Sahi start pages and controller are moved to secure protocol (HTTPS) in order to effectively manage sessions with the latest browser restrictions. - Changed implementation for identifying popup windows because of an issue with Firefox v79 and above. - Popup window related modification: 1. :::caution[Important] Please update your scripts accordingly. ::: 2. Modal dialogs in IE will be identified as a popup window. :::caution[Important] Add `_selectWindow(<>)` in the script before interacting with the modal window. ::: 3. Cross-domain iframe in the popup window will be identified by domain & popup both. Before Sahi v9.0.2 it was identified by domain only. :::caution[Important] Add `_selectWindow(<>)` with `_selectDomain(<>)` in the script before interacting with the cross-domain iframe in the popup window. ::: :::caution[Important] If you are using Mobile browsers and if scripts are Aborting, please configure SSL using the steps in the [link](https://resources.sahipro.com/docs/using-sahi/playback-mobile-browser/). ::: 3. **Sahi Pro v9.0.1** - No changes. ## What is new in Sahi Pro Desktop Add-on 1. **Sahi Pro Desktop Add-on v9.1.0** - No changes. 2. **Sahi Pro Desktop Add-on v9.0.2** - No changes. 3. **Sahi Pro Desktop Add-on v9.0.1** - **Bug Fixes** - Java/Applets Application: Handled exception in java mode when column value is null. ## What is new in Sahi Pro Mobile Add-on 1. **Sahi Pro Mobile Add-on v9.1.0** - No changes. 2. **Sahi Pro Mobile Add-on v9.0.2** - No changes. 3. **Sahi Pro Mobile Add-on v9.0.1** - **Modifications** :::caution[Important] Note: From Sahi Pro v9.0.1, `_connectDevice` and `_selectDevice` executes implicitly if the start mode is Android or iOS. No need to write these APIs in the script.\ To execute these APIs explicitly from the script, pass `connectDeviceInternal=false` as an extra parameter in Playback settings. Refer [here](https://resources.sahipro.com/docs/using-sahi/run-tests-via-editor/) for more details. ::: ## What is new in Sahi Pro SAP Add-on 1. **Sahi Pro SAP Add-on v9.1.0** - No changes. 2. **Sahi Pro SAP Add-on v9.0.2** - No changes. 3. **Sahi Pro SAP Add-on v9.0.1** - No changes. --- # What is new in Sahi Pro v9.0.2 Sahi Pro v9.0.2 is a minor update release with bugfixes and modifications predominantly related to resolve latest browser restrictions. Some popup related scripts may not work. Please refer modifications section for more details. ## Update Instructions :::caution[Important] - For updating Sahi Pro from v9.0.1 to v9.0.2 use [Update Sahi Pro](https://resources.sahipro.com/docs/using-sahi/check-for-updates/) web UI. - For updating Sahi Pro from v9.0.0 to v9.0.2 please follow the below instructions. 1. On Linux OS, after upgrading through [Update Sahi Pro](https://resources.sahipro.com/docs/using-sahi/check-for-updates/) web UI please grant permission for the 'SahiBaseDir/userdata/bin/verify\_ssl\_root\_cert\_linux.sh' file.\ Eg: chmod 755 verify\_ssl\_root\_cert\_linux.sh 2. On Windows OS, When using any DB apart from H2, Update feature stop working.\ You need to update at least once from Sahi Pro 9.0.0 version in this manner to ensure all future updates work fine. **Resolution:**\ You will need to temporarily switch your database to H2 > Perform the Update and then Switch back to your current database settings.\ For more information about using different databases for reports please see the document for **Use a Different Database** in **Using Sahi**. **Steps:** 1. Take a backup of your existing database. (It may be "mysql", "mssql", "postgresql", "oracle" etc.) When upgrading Sahi Pro and reverting your database back to your current one, your db will also get updated. So, in order to avoid losing any data, taking a backup is a must before proceeding to below steps. 2. Switch your database settings to H2 database. 3. Perform update through [Update Sahi Pro](https://resources.sahipro.com/docs/using-sahi/check-for-updates/) web UI. 4. Now Switch back to your original DB settings. ::: ## Key Features - Added support for passing index with window identifier in [Popup Windows](https://resources.sahipro.com/docs/sahi-script/functions/popup-windows/) apis to differentiate browser window if base and popup window are same. - Support for new versions of Chrome (>83) and Firefox (>78) which have third party cookie restrictions and modified behaviour of popup windows. ## Bug Fixes and Improvements - Fixed third-party cookies being blocked when Secure and SameSite="None" attributes are not set in latest Chrome and Firefox. :::caution[Important] If you are using Chrome version 83 and above and getting 'step did not complete in 90 sec' issue, please delete the Chrome profiles folder at SahiBaseDir/userdata/browser/chrome/profiles and restart Sahi ::: :::caution[Important] If you are using Mac OS and Firefox, please delete the Firefox profiles folder at SahiBaseDir/userdata/browser/ff/profiles and restart Sahi ::: - Java 12 performance issue on controller and editor are fixed. - Fixed incorrect data is coming if blank cells are present and `getData` function is used to get data from excel(.xlsx) file. - Fixed 'Could not acquire browser instance' issue when multiple suites are trigger. ## Modifications - Sahi start pages and controller are moved to secure protocol (HTTPS) in-order to effectively manage sessions with the latest browser restrictions. - Changed implementation for identifying popup windows because of an issue with Firefox v79 and above. - Popup window related modification: 1. :::caution[Important] Please update your scripts accordingly. ::: 2. Modal dialogs in IE will be identified as a popup window. :::caution[Important] Add `_selectWindow(<>)` in the script before interacting with the modal window. ::: 3. Cross-domain iframe in the popup window will be identified by domain & popup both. Before Sahi v9.0.2 it was identified by domain only. :::caution[Important] Add `_selectWindow(<>)` with `_selectDomain(<>)` in the script before interacting with the cross-domain iframe in the popup window. ::: :::caution[Important] If you are using Mobile browsers and if scripts are Aborting, please configure SSL using the steps in the [link](https://resources.sahipro.com/docs/using-sahi/playback-mobile-browser/). ::: --- # What is new in Sahi Pro v9.0.1 Sahi Pro v9.0.1 is a minor update release with bugfixes and modifications. Sahi Pro v9.0.1 can be updated from Sahi Pro v9.0.0 through the Update Sahi Pro web UI. :::note[Renamed] The Desktop and Mobile Add-ons are now the [Desktop Engine](https://resources.sahipro.com/docs/introduction/sahi-pro-desktop-engine/) and [Mobile Engine](https://resources.sahipro.com/docs/introduction/sahi-pro-mobile-engine/). ::: :::caution[Important] **Issue in updating from v9.0.0:**\ On Windows OS, When using any DB apart from H2, Update feature stop working.\ You need to update at least once from Sahi Pro 9.0.0 version in this manner to ensure all future updates work fine. **Resolution:**\ You will need to temporarily switch your database to H2 > Perform the Update and then Switch back to your current database settings.\ For more information about using different databases for reports please see the document for **Use a Different Database** in **Using Sahi**. **Steps:** 1. Take a backup of your existing database. (It may be "mysql", "mssql", "postgresql", "oracle" etc.) When upgrading Sahi Pro and reverting your database back to your current one, your db will also get updated. So, in order to avoid losing any data, taking a backup is a must before proceeding to below steps. 2. Switch your database settings to H2 database. 3. Perform Update. 4. Now Switch back to your original DB settings. ::: ## Key Features - Support for [data drive using database](https://resources.sahipro.com/docs/using-sahi/test-data-files/) in Business Driven Test Automation (BDTA). ## Bug Fixes and Improvements - Fixed Bugs for incorrect logs where native apis failed. - Fixed bugs for JUnit logs. - Fix for external data drive file is not found while executing scenarios on Linux OS. - Fix for BDTA data file does not sync from mac to linux system in Drun. - Fix for newly written '\[Keyword\]' in keyword column does not allow to edit any cell in scenario in editor. - Fix for blank parameter is passed as function argument in scenario then it fails scenario playback execution. - Performance improvements for HAR in script reports. - Modified \_dataDrive api to stop the execution for next set of data if the step fails because of browser/ window not responding. - Fixed Function details popup horizontal scroll issue in Chrome caused by Chrome update. - Sync add-ons with installed version of Sahi Pro. - Preserve shell script executable property in update feature. - Providing information about changes that will occur in the application when user wants to rollback to last install version. - Storing separate backup for patches. - Fix for update feature on Windows OS, When using any DB apart from H2. - Fix for third-party cookies being blocked in Chrome 83 version. :::caution[Important] If you are using Chrome version 83 and getting 'step did not complete in 90 sec' issue randomly, please delete the Chrome profiles folder at SahiBaseDir/userdata/browser/chrome/profiles ::: ## What is new in Sahi Pro Desktop Add-on v9.0.1 ### Bug Fixes - Java/Applets Application: Handled exception in java mode when column value is null. ## What is new in Sahi Pro Mobile Add-on v9.0.1 ### Modifications :::caution[Important] Note: From Sahi Pro v9.0.1, `_connectDevice` and `_selectDevice` executes implicitly if the start mode is Android or iOS. No need to write these APIs in the script.\ To execute these APIs explicitly from the script, pass `connectDeviceInternal=false` as extra parameter in Playback settings. Refer [here](https://resources.sahipro.com/docs/using-sahi/run-tests-via-editor/) for more details. ::: --- # What is new in Sahi Pro v9.0.0 Sahi Pro v9.0.0 is a major release with significant feature additions and modifications. The following summarizes features and enhancements in Sahi Pro v9.0.0. :::note[Renamed] The Desktop, Mobile and SAP Add-ons are now the [Desktop Engine](https://resources.sahipro.com/docs/introduction/sahi-pro-desktop-engine/), [Mobile Engine](https://resources.sahipro.com/docs/introduction/sahi-pro-mobile-engine/) and [SAP Engine](https://resources.sahipro.com/docs/introduction/sahi-pro-sap-engine/). ::: :::danger[Caution] **Read this section, before upgrading to Sahi Pro v9.0.0** - Java 1.8 or above is needed for running Sahi Pro v9.0.0 - Curl connection implementation has been removed in Sahi Pro v9.0.0. 1. In Sahi Pro v8.0.0, curl connection implementation was used for 401 authentication handling. It was noted that our curl connection implementation was causing issues for users. So it has been removed. 2. There have been major improvements for 401 authentication handling in Sahi Pro v9.0.0. Thus users will not be impacted by this removal. ::: ## Key Features ### Business Driven Test Automation In Sahi Pro 9.0.0 we have revisited the way we approach the test automation problem. Till the previous version, Our recorder, function extractor and scenario framework made it easy to create test automation scripts without writing much code. How ever it still needed the tester's familiarity with code to make it all work. You coded less, but you still needed the knowledge. In 9.0.0, we wanted to make it really easy for any tester to pick and use Sahi Pro - even testers without much coding knowledge or experience. So we moved around our existing pieces, and came up with [Business Driven Test Automation (BDTA)](https://resources.sahipro.com/docs/using-sahi/business-driven-test-automation/). BDTA flips the test automation by allowing the tester to create the business scenarios first, even before the application is ready or has a UI. When the application UI gets ready, the recorder can be exercised to implement keywords by capturing the underlying steps and elements. ### Data Driven Testing Running test cases with different sets of data can now be easily done via the [Data Drive](https://resources.sahipro.com/docs/using-sahi/getting-started/test-data-files/) wizard. This implementation is easier to use than our older implementation. It also ensures tests are still readable even after moving data outside. ### Autoheal for web automation We have made test execution more resilient with the [Autoheal](https://resources.sahipro.com/docs/using-sahi/autoheal/) feature. If an element has changed, Sahi will try to guess the new element. If the new element is found, Sahi will mark the change in the logs and continue execution. This can reduce failures and reduce effort spent in stopping, analyzing and rerunning scripts. (Autoheal is currently available only for web automation.) ### Enhanced Suite analysis When suites fail, a good amount of time was spent analyzing the test results to find the core problem. We have enhanced [Suite analysis](https://resources.sahipro.com/docs/using-sahi/suite-analysis/) to analyze the reports and pinpoint the source of failures. When you know that the 23 failing scripts are all failing due to just 3 specific steps, it becomes very easy and fast to fix and rerun. ### Create Virtual Machines with AWS Cloud Formation If you have large suites of tests and multi machine playback is needed, it may be necessary to create Windows instances on the cloud with various browsers installed on them. We have made this task simple by providing a AWS Cloud Formation Template through which Master and Worker Nodes can be configured and created easily with popular browsers and Sahi Pro runner installed on them. This eases the devops tasks needed to get a working cloud execution environment up and running. This feature is elaborated over [here](https://resources.sahipro.com/docs/using-sahi/aws-cloud-formation/). ### Mobile Automation integration with AWS Device Farm While the above cloud environment helps with the browser and desktop automation tasks, testing on mobile also needed attention. Apart from local machines with tethered mobile devices, Sahi Pro now [integrates with AWS Device Farm](https://resources.sahipro.com/docs/using-sahi/mobile-integration-device-farm/) on the cloud. This makes testing multiple mobile OSes and Devices much more manageable. ### Automatic thread allocation during playback We have added [automatic thread allocation](https://resources.sahipro.com/docs/using-sahi/auto-thread/) during playback. Sahi Pro chooses how many threads of browsers etc. to run on a Node based on the CPU load on that machine. This prevents overloading a specific machine. Overloaded machines can lead to unresponsive scripts which eventually abort. ### Prevent unauthorized remote access We have also made Sahi Pro more secure by preventing unauthorized access from other computers. Restrictions can be made via login/password and also IP based filtering. Refer [here](https://resources.sahipro.com/docs/using-sahi/restrict-remote-access/) for details. ### Updating Sahi Pro is now easier While working with remote Nodes, updating Sahi Pro versions, modifying configuration and adding support jars/patches needed one to go to individual nodes and update them. - From 9.0.0 most configurations are [automatically synced](https://resources.sahipro.com/docs/using-sahi/run-tests-via-editor/#distributed-suite-runs). - Custom jar files may be used in your project to read PDF files or connect to SSH. Addition/deletion of custom jar files need a restart of Sahi Pro, so they need to be explicitly synced. Through the [Update Sahi Pro](https://resources.sahipro.com/docs/using-sahi/check-for-updates/) web UI, custom jars can be added to the Sahi Pro classpath and synced to all required nodes. Sahi Pro will automatically restart if needed. - It is now possible to update Sahi Pro to the latest minor or major version via the web UI. Patches from Sahi Pro's Support team can also be applied via this UI making it easy to apply changes on multiple machines. This should further reduce the effort of the IT/DevOps teams. ### Additional notes - Version 9.0.0 release also offers an enhanced Desktop automation Add-on, Mobile Automation Add-on and an all new Add-on for SAP GUI automation. - This version of Sahi Pro should be easier to use, consume lesser time, automate better and support more technologies. ## New APIs - [\_isEdgeNew](https://resources.sahipro.com/docs/sahi-script/functions/fetch/#_isedgenew): It identifies new Microsoft Edge browser version 79.0.309 and above. - [\_setFile3](https://resources.sahipro.com/docs/sahi-script/functions/actions/#_setfile3): File upload is now simplified with this API as user is not required to provide any substitution rule. - [\_getHarLogs](https://resources.sahipro.com/docs/sahi-script/functions/logging/#_getharlogs): It gets the HAR logs accumulated while executing the steps between `_startHarLogging` and `_stopHarLogging`. - [\_includeAR](https://resources.sahipro.com/docs/sahi-script/functions/include/#_includear): This API includes Accessor Repository as CSV file. - [\_crawlWebsite](https://resources.sahipro.com/docs/sahi-script/functions/web-crawler/#_crawlwebsite): This API is used for testing links on a website. Sahi will navigate to all the links and store the information in a csv file. ## Bug Fixes and Improvements - Supports OpenJDK 8 and above versions. - Improved performance of logs. - Automatic ssl error fixes on Linux and Mac. - Major improvements in 401 authentication handling. - Introduced automatic login using transparent authentication. - Supported kerberos authentication, persistent NTLM authentication. - Bug fixes for NTLM authentication with multiple user credentials. - Refer [here](https://resources.sahipro.com/docs/sahi-script/401-authentication/) for more details. - Added batch & shell scripts to restart Sahi. - Bug fixes for JS code coverage. - Bug fixes and performance improvement in Sahi editor. - Wireless mobile browser playback can now be triggered from Sahi Controller, Sahi Editor, via Ant, via Maven, via testrunner etc. 1. Refer [here](https://sahipro.com/alldocs/v9.0.0/using-sahi/playback-mobile.html#Run%20From%20Sahi%20Pro%20Mobile%20Web%20Runner%20-%20Android) for Android browser playback. 2. Refer [here](https://sahipro.com/alldocs/v9.0.0/using-sahi/playback-mobile.html#Run%20From%20Browser%20-%20iOS) for iOS browser playback. - Email sending available for every sub suite finish. Refer [here](https://resources.sahipro.com/docs/using-sahi/run-tests-via-editor/#advanced-run-settings) for details. - Introduced node level tags which can be specified in `prerequisites` column of data driven suite. Refer [here](https://resources.sahipro.com/docs/using-sahi/data-driven-suites/#structure-explained) for details. - Load testing with different master. Refer [here](https://resources.sahipro.com/docs/using-sahi/load-testing/#load-testing-using-a-different-master) for details. - Load tests can now be run through ANT. Refer [here](https://resources.sahipro.com/docs/using-sahi/load-testing/#running-load-tests-through-ant) for details. - Email sending available for dload and dload different master. - We can now specify the maximum duration for script/suite execution in `timeout_minutes` column of data driven suite. Refer [here](https://resources.sahipro.com/docs/using-sahi/data-driven-suites/#structure-explained) for details. - We can now specify the maximum duration for script/suite execution in `timeout_minutes` column of data driven suite. Refer [here](https://resources.sahipro.com/docs/using-sahi/data-driven-suites/#structure-explained) for details. - Introduced `Avoid Skipping` feature in [Advanced Playback Settings](https://resources.sahipro.com/docs/using-sahi/run-tests-via-editor/#advanced-run-settings). It prevents skipping of dependent script even if the parent script has `FAILED` or `ABORTED`. - Introduced `Convert To English` feature in reports. It translates the executed script steps into corresponding English phrases. ## Known Issues These are known issues which will be fixed soon as part of a minor update. - Autoheal works only on Browser mode currently - Changes to mswindows.json and sap.json are not reflected via automatic synchronization with Suite playback. They need to be set on the Node and restarted - iOS automation sometimes fails randomly when using XCode 11 and iOS 13 :::note To fix this: - Use XCode version below 11 Or - set `ios.delete_derived_data_before_connect=true` in `/userdata/config/userdata.properties`. Note that, with this setting, scripts on iOS can be executed sequentially only. ::: - In Scenario file, Data Drive using the new Data column is currently only supported for files (csv, xls and xlsx). Database support will be added in upcoming updates or releases. :::caution[Important] **Refer [What's new in Sahi Pro Desktop Add-on v9.0.0](https://resources.sahipro.com/docs/release-notes/v9-0-0/desktop-engine/) for features in Sahi Pro Desktop Add-on v9.0.0.** ::: :::caution[Important] **Refer [What's new in Sahi Pro Mobile Add-on v9.0.0](https://resources.sahipro.com/docs/release-notes/v9-0-0/mobile-engine/) for features and enhancements done in Sahi Pro Mobile Add-on v9.0.0.** ::: :::caution[Important] **Refer [What's new in Sahi Pro SAP Add-on v9.0.0](https://resources.sahipro.com/docs/release-notes/v9-0-0/sap-engine/) for features in Sahi Pro SAP Add-on v9.0.0.** ::: --- # What is new in Sahi Pro Desktop Add-on v9.0.0 Sahi Pro Desktop Add-on v9.0.0 is a major release with significant feature additions and modifications. The following summarizes features and enhancements in Sahi Pro Desktop Add-on v9.0.0. :::note[Renamed] The Desktop, Mobile and SAP Add-ons are now the [Desktop Engine](https://resources.sahipro.com/docs/introduction/sahi-pro-desktop-engine/), [Mobile Engine](https://resources.sahipro.com/docs/introduction/sahi-pro-mobile-engine/) and [SAP Engine](https://resources.sahipro.com/docs/introduction/sahi-pro-sap-engine/). ::: :::note Note: Sahi Pro Desktop Add-on requires a different license than that of Sahi Pro. ::: Refer to [Sahi Pro Desktop Add-on](https://resources.sahipro.com/docs/introduction/sahi-pro-desktop-engine/) page for details. ## Key Features :::caution[Important] Read this section, before upgrading to Sahi Pro Desktop Add-on v9.0.0 ::: ### Playback - Playback of multiple scripts in parallel is now supported. ## New APIs ### Windows Application 1. - [\_lockWindow](https://resources.sahipro.com/docs/sahi-script/functions/script-execution-control/#_lockwindow): Locks the current application window to foreground. - [\_unlockWindow](https://resources.sahipro.com/docs/sahi-script/functions/script-execution-control/#_unlockwindow): Unlocks or releases the lock acquired by calling \_lockWindow. ### Java/Applets Application 1. - [\_lock](https://resources.sahipro.com/docs/sahi-script/functions/script-execution-control/#_lock): Scripts can be forced to synchronize with each other by acquiring locks. - [\_unlock](https://resources.sahipro.com/docs/sahi-script/functions/script-execution-control/#_unlock): Unlocks or releases the lock. - [\_lockWindow](https://resources.sahipro.com/docs/sahi-script/functions/script-execution-control/#_lockwindow): Locks the current application window to foreground - [\_unlockWindow](https://resources.sahipro.com/docs/sahi-script/functions/script-execution-control/#_unlockwindow): Unlocks or releases the lock acquired by calling \_lockWindow. - [\_windowExists](https://resources.sahipro.com/docs/sahi-script/functions/popup-windows/#_windowexists): Check if the specified window exists. ## Bug Fixes and Improvements ### Windows Application 1. - Fixed : Run as `Debug` with [Debug points.](https://resources.sahipro.com/docs/using-sahi/run-tests-via-editor/#debug-a-test) - Fixed : [\_pause](https://resources.sahipro.com/docs/sahi-script/functions/debug-helpers/#_pause) API. - Introduced [automatic scroll](https://resources.sahipro.com/docs/using-sahi/windows-desktop/#scripting-notes) for finding a element within a scrollable parent element. - Multiple relational APIs are now supported. - Automatically focus on element before performing keyboard event APIs like \_setValue, \_keyDown etc. - Introduced native extension for automating MFC based applications. - Performance improvement and minor bug fixes. ### Java/Applets Application 1. - Fixed : Run as `Debug` with [Debug points.](https://resources.sahipro.com/docs/using-sahi/run-tests-via-editor/#debug-a-test) - Fixed : [\_pause](https://resources.sahipro.com/docs/sahi-script/functions/debug-helpers/#_pause) API. :::caution[Important] **Refer [What's new in Sahi Pro v9.0.0](https://resources.sahipro.com/docs/release-notes/v9-0-0/) for features and enhancements done in Sahi Pro v9.0.0.** ::: :::caution[Important] **Refer [What's new in Sahi Pro Mobile Add-on v9.0.0](https://resources.sahipro.com/docs/release-notes/v9-0-0/mobile-engine/) for features and enhancements done in Sahi Pro Mobile Add-on v9.0.0.** ::: :::caution[Important] **Refer [What's new in Sahi Pro SAP Add-on v9.0.0](https://resources.sahipro.com/docs/release-notes/v9-0-0/sap-engine/) for features in Sahi Pro SAP Add-on v9.0.0.** ::: --- # What is new in Sahi Pro Mobile Add-on v9.0.0 Sahi Pro Mobile Add-on v9.0.0 is a major release with significant feature additions and modifications. The following summarizes features and enhancements in Sahi Pro Mobile Add-on v9.0.0 :::note[Renamed] The Mobile Add-on is now the [Mobile Engine](https://resources.sahipro.com/docs/introduction/sahi-pro-mobile-engine/). ::: :::note Note: Sahi Pro Mobile Add-on requires a different license than that of Sahi Pro. ::: Refer to [Sahi Pro Mobile Add-on](https://resources.sahipro.com/docs/introduction/sahi-pro-mobile-engine/) page for details. ## Key Features :::caution[Important] Read this section, before upgrading to Sahi Pro Mobile Add-on v9.0.0 ::: 1. #### Android Viewer - Security restrictions may prohibit Android Viewer from capturing the screen shot to be displayed. In such a case, now you can use the [Screenshot Outline View](https://resources.sahipro.com/docs/using-sahi/android-details/#screenshot-outline-view) feature in `Android viewer`. #### AWS Devicefarm Integration - Apart from local machines with tethered mobile devices, Sahi Pro now [integrates with AWS Device Farm](https://resources.sahipro.com/docs/using-sahi/mobile-integration-device-farm/) on the cloud. This makes testing multiple mobile OSes and Devices much more manageable. #### iOS Hybrid App - Now we can identify as well as record elements in [hybrid apps](https://resources.sahipro.com/docs/using-sahi/ios-details/#recording-hybrid-app) as HTML web elements. ## New APIs ### Android Application 1. **Action APIs** - [\_doubleClick](https://resources.sahipro.com/docs/sahi-script/functions/actions/#_doubleclick): Simulates double click on the given element. - [\_eval](https://resources.sahipro.com/docs/sahi-script/functions/actions/#_eval): Evals the code in android uiautomator. - [\_mSetOrientation](https://resources.sahipro.com/docs/sahi-script/functions/mobile-common/#_msetorientation): Rotates the device screen based on the orientation type. **Fetch APIs** - [\_mGetOrientation](https://resources.sahipro.com/docs/sahi-script/functions/mobile-common/#_mgetorientation): Returns device orientation. **Other APIs** - [\_mStartWebContext](https://resources.sahipro.com/docs/sahi-script/functions/mobile-common/#_mstartwebcontext): Changes the execution mode to Android Webview and starts the execution of the following steps as Web. - [\_mStopWebContext](https://resources.sahipro.com/docs/sahi-script/functions/mobile-common/#_mstopwebcontext): Stops the execution of following steps in Android WebView. - [\_launchNewMobileBrowser2](https://resources.sahipro.com/docs/sahi-script/functions/mobile-common/#_launchnewmobilebrowser2): Launches a new browser instance on a device. This will consume a device so that no other script will run on that device until browser execution finished. ### iOS Application 1. **Action APIs** - [\_mSetOrientation](https://resources.sahipro.com/docs/sahi-script/functions/mobile-common/#_msetorientation): Rotates the device screen based on the orientation type. **Fetch APIs** - [\_mGetOrientation](https://resources.sahipro.com/docs/sahi-script/functions/mobile-common/#_mgetorientation): Returns device orientation. **Other APIs** - [\_mStartWebContext](https://resources.sahipro.com/docs/sahi-script/functions/mobile-common/#_mstartwebcontext): Changes the execution mode to Android Webview and starts the execution of the following steps as Web. - [\_mStopWebContext](https://resources.sahipro.com/docs/sahi-script/functions/mobile-common/#_mstopwebcontext): Stops the execution of following steps in Android WebView. - [\_launchNewMobileBrowser](https://resources.sahipro.com/docs/sahi-script/functions/mobile-common/#_launchnewmobilebrowser): Launches a new browser instance on a device. - [\_launchNewMobileBrowser2](https://resources.sahipro.com/docs/sahi-script/functions/mobile-common/#_launchnewmobilebrowser2): Launches a new browser instance on a device. This will consume a device so that no other script will run on that device until browser execution finished. ## Bug Fixes 1. - [\_dragDropXY](https://resources.sahipro.com/docs/sahi-script/functions/actions/#_dragdropxy) for Android. - [\_pause](https://resources.sahipro.com/docs/sahi-script/functions/debug-helpers/#_pause) for Android and iOS. It will open mobile viewer along with the controller. - [Debugging Sahi Scripts](https://resources.sahipro.com/docs/using-sahi/run-tests-via-editor/#debug-a-test) for Android and iOS. It will open mobile viewer along with the controller. - [\_count](https://resources.sahipro.com/docs/sahi-script/functions/fetch/#_count) for Android. - [\_collect](https://resources.sahipro.com/docs/sahi-script/functions/fetch/#_collect) for Android. --- # What is new in Sahi Pro SAP Add-on v9.0.0 Sahi Pro SAP Add-on v9.0.0 is its first major release. :::note[Renamed] The SAP Add-on is now the [SAP Engine](https://resources.sahipro.com/docs/introduction/sahi-pro-sap-engine/). ::: :::note Note: Sahi Pro SAP Add-on requires a different license than that of Sahi Pro. ::: Refer to [Sahi Pro SAP Add-on](https://resources.sahipro.com/docs/introduction/sahi-pro-sap-engine/) page for details. --- # What is new in Sahi Pro v8.0.0 Sahi Pro v8.0.0 is a major release with significant feature additions and modifications. The following summarizes features and enhancements in Sahi Pro v8.0.0. :::note[Renamed] The Desktop and Mobile Add-ons are now the [Desktop Engine](https://resources.sahipro.com/docs/introduction/sahi-pro-desktop-engine/) and [Mobile Engine](https://resources.sahipro.com/docs/introduction/sahi-pro-mobile-engine/). ::: :::danger[Caution] **Read this section, before upgrading to Sahi Pro v8.0.0** NOTE: license.data files will no longer work from v8.0.0.\ NOTE: Sahi Pro License Servers will also not work from v8.0.0. 1. We have brought in significant changes to our licensing mechanism to ease end user administration.\ From v8.0.0, license product keys will be used instead of license.data files.\ We are reaching out to our customers to provide product keys for the licenses they have bought. 2. Sahi Pro User licenses allow installation only on one machine 3. Sahi Pro Concurrent licenses should be used if you need to work on multiple machines 4. Two (2) Sahi Pro Runner licenses are provided free with each Concurrent license. Additional Runner licenses will need to be purchased. (Eg. If you have 5 concurrent licenses, you will get 1 product key and you will be able to run 5 concurrent instances of Sahi Pro and 10 instances of Sahi Pro Runner.) ::: ## Key Features ### License Product Keys - From v8.0.0, Sahi Pro will use Product Keys instead of license.data files. Administration of license keys are done from the [Sahi Pro License Hub](https://license.sahipro.com/) portal. For detailed overview please see [License and Product Keys](https://resources.sahipro.com/docs/introduction/sahi-license-hub/) ### Dependency, Retry and Modes in Suites - **Dependency**: A module of an application under test may depend on another module. For example, a loan processing step depends on the correct working of loan application form. There is no point of verifying loan processing, if the loan application step is broken. In such cases, in our data driven suite, we can now specify that the loan\_processing sub-suite/script depends on loan\_application sub-suite/script. When a script fails, the dependent scripts are marked as SKIPPED. - **Retry**: Till 7.5.0, Sahi Pro would create a failed\_script\_suite comprising all failed scripts of a suite. This could be rerun as a separate target later.\ With the Dependeny feature, a failure may cause all dependent scripts to unnecessarily be skipped. So we have introduced immediate retry, which retries a script as soon as it fails. The number of script retries for ABORTED and FAILURE statuses can be configured at suite level from Editor, ANT and batch/shell scripts. Such retries are also correctly reported in playback logs. - **Modes**: In distributed playback, some nodes may have specific browsers, some may be connected to iOS devices and some to Android. A script may have specific needs for execution. Eg. a script may want to interact with Chrome browser and an Android device. In such cases, we can specify "Modes" for a script in Data Driven Suites. Such a script will only execute when its "Modes" requirements are met. If any matching node is available, scripts will be queued for execution on such matching nodes. If no matching node is found, the script will be marked as NOT\_SUPPORTED. See [Data Driven Suites](https://resources.sahipro.com/docs/using-sahi/data-driven-suites/) for more details. ### Logs and Reports - `Suite Analysis` : Suite Analysis report allows users to analyze the causes of failures of the specific run and also of all historical runs of that suite. More on [Suite Analysis](https://resources.sahipro.com/docs/using-sahi/suite-analysis/). - `Consolidated Report` : On the Suites List page, one can select specific Suites and get a consolidated report of pass/fail etc. This is useful when sending reports to Management. Consolidated Report can also be downloaded as Excel. More on [Consolidated Report](https://resources.sahipro.com/docs/using-sahi/reports-list/#consolidate-reports). - Added SKIPPED, NOT\_SUPPORTED, ABORTED and USER\_ABORTED statuses to logs. See [Script/Suite statuses](https://resources.sahipro.com/docs/using-sahi/sahi-reports/#statuses) - Added graphs in offline suite report page. - Added checkbox to show/hide image in HTML logs. - Added checkboxes to filter suite report by status. ### Editor - **Passing Named Parameters**: In Scenario files, till v7.5.0, only parameter values were passed to keywords.\ Eg. ```js login | "testuser" | "mypassword" ``` We have now introduced the ability to pass named parameters: Eg. ```js login | username:"testuser" | password:"mypassword" ``` The advantages are: 1. The scenario is more readable, especially in cases where lots of similar parameters are passed. 2. Parameters can be passed in any order 3. Parameters can be omitted easily Read more on [Passing Named Paramaters in Scenario Files](https://resources.sahipro.com/docs/using-sahi/sahi-script-editor/#passing-named-paramaters) - Added `depends` and `modes` columns in dd.csv files. For more details please refer [Data Driven Suites](https://resources.sahipro.com/docs/using-sahi/data-driven-suites/) - Implemented better Search in Documentation. - Add Function Call Checkbox: While extracting functions, both the function definition and function call were created. Now, we can optionally choose whether we want the function call or not using "Add Function Call" checkbox. - **Dynamic Accessor Repository Entry**: Sometimes the identification of an element depends on text that changes dynamically. Eg. ```js _button("Edit", _near(_div("Ram"))) ``` In this, "Ram" may change dynamically. This can now be handled like this: ```js // my_AR.sah $_BUTTON_EDIT_NEAR = _button("Edit", _near(_div("DYNUSER"))); //DYNUSER is just any placeholder. You can use anything here. ``` ```js // myScript.sah var $user = "Sita"; var $btn = $_BUTTON_EDIT_NEAR; // $btn is now _button("Edit", _near(_div("DYNUSER"))); $btn = $btn.replace2("DYNUSER", $user); // use replace2 to replace any string with its replacement string // $btn is now _button("Edit", _near(_div("Sita"))); _click($btn); ``` - **CSV Files as Accessor Repository**: Till v7.5.0, Accessor Repository files were just .sah javascript files in `name=value;` format. Since v8.0.0, one can create Accessor Repository files as CSV files. CSV files allows multiple AR values (say for EnglishWeb, JapaneseWeb, EnglishMobile etc.) to be associated with the same AR keys. They can then be loaded using \_include("my\_AR.csv", "JapaneseWeb") to load corresponding AR values. Read [Accessor Repository in CSV Format](https://sahipro.com/alldocs/v8.0.0/using-sahi/sahi-script-editor.html#Accessor%20Repository%20in%20CSV%20Format). - For fetching the data from external source in Scenario files, added the capability to get the row based on row identifier. For more details please see [Using External Data](https://resources.sahipro.com/docs/using-sahi/test-data-files/)`case 6 and case 7.` - Added support for TypeScript for scripting. For more details please see [TypeScript Playback](https://resources.sahipro.com/docs/using-sahi/typescript-support/). ### REST Client - REST Client now supports files uploading from the request body fields. Supports both multipart form and binary upload. For more details please see [Uploading a file using REST Client](https://resources.sahipro.com/docs/using-sahi/rest-api/build-a-request/#upload-a-file). ### Controller - Added checkboxes for Sahi modes in Controller Info tab. - Added feature to auto create snippet script when the script name field for recording is empty. ### Database - Fixed for MySql connection issue with a new connector. Added SQL in create\_report for setting the SQL mode to 'NO\_BACKSLASH\_ESCAPES' - Fixed Sahi reports for Postgresql. - Added batch and shell script to delete suite reports of specified duration. ## New APIs - [\_addResponseSubstitutionRule](https://resources.sahipro.com/docs/sahi-script/functions/http-responses/#_addresponsesubstitutionrule): Substitutes the HTTP response for all further responses coming in this browser session. - [\_removeResponseSubstitutionRule](https://resources.sahipro.com/docs/sahi-script/functions/http-responses/#_removeresponsesubstitutionrule): Removes the response substitution rule for all further responses coming in this browser session. - [\_getLayout](https://resources.sahipro.com/docs/sahi-script/functions/layout-verification/#_getlayout): Returns string representing page layout. ## Modified APIs - [\_getDB](https://resources.sahipro.com/docs/sahi-script/functions/database/#_getdb): Argument `$isPasswordEncrypted` is added. - [\_takeScreenShots](https://resources.sahipro.com/docs/sahi-script/functions/screenshots/#_takescreenshots): Added `$noLogs` (it will not log the images in Sahi logs) parameter. - [\_readCSVFile](https://resources.sahipro.com/docs/sahi-script/functions/files/#_readcsvfile): `includeHeader` default value changed to `false` and modified 2nd argument type to object. - [\_getDB](https://resources.sahipro.com/docs/sahi-script/functions/database/#_getdb): Added Overloaded API which accept object as parameter. ## Bug Fixes - Fixed : [\_containsText](https://resources.sahipro.com/docs/sahi-script/functions/fetch/#_containstext): for indexOf not defined in IE enterprise. - Fixed : [\_testcase](https://resources.sahipro.com/docs/sahi-script/functions/logging/#_testcase): After one test case failure, further test cases were showed as the failure. - Fixed : [\_takePageScreenshot](https://resources.sahipro.com/docs/sahi-script/functions/screenshots/#_takepagescreenshot): taking the screenshot of an element inside the scrolled element, for pages with scroll. - Fixed : [\_closeBrowser](https://resources.sahipro.com/docs/sahi-script/functions/actions/#_closebrowser): Not releasing the browser capacity due to which launchNewBrowser was breaking after browser capacity. - Editor - Slowness. - Editor - Fixed passing array as a single parameter while importing functions at Scenario files. - Editor - REST Client: REST request was encoding the request body for all content types; now encodes request body only on Content type is application/x-www-form-url-encoded. Also removed redundant encoding of the REST request fields. - Editor - Fixed column size breaking in Chrome/Opera for sheets. - Logs - Code Coverage: If web page contains IFrame or web page reloads. - Logs - Email Report: Added `view logs` link and `test case report` table. For Outlook, reports table was visible properly. - Logs - Fixed graph in offline report and email report for Dload. - Fixed Authentication: Added curl support for bypassing Windows Negotiate/NTLMSSP authentication credentials prompts. Supports persistent connections for servers like IIS which require Persistent authentication connection. - Fixed Heap Space issue while reading large XLSX file. - Fixed HAR Logging for request returning HTTP/1.1 200 200 instead of HTTP/1.1 200 OK and for the request having decoded characters. - Fixed Firefox 90 seconds issues. - Fixed Screenshot with dual screen issue. - Fixed certificate generation for subject alternative names of SSL. - Fixed certificate creation with short Domains. - Fixed SSL - Added nss-util command to import Sahi certificate in NSS trusted certificates database. :::caution[Important] **Refer [What's new in Sahi Pro Desktop Add-on v8.0.0](https://resources.sahipro.com/docs/release-notes/v8-0-0/desktop-engine/) for features and enhancements done in Sahi Pro Desktop Add-on v8.0.0.** ::: :::caution[Important] **Refer [What's new in Sahi Pro Mobile Add-on v8.0.0](https://resources.sahipro.com/docs/release-notes/v8-0-0/mobile-engine/) for features and enhancements done in Sahi Pro Mobile Add-on v8.0.0.** ::: --- # What is new in Sahi Pro Desktop Add-on v8.0.0 Sahi Pro Desktop Add-on v8.0.0 is a major release with significant feature additions and modifications. The following summarizes features and enhancements in Sahi Pro Desktop Add-on v8.0.0. :::note[Renamed] The Desktop and Mobile Add-ons are now the [Desktop Engine](https://resources.sahipro.com/docs/introduction/sahi-pro-desktop-engine/) and [Mobile Engine](https://resources.sahipro.com/docs/introduction/sahi-pro-mobile-engine/). ::: ## Key Features :::caution[Important] Read this section, before upgrading to Sahi Pro v8.0.0 ::: ### Controller - Fixed: `JAVA Controller` for Desktop Add-on. - Java/Applets Application : [List Properties](https://resources.sahipro.com/docs/using-sahi/sahi-controller/#action-buttons): Lists all the properties of the element. - Java/Applets Application : [Coordinates](https://resources.sahipro.com/docs/using-sahi/sahi-controller/#retrieve-coordinates-of-a-point): Retrieve Coordinates of a point. ## New APIs ### Windows Application 1. **Action APIs** - [\_keyPress](https://resources.sahipro.com/docs/sahi-script/functions/actions/#_keypress): Simulates pressing a key on the given element. Do keyDown and keyUp together. - [\_keyUp](https://resources.sahipro.com/docs/sahi-script/functions/actions/#_keyup): Simulates releasing a key press on the given element. - [\_keyDown](https://resources.sahipro.com/docs/sahi-script/functions/actions/#_keydown): Simulates pressing down a key on the given element. **Assertion APIs** - [\_assertHorizontallyAligned](https://resources.sahipro.com/docs/sahi-script/functions/assertions/#_asserthorizontallyaligned): Asserts if two elements are horizontally aligned. - [\_assertVerticallyAligned](https://resources.sahipro.com/docs/sahi-script/functions/assertions/#_assertverticallyaligned): Asserts if two elements are vertically aligned. - [\_assertCentered](https://resources.sahipro.com/docs/sahi-script/functions/assertions/#_assertcentered): Asserts if the inner element is vertically or horizontally centered to the container element. - [\_assertVisiblyInside](https://resources.sahipro.com/docs/sahi-script/functions/assertions/#_assertvisiblyinside): Asserts if an element is visibly inside another element. - [\_assertVisiblyOutside](https://resources.sahipro.com/docs/sahi-script/functions/assertions/#_assertvisiblyoutside): Asserts if an element is visibly outside another element. - [\_assertVisiblyOn](https://resources.sahipro.com/docs/sahi-script/functions/assertions/#_assertvisiblyon): Asserts if an element is placed on another element. - [\_assertFitsWidth](https://resources.sahipro.com/docs/sahi-script/functions/assertions/#_assertfitswidth): Asserts if an element fits within the width of another element. - [\_assertFitsHeight](https://resources.sahipro.com/docs/sahi-script/functions/assertions/#_assertfitsheight): Asserts if an element fits within the height of another element. **Alignment APIs** - [\_areHorizontallyAligned](https://resources.sahipro.com/docs/sahi-script/functions/alignment/#_arehorizontallyaligned): Checks whether two elements are horizontally aligned or not. - [\_areVerticallyAligned](https://resources.sahipro.com/docs/sahi-script/functions/alignment/#_areverticallyaligned): Checks whether two elements are vertically aligned or not. - [\_isCentered](https://resources.sahipro.com/docs/sahi-script/functions/alignment/#_iscentered): Checks whether the inner element is vertically or horizontally centered to the container element. - [\_isVisiblyInside](https://resources.sahipro.com/docs/sahi-script/functions/alignment/#_isvisiblyinside): Checks whether an element is visibly inside another element. - [\_isVisiblyOutside](https://resources.sahipro.com/docs/sahi-script/functions/alignment/#_isvisiblyoutside): Checks whether an element is visibly outside another element. - [\_isVisiblyOn](https://resources.sahipro.com/docs/sahi-script/functions/alignment/#_isvisiblyon): Checks whether an element is placed on another element. - [\_fitsWidth](https://resources.sahipro.com/docs/sahi-script/functions/alignment/#_fitswidth): Checks whether an element fits within the width of another element. - [\_fitsHeight](https://resources.sahipro.com/docs/sahi-script/functions/alignment/#_fitsheight): Checks whether an element fits within the height of another element. **Accessor APIs** - [\_wEdit](https://resources.sahipro.com/docs/sahi-script/functions/windows-accessors/#_textbox--_edit--_wedit): Window specific accessor API. - [\_wCombobox](https://resources.sahipro.com/docs/sahi-script/functions/windows-accessors/#_select--_combobox--_wcombobox): Window specific accessor API. - [\_wHyperlink](https://resources.sahipro.com/docs/sahi-script/functions/windows-accessors/#_link--_hyperlink--_whyperlink): Window specific accessor API. - [\_wRadiobutton](https://resources.sahipro.com/docs/sahi-script/functions/windows-accessors/#_radio--_radiobutton--_wradiobutton): Window specific accessor API. - Accessor API's: [Identifier](https://resources.sahipro.com/docs/sahi-script/functions/windows-accessors/): Support for the associative array to access elements. **Relational APIs** - [\_parentNode](https://resources.sahipro.com/docs/sahi-script/functions/relations/#_parentnode): Returns parent element of the specified element. - [\_startLookInside](https://resources.sahipro.com/docs/sahi-script/functions/relations/#_startlookinside): Specifies that the element should be searched within another element. - [\_stopLookInside](https://resources.sahipro.com/docs/sahi-script/functions/relations/#_stoplookinside): Re-sets the \_startLookInside relation marker. **Screenshot APIs** - [\_takePageScreenShot](https://resources.sahipro.com/docs/sahi-script/functions/screenshots/#_takepagescreenshot): Take a full screenshot of an element or the window application. - [\_assertSnapShot](https://resources.sahipro.com/docs/sahi-script/functions/screenshots/#_assertsnapshot): Take a screenshot of specified element and compare with reference image. ### Java/Applets Application 1. **Action APIs** - [\_focusWindow](https://resources.sahipro.com/docs/sahi-script/functions/actions/#_focuswindow): Brings the window above all other windows. **Assertion APIs** - [\_assertHorizontallyAligned](https://resources.sahipro.com/docs/sahi-script/functions/assertions/#_asserthorizontallyaligned): Asserts if two elements are horizontally aligned. - [\_assertVerticallyAligned](https://resources.sahipro.com/docs/sahi-script/functions/assertions/#_assertverticallyaligned): Asserts if two elements are vertically aligned. - [\_assertCentered](https://resources.sahipro.com/docs/sahi-script/functions/assertions/#_assertcentered): Asserts if the inner element is vertically or horizontally centered to the container element. - [\_assertVisiblyInside](https://resources.sahipro.com/docs/sahi-script/functions/assertions/#_assertvisiblyinside): Asserts if an element is visibly inside another element. - [\_assertVisiblyOutside](https://resources.sahipro.com/docs/sahi-script/functions/assertions/#_assertvisiblyoutside): Asserts if an element is visibly outside another element. - [\_assertVisiblyOn](https://resources.sahipro.com/docs/sahi-script/functions/assertions/#_assertvisiblyon): Asserts if an element is placed on another element. - [\_assertFitsWidth](https://resources.sahipro.com/docs/sahi-script/functions/assertions/#_assertfitswidth): Asserts if an element fits within the width of another element. - [\_assertFitsHeight](https://resources.sahipro.com/docs/sahi-script/functions/assertions/#_assertfitsheight): Asserts if an element fits within the height of another element. **Alignment APIs** - [\_areHorizontallyAligned](https://resources.sahipro.com/docs/sahi-script/functions/alignment/#_arehorizontallyaligned): Checks whether two elements are horizontally aligned or not. - [\_areVerticallyAligned](https://resources.sahipro.com/docs/sahi-script/functions/alignment/#_areverticallyaligned): Checks whether two elements are vertically aligned or not. - [\_isCentered](https://resources.sahipro.com/docs/sahi-script/functions/alignment/#_iscentered): Checks whether the inner element is vertically or horizontally centered to the container element. - [\_isVisiblyInside](https://resources.sahipro.com/docs/sahi-script/functions/alignment/#_isvisiblyinside): Checks whether an element is visibly inside another element. - [\_isVisiblyOutside](https://resources.sahipro.com/docs/sahi-script/functions/alignment/#_isvisiblyoutside): Checks whether an element is visibly outside another element. - [\_isVisiblyOn](https://resources.sahipro.com/docs/sahi-script/functions/alignment/#_isvisiblyon): Checks whether an element is placed on another element. - [\_fitsWidth](https://resources.sahipro.com/docs/sahi-script/functions/alignment/#_fitswidth): Checks whether an element fits within the width of another element. - [\_fitsHeight](https://resources.sahipro.com/docs/sahi-script/functions/alignment/#_fitsheight): Checks whether an element fits within the height of another element. **Accessor APIs** - Accessor API's: [Identifier](https://resources.sahipro.com/docs/sahi-script/functions/java-accessors/): Support for the associative array to access elements. **Relational APIs** - [\_parentNode](https://resources.sahipro.com/docs/sahi-script/functions/relations/#_parentnode): Returns parent element of the specified element. **Fetch APIs** - [\_getIconPath](https://resources.sahipro.com/docs/sahi-script/functions/java/#_geticonpath): Returns path of the graphic image that the element displays. - [\_getAttribute](https://resources.sahipro.com/docs/sahi-script/functions/fetch/#_getattribute): Return the attribute value of the element. - [\_collectAttributes](https://resources.sahipro.com/docs/sahi-script/functions/fetch/#_collectattributes): Returns attribute value of all elements of the specified type matching the identifier. - [\_collectElementsInfo](https://resources.sahipro.com/docs/sahi-script/functions/fetch/#_collectelementsinfo): Returns Accessor Info object of all elements of the specified type - [\_contains](https://resources.sahipro.com/docs/sahi-script/functions/fetch/#_contains): Returns true if the specified child element is a child of the specified parent element, else false. - [\_containsText](https://resources.sahipro.com/docs/sahi-script/functions/fetch/#_containstext): Returns true if element contains the text, else false. - [\_getTableContents](https://resources.sahipro.com/docs/sahi-script/functions/fetch/#_gettablecontents): Returns the data from the table, in two dimensional array. - [\_getCellIndex](https://resources.sahipro.com/docs/sahi-script/functions/java/#_getcellindex): Returns an array with first value as row index and second value as column index of the table. **Screenshot APIs** - [\_takePageScreenShot](https://resources.sahipro.com/docs/sahi-script/functions/screenshots/#_takepagescreenshot): Take a full screenshot of a element or the window application. - [\_assertSnapShot](https://resources.sahipro.com/docs/sahi-script/functions/screenshots/#_assertsnapshot): Take a screenshot of specified element and compare with reference image. **Window APIs** - [\_getWindows](https://resources.sahipro.com/docs/sahi-script/functions/popup-windows/#_getwindows): Returns an array of window-property objects. ## Modified APIs ### Windows Application 1. - [\_collectAttributes](https://resources.sahipro.com/docs/sahi-script/functions/fetch/#_collectattributes): Allowed all possible attributes. - [\_click](https://resources.sahipro.com/docs/sahi-script/functions/actions/#_click): Added support for combination keys. - [\_rightClick](https://resources.sahipro.com/docs/sahi-script/functions/actions/#_rightclick): Added support for combination keys. - [\_doubleClick](https://resources.sahipro.com/docs/sahi-script/functions/actions/#_doubleclick): Added support for combination keys. - [\_mouseDown](https://resources.sahipro.com/docs/sahi-script/functions/actions/#_mousedown): Added support for combination keys. - [\_mouseUp](https://resources.sahipro.com/docs/sahi-script/functions/actions/#_mouseup): Added support for combination keys. - [\_mouseOver](https://resources.sahipro.com/docs/sahi-script/functions/actions/#_mouseover): Added support for combination keys. - [\_takeScreenShots](https://resources.sahipro.com/docs/sahi-script/functions/screenshots/#_takescreenshots): Added `$noLogs` (it will not log the images in Sahi logs) parameter. ### Java/Applets Application 1. - [\_takeScreenShots](https://resources.sahipro.com/docs/sahi-script/functions/screenshots/#_takescreenshots): Added `$noLogs` (it will not log the images in Sahi logs) parameter. ## Bug Fixes ### Windows Application 1. - Fixed [\_setValue](https://resources.sahipro.com/docs/sahi-script/functions/actions/#_setvalue): Set the case-sensitive value while Caps-lock ON. - Fixed [onAfterStep](https://resources.sahipro.com/docs/sahi-script/functions/script-execution-control/#onafterstep) callback function api. - Fixed [onBeforeStep](https://resources.sahipro.com/docs/sahi-script/functions/script-execution-control/#onbeforestep) callback function api. ### Java/Applets Application 1. - Fixed \_click: for JTree node. - Fixed \_clickNative: for JTree node. - Fixed \_windowAction: for Java Application. - Fixed \_setSelected: for Oracle Forms. - Fixed \_setAccessorIgnoreCase. :::caution[Important] **Refer [What's new in Sahi Pro v8.0.0](https://resources.sahipro.com/docs/release-notes/v8-0-0/) for features and enhancements done in Sahi Pro v8.0.0.** ::: :::caution[Important] **Refer [What's new in Sahi Pro Mobile Add-on v8.0.0](https://resources.sahipro.com/docs/release-notes/v8-0-0/mobile-engine/) for features and enhancements done in Sahi Pro Mobile Add-on v8.0.0.** ::: --- # What is new in Sahi Pro Mobile Add-on v8.0.0 Sahi Pro Mobile Add-on v8.0.0 is a major release with significant feature additions and modifications. The following summarizes features and enhancements in Sahi Pro Mobile Add-on v8.0.0 :::note[Renamed] The Desktop and Mobile Add-ons are now the [Desktop Engine](https://resources.sahipro.com/docs/introduction/sahi-pro-desktop-engine/) and [Mobile Engine](https://resources.sahipro.com/docs/introduction/sahi-pro-mobile-engine/). ::: :::note Note: Sahi Pro Mobile Add-on requires a different license file than that of Sahi Pro. ::: Refer to [Sahi Pro Mobile Add-on](https://resources.sahipro.com/docs/introduction/sahi-pro-mobile-engine/) page for details. ## Key Features :::caution[Important] Read this section, before upgrading to Sahi Pro Mobile Add-on v8.0.0 ::: 1. #### Controller - `Sahi Controller`: Fixed element identification with respect to the relational apis. - `Java Controller`: Fixed recording and element identification with respect to the relational apis. #### Android/iOS Viewer - `Optimize Viewer` checkbox has been removed from the iOS Viewer. By default, the viewer is optimized. - Added [Webview](https://resources.sahipro.com/docs/using-sahi/android-details/#recording-hybrid-app) support in Android. #### Configuration - Added [ios\_devices.xml](https://resources.sahipro.com/docs/using-sahi/ios-details/#configure-ios-devicessimulators) and [android\_devices.xml](https://resources.sahipro.com/docs/using-sahi/android-details/#configure-android-devicesemulators) at `/userdata/config`. Device list will be fetched from the respective xml file. - Added property `ios.keyboard.buttons.autoclick`, in which user can specify the name of the keyboard button which is used to hide the keyboard. Separate multiple names with semi-colon. #### Plyaback - Implemented distributed playback for Mobile Add-on. - Fixed Android/iOS Java Driver playback from scenario file. ## New APIs ### Android Application 1. **Action APIs** - [\_check](https://resources.sahipro.com/docs/sahi-script/functions/actions/#_check): Checks the given checkbox or radio button. - [\_uncheck](https://resources.sahipro.com/docs/sahi-script/functions/actions/#_uncheck): Unchecks the given checkbox. **Screenshot APIs** - [\_takePageScreenShot](https://resources.sahipro.com/docs/sahi-script/functions/screenshots/#_takepagescreenshot): Take a full screenshot of a application element or the device. - [\_assertSnapShot](https://resources.sahipro.com/docs/sahi-script/functions/screenshots/#_assertsnapshot): Takes the full screen shot of the screen or the element if specified, and compares with the reference image. **Android WebView APIs** - [\_aStartWebContext](https://resources.sahipro.com/docs/sahi-script/functions/android/#_astartwebcontext): Change the execution mode to ANDROID\_WEBVIEW and start the execution of the following steps as Web. - [\_aStopWebContext](https://resources.sahipro.com/docs/sahi-script/functions/android/#_astopwebcontext): Stop execution in Android WebView. **Other APIs** - [\_deviceInfo](https://resources.sahipro.com/docs/sahi-script/functions/mobile-common/#_deviceinfo): Returns device information as an associative array. ### iOS Application 1. **Action APIs** - [\_check](https://resources.sahipro.com/docs/sahi-script/functions/actions/#_check): Checks the given checkbox or radio button. - [\_uncheck](https://resources.sahipro.com/docs/sahi-script/functions/actions/#_uncheck): Unchecks the given checkbox. **Fetch APIs** - [\_isChecked](https://resources.sahipro.com/docs/sahi-script/functions/fetch/#_ischecked): Returns the current status of checkbox or radio button. **Screenshot APIs** - [\_takePageScreenShot](https://resources.sahipro.com/docs/sahi-script/functions/screenshots/#_takepagescreenshot): Take a full screenshot of a application element or the device. - [\_assertSnapShot](https://resources.sahipro.com/docs/sahi-script/functions/screenshots/#_assertsnapshot): Takes the full screen shot of the screen or the element if specified, and compares with the reference image. **Other APIs** - [\_deviceInfo](https://resources.sahipro.com/docs/sahi-script/functions/mobile-common/#_deviceinfo): Returns device information as an associative array. - [\_iSetAutoDismissKeyboard](https://resources.sahipro.com/docs/sahi-script/functions/ios/#_isetautodismisskeyboard): Dismiss the keyboard automatically after setting value. ## Modified APIs 1. #### Android Application - [\_takeScreenShots](https://resources.sahipro.com/docs/sahi-script/functions/screenshots/#_takescreenshots): Added `$noLogs` (it will not log the images in Sahi logs) parameter. - [\_launchNewMobileBrowser](https://resources.sahipro.com/docs/sahi-script/functions/mobile-common/#_launchnewmobilebrowser): DeviceId (required) as first parameter and URL as second parameter. #### iOS Application - [\_takeScreenShots](https://resources.sahipro.com/docs/sahi-script/functions/screenshots/#_takescreenshots): Added `$noLogs` (it will not log the images in Sahi logs) parameter. - [\_setValue](https://resources.sahipro.com/docs/sahi-script/functions/actions/#_setvalue): Implemented `$props` arguments, which is used to dismiss the keyboard as well as clear the text. ## Bug Fixes 1. - [\_setValue](https://resources.sahipro.com/docs/sahi-script/functions/actions/#_setvalue) for Android versions below Lollipop. :::caution[Important] **Refer [What's new in Sahi Pro v8.0.0](https://resources.sahipro.com/docs/release-notes/v8-0-0/) for features and enhancements done in Sahi Pro v8.0.0.** ::: :::caution[Important] **Refer [What's new in Sahi Pro Desktop Add-on v8.0.0](https://resources.sahipro.com/docs/release-notes/v8-0-0/desktop-engine/) for features and enhancements done in Sahi Pro Desktop Add-on v8.0.0.** ::: --- # What is new in Sahi Pro v7.5.0 Sahi Pro v7.5.0 is a major release with significant feature additions and modifications. The following summarizes features and enhancements in Sahi Pro v7.5.0. :::note[Renamed] The Desktop Add-on is now the [Desktop Engine](https://resources.sahipro.com/docs/introduction/sahi-pro-desktop-engine/). ::: ## Key Features :::caution[Important] Read this section, before upgrading to Sahi Pro v7.5.0 ::: 1. [Sahi Framework now supports Java](https://resources.sahipro.com/docs/using-sahi/sahi-script-editor/#scenarios-with-java): Sahi's Framework previously supported calling Sahi script (Javascript) functions. Now Scenario files can call Java methods. This should help teams which want to use Java instead of Javascript for automation. APIs [\_importJava](https://resources.sahipro.com/docs/sahi-script/functions/include/#_importjava) and [\_loadJavaInstance](https://resources.sahipro.com/docs/sahi-script/functions/include/#_loadjavainstance) have been added to enable calling Java libraries from Sahi scripts. 2. Sahi specific assertions in Java driver: Assertions in Junit etc. do not have the wait and retry mechanism which is available in Sahi's javascript assertions. Also junit assertion failures cause Java tests to abort. Now assertion APIs have been added to Java driver with implicit wait-retry mechanism. When these assertions are invoked from Sahi scripts or Scenario files, assertion failures do not stop execution. Also logs are automatically generated. When using with a junit like framework, calling `b.throwExceptionOnAssertionFailure(true)` will ensure Exception is thrown during failures. 3. [Create Accessor Repository from existing scripts](https://resources.sahipro.com/docs/sahi-script/script-view/#create-an-accessor-repository): If scripts have already been created, and you now want to start using Accessor Repository, it is now possible to extract accessors from existing scripts into Accessor Repository files easily from the Editor. 4. Password Encoding: Previously, passwords used to be recorded as is, making passwords easily visible to others. This can be a concern in specific cases where real credentials are needed for accessing your application. [\_setPassword](https://resources.sahipro.com/docs/sahi-script/functions/actions/#_setpassword), [\_encrypt](https://resources.sahipro.com/docs/sahi-script/functions/utilities/#_encrypt) APIs have been added and Editor now has a [Password Encoder](https://resources.sahipro.com/docs/using-sahi/sahi-script-editor/#password-encoder) utility. Please note that the encoding makes it slightly more complex to know your password, but is not very secure. 5. Desktop Automation without Browser Automation: If you want to automate only Desktop applications, and do not need Sahi Pro's browser automation capabilities, it is now possible to turn off browser capabilities and use only a Desktop Add-on license (without needing a Sahi Pro license). 6. Support for [OAuth2 in REST automation APIs](https://resources.sahipro.com/docs/using-sahi/rest-api/getting-started/) 7. If Sahi Pro license is expired, Sahi Pro will be disabled but user can continue with Sahi Pro Runner of the same version. 8. Auto-completion of words as user types in the Editor ## New APIs - [\_importJava](https://resources.sahipro.com/docs/sahi-script/functions/include/#_importjava): Creates a new instance of the Java class and sets it into a presumed variable name. - [\_loadJavaInstance](https://resources.sahipro.com/docs/sahi-script/functions/include/#_loadjavainstance): Returns an instance of the Java class. - [\_setPassword](https://resources.sahipro.com/docs/sahi-script/functions/actions/#_setpassword): Decrypts and sets the password into the element. - [\_encrypt](https://resources.sahipro.com/docs/sahi-script/functions/utilities/#_encrypt): Returns encrypted password string. - [\_getSessionId](https://resources.sahipro.com/docs/sahi-script/functions/utilities/#_getsessionid): Returns session id of current script. - [\_isEnabled](https://resources.sahipro.com/docs/sahi-script/functions/fetch/#_isenabled): Returns true if element is enabled, else false. - [\_expectPrint](https://resources.sahipro.com/docs/sahi-script/functions/javascript-dialogs/#_expectprint): Sets expectation for print statements. Script can be failed for unexpected print calls. - [\_expectAlert](https://resources.sahipro.com/docs/sahi-script/functions/javascript-dialogs/#_expectalert): Sets expectation for alert statements. Script can be failed for unexpected alert calls.. ## Modified APIs - [\_setFile](https://resources.sahipro.com/docs/sahi-script/functions/actions/#_setfile): Modified to escape special characters in action url. - [\_setFile2](https://resources.sahipro.com/docs/sahi-script/functions/actions/#_setfile2): Added support for Javascript validations and submission of file contents - [\_compareImages](https://resources.sahipro.com/docs/sahi-script/functions/screenshots/#_compareimages): Fixed for non BROWSER modes also. Fixed default threshold value. ## Bug Fixes - Java Controller: Fixed assertions. **Browser** - Fixed: [\_setLanguage](https://resources.sahipro.com/docs/sahi-script/functions/multi-language/#_setlanguage) API (Language translations were not working in scenario files) - Fixed: [\_takePageScreenshot](https://resources.sahipro.com/docs/sahi-script/functions/screenshots/#_takepagescreenshot) API for elements with Fixed Position. - Fixed: [\_position](https://resources.sahipro.com/docs/sahi-script/functions/fetch/#_position) API for elements with Fixed: Position. - Fixed: [\_dragDrop](https://resources.sahipro.com/docs/sahi-script/functions/actions/#_dragdrop) with datatransfer object. - Fixed: [\_fail](https://resources.sahipro.com/docs/sahi-script/functions/script-execution-control/#_fail) with email report was throwing exception. - Fixed: [\_renameFile](https://resources.sahipro.com/docs/sahi-script/functions/files/#_renamefile) when both old and new files are same and existing, Sahi was deleting the file. - Editor - Playback status messages were not appearing, if the status message box is closed. - Editor - Fixed: alt+O alt+N alt+2 shortcuts were deleting contents of focused cell value in scenario files. - Editor - Fixed: In dd.csv Alt+N was opening a new worksheet, but URL header was not present. - Editor - Fixed: On adding more then 10 column in spreadsheet without header tag, only upto 10th column is visible. - Editor - Fixed: Reading excel with referenced book. - Editor - Fixed: Create function is escaping dollar ($) if more than one dollar is present in actual parameter. - Editor - Fixed: In Scenario Editor, on adding "////" as comment instead of "//" before function call, Sahi was commenting entire test case and skipping to next test case. Thus, ignoring the next function calls made in the test case. - Editor Search and Replace- Fixed Search for handling special characters. - Controller - Fixed: On recording script with .js extension, .sah extension was appending with the script name. - Controller - Fixed: On opening SCRIPT EDITOR from record tab, if script's extension is .js, File Not Found error was coming on editor. - Controller - Fixed: On selecting Click action from the drop-down below Evaluate Expression text area, click statement was not appearing in result text area. - Controller - Fixed: Evaluate Expression was not working if the script was paused. - Controller - Fixed: Recording and identification for ShadowDom v1. Added "browser.shadowdom.chrome.optimize\_for\_version" property in /config/sahi.properties, which will be used to find elements based on its value in chrome browser. - Recording - Fixed: with [\_openWindow](https://resources.sahipro.com/docs/sahi-script/functions/actions/#_openwindow): Sahi was not recording resolution of browser window. - Configure - Fixed: ctrl+Z was changing the whole contents of current page with the contents of previous page. - Reports - Fixed: Added DEBUGINFORMATION to STEPREPORTS in Sync reports. - Mobile Playback - Fixed: Mobile Playback was not happening because of time difference between client and server. - Logs - Fixed: On comparing logs in reports, suiteId list was overlapping suite summary table. - Logs - Fixed: DEBUG INFO: If script is executed in one machine, and logs are accessed from different machine, Sahi was taking script path of the machine where execution happend. Hence, if clicked on step in log, File not found was coming. - Fixed: File download for files with filename more than 255 characters. - Fix for Safari(Mac) intermittent connection failure when performing SessionState\_ping. Introduced a delay before socket closure. This delay can be configured from sahi.properties. - Fixed CodeCoverage Instrumentor. IF-ELSE not instrumented correctly if we use if-else without braces. - Fixed: Close the browser launched from \_launchNewBrowser after suite end, in single session. - Fixed: For Java/Windows mode, if script failed because of 90 sec error, Sahi was not taking screenshot. :::caution[Important] **Refer [Whats new in Sahi Pro Desktop Add-on v7.5.0](https://resources.sahipro.com/docs/release-notes/v7-5-0/desktop-engine/) for features and enhancements done in Sahi Pro Desktop Add-on v7.5.0.** ::: --- # What is new in Sahi Pro Desktop Add-on v7.5.0 Sahi Pro Desktop Add-on v7.5.0 is a major release with significant feature additions and modifications. The following summarizes features and enhancements in Sahi Pro Desktop Add-on v7.5.0. :::note[Renamed] The Desktop Add-on is now the [Desktop Engine](https://resources.sahipro.com/docs/introduction/sahi-pro-desktop-engine/). ::: ## Key Modifications :::caution[Important] Read this section, before upgrading to Sahi Pro v7.5.0 ::: **Desktop Automation without Browser Automation** If you want to automate only Desktop applications, and do not need Sahi Pro's browser automation capabilities, it is now possible to turn off browser capabilities and use only a Desktop Add-on license (without needing a Sahi Pro license). One needs to [add licenses](https://resources.sahipro.com/docs/using-sahi/desktop-engine/#install-sahi-pro-desktop-engine) based on Sahi capabilities enabled. ## New APIs **Windows Application** - [\_importJava](https://resources.sahipro.com/docs/sahi-script/functions/include/#_importjava): Creates a new instance of the Java Class and sets it into a presumed variable name. - [\_loadJavaInstance](https://resources.sahipro.com/docs/sahi-script/functions/include/#_loadjavainstance): Returns a instance of the Java Class. - [\_drag](https://resources.sahipro.com/docs/sahi-script/functions/windows/#_drag): Simulates a drag action. - [\_drop](https://resources.sahipro.com/docs/sahi-script/functions/windows/#_drop): Simulates a drop action. - [\_dropDrop](https://resources.sahipro.com/docs/sahi-script/functions/actions/#_dragdrop): Simulates a drag and drop action. - [\_setAccessorIgnoreCase](https://resources.sahipro.com/docs/sahi-script/functions/accessor-basics/#_setaccessorignorecase): To ignore case differences in identifiers of Accessors. - [\_windowAction](https://resources.sahipro.com/docs/sahi-script/functions/actions/#_windowaction): Performs various window level actions. - [\_getAttribute](https://resources.sahipro.com/docs/sahi-script/functions/fetch/#_getattribute): Return the required attribute of the element. - [\_window](https://resources.sahipro.com/docs/sahi-script/functions/windows-accessors/#_window) accessor api. - [\_windowExists](https://resources.sahipro.com/docs/sahi-script/functions/popup-windows/#_windowexists): Returns true if the window exists. - [\_count](https://resources.sahipro.com/docs/sahi-script/functions/fetch/#_count): Counts number of element present. - [\_collect](https://resources.sahipro.com/docs/sahi-script/functions/fetch/#_collect): Returns elements of the specified type matching the identifier within relations. - [\_getOptions](https://resources.sahipro.com/docs/sahi-script/functions/fetch/#_getoptions): Returns values or texts of all options of the select element. - [\_getWindows](https://resources.sahipro.com/docs/sahi-script/functions/popup-windows/#_getwindows): Returns an array of window-property objects. - [\_collectAttributes](https://resources.sahipro.com/docs/sahi-script/functions/fetch/#_collectattributes): Returns element attributes of all elements of the specified type matching the identifier within relations. - [\_collectElementsInfo](https://resources.sahipro.com/docs/sahi-script/functions/fetch/#_collectelementsinfo): Returns Accessor Info object of all elements of the specified type within relations. - [\_leftOf](https://resources.sahipro.com/docs/sahi-script/functions/relations/#_leftof): Specifies that the other element should be searched to the left of this element. - [\_rightOf](https://resources.sahipro.com/docs/sahi-script/functions/relations/#_rightof): Specifies that the other element should be searched to the right of this element. - [\_leftOrRightOf](https://resources.sahipro.com/docs/sahi-script/functions/relations/#_leftorrightof): Specifies that the other element should be searched to the left or right of this element. - [\_above](https://resources.sahipro.com/docs/sahi-script/functions/relations/#_above): Specifies that the other element should be searched above this element. - [\_under](https://resources.sahipro.com/docs/sahi-script/functions/relations/#_under): Specifies that the other element should be searched under this element. - [\_aboveOrUnder](https://resources.sahipro.com/docs/sahi-script/functions/relations/#_aboveorunder): Specifies that the other element should be searched above or below this element. - [\_contains](https://resources.sahipro.com/docs/sahi-script/functions/fetch/#_contains): Returns true if the specified child element is a child of the specified parent element, else false. - [\_containsText](https://resources.sahipro.com/docs/sahi-script/functions/fetch/#_containstext): Returns true if element contains the text, else false. - [\_closeWindow](https://resources.sahipro.com/docs/sahi-script/functions/actions/#_closewindow): Closes the selected window. - [\_addToSuiteInfo](https://resources.sahipro.com/docs/sahi-script/functions/script-suite-info/#_addtosuiteinfo): Appends the customFieldName and customFieldValue in Suite Info. - [\_artifact](https://resources.sahipro.com/docs/sahi-script/functions/logging/#_artifact): To save a file as part of the logs. - [\_position](https://resources.sahipro.com/docs/sahi-script/functions/fetch/#_position): Returns the position of element. - [\_logImage](https://resources.sahipro.com/docs/sahi-script/functions/logging/#_logimage): Adds the image to logs. - [\_logOutput](https://resources.sahipro.com/docs/sahi-script/functions/logging/#_logoutput): Allows concatenating multiple output messages during a script execution, and display the concatenated string in the script and suite reports. - [\_focusWindow](https://resources.sahipro.com/docs/sahi-script/functions/actions/#_focuswindow): For WINDOWS mode. - [\_pause](https://resources.sahipro.com/docs/sahi-script/functions/debug-helpers/#_pause): Runs the script till that point and pauses execution. - [\_encrypt](https://resources.sahipro.com/docs/sahi-script/functions/utilities/#_encrypt): Returns encrypted password string. - [\_setPassword](https://resources.sahipro.com/docs/sahi-script/functions/actions/#_setpassword): Types the password into the element. - [\_areEqual](https://resources.sahipro.com/docs/sahi-script/functions/fetch/#_areequal): Compares two Javascript data type or arrays. - Controller: [List Properties](https://resources.sahipro.com/docs/using-sahi/sahi-controller/#action-buttons): Lists all the properties of the element. **Java/Applets Application** - [\_importJava](https://resources.sahipro.com/docs/sahi-script/functions/include/#_importjava): Creates a new instance of the Java Class and sets it into a presumed variable name. - [\_loadJavaInstance](https://resources.sahipro.com/docs/sahi-script/functions/include/#_loadjavainstance): Returns a instance of the Java Class. - JTree Automation api [\_expand](https://resources.sahipro.com/docs/sahi-script/functions/actions/#_expand): Expand tree element. - JTree Automation api [\_collapse](https://resources.sahipro.com/docs/sahi-script/functions/actions/#_collapse): Collapse tree element. - [\_encrypt](https://resources.sahipro.com/docs/sahi-script/functions/utilities/#_encrypt): Returns encrypted password string. - [\_setPassword](https://resources.sahipro.com/docs/sahi-script/functions/actions/#_setpassword): Types the password into the element. - [\_selectRange](https://resources.sahipro.com/docs/sahi-script/functions/actions/#_selectrange): Selects the text between the range specified. - [\_selectTextRange](https://resources.sahipro.com/docs/sahi-script/functions/actions/#_selecttextrange): Selects the text. - [\_getSelectionText](https://resources.sahipro.com/docs/sahi-script/functions/fetch/#_getselectiontext): Returns Text selected by the user. - [\_position](https://resources.sahipro.com/docs/sahi-script/functions/fetch/#_position): Returns positions of specific elements. - [\_positionNative](https://resources.sahipro.com/docs/sahi-script/functions/fetch/#_positionnative): Returns the absolute positions of elements. - [\_clickNativeXY](https://resources.sahipro.com/docs/sahi-script/functions/actions/#_clicknativexy): Simulates a click event at the specified point. - [\_count](https://resources.sahipro.com/docs/sahi-script/functions/fetch/#_count): Counts number of element present. - [\_collect](https://resources.sahipro.com/docs/sahi-script/functions/fetch/#_collect): Returns elements of the specified type matching the identifier within relations. - [\_launchJavaApplication](https://resources.sahipro.com/docs/sahi-script/functions/java/#_launchjavaapplication): To start java application(.jar files). - [\_isEnabled](https://resources.sahipro.com/docs/sahi-script/functions/fetch/#_isenabled): Returns true if element is enabled, else false. - [\_dragNative](https://resources.sahipro.com/docs/sahi-script/functions/java/#_dragnative): Simulates a drag event. - [\_dropNative](https://resources.sahipro.com/docs/sahi-script/functions/java/#_dropnative): Simulates a drop event. - [\_pause](https://resources.sahipro.com/docs/sahi-script/functions/debug-helpers/#_pause): Runs the script till that point and pauses execution. - [\_addToSuiteInfo](https://resources.sahipro.com/docs/sahi-script/functions/script-suite-info/#_addtosuiteinfo): Appends the customFieldName and customFieldValue in Suite Info. - [\_artifact](https://resources.sahipro.com/docs/sahi-script/functions/logging/#_artifact): To save a file as part of the logs. - [\_logImage](https://resources.sahipro.com/docs/sahi-script/functions/logging/#_logimage): Adds the image to logs. - [\_logOutput](https://resources.sahipro.com/docs/sahi-script/functions/logging/#_logoutput): Allows concatenating multiple output messages during a script execution, and display the concatenated string in the script and suite reports. - [\_getOptions](https://resources.sahipro.com/docs/sahi-script/functions/fetch/#_getoptions): Returns values or texts of all options of the select element. - [\_dragDropNative](https://resources.sahipro.com/docs/sahi-script/functions/actions/#_dragdropnative): Simulates a drag and drop event. - [\_areEqual](https://resources.sahipro.com/docs/sahi-script/functions/fetch/#_areequal): Compares two Javascript data type or arrays. - [\_setAccessorIgnoreCase](https://resources.sahipro.com/docs/sahi-script/functions/accessor-basics/#_setaccessorignorecase): To ignore case differences in identifiers of Accessors. - Controller: [List Properties](https://resources.sahipro.com/docs/using-sahi/sahi-controller/#action-buttons): Lists all the properties of the element. ## Modified APIs **Java/Applets Application** - [\_getText](https://resources.sahipro.com/docs/sahi-script/functions/fetch/#_gettext) or [\_getValue](https://resources.sahipro.com/docs/sahi-script/functions/fetch/#_getvalue): supports index, name and regex. - [\_setselected](https://resources.sahipro.com/docs/sahi-script/functions/actions/#_setselected) : added implementation for tree-item with regex, index and multi select - [\_setValue](https://resources.sahipro.com/docs/sahi-script/functions/actions/#_setvalue): implemented for jTable. - [\_type](https://resources.sahipro.com/docs/sahi-script/functions/actions/#_type): was not taking integer values. ## Bug Fixes **Windows Application** - Fixed [\_setSelected](https://resources.sahipro.com/docs/sahi-script/functions/actions/#_setselected) for excel and outlook. - Fixed recording and playback of [\_setSelected](https://resources.sahipro.com/docs/sahi-script/functions/actions/#_setselected) for WPF and Silverlight framework. - Fixed [\_type](https://resources.sahipro.com/docs/sahi-script/functions/actions/#_type) appending new line. - Fixed Multiple [\_setvalue](https://resources.sahipro.com/docs/sahi-script/functions/actions/#_setvalue) recording for slider control. - Fixed [\_typeCell](https://resources.sahipro.com/docs/sahi-script/functions/windows/#_typecell) and [\_setCell](https://resources.sahipro.com/docs/sahi-script/functions/windows/#_setcell) for new line insertion in excel sheet. - Fixed [\_getSelectionText](https://resources.sahipro.com/docs/sahi-script/functions/fetch/#_getselectiontext) returning wrong value if no text selected. - Fixed [\_setCell](https://resources.sahipro.com/docs/sahi-script/functions/windows/#_setcell) for formula. - Fixed [\_selectTextRange](https://resources.sahipro.com/docs/sahi-script/functions/actions/#_selecttextrange) for not throwing an error, if desired string is not found. - Fixed Conflict between [\_list](https://resources.sahipro.com/docs/sahi-script/functions/browser-accessors/#_list) and list api. - Fixed [\_setValue](https://resources.sahipro.com/docs/sahi-script/functions/actions/#_setvalue) for data-item. - Fixed [\_log](https://resources.sahipro.com/docs/sahi-script/functions/logging/#_log) with image. - Fixed [\_compareImages](https://resources.sahipro.com/docs/sahi-script/functions/screenshots/#_compareimages). - Fixed Identification of Silverlight elements on internet explorer. - Fixed Script failure on excel window due to wrong window handle returned by Process API. - Fixed Recording issue caused by variable name attribute of edit control. - Fixed Identification for non browser element in IE. - Fixed Click issue if left mouse button already pressed. - Fixed Indexing issue with popup (window). - Fixed Window focus issue. - Fixed Wrong log message if window (popup) not found. - Fixed Identification failure for some elements due to null reference of attribute. - Fixed Click issue on menu-item. - Fixed Window not found in case of multiple windows with same name using index. - Fixed Extra image added in log if unit test failed in window, fixed. - Fixed "\\n" not setting in silver-light edit control. - Fixed For Sahi Controller IE Select Drop down appearing only momentarily and disappears on click. Cause of the issue: This is IE's default behavior. **Java/Applets Application** - Fixed [\_setSelected](https://resources.sahipro.com/docs/sahi-script/functions/actions/#_setselected) Multiple select list de-selects previous selected item. - Fixed [\_clickNative](https://resources.sahipro.com/docs/sahi-script/functions/actions/#_clicknative). - Fixed [\_near](https://resources.sahipro.com/docs/sahi-script/functions/relations/#_near) it was considering only siblings. - Fixed [\_getValue](https://resources.sahipro.com/docs/sahi-script/functions/fetch/#_getvalue) for listView with index and for tableHeader. - Fixed setServerVar script was failing if we use [\_pause](https://resources.sahipro.com/docs/sahi-script/functions/debug-helpers/#_pause) api. - Fixed [\_setvalue](https://resources.sahipro.com/docs/sahi-script/functions/actions/#_setvalue) for \\t. - Fixed [\_log](https://resources.sahipro.com/docs/sahi-script/functions/logging/#_log) with image. - Fixed [\_dragDropNative](https://resources.sahipro.com/docs/sahi-script/functions/actions/#_dragdropnative) for table, if destination argument is only table then null pointer exception was coming - Fixed [\_isVisible](https://resources.sahipro.com/docs/sahi-script/functions/fetch/#_isvisible) for treeItem. - Fixed [\_compareImages](https://resources.sahipro.com/docs/sahi-script/functions/screenshots/#_compareimages). - Fixed Assertions - Fixed On identification \_in was not coming when parent is set as anchor element. For parent also \_near relation was set. - Fixed Issue with JMenu click. - Fixed Indexing for popup names. - Fixed NullPointerException while clicking on JTable cell whose value is null. - Fixed Identification issue fixed for text contain \\t. - Fixed Identification issue for cell span table. - Fixed Identification of element if element name contains new line characters. - Fixed setStrictVisiblity issue in applet when element is visible but not showing on screen. - Fixed Java Application not coming in focus if script fail while taking screenshot (still if you minimize the application then it will not focus, but if application is on background then it will come into focus while taking screenshot). :::caution[Important] **Refer [Whats new in Sahi Pro v7.5.0](https://resources.sahipro.com/docs/release-notes/v7-5-0/) for features and enhancements done in Sahi Pro v7.5.0.** ::: --- # What is new in Sahi Pro Mobile Add-on v7.5.0 Sahi Pro Mobile Add-on v7.5.0 is its first major release. :::note[Renamed] The Mobile Add-on is now the [Mobile Engine](https://resources.sahipro.com/docs/introduction/sahi-pro-mobile-engine/). ::: :::note Note: Sahi Pro Mobile Add-on requires a different license file than that of Sahi Pro. ::: Refer to [Sahi Pro Mobile Add-on](https://resources.sahipro.com/docs/introduction/sahi-pro-mobile-engine/) page for details. --- # What is new in Sahi Pro v7.0.1 Sahi Pro v7.0.1 is a minor release and contains bugfixes. ## Bug Fixes - Fixed Chrome 58+ SSL related issues. - Fixed Flex identification and recording. - Fixed slowness related problems. - API - Fixed \_setHeader() for authorization. - API - Modified \_setWaitTimes() - Fixed fetching url containing multiple parameter from suite(.dd.csv) file in script --- # What is new in Sahi Pro Desktop Add-on v7.0.1 Sahi Pro Desktop Add-on v7.0.1 is minor release and contains bugfixes. :::note[Renamed] The Desktop Add-on is now the [Desktop Engine](https://resources.sahipro.com/docs/introduction/sahi-pro-desktop-engine/). ::: ## Key Features **Windows Desktop** - Added API \_select, \_radio, \_textbox and \_link for windows mode. - Now, recording a script will keep the cursor red in color until the specific step is recorded. ## Bug Fixes **Windows Desktop** - Fixed \_selectWindow API for regular expression with index. - Fixed \_setSelected API for regular expresion with index. - Fixed \_in API for regular expression. - Fixed recording of a click on \_edit (\_textbox). - Fixed wait mechanism for failure of a script. - Fixed call back function OnScriptFailure for windows mode - Fixed \_setValue API for Scrollbar. - Fixed \_assertContainsText API - Fixed \_assertNotContainsText API **Java Application** - Fixed for port number other than 9999. --- # What is new in Sahi Pro v7.0.0 Sahi Pro v7.0.0 is a major release with significant feature additions and modifications. Please read this page fully before upgrading. :::note[Renamed] The Desktop Add-on is now the [Desktop Engine](https://resources.sahipro.com/docs/introduction/sahi-pro-desktop-engine/). ::: ## Key Modifications :::caution[Important] Read this section, before upgrading to Sahi Pro v7.0.0 ::: ### Expansion of platform to support non web technologies Sahi Pro v7.0.0 is major rewrite of Sahi Pro. It was required to allow support for technologies other than web. Sahi Pro Desktop Add-on has been introduced which supports Windows and Java technologies. :::danger[Caution] Backward incompatible changes: - Java language driver: Sahi Pro's java language driver had been lagging behind Sahi script in implementation of APIs. We have now completely rewritten the Java driver such that new APIs are autogenerated and does not need maintenance. This has forced some deviations from the current Java driver. Please read [Sahi Pro v7.0.0 Java Driver changes](https://sahipro.com/alldocs/v7.0.0/introduction/sahi-pro-v700-java-driver-changes.html) before upgrading. - Removal of Ruby driver: Due to very low demand for Ruby driver, we have removed support for Ruby driver. If you are a customer using the Ruby driver, please email us at support @ sahipro.com to discuss possible recourse. - Removal of older Java applet support. Sahi Pro v7.0.0 no longer supports the older (`_applet()`) way of interaction with applets. Sahi Pro v7.0.0 Desktop Add-on adds support for Java Applets, Java Desktop and Java Web Start Applications ::: ## Key Features ### Support for Add-ons Sahi Pro can be extended to work with technologies other than browsers using Add-ons. Scripts use [\_setMode](https://resources.sahipro.com/docs/sahi-script/functions/script-execution-control/#_setmode) with [multiple modes](https://resources.sahipro.com/docs/sahi-script/multiple-modes/) to interact with applications. [Sahi Pro Desktop Add-on](https://resources.sahipro.com/docs/introduction/sahi-pro-desktop-engine/) has been released with v7.0.0 with support for Windows and Java applications. ### REST Client UI [REST Client UI](https://resources.sahipro.com/docs/using-sahi/rest-api/getting-started/) helps to work easily with REST APIs. It gives a graphical user interface to create scripts to interact with REST APIs, add assertions etc. ### Javascript Code Coverage Reports It is now possible to get Javascript Code Coverage metrics of web application. Reports are generated with function and decision point metrics and available with Sahi's suite reports. This has been described in detail [here](https://resources.sahipro.com/docs/using-sahi/javascript-code-coverage/). ### Script name, testcase name in tags In scenario files (.s.csv) and data driven suite files (.dd.csv), user can run specific script by specifying script name or testcase name in tag field under playback properties in editor playback, for details click [here](https://resources.sahipro.com/docs/using-sahi/sahi-script-editor/#scenario-editor). ### Artifacts and screenshots available in offline reports Now artifacts and screenshots appear in offline reports. ### Evaluate Expression Now user can write a script snippet in evaluate expression ant run it. It has ability to select different mode. This has been described in detail [here](https://resources.sahipro.com/docs/using-sahi/sahi-controller/#evaluate-expression). ### JsDoc While creating function from editor user can add JsDoc in script. This has been described in detail [here](https://resources.sahipro.com/docs/sahi-script/script-view/#create-a-function). ## New APIs - [\_setWaitTimes](https://resources.sahipro.com/docs/sahi-script/functions/script-execution-control/#_setwaittimes): Allows to set page, AJAX and flex wait times during script execution. ## Modified APIs - [\_typeKeyCodeNative](https://resources.sahipro.com/docs/sahi-script/functions/actions/#_typekeycodenative): The new implementation enables the user to type all the characters which has a KeyEvent and ASCII code associated to it. - [\_writeCSVFile](https://resources.sahipro.com/docs/sahi-script/functions/files/#_writecsvfile): The new implementation enables the user to force strings to be inside quotes in the csv file. Empty cells at the end of rows are not trimmed. ## Bug Fixes - Fixed SSL certificate issues in Chrome 58+. - API - Fixed \_stopTestCase API (it was highlighted with red color in logs previously). - API - Fixed \_assertSnapShot issue where the selected element alone was not captured in the screenshot - Fixed use of square brackets in string, as an argument, inside a scenario file which was not behaving correctly. - Fixed path for keyCode\_combinations.txt in \_typeKeyCodeNative. - Fixed assertions in java controller. - Fixed navigateTo not recording in java controller. - Fixed the issue of Web Title changing from "Editor - file name" to "Editor - file's full path" after renaming or deleting nodes in editor. - Fixed recording with anchor button on click in applet from java controller. - Fixed recording for popup in java controller for web application. - Fixed issue of script containing special characters not launching in editor, though it was recording correctly from controller. - Fixed issue of expectPrompt and expectConfirm step (recorded as previous step) showing blank line in Java controller's - recorded steps. - Fixed appendToScript not working in java controller. - Fixed controller's evaluate expression in case of special characters in popup's title (Both Sahi & Java controller). - Fixed adding tag in s.csv file which needed editor's reload. --- # What is new in Sahi Pro Desktop Add-on v7.0.0 Sahi Pro Desktop Add-on v7.0.0 is its first major release. :::note[Renamed] The Desktop Add-on is now the [Desktop Engine](https://resources.sahipro.com/docs/introduction/sahi-pro-desktop-engine/). ::: :::note Note: Sahi Pro Desktop Add-on requires a different license file than that of Sahi Pro. ::: Refer to [Sahi Pro Desktop Add-on](https://resources.sahipro.com/docs/introduction/sahi-pro-desktop-engine/) page for details. --- # What is new in Sahi Pro v6.3.2 Sahi Pro v6.3.2 is a minor release and contains bugfixes. ## Bug Fixes - Fixed junit reports - scripts without testcases were not reported correctly - Fixed Scenario file logs and ALREADY\_LOGGED exception in reports. Some specific errors were not reported properly causing failed scenarios to pass. - Fixed AngularJS 2.0 preview issue. Handled redefined window and XHR methods. - Fixed Accessor Identification for identifiers staring with "\[xyz\] ". - Fixed bug where emails were sent for every child suite also, if there were multiple suites inside a suite. - Fixed \_click api for link in Opera version 40+. --- # What is new in Sahi Pro v6.3.1 Sahi Pro v6.3.1 is a minor release and contains one new feature and bugfixes. ## Key Features ### File Access Security Sahi Pro now allow users to access only those files, which are located on a specific path. For this, you need to configure `userdata_hidden.properties` located at `/userdata/config`. This has been described in detail [here](https://resources.sahipro.com/docs/using-sahi/restrict-files-access/). ## Bug Fixes - Report - Fixed compare suites in suite-report. - Report - Fixed compare screenshots for scenario file. - Report - Fixed expand-all in compare screenshot page. - Report - Fixed script-report in `Junit` format. Now it will displays the testcases if the script has any testcases. - Report - Fixed testcase count in offline reports. - Report - Fixed online/offline testcase-report, it was showing all subsuites info in suite info box. - Report - Fixed showing proper background color for steps in scenario file in case of failure in step. - Report - Fixed suite-report, if it is ran by some specific tags, it will shows only those suites in suite-report tree hierarchy. - Report - Fixed artifacts description in script-report. - Api - Fixed `_selectBrowser` api. - Api - Fixed `_artifact` api. Now you can use only drive path e.g. `_artifact("C:\")`. - Fixed `[ReturnValue]` in scenario file. It was returning null before. - Fixed automatic creating failed suite(dd.csv) file. --- # What is new in Sahi Pro v6.3.0 Sahi Pro v6.3.0 is a major release and contains many new features and bugfixes. ## Key Features ### Tree Structure in Logs Suite report will now be displayed as a nested tree structure. It shows the exact nested level for scripts the way it is written in suite / dd.csv file so that user can get the idea of which script belongs to which suite / dd.csv file. Offline reports will also look as nested tree structure. This has been described in detail [here](https://resources.sahipro.com/docs/using-sahi/sahi-reports/). :::caution[Important] **WARNING related to Suite report** - Sahi Database has been modified from Sahi Pro v6.3.0 - If you upgrade to Sahi Pro v6.3.0, then older suite reports will be displayed in the older flat structure instead of the new tree structure. - Syncing suite reports created in older versions of Sahi Pro to Sahi Pro v6.3.0, will display the older reports in flat structure. ::: :::note IMPORTANT: For distributed run, we strongly recommand using Sahi Pro v6.3.0 on both master and slaves machines, so as to get desired suite report structure. ::: :::note NOTE: The failed suite will contain all the failed scripts at the same level, so there will not be any tree structure in failed suite report. ::: ### Periodic Notification During Script Playback During script playback, a notification of the current suite status will now be shown. The notification would be updated when the status of a script changes. A summary of the number of Testcases and Scripts passed and the number of Testcases and Scripts ran will also be printed. When scripts are executed using a command prompt (which includes Testrunner, Drun, Drun Diff Master and Ant), the messages will be logged in their corresponding consoles. In the case of Editor, the notification will appear on the bottom right corner of the Editor screen. You can read more about these notifications [here](https://resources.sahipro.com/docs/using-sahi/run-tests-via-editor/#periodic-summary-during-script-runs). ### Auto-Indentation in Script Editor A new Auto-Indentation button has been added in the Script Editor. When pressed, it will read the contents of the entire .sah script and correct its indentations and format. This improves readability, reduces efforts and brings all formatted scripts to the same pattern. Script formatting has been described in detail [here](https://resources.sahipro.com/docs/sahi-script/script-view/#auto-format). ## New APIs **Assertion APIs** - [\_assertHorizontallyAligned](https://resources.sahipro.com/docs/sahi-script/functions/assertions/#_asserthorizontallyaligned): Asserts if two elements are horizontally aligned. - [\_assertVerticallyAligned](https://resources.sahipro.com/docs/sahi-script/functions/assertions/#_assertverticallyaligned): Asserts if two elements are vertically aligned. - [\_assertCentered](https://resources.sahipro.com/docs/sahi-script/functions/assertions/#_assertcentered): Asserts if inner element is vertically or horizontally centered to the container element. - [\_assertVisiblyInside](https://resources.sahipro.com/docs/sahi-script/functions/assertions/#_assertvisiblyinside): Asserts if an element is visibly inside another element. - [\_assertVisiblyOutside](https://resources.sahipro.com/docs/sahi-script/functions/assertions/#_assertvisiblyoutside): Asserts if an element is visibly outside another element. - [\_assertVisiblyOn](https://resources.sahipro.com/docs/sahi-script/functions/assertions/#_assertvisiblyon): Asserts if an element is placed on another element. - [\_assertFitsWidth](https://resources.sahipro.com/docs/sahi-script/functions/assertions/#_assertfitswidth): Asserts if an element fits within the width of another element. - [\_assertFitsHeight](https://resources.sahipro.com/docs/sahi-script/functions/assertions/#_assertfitsheight): Asserts if an element fits within the height of another element. **Alignment APIs** - [\_areHorizontallyAligned](https://resources.sahipro.com/docs/sahi-script/functions/alignment/#_arehorizontallyaligned): Checks whether two elements are horizontally aligned or not. - [\_areVerticallyAligned](https://resources.sahipro.com/docs/sahi-script/functions/alignment/#_areverticallyaligned): Checks whether two elements are vertically aligned or not. - [\_isCentered](https://resources.sahipro.com/docs/sahi-script/functions/alignment/#_iscentered): Checks whether inner element is vertically or horizontally centered to the container element. - [\_isVisiblyInside](https://resources.sahipro.com/docs/sahi-script/functions/alignment/#_isvisiblyinside): Checks whether an element is visibly inside another element. - [\_isVisiblyOutside](https://resources.sahipro.com/docs/sahi-script/functions/alignment/#_isvisiblyoutside): Checks whether an element is visibly outside another element. - [\_isVisiblyOn](https://resources.sahipro.com/docs/sahi-script/functions/alignment/#_isvisiblyon): Checks whether an element is placed on another element. - [\_fitsWidth](https://resources.sahipro.com/docs/sahi-script/functions/alignment/#_fitswidth): Checks whether an element fits within the width of another element. - [\_fitsHeight](https://resources.sahipro.com/docs/sahi-script/functions/alignment/#_fitsheight): Checks whether an element fits within the height of another element. ## Other Features and Enhancements - Updated Sahi certificate from SHA1 to SHA256. - When Sahi Pro is started, a prompt will appear if invalid/expired license.data file is added or if wrong license server configurations are added in `sahi_pro/userdata/config/userdata.properties`. From this prompt, one can - Use new license.data file. - Change or add license server configurations. - Or if one has ever acquired a lease from license server configurations provided in userdata.properties the one can extend the lease for 10 minutes for 3 times i.e total of 30 minutes. ![](https://resources.sahipro.com/docs/assets/images/releases/license_alert.webp) ## Bug Fixes - Fix for \_launchNewBrowser. Object identification was failing in IE Quirks mode. - Fix for \_wait API in Excel Framework and Robot Framework. - Fix for spaces in field name of \_addToSuiteInfo. - Controller - "Save AR" button now gets enabled on writing a new AR Key. - Controller - Fixed opening of new recorded scripts with spaces in its file name (by clicking on "Script Editor" link in Controller). - Fix for ShadowDOM identification in Firefox. - Editor - Disabled closing of Playback properties (on clicking the 'Run' button) if fields are missing or Start URL is invalid. - Editor - Fixed creation of function (without arguments) from the Sahi Editor. - Editor - Fixed autofocus while creating, opening and saving scripts. - Fix for trailing spaces in email.properties and sync\_db.properties file. --- # What is new in Sahi Pro v6.2.1 Sahi Pro v6.2.1 is a minor release. It contains various small feature enhancements and bugfixes requested by customers ## New APIs **Fetch APIs** - [\_collectElementsInfo](https://resources.sahipro.com/docs/sahi-script/functions/fetch/#_collectelementsinfo): Collects all accessor identification information for various elements in UI. Useful in building custom tools for script generation. **Script Execution Control APIs** - [\_stopTestCase](https://resources.sahipro.com/docs/sahi-script/functions/script-execution-control/#_stoptestcase): Causes a scenario file to stop execution of a testcase. When called from inside a testcase in a scenario file, that particular testcase execution will be stopped. Execution will proceed to the next testcase. ## Modified APIs - [RESTResponse.getBodyAsString](https://resources.sahipro.com/docs/sahi-script/functions/rest-api/#restresponsegetbodyasstring): This API has been modified to take an optional character encoding. - [\_setLanguage](https://resources.sahipro.com/docs/sahi-script/functions/multi-language/#_setlanguage): An optional third parameter `append` has been added to allow multiple translation files. - [\_takePageScreenShot](https://resources.sahipro.com/docs/sahi-script/functions/screenshots/#_takepagescreenshot): A `mode` attribute can be passed in $props parameter to take screen shots of scrollable elements. - [\_launchNewBrowser](https://resources.sahipro.com/docs/sahi-script/functions/multiple-browsers/#_launchnewbrowser): Added second optional parameter "browserType" to open a new browser instance of a specific type eg. ie, firefox or chrome. Default browserType is same as the browser type of the base window. ## Other Features and Enhancements - API - Implemented clickNative, clickNativeXY, typeNative, typeKeyCodeNative for java mode. - API - Added charSet parameter(optional) in getBodyAsString() api. Default is "UTF-8". - Logs - Added new column in suite reports for showing scripts start time. - Added offline html logs for dload. - Added support for dynamic subject in emails. Subject can be added like: "subject : $SUITEINFO\_NAME". - Added support for postgresql database. (new support for DB) ## Bug Fixes - API - Fixed \_collect, \_collectAttributes and \_count API for multiple relations. - API - Fixed \_isEdge - API - Fixed \_isDataPassed api, was returning true in any case by ddcsv. - API - Fixed relational APIs for java mode. - Logs - Fixed html logs for printing javascript errors with escaping. - Fixed indentation - 4 units of space after pressing enter in editor for beautification. - Fixed 415 unsupported media type. - Fixed SahiEndPoint Distributed Run Tags integrated at Sahi Endpoint changes in sahi endpoint doc file. - Fixed dload logs: Showing average time taken in graphs. - Fixed dload step graph. - Fixed dload logs when subject fails. - Fixed cookies deletion done with Cookie Manager. - Fixed file chooser for Mac OS. --- # What is new in Sahi Pro v6.2.0 Sahi Pro v6.2.0 is a major release and contains many new features and bugfixes. Sahi Pro Runner has been introduced since this version (v6.2.0) ## Key Features ### Microsoft Edge Support Sahi Pro V6.2.0 adds support for the latest Microsoft Edge browser. :::note NOTE: Microsoft Edge supports only single thread, so parallel execution not supported for this browser. You need to close any running instance of Microsoft Edge before playback. ::: ### Passing External Data in Excel Normally, parameter data is passed inline to keywords/functions in scenario files. However, one may want to keep the parameter data in a separate file for easier maintenance. Sahi Pro 6.2 adds the ability to represent data in external files or database and allows an easy way of accessing such externalized data. Please read the documentation [Passing External Data](https://resources.sahipro.com/docs/using-sahi/test-data-files/) for more details. ### Restrict Remote Access Any user on the network could access Sahi Pro via web browser and modify its configuration and settings.\ This new feature helps prevent other remote machines from directly accessing the Editor, Logs and Configuration of the host machine. Please refer to [Restrict Remote Access](https://resources.sahipro.com/docs/using-sahi/restrict-remote-access/) section for more details. ### Sahi Pro License Server Organizations using Sahi Pro Concurrent licenses can now manage licenses using a central License Server. The License Server is available on request. Please email support@sahipro.com. ### Sahi Pro Runner Sahi Pro Runner is a leaner version of Sahi Pro, to be used for pure playback purposes especially from automated build systems. It does not have the Controller or Editor. It is well suited for running with Jenkins or for use as a Central Reporting server. Sahi Pro Runner is available as a separate download on the [downloads archive](https://resources.sahipro.com/docs/introduction/installers.html) page. ### Support for Multiple Languages Sahi allows testing of websites in any language using the same scripts as long as translations are available for that language. Please refer to [Multi Language API](https://resources.sahipro.com/docs/sahi-script/functions/multi-language/) section for more details. ### Download Artifacts All artifacts in a suite or script can now be downloaded as a zip from the corresponding suite or script report page. ### Download Reports Offline Suite logs and script logs(within a suite) can now be downloaded directly from the logs page. These log reports can be of different types (email, html, xml, excel, junit etc.). ### Auto Refresh Logs Suite and script reports can be set to auto refresh to refresh the logs after every 2 seconds until the execution completes. This will be helpful to track reports in the middle of execution. Please refer to [Auto Refresh Logs](https://resources.sahipro.com/docs/using-sahi/suite-report/#watch-a-running-suite) section for more details. ### Data Driven Suites with testcases Added support to execute only specific testcases in data driven suites. Please read the documentation [Data Driven Suites with testcases](https://resources.sahipro.com/docs/using-sahi/data-driven-suites/#data-driven-suites-with-testcases) for more details. ## New APIs **Script/Suite Info APIs** - [\_addToSuiteInfo](https://resources.sahipro.com/docs/sahi-script/functions/script-suite-info/#_addtosuiteinfo): Appends the customFieldName and customFieldValue in Suite Info. **Logging APIs** - [\_artifact](https://resources.sahipro.com/docs/sahi-script/functions/logging/#_artifact): It is used to save a file as part of the logs. For example, one may want to store a snapshot of the server log file along with the script report. - [\_logOutput](https://resources.sahipro.com/docs/sahi-script/functions/logging/#_logoutput): Keeps concatenating the message and is shown in suite and script reports. **Browser Detection APIs** - [\_isEdge](https://resources.sahipro.com/docs/sahi-script/functions/fetch/#_isedge): Returns true if the current browser is Microsoft Edge. **Language APIs** - [\_setLanguage](https://resources.sahipro.com/docs/sahi-script/functions/multi-language/#_setlanguage): Sets the language in which the script will be executed. ## Modified APIs - [\_resource](https://resources.sahipro.com/docs/sahi-script/functions/include/#_resource): This API has been modified to work for scenario files. Also now regex or folder path can be passed to this API. - [\_scriptPath](https://resources.sahipro.com/docs/sahi-script/functions/script-suite-info/#_scriptpath), [\_resolvePath](https://resources.sahipro.com/docs/sahi-script/functions/script-suite-info/#_resolvepath), [\_userDataDir](https://resources.sahipro.com/docs/sahi-script/functions/script-suite-info/#_userdatadir), [\_userDataPath](https://resources.sahipro.com/docs/sahi-script/functions/script-suite-info/#_userdatapath): An extra parameter $fileSeparator is added in these apis. Can be one of "\\\\" or "/" .Defaults to "/". - [\_writeCSVFile](https://resources.sahipro.com/docs/sahi-script/functions/files/#_writecsvfile) : An extra parameter $forceQuotes is added. Force strings to be inside quotes in the csv file. Defaults to false. - Screenshot apis are now modified to work for multiple screens also. ## Other Features and Enhancements - API - Added support for screenshot apis in case of multi screens. - Controller - Error messages will be displayed in controller playback tab for quick reference. Failure messages will not be shown. - Controller - Added controller.offline\_logs.type property in sahi.properties for creating offline html logs form controller playback. - Editor - In "Find Usage", result message will be shown as "x matches found in y files". - Editor - Added support for properties file to support multi language. - Editor - When any script is not saved, clicking on playback will give an alert and ask to save the files before playback. - Editor - Tabs inside the editor can be closed using middle click of mouse. - Editor - Highlighting active line in editor. - Editor - Added red colour header symbol for new files created in editor. - Editor - Maintaining tree state on page reload in editor's navigator. - Editor - Deselect cell in spreadsheet when tab is changed. - Editor - Added support to find on "Enter" key press in Find Usage. - Excel - Added new methods deleteColumn and deleteColumns in excel API. - Excel - In associative array2d.set method, one can use row/column header name instead of index. - Excel - Removing start and end spaces from arguments in Excel Framework. - Flex - Added functionality for scrolling horizontally and get cell of datagrid. - Logs - Made DBReport's Sync DB dialogue box movable. - Logs - Showing time(near steps) in 12-hr format with AM/PM. - Logs - Added sync in progress message and disabled the sync button when sync in progress. - Logs - Showing system exceptions in logs. - Logs - Added support to remove a function from logs using fnName.noLog = true in Sahi script. - Logs - Replaced timestamp with uuid(global id) in script/suite ids and modified reports accordingly. - Added support for sending body data in DELETE request. - Added support for window action on linux operating system. - Make proxy\_alert.disabled to false in userdata.properties. - Added null check and setting default value of "mail.smtp.starttls.enable" to "false" ## Bug Fixes - API - \_writeCSVFile API not able to write integer 0 in csv. Fixed. - API - \_byId API fix for iframes. - API - Assertion for \_cell API. Fixed. - API - \_isVisible() will should always return boolean value and not error. Fixed. - API - Fix for onBeforeStep and onAfterStep with windowAction APIs leading to 150 seconds timeout. - API - Fixed behavior of \_renameFile. If file to be renamed is not present, it won't do anything. - Controller - Fixed "Script Editor" link in controller for Windows. - Controller - Recording of select box on IE6,7,8,9,10 not working properly. Fixed. - Controller - Fix for identification of SVG elements with relational APIs. - Controller - Check for blank files when evaluating from controller. Also fixed error messages from controller in case of no script or AR name while recording. - Controller - Controller playback of a script was creating two folders for HTML offline logs. Fixed. - Excel - Editing and saving an excel file(having multiple sheets) in Sahi's editor should not delete other sheets of that file. Fixed. - Excel - deleteRows(index) method was not deleting last row from the sheet. Fixed. - Editor - s.csv , dd.csv , xls files does not save the focused element content. Fixed. - Editor - Playback of same suite inside the ddcsv with different arguments. Fixed. - Editor - Showing correct message when .csv, .dd.csv, .xls, .xlsx type files are opened from other editor while being edited from Sahi's editor. - Editor - Creating a new file should not reload the editor page. Fixed. - Editor - Loading of last file should not happen if new file is opened and reloading the page. Fixed. - Editor - Double scroll bar problem is fixed. - Editor - Fixed masking issue to hide masked info. - Editor - Creation of new file with name like a.csv.csv when providing the extension in input box. Fixed. - Editor - Fixed issue where Replace won't work if $ is used in the search and replace. - Logs - Showing testcase summary in logs while doing distributed run. - Logs - Fixed total steps count and testcases count in logs. - While doing distributed run, copying of images from slave to master is fixed. - Fixed drun unzip issue on mac: using CanonicalPath for zipping/unzipping files. - Fixed drun going into infinite loop. Added flag "drun.node\_inactive\_timeout" in sahi.properties for marking node as inactive and come out from the loop. - Parsing of switch case inside a script is fixed. - More preferences are added for firefox to prevent SSL handshake errors in Firefox. - Saving date object value in variable in script. Fixed. - Adding Listeners to frame. Fixed. - Scenario file with tags should run when used in dd.csv using tags. Fixed. --- # What is new in Sahi Pro v6.1.0 Sahi Pro v6.1.0 is a major release and contains many new features and bugfixes. ## Changes in Sahi's behaviour :::caution[Important] There are some changes in Sahi's behaviour in this release which need changes in usage. Please go through the [Changes needed in Usage](#changes-needed-in-usage) section for details. ::: ## Fresh install with MySQL, MSSQL or Oracle databases By default Sahi stores its reports in a H2 database which is bundled along with Sahi. If you wish to store your reports in MySQL, MSSQL or Oracle databases, you can do so by performing some post installation steps. Please refer to [MySQL](https://resources.sahipro.com/docs/using-sahi/storing-reports-in-mysql/), [MSSQL](https://resources.sahipro.com/docs/using-sahi/storing-reports-in-mssql/) and [Oracle](https://resources.sahipro.com/docs/using-sahi/storing-reports-in-oracle/) sections for details. :::note IMPORTANT: Please note that from SahiPro 6.1.0 onwards, you do not need to run db queries manually for any database, for a fresh installation. ::: ## Upgrade :::caution[Important] Upgrading to SahiPro 6.1.0 is easier than before. Please refer to [Upgrade Sahi](https://resources.sahipro.com/docs/using-sahi/upgrade/) section for details. ::: ## Key Features ### Support for Shadow DOM and Custom HTML Elements HTML5 introduced the concept of ShadowDOM and custom HTML elements which allows developers to write their own custom tags and define the tag's behaviour. This unfortunately breaks how most tools traverse the DOM to identify elements. Sahi Pro 6.1.0 supports identification and recording of elements in ShadowDOM and custom HTML elements. ### Support for Polymer Elements Sahi Pro 6.1.0 has inbuilt support for identifying and working with Google Polymer elements. This is based on the new ShadowDOM and custom HTML element support. [Working with Polymer Elements](https://resources.sahipro.com/docs/sahi-script/working-with-polymer/)\ [Polymer Accessor APIs](https://resources.sahipro.com/docs/sahi-script/functions/polymer-accessors/) ### Editor Enhancements Editor has been enhanced for usability. #### Error Notification If your script has any syntax errors, it will now be displayed in the editor while writing the scripts. If an undefined function or a non-existent API is called, a red error sign will be shown at that line. ![](https://resources.sahipro.com/docs/assets/images/releases/610/editor_errors.webp) . Check [Errors in Scripts](https://resources.sahipro.com/docs/sahi-script/script-view/) for more details. #### Find and Replace You can search for functions and variables in all the scripts and scenario files using the new Find Usage dialog. Click on find usage button in the top menu to get the search options. ![](https://resources.sahipro.com/docs/assets/images/releases/610/find_usage_results.webp) Enter the text to be searched and select if you want to specifically search for a function or variable. If both are left unchecked, both will be searched. You can also specify the types of file you want to search in. If you want to replace the searched text, simply put the replacment in the 'Replace with' text box and select the files in which text should be replaced. Click on Replace button. Please refer to the [Find and Replace](https://resources.sahipro.com/docs/sahi-script/script-view/#find-and-replace) section for more details. #### Debugging using breakpoints You can now debug your Sahi scripts by adding breakpoints and executing from the editor. A breakpoint can be added by clicking on the left of a line in script editor. A red dot appears signifying the breakpoint. If you execute this script from the editor, Sahi will pause the script at the breakpoint and launch the controller. You can then step through the script to debug the behaviour. `Clear Break Points` can be used to clear the break points of all scripts. ![Debug points](https://resources.sahipro.com/docs/assets/images/using-sahi/editor/breakpoints.webp) Check [Debugging Sahi Scripts](https://resources.sahipro.com/docs/using-sahi/run-tests-via-editor/#debug-a-test) for more details. #### Context information Context information access and usage experience has been enhanced. #### Others A bunch of other Editor enhancements mentioned below. ### New Format for Scenario Files A new format for scenario files has been added. It allows additional columns for comments and tags. Tags can be specified for each Test Case. If tags are passed during the run, only matching Test Cases will be executed. ![](https://resources.sahipro.com/docs/assets/images/releases/610/scenario_editor_new.webp) Please refer to [Scenario Editor](https://resources.sahipro.com/docs/using-sahi/sahi-script-editor/#scenario-editor) for more details. Sample scenario files have been changed to reflect the new format. ### Sync Reports to a Central Database You can now sync execution logs between two machines running sahi. The destination machine can be a Central machine where reports from various sources can be synced to. This is especially useful in a continuous integration setup where one wants to aggregate the reports of each build's run at a central location. Refer to [Sync Reports to Central Database](https://resources.sahipro.com/docs/using-sahi/sahi-syncdb/) section for more details. ### Periodic emails As of this release, we provide the ability to send periodic emails during the course of a suite run. This can be useful in cases where the run takes a long time to complete. Regular email updates help to know the progress. Refer to `Send Email Reports` section in [Editor Advanced Playback Settings](https://resources.sahipro.com/docs/using-sahi/run-tests-via-editor/#advanced-run-settings). ### Oracle database support for Reports Users can now choose to store Reports in an Oracle database. Please refer to [storing reports in Oracle](https://resources.sahipro.com/docs/using-sahi/storing-reports-in-oracle/) for more details. ### Improvements in Distributed runs **Smart zip** In versions prior to SahiPro 6.1.0, the entire scripts folder would get synced to different nodes. As of this release, we only sync the scripts necessary to execute a run. Please refer to [Smart zip](https://sahipro.com/alldocs/v6.1.0/using-sahi/playback-desktop.html#Smart%20zip%20(from%20SahiPro%206.1.0)) for more details. **Distribute scripts in rotation** Distribution of scripts across nodes has now been made more even. Please refer to [Scripts rotation](https://sahipro.com/alldocs/v6.1.0/using-sahi/playback-desktop.html#Distribute%20scripts%20in%20rotation%20(from%20SahiPro%206.1.0)) for more details. **Ability to specify Threads** Previously, the number of browsers running on a Node in a distributed run could only be controlled by the Capacity of the browser, mentioned in browser\_types.xml. As of this release, it is possible to specify Threads for a distributed run. The minimum of Threads and Capacity will determine the number of browsers to run in parallel. **Nodes monitoring** The nodes participating in a distributed run are now monitored internally for health. Please refer to [Nodes monitoring](https://sahipro.com/alldocs/v6.1.0/using-sahi/playback-desktop.html#Nodes%20monitoring%20(from%20SahiPro%206.1.0)) to understand how this makes the run better. **Ability to register Nodes externally** It is now possible to register additional node(s) in the middle of a long running distributed run and share the workload. Refer to [Registering external nodes](https://resources.sahipro.com/docs/using-sahi/playback-via-ant/#ability-to-register-nodes-externally-from-sahi-pro-v610) for details. ## New APIs **Include APIs** - [\_resource](https://resources.sahipro.com/docs/sahi-script/functions/include/#_resource): API to include external resource files like csvs, excel files, images, in distributed runs. **Fetch APIs** - [\_positionNative](https://resources.sahipro.com/docs/sahi-script/functions/fetch/#_positionnative): Returns the position of an element relative to screen. **Script Execution Control APIs** - [\_byPassWaitMechanism](https://resources.sahipro.com/docs/sahi-script/functions/script-execution-control/#_bypasswaitmechanism): When set to true, script will not use the Sahi wait mechanism. Use with caution. **File APIs** - [\_fileExists](https://resources.sahipro.com/docs/sahi-script/functions/files/#_fileexists): Returns true if file exists, else false. **Data Drive related APIs** - [getDataForDataDrive](https://resources.sahipro.com/docs/sahi-script/functions/data-drive/#excel-sheet): \_getExcel().getDataForDataDrive() API has been added which returns data in a format appropriate for passing into \_dataDrive. \_getExcel().getData() should NOT be used with \_dataDrive. **Script/Suite Info APIs** - [\_testcasesInfo](https://resources.sahipro.com/docs/sahi-script/functions/script-suite-info/#_testcasesinfo): Returns an array of testcase-property objects of the executed testcases. ## Modified APIs - [\_setSpeed](https://resources.sahipro.com/docs/sahi-script/functions/script-execution-control/#_setspeed): This API has been modified to work at a script level. Using this in one script will not affect the behaviour of other scripts. - [\_areEqual](https://resources.sahipro.com/docs/sahi-script/functions/fetch/#_areequal): This API has been fixed to work correctly in an if condition. Earlier it could be used only inside an Assertion API. - [\_assertSnapShot](https://resources.sahipro.com/docs/sahi-script/functions/screenshots/#_assertsnapshot), [\_compareImages](https://resources.sahipro.com/docs/sahi-script/functions/screenshots/#_compareimages), [\_assertEqualImages](https://resources.sahipro.com/docs/sahi-script/functions/assertions/#_assertequalimages): The difference threshold has been changed to float instead of int. Existing scripts do not need to change. - [\_readExcelFile](https://resources.sahipro.com/docs/sahi-script/functions/excel/#_readexcelfile): This API takes an extra parameter $ignoreEmptyRows. If not specified, it defaults to false which means that empty rows will be returned. Existing scripts do not need to change. ## Other Features and Enhancements - Editor Metadata implementation revamped. Earlier implementation caused OutOfMemory errors in some scenarios. - Editor Context panel displays Sahi APIs along with arguments. - Editor: If a function is present in multiple files, it is shown only once in the Function Name dropdown in the Context panel. User can choose the appropriate library file to include the correct function. Similar behaviour is applicable for Accessor Repository keys as well. - Editor: In a scenario file, auto complete of a function shows only one entry for a function name, if it is present in multiple library files. The correct file to include can be chosen from Function Details. - Editor: Cut, Copy and Paste of files and folders, implemented in Editor. - Editor: Added ability to traverse forward and back in Editor, based on scripts opened through function lookup in Context editor - Editor: Shortcuts added in Editor for comments, adding duplicate line of code, removing a line of code, etc. - Editor: `Close All` and `Close Others` options added for closing scripts. - Editor: File or folder rename automatically changes all includes in containing scripts, and script definitions in suites. - Editor: Added Refresh Metadata icon in Context panel. - Editor: Added `Insert + Enter` button in Context panel, to end line with semicolon and go to next line. - Users can now view plain CSV and Excel files in the Editor. - Editor: Added "Expand All" and "Collapse All" in Navigator. - Mailer functionality has been enhanced. - Users can now send emails with attachments. - More APIs have been added in Mailer class. Please refer to [Sending Emails](https://resources.sahipro.com/docs/sahi-script/sending-emails/) for more details. - WebSockets are now correctly handled. HTTPS sites with non 443 ports may break in very rare cases. Such sites need to be added to `ssl_host_port.txt` via `Configure` link on `Dashboard`. - Scripts for applications running inside Chromium Embedded Framework can be recorded and executed. Refer to [Chromium Embedded Framework](https://resources.sahipro.com/docs/using-sahi/recording-on-chromium-embedded-framework/) for more details. - Single machine run also goes through the same underlying framework as Distributed runs, but scripts are not synced to `temp/copied/scripts` folder. The Suite Report will show localhost in the Nodes Info. In previous releases, Nodes Info would be blank. - Added SahiEndPoint.java. This exposes all the APIs needed for external code to integrate with Sahi functionality. Updated the [Sahi Integration Support](https://resources.sahipro.com/docs/using-sahi/sahi-integration/) document as well. - Updated h2 jar to version 1.3.159. This speeds up SQL selects considerably. - force\_inject.txt added for forcing injection in specific cases where full html is fetched via AJAX and written using document.write. - Added pass\_through\_urls.txt to transparently pass through content. - ConfigureUI: Added brief description of each Configuration file at the top of each file. - Added force\_inject and pass\_through\_urls to ConfigureUI - Added support for handling PATCH request. - \_dataDrive will ignore a row, if it starts with // - Logs: For a scenario run, Expand All will expand the Sahi functions as well. - Added diagnostics.sah to show information regarding Sahi, OS and browser in the logs. Users can include this script when running the suite. This gives the ability to check diagnostic information for a suite that was run in the past. - When a log is opened, the suite or script name is set as the title for the browser page. - Documentation: Added global search bar which helps in searching for items across different headings. - Template of email sent after a suite, has been modified. Information added for TestCases. - Failed scripts suite is created in the Initiator scripts folder in "drun different master" scenario. - ANT xml Retry targets have been changed for drun and drun different master scenarios. - Simplified ANT and batch file parameters used in drun and drun different master scenarios - Added proxy.host to sahi.properties. This setting helps in cases where isHostTheProxy fails to identify the proxy properly. - Added support for downloading blob content (HTML5 Blob object). - Added pointer events for IE-10 and IE-11 - \_readCSVFile also returns associative Array to be consistent with \_readExcelFile. No change needed in existing code. - Testcase counts are shown in suite report logs. - `[ReturnValue]` keyword added in [Excel Framework](https://resources.sahipro.com/docs/using-sahi/sahi-script-editor/#build-tests-in-the-no-code-test-editor) to access value returned by previous step. - Controller: `Show clientX and clientY` functionality works on CTRL+SHIFT+mouseover, instead of CTRL+mouseover. ## Bug Fixes - Suites running for more than 50 minutes would show up as RUNNING. If email were to be configured for the run, the email would go before the end of the run. Fixed. - Added checks to prevent \_sahi from being initialised twice. Can happen if injection happens multiple times (partials fetched by AJAX and written using document.write) - \_getValue was not showing correct error message if the element passed was not found. Fixed. - Editor: Search is no longer case sensitive. - Editor: If a file was saved as an existing file that was already open, the contents were not being updated. Fixed. - Editor Context Panel: Fixed incorrect removal of spaces from arguments during Update and Insert - Editor Context Panel: Update of inner function call fixed. - Editor Context Panel: Fix to quote urls in Arguments correctly - Editor Context Panel: Loading AR values only for AR like keys ($\_TEXTBOX and not $abcd) - Editor Context Panel: If the entire function text matching a dropdown value were to be typed, arguments were not being updated. Fixed. - Editor Context Panel: If arguments are left blank, Update will remove null arguments at the end, but add null arguments otherwise. - Editor Context Panel: Added check to not quote function arguments which are themselves functions. - Editor Playback window height will now remain fixed. - Editor: Fixed bug in editor to stop loading tab contents 2 times. - Editor: Removed extra server calls to save Editor history. - Editor: Modified .suite files would not show \*. Fixed. - Editor: Content of open tabs loaded only when tab is selected. - Editor: History for unselected logs info elements was not getting saved correctly. Fixed. - Editor loading optimized. - Editor: Tabs are opened from history only for scripts matching the scripts directory. - Editor: Hide "Show Context", "Create Function", "View Doc" buttons for Suite files. - Editor Navigator filter showed only .sah files on selecting "Scripts" and .suite files on selecting "Suites" from dropdown. Now it will show .sah, .sahi, .js, .s.csv, .xls, .xlsx files on selecting "Scripts" and .suite, .dd.csv files on selecting "Suites" - Editor: Sometimes, script refresh causes blank content to appear. Fixed. - Editor: When a loadSahi or loadExcel line is added or removed, the scenario metadata should be refreshed. Fixed. - Editor: Erratic Context function metadata behaviour fixed. - Editor: Choosing New -> Script, and pressing Ctrl + S now opens the Save As dialog. - Editor: Navigator now shows Folders first and then Files. - Editor: If "Link with Editor" was chosen in the Navigator and a new file was created, it was not linked in the Navigator. Fixed. - Editor: When a new data driven suite is created, the columns #script, url and tags are added by default. - Editor: In a scenario file, a double quoted cell value was not copied correctly to a different cell. Fixed. - Editor: Undo-Redo functionality did not work well in Scenario files. Fixed. - Editor: Empty lines at the end of a scenario file are not saved anymore. - Editor: Opening a spreadsheet that had a TAB character caused problems. Fixed. - Editor: "Create Suite" link should save with \[.suite\] extension by default. Fixed. - Editor: In the Playback window, closing the alert for empty browser and start url fields, would cause the Playback window to be closed. Fixed. - Intermediate zip files created in distributed run scenarios were not being deleted at times. Fixed. - Update of offline logs would sometimes throw FileNotFoundException. Fixed. - Flex: After \_click is performed on a MxComponent Element (for example: Button), the element still appeared dark (as if Mouse was still pressed on that Button). Fixed. - Playback with !tag matching was broken. Fixed. - Controller: Corrected areWindowsLoaded functionality for Diagnose. - Added trycatch for xhr check to handle Permission Denied errors. - Fixed recording of "Enter" based form submits. - Controller: Recorded steps data now scrolls to the bottom to show latest steps. - Controller Playback: If a script was run without checking the Start URL checkbox, and an error was encountered in the first step, rerunning the script would do nothing. Fixed. - PacProxySelector changes - Multiple bugs (shExpMatch, isInNet, myIpAddress) in pacFunctions.js fixed. - Single quote in url breaks proxy pac. Fixed. - Added --enable-npapi while launching chrome to enable java after chrome 42. Needed for supporting Applets. - dataTransfer set to null for Firefox versions greater than 30. Fixes simple drag drop on Firefox. Complex cases may need \_dragDropNative - In all screenshot APIs that did image comparison, the difference threshold has been changed to float instead of int. Existing scripts do not need change. - \_assertEqualImages: If the actual and expected images have the same name but are from different directories, the expected image is compared with itself instead of the actual image. Fixed. - In offline logs, Show Retry logs link should be displayed only when there is a failure. Fixed. - Url added to donot\_download\_urls.txt does not prevent the download, if content disposition forces download. Fixed. - If IE has an external proxy, starting and stopping Sahi without ever launching IE, will cause external proxy to be deleted from IE. Fixed. - Comparing screenshots between two Report logs should not display images from \_assertEqualImages step. Fixed. - Changes to use 127.0.0.1 instead of localhost for proxy lookup in IE, Firefox and Chrome. Fixes Firefox random failures due to DNS lookup errors. - Controller: Fixed step wise playback from controller - Controller: When recording a script, clicking on "Append to Script" will cause appended steps to appear in result textarea. - "Stop All" functionality will close all running scripts as well. - \_windowAction API fails for Sahi installations with space in their path. Fixed. - Corrected \_lock, \_unlock documentation to reflect latest functionality. - Added changes to create SSL socket with getHostAddress() instead of getHostName(). Fixed slow running script on a https URL on mobile device. - \_launchNewBrowser was using the same pool as the launching browser which led to capacity exhaustion for the browser type. Now it uses a different pool with the same capacity as that of the launching browser. - Added support for response stream with gzip encoding in REST APIs. - Disabled firefox data reporting - Added junit suite report as part of offline logs. - Logs: Removed "Pass threshold" from Suites list, since it was not being used. - \_openBrowser resets domain and window contexts. - Scenario Files: global setup and teardown are called before and after each testcase block. If using data drive, local setup and teardown are called after each line of data. - setup and teardown are shown grouped in logs - mail.isSSL in email.properties was not used correctly which caused non SSL connections to fail. Fixed. - One could not run Data driven suites (.dd.csv) on mobile devices. Fixed. ## Changes needed in Usage :::caution[Important] This section assumes that you have already been using Sahi. It lists changes in Sahi's behaviour in SahiPro 6.1.0. ::: - In a distributed run, only the participating scripts in the suite are zipped and sent over to the nodes. Hence if your scripts refer to any resources like CSV files (through [CSV APIs](https://resources.sahipro.com/docs/sahi-script/functions/files/#csv-files)) or Excel files (through [Excel APIs](https://resources.sahipro.com/docs/sahi-script/functions/excel/)) or images etc, they have to be explicitly included in your scripts using the [\_resource](https://resources.sahipro.com/docs/sahi-script/functions/include/#_resource) API. Please use relative path for resources so that they can work on all the nodes. In summary, any resource that your script uses (other than scripts themselves), needs to be included through \_resource APIs. - The ANT xmls have changed. Please regenerate the ANT xml files used in your continuous integration systems, from the Playback Editor. The old ANT xmls may or may not work, so please use the new versions. - Accessors metadata location has changed. `accessors_metadata.txt`, `accessors_flex_metadata.txt` and `accessors_applet.metadata.txt` have been removed from `userdata/config`. The default values for accessor identification have been moved in to `config/accessor_metadata/` as .json files. To customize accessors, please refer to [Tweaking Sahi APIs](https://resources.sahipro.com/docs/sahi-script/tweaking-sahi-functions/) for details. - APIs declared via accessor metadata need not be defined again in normal\_functions.txt. :::caution[Important] normal\_functions.txt should not be modified by end user. ::: :::note NOTE: If you have not modified Accessor metadata in your previous versions, no changes are required. ::: - Reports xsl location has changed. The default report XSL files which are shipped with Sahi have now been moved into `config/reports/xxx`. The XSLs have been modified significantly to reflect database changes. If you have customized these xsls previously, create a copy in `userdata/config/reports/xxx` folder and apply your changes in this copy. Refer to [Modifying an existing reporting type](https://resources.sahipro.com/docs/using-sahi/customize-reports/#change-a-report-type) section for details. :::note NOTE: If you have not customized any xsls in your previous versions, no changes are required. ::: - Once SahiPro 6.1.0 is installed, before opening Sahi Editor, please clear the browser cache on the browser that the Editor opens in. This is needed to load the 6.1.0 Editor javascript files correctly. - A very early form of TestRunner usage using browser path, browser exe, as shown below, has been removed. Please use testrunner.bat instead. ```sh java -cp /path/to/ant-sahi.jar net.sf.sahi.test.TestRunner [] ``` - In the Editor, Context Panel information is populated by Ctrl + Click on a line. Earlier, this would happen on Click. - If you had received patches from us for a previous version, please refer to [Post Upgrade steps for all installations](https://sahipro.com/alldocs/v6.1.0/using-sahi/upgrade.html#Post%20Upgrade%20steps%20for%20all%20installations) section for details on how to deal with `user_extensions.js` and `userdata/extlib` jars. --- # What is new in Sahi Pro v6.0.1 Sahi Pro v6.0.1 is a bugfix release. :::caution[Important] **WARNING related to Upgrades** - **Upgrade from SahiPro versions older than 6.0.0** Please do NOT upgrade to Sahi Pro 6.0.1 from an existing installation whose version is earlier than 6.0.0. There were significant changes in userdata folder introduced in 6.0.0 which would cause problems. Please do a fresh installation of Sahi Pro 6.0.1 in another folder and copy over your older userdata/scripts folder to the new installation. Also selectively copy changes from userdata/config files to the new installation. - **It is OK to [upgrade](https://resources.sahipro.com/docs/using-sahi/quick-tutorial/#upgrade-sahi) to Sahi Pro 6.0.1 from Sahi Pro 6.0.0.** A few files are different in Sahi Pro 6.0.1. 1. If you have not changed any xsls in the `userdata/config/reports` folder, just copy over the contents from `config/userdata_template/config/reports`. Else, merge the differences manually. 2. Merge the contents of `config/userdata_template/config/donot_download_urls.txt` to `userdata/config/donot_download_urls.txt` folder. 3. Copy over `config/userdata_template/scripts/global_include.sah` to `userdata/scripts/global_include.sah` 4. Copy over `subject.sah` and `noise.sah` from `config/userdata_template/scripts/demo/load` to `userdata/scripts/demo/load` folder 5. If you have previously created ANT xmls **with Retry targets** using the `Editor`, regenerate the ANT xmls from `Editor | Playback | Create Ant Target`, since the Retry targets have changed. If your ANT xmls do not contain Retry targets, you do not need to regenerate the ANT xmls. ::: ## Bug Fixes - Scripts were running slower because Sahi was waiting for uninitiated XmlHttpRequest objects also. Fixed - Highlighting matching brackets in Editor and Controller was broken. Fixed - URL encoding query parameters in REST APIs - Editor was saving files with \\n as line separator. Fixed to use the file's original line ending. - windowAction APIs which were experimental in Mac, are temporarily disabled. - When \_setStrictVisibilityCheck is true, elements inside frames were returning false for \_isVisible. Fixed. - Object Repository is renamed to Accessor Repository to better convey its usage and meaning. File endings will now default to \_AR.sah. Existing \_OR.sah will continue to work. - Added props parameter in \_assertSnapShot API which allows specifying additional attributes like delay, trim, image type etc. - Property java.ntlm.transparent\_authentication.enabled in sahi.properties was doing the opposite. Fixed. - In a data driven suite, if the header column size and row column size did not match, there were failures on a single machine as well as distributed run. Fixed. - In a distributed run with a data driven suite, if a row had a blank value in an intermediate column, the script execution would fail and the run would go into an infinite loop. Fixed. - After the execution on first node was aborted, when scripts were re-executed on another node, offline logs were not getting generated. Fixed. - When a node goes offline, master would sometimes hang waiting for a response and retry would never be invoked. Fixed. - Fix to sync the scripts to the correct machine in case of Distributed Run with a different master - In a distributed run, if the nodes are unavailable (browser is not supported or Master cannot communicate with the node), the run would never terminate. Fixed. - Trimming contents in Import CSV in Editor. The untrimmed spaces was causing scenarios to fail. Fixed. - Fixed UI issues in ddcsv editor - Copy paste, editing etc. were broken - Optimizing getAssociatedLabel. Look only in current window object and only upto 8 parents. Was using too much CPU for pages with lots of nested iframes and containing lots of elements. - In some cases, \_takePageScreenShot showed double images when the page size was less than the browser window size. Fixed - \_assertEqualImages and \_compareImages was failing when any of the file paths had a space in them. Fixed. - Running an empty suite returns success now - Optimized fetching of suites list in Logs - Incorrect information in junit reports removed - dload.bat would not terminate after running the load tests. Fixed. - Documentation added for APIs [\_startHarLogging](https://resources.sahipro.com/docs/sahi-script/functions/logging/#_startharlogging) and [\_stopHarLogging](https://resources.sahipro.com/docs/sahi-script/functions/logging/#_stopharlogging) - Load testing documentation updated - When testing an ANT target generated from `Editor > Playback > Create Ant Target`, in case of a Retry, the Retry status was not considered as the final status. Fixed. - Dload ANT target has been fixed ## Features - [\_mouseOverNative](https://resources.sahipro.com/docs/sahi-script/functions/actions/#_mouseovernative) added for native mouse events - subjectRepeatCount can be passed to dload. subject.sah will be run that many times at each load level. This helps average out any abnormal behaviour during that moment of execution. --- # What is new in Sahi Pro v6.0.0 Sahi Pro v6.0.0 is a major release and contains many new features and fixes. The focus of this release is tester productivity enhancement. :::caution[Important] This release has significant changes in userdata folder. Please do not upgrade on an existing installation. Please do a fresh installation of Sahi Pro 6.0.0. in another folder and copy over your older userdata/scripts folder to the new installation. Also selectively copy changes from userdata/config files to the new installation. ::: ## Key features ### Editor ![](https://resources.sahipro.com/docs/assets/images/releases/editor_overview.webp) **Script and Suites Editor** The Sahi Script Editor has been completely revamped. The editor allows you to view all the scripts in the scripts directories and edit them from the browser based editor. The editor supports normal Sahi scripts, Scenario files (.s.csv) and Data-driven Suite files (.dd.csv). **Editor Context Pane** The Context pane of the editor lists all known functions in the script directories, making discovery of functions very easy. One can view the details of functions used in scripts, discover and call functions from any other script and also create new functions through the "Create Function" dialog. This prevents testers from writing duplicate functions or making mistakes in function names or parameters passed. Object repository entries are also visible and editable via the Context pane. **Playback from editor** ![](https://resources.sahipro.com/docs/assets/images/releases/playback.webp) Scripts and suites can be executed directly from the Editor. Functionality of the older Web based testrunner (available upto v5.1.2) has been integrated into the Editor. One can choose single or multiple browsers for playback. Suites can be played back sequentially in a single browser session, or run in parallel on a single machine or run distributed across multiple machines with parallel instances running on each machine. Simple or data-driven suites can also be created on the fly using the Create Suite functionality. **Ant targets and Jenkins support** Ant targets for running with builds can now be created from the Script Editor itself via the "Create Ant Target" functionality. Read more in "Triggering Sahi Pro from Jenkins" section. ### Triggering Sahi Pro from Jenkins ![](https://resources.sahipro.com/docs/assets/images/releases/jenkins.webp) Sahi Pro needs real browsers to playback test scenarios. But most Jenkins/build machines run in server mode and do not have a GUI. This forces end users to either try with headless browsers or to execute Sahi scripts remotely. With the new changes this is what you can do: Jenkins machine (J): Run Jenkins on server. No Sahi installed. Sahi Master machine (SM): Sahi Pro runs on this machine and behaves as Master Sahi slave machines (SL1, SL2, SL3): These are slave machines with Sahi Pro running on them. During the build process: Jenkins pulls the latest scripts from the Source Control Management (SCM) system. It calls the Sahi ant target. Sahi target copies over the scripts from Jenkins (J) to master (SM). SM then copies scripts to SL1, SL2, SL3, distributes the execution and collects all reports. Sahi ant target then pulls reports from SM to Jenkins. This allows Jenkins to remain a headless server and does not need Sahi installed on it. Also all distribution of scripts and pulling of reports happens through Sahi's ant target itself. ### Object Repository Object repository is now tightly integrated in Controller itself. - Once a Object Repository file is chosen, an element will always be identified first by its OR entry, even when not in recording mode. This prevents the same element from being identified in multiple ways in different scripts. - When elements have been smartly identified using Relational APIs like \_near or \_under once, newer recordings on those pages will simply use the OR entry, so other users do not need to worry about doing it again or wrongfully using a different identification mechanism. - There is also provision to modify existing OR entries. ### Better Reporting #### Browser Page and Element Screenshots via \_takePageScreenShot Screenshots are a useful way to get more information in case of script failures. Sahi now has the ability to take screenshots of just the browser content and not the full desktop. One can even take screenshots of specific elements like a table or a div containing a graph. Have a look at \_takePageScreenShot API for usage. #### Better error stacktraces ![](https://resources.sahipro.com/docs/assets/images/releases/failure_stacktrace.webp) On script failure or error, Sahi logs now shows the stacktrace of function calls, allowing easy navigation to calling functions. #### Script locking for synchronization API \_lock allows synchronization between scripts. When a lock on one label is obtained another script cannot obtain the lock on the same label and will wait till \_unlock is called. Similarly \_lockWindow API can be used to exclusively work on a particular window. This is useful in taking screenshots during parallel playback. This is already used in global\_include.sah #### Globally included global\_include.sah file All scripts now automatically include global\_include.sah file during playback. Common error handling functions like onScriptError and onScriptFailure can be defined here. Sahi Pro 6.0.0 ships with a default global\_include.sah with default implementations of error callback functions. #### Searching scripts within suites in Sahi's logs It is now possible to search both by suite and script name and also see scripts executed as part of suite runs. #### Improved Graphs Graphs on suites reports page have been improved to present information better. ### Compare images ![](https://resources.sahipro.com/docs/assets/images/releases/compare_screenshots.webp) APIs for comparing two images and asserting on images has been added. Combined with the ability to take screenshots of individual elements, you can now add assertions of graphs or specific UI elements which are to be asserted for their visual correctness. ### Native events Sahi Pro so far had support for native keyboard events. From 6.0.0 native mouse events are also supported. This allows complex functionality like dragdrop across multi domain iframes, complex file upload controls etc. ## New APIs **Fetch related APIs** - [\_getTableContents](https://resources.sahipro.com/docs/sahi-script/functions/fetch/#_gettablecontents): Gets contents from an html table - [\_getOptions](https://resources.sahipro.com/docs/sahi-script/functions/fetch/#_getoptions): Gets the values or texts of all options of the select element - [\_getScreenSize](https://resources.sahipro.com/docs/sahi-script/functions/fetch/#_getscreensize): Returns the inner width and inner height of the browser window - [\_userAgent](https://resources.sahipro.com/docs/sahi-script/functions/fetch/#_useragent): Returns the UserAgent string of the browser - [\_areEqual](https://resources.sahipro.com/docs/sahi-script/functions/fetch/#_areequal): Compares two JavaScript types or arrays - [\_isPhantomJS](https://resources.sahipro.com/docs/sahi-script/functions/fetch/#_isphantomjs): Returns if the current browser is a PhantomJS browser **Native click related APIs** - [\_clickNative](https://resources.sahipro.com/docs/sahi-script/functions/actions/#_clicknative): Performs a native click on an element - [\_clickNativeXY](https://resources.sahipro.com/docs/sahi-script/functions/actions/#_clicknativexy): Performs a native click at the given coordinates - [\_doubleClickNative](https://resources.sahipro.com/docs/sahi-script/functions/actions/#_doubleclicknative): Performs a native double click on an element - [\_rightClickNative](https://resources.sahipro.com/docs/sahi-script/functions/actions/#_rightclicknative): Performs a native right click on an element - [\_dragDropNative](https://resources.sahipro.com/docs/sahi-script/functions/actions/#_dragdropnative): Simulates a dragdrop event from element 1 to element 2 using native events - [\_dragDropNativeXY](https://resources.sahipro.com/docs/sahi-script/functions/actions/#_dragdropnativexy): Simulates a dragdrop event from element at first set of coordinates to element at second set of coordinates, using native events **Assertion APIs** - [\_assertVisible](https://resources.sahipro.com/docs/sahi-script/functions/assertions/#_assertvisible): Use this instead of \_assert(\_isVisible) - [\_assertNotVisible](https://resources.sahipro.com/docs/sahi-script/functions/assertions/#_assertnotvisible): Use this instead of \_assert(!\_isVisible) - [\_assertEqualImages](https://resources.sahipro.com/docs/sahi-script/functions/assertions/#_assertequalimages): Asserts that two images are similar - [\_assertSnapShot](https://resources.sahipro.com/docs/sahi-script/functions/screenshots/#_assertsnapshot): Takes a page screenshot of the webpage or requested element and asserts its similarity to a reference image **Images related APIs** - [\_takePageScreenShot](https://resources.sahipro.com/docs/sahi-script/functions/screenshots/#_takepagescreenshot): Take a full page screenshot of a browser element or the web page - [\_compareImages](https://resources.sahipro.com/docs/sahi-script/functions/screenshots/#_compareimages): Allows comparison of two images - [\_logImage](https://resources.sahipro.com/docs/sahi-script/functions/logging/#_logimage): Logs an image to the Report logs **Popup window related APIs** - [\_windowExists](https://resources.sahipro.com/docs/sahi-script/functions/popup-windows/#_windowexists): Use this to check if a window is open - [\_getRecentWindow](https://resources.sahipro.com/docs/sahi-script/functions/popup-windows/#_getrecentwindow): Returns the most recently opened window **Lock related APIs** - [\_lockWindow](https://resources.sahipro.com/docs/sahi-script/functions/script-execution-control/#_lockwindow): Use this instead of \_lock when dealing with window related APIs - [\_unlockWindow](https://resources.sahipro.com/docs/sahi-script/functions/script-execution-control/#_unlockwindow): Use this when using \_lockWindow **Documentation APIs** - [\_startDocumentation](https://resources.sahipro.com/docs/sahi-script/functions/documentation/#_startdocumentation): Use this to document an existing script - [\_stopDocumentation](https://resources.sahipro.com/docs/sahi-script/functions/documentation/#_stopdocumentation): Stops the documentation **Misc APIs** - [\_toJSON](https://resources.sahipro.com/docs/sahi-script/functions/utilities/#_tojson): Converts a JSON object to a string **Callback APIs** - [onBeforeStep](https://resources.sahipro.com/docs/sahi-script/functions/script-execution-control/#onbeforestep): Called before every step in the script - [onAfterStep](https://resources.sahipro.com/docs/sahi-script/functions/script-execution-control/#onafterstep): Called after every step in the script ## Modified API's - [\_isVisible](https://resources.sahipro.com/docs/sahi-script/functions/fetch/#_isvisible): $checkZIndex and $doScroll have been newly added. Scripts written before 6.0.0 do NOT need changes. - [\_takeScreenShot](https://resources.sahipro.com/docs/sahi-script/functions/screenshots/#_takescreenshot): $format and $resizePercentage have been moved into a $props parameter. **Scripts written before 6.0.0 will need changes.** - [\_scriptStartTime](https://resources.sahipro.com/docs/sahi-script/functions/script-suite-info/#_scriptstarttime): Returns a Date object. Previous versions returned a String. **Scripts written before 6.0.0 will need changes.** - [\_lastAlert](https://resources.sahipro.com/docs/sahi-script/functions/javascript-dialogs/#_lastalert): \_lastAlert now takes an optional parameter $allalerts. If $allalerts is true it will return all alerts encountered in that session, as an array. Scripts written before 6.0.0 do NOT need changes. - [\_lastConfirm](https://resources.sahipro.com/docs/sahi-script/functions/javascript-dialogs/#_lastconfirm): \_lastConfirm now takes an optional parameter $allconfirms. If $allconfirms is true it will return all confirmation messages encountered in that session, as an array. Scripts written before 6.0.0 do NOT need changes. ## Other Features and Enhancements - Set button has been removed from Playback tab in controller. You can directly Play a script. - Configure screens can only be accessed from local machine, so one cannot access another Sahi server and look at its properties. One can reset this behaviour by setting `configuration.allow_remote_access=true` in userdata.properties. - DRun works with multiple browsers - If a node does not have the browser available, DRun will automatically distribute the scripts to other nodes on which the browser is available. - Logs can be viewed in English if "&lang=en" is added to the logs URL. - Suite Name and Script Name have been added to the Filter criteria. One can filter reports using either of these fields. If Suite Name is chosen, suite reports that match the suite name will be displayed. If Script Name is chosen, all scripts and suites containing the script would be displayed. - One can configure whether attachment should be sent along with email, at the end of a run. By default, attachment would be sent. To disallow it, set `mail.send_attachment=false` in userdata.properties - One can configure the maximum size of attachment sent with email after a run. By default, there is no limit on the size. To change this, add `mail.max_allowed_attachment_size=` in userdata.properties. `` is to be specified in bytes. 0 means no limit. - Added a new window property sahiWindowId which is returned as part of window objects from \_getWindows. sahiWindowId is an id autogenerated by Sahi and can be used in [\_selectWindow](https://resources.sahipro.com/docs/sahi-script/functions/popup-windows/#_selectwindow) and [\_windowExists](https://resources.sahipro.com/docs/sahi-script/functions/popup-windows/#_windowexists) APIs - One can configure the CSV separator to be used when dealing with Data driven suites(.dd.csv), .csv and Scenario files(.s.csv). By default, this is a comma (","). But this can be changed, say to a semi-colon(";") by setting `csv.word_separator=;` in userdata.properties. This csv separator will be used when running a data driven suite. It will also be used when loading and saving a scenario file or data driven suite from the Editor. - Reports Export to Excel functionality enhanced. - Screenshot images now appear in the Excel file exported from a Script report - Export to Excel functionality added in Testcase report page - Accessor metadata information has now been externalized. This is modifiable via userdata/config/accessors\_metadata.txt (HTML), accessors\_applet\_metadata.txt (Applets) and accessors\_flex\_metadata.txt(Flex). So if one wants to change the order of attributes appearing in the Alternatives dropdown in the Controller or add a new attribute, etc, they can modify these text files directly instead of having to touch JavaScript source files. Restart Sahi for the changes to take effect. - Added ability to specify downloadable content in content\_detection.txt. The pattern to add looks like `download:.*abc.*`. If a page's initial content matches this pattern, it will be downloaded. This is useful when one cannot use download\_urls.txt for this purpose. Example: Assume a webpage that displays some HTML content and a Submit button. On pressing the Submit button, the server returns an XML response. Assume that the url does not change in the response. Since the response is XML, Sahi cannot process this page. Hence it has to be downloaded. But putting the url in download\_urls.txt will cause the first page also to be downloaded. So instead, find a pattern in the starting content of the second webpage and add that pattern in content\_detection.txt. - Enhanced stacktraces in logs - [\_getExcel](https://resources.sahipro.com/docs/sahi-script/functions/excel/#_getexcel) changes: - If a cell has a formula, `getData` and `get` functions return value instead of formula. Added a method `getCellFormula` that returns formula. - Added `getSheetNames` that returns all the sheet names as a String array - Added `getRawWorkbook` which returns a Workbook POI object. This gives the user the flexibility to deal with the Workbook object directly - Added `getCellObject` that returns a Cell POI object. - Added `getCellFont` that returns a Font POI object. - Handling domains with protocols in \_selectDomain. - Made NTLM transparent authentication configurable. - Added AccessControlAllowAllResponse for crossDomain Access of Sahi urls. - Added a [document](https://resources.sahipro.com/docs/using-sahi/sahi-integration/) that explains how Sahi can be integrated with external tools. It provides a step by step list of all URL calls that might be required for a complete integration with Sahi. - Users can specify a list of function names that appear as autocompletion suggestions in the `Function Name` textbox when creating a function from the Editor. This list of functions can be specified in function\_names.txt from the Configure UI - XHR ready state 1 default wait time added. - Applet automation has been reimplemented to need less interference from end user. - Added exclude\_inject\_applet.txt to exclude specific applets from being injected by Sahi. - Support for signed applets - New Applet automation implementation - Fixed \_takeScreenShot and \_takeScreenShots for phantomjs. - Updated graphs for dload reports. Added Step-vs-Time and URL-vs-Time graph for dload tests. - Dload now runs the subject script 3 times at each noise level, and shows average time. The number can be changed by setting `dload.number_of_time_subject_execute=` in userdata.properties. - Added Pro and OS versions to documented APIs. - \_log can also take an image - Added \_assertEqual() statement while recording Alert / Confirm / Prompt - \_checkbox and \_radio are now recorded with \_check and \_uncheck instead of \_click. - Attribute type (ID, Name etc) can be displayed for Attributes in the Controller Alternatives dropdown. This is configurable through `"controller.display_attribute_type.enabled"` in userdata.properties. By default, attribute type is not displayed. - if strictvisibility is true, recurseInFrames ignores invisible frames and iframes. - Added clickNative for Flex. - APIs \_enableDefaultErrorLogging and \_disableDefaultErrorLogging added - Added line information for script parsing errors. - Added implementation for \_sahi.SKIP\_SCREENSHOTS and \_sahi.SKIP\_ASSERT\_SNAPSHOTS. If \_sahi.SKIP\_SCREENSHOTS is true, APIs that take screenshots will be skipped. If \_sahi.SKIP\_ASSERT\_SNAPSHOTS is true, APIs that assert screenshots will be skipped. ## Bug Fixes - If email send fails, the last script's status did not get updated in the offline reports - Wait for offline logs to be written before returning SUCCESS or FAILURE status - In drun, only available browsers are now used. - Time taken for drun was updated twice - once before and once after log creation. - readCSV for mac (\\r\\n) fixed - Corrected total steps count in logs. - Simple optimization to try inject in sample first. Fixes bug of Out of Memory Error in html-head-script-20mb-/script-/html - Fix for drun offline logs not showing images. Copying only if image exists. - imageDirectory is now created, if it does not exist while creating offline logs. - Fix for testcases reporting. Once a sript failed with an error, further testcases were not being logged. Also fixes duplicate error logging in Excel framework. - Sometimes a blank line with timestamp was visible in logs. - ERROR log now comes inside function folding - Handle window titles with quotes in \_popup - Takes care of unicode in logs and controller playback tab. Fixed Log\_highlight to show unicode characters properly. - \_readCSV fixed for handling empty rows. - Fixed saving script bug with extra new line on top. - DRUN Throws Exception if the nodes string has space after a comma - XHR monitoring in IE fixed. - Default lock timeout increased to 1 minute from 5 seconds. - Added configurable delay time for typeNative Safari bug. Default time is 10 ms. - Changes made for showing NaN for time taken in Log in IE and firefox Browser. - Added Confirmation message in Controller Record functionality, if file already exists. - Fix to show "is key tool available" and "is jar signer available" in Controller info tab - Fixed "SSLProtocolException: handshake alert: unrecognized\_name" by setting jsse.enableSNIExtension=false. - Prevent NTLM auto login and prevent caching of NTLM credentials. - Noise data is no longer stored in the database for dload. - \_windowAction() will now fail gracefully upon call in Linux. - \_collectAttributes() was returning null if the collection array is huge. - Now HARViewer works in H2 db as well as MySql. - Alerts did not appear when recording script. - Fixed broken XUA injection - email properties changed for prefix in subject and content - SSL root certificate acceptance fails if there is a space in path of sahi - Fixed bug - When running a suite in Opera 24, the log incorrectly shows Chrome. - Fixed wrong message in assertExists failure. - domainfix.txt file no longer needed. Sahi automatically handles this. - \_assert statements fixed to always cause failure, not error. This means that when evaluating the \_assert, if an element is not found, it will be handled as a failure and not as an error. Thus the script will continue to execute. - Fixed browser stacktrace in case of failure. - Removed console.log statements and also added a dummy console.log for older browsers. - Removed exception for java and ruby driver while recording confirm and prompt. - Changed displayInfo to fix accessor.value for java/ruby controller mode. - Fixed issue - if an element identifier has slashes, it was not identified correctly - Assertions when recorded, should not double escape newlines. "a\\nb" should not become "a\\\\nb" - Fixing flakiness due to race conditions in fetch functionality. Fixes collect and count related random failures. - Fix for \_setStrictVisibility not working on iframes unless page is reloaded. - Fixing build recurseInIframes handles different domains. - Added a 2nd parameter - "relative" in \_position API - Fixed toLowerCase error if sahi.accessor.ignore\_case=true. - Identification of `` tag in Opera, IE9 and IE10. - Truncating long strings in logs of function arguments - Excel framework null, blank behavior fixes: If blank cell, treat as null in excelfw. Handle null in function logging (was \[object\]) - Now \_wait works for time given as String - setselected now works with selectbox with size > 0. conversion added for java keycodes to phantomjs keycodes. - Changes in \_writeCSVFile API For Extra line in start of a CSV file while overwriting. and changes accordingly in csv.sah - Added other characters (like '$', "@', etc) to be written using native events --- # What is new in Sahi Pro v5.1.2 Sahi Pro 5.1.2 is a bugfix release. ## Bug Fixes - Fixed Chrome issue where Chrome runs too fast without properly waiting for page loads since Chrome 34. If you do not wish to upgrade from 5.1.1, you can also just apply the patch mentioned in [this blog post](http://sahi.co.in/fast-execution-without-waits-in-chrome-34/). --- # What is new in Sahi Pro v5.1.1 Sahi Pro 5.1.1 is a significant bugfix release. ## Features - Added `donot_download_urls.txt` in `userdata/config.`. `download_contenttypes.txt` and `download_urls.txt` specify which files should be be downloaded using contenttype or url pattern. Sometimes all urls of a particular content type need to be downloaded, EXCEPT some matching a particular URL pattern. These exception URLs can be specified in `donot_download_urls.txt.` - Working with Sahi APIs made easier through Controller. - Select an API from `APIs List:` textbox and press `Enter` key to copy it to the `Evaluate expression` box. - Element Accessors can be inserted at a specific cursor position or cursor selection in the expression inside the `Evaluate expression` box, through the Accessor Copier. - Added more support for REST APIs. - Added API [RESTRequest.setCredentials](https://resources.sahipro.com/docs/sahi-script/functions/rest-api/#restrequestsetcredentials) to handle pages that require Authentication (401 response code). - Added API [RESTRequest.setBody](https://resources.sahipro.com/docs/sahi-script/functions/rest-api/#restrequestsetbody) to set the body of the request with a complete set of key-value pairs. - Added APIs [\_frame](https://resources.sahipro.com/docs/sahi-script/functions/browser-accessors/#_frame), [\_startLookInside](https://resources.sahipro.com/docs/sahi-script/functions/relations/#_startlookinside), [\_stopLookInside](https://resources.sahipro.com/docs/sahi-script/functions/relations/#_stoplookinside). - `_wait` now accepts a `function` as the `condition` argument. Sahi will wait for either the entire timeout or till the specified `function` returns `true`. - Added ability to configure `substitutions.xml`, `content_detection.txt`, `email_template.txt`, `response_headers_remove.txt`, `urlhistory.txt`, `donot_download_urls.txt` and `user_extension.js` through `Configure` link on Dashboard. - Changes to configuration files (through `Configure` link on Dashboard) excluding `browser_types.xml` and `userdata.properties` do not need a restart of SahiPro. Refresh the application page for changes to take effect. - Added argument `ignoreEmptyRows` in `_readCSVFile` API, to ignore blank rows in the csv file. - Added `Find` functionality in `Sahi Script Editor`. Earlier, unless the script had been scrolled once, text could not be found successfully on the page. - Applet docs updated. - Renamed `mail.subject` to `mail.subject.prefix` and `mail.content` to `mail.content.prefix` in email.properties. These values can be left blank. - Updated [documentation](https://resources.sahipro.com/docs/using-sahi/email-during-playback/#emailproperties-file-explained) for sending email through Sahi. - Sahi favicon changed on the Controller. - PhantomJS icon will be displayed on the Dashboard if `phantomjs.exe` is present in `/ext/phantomjs`. The configuration need not be explicitly added to `browser_types.xml.` - Changes to expand Links automatically in the Docs tree on search. ## Bug Fixes - Fixed Testrunner playback in single session. - Fixed Suites playback on mobile devices. - Docs will now open correctly on IE 8 browser. - Fixed Email Reports functionality for Linux. - Fixed failure in SSL root certificate acceptance when there was a space in the Sahi installation path. - Fixed Element identification problems in `Flex.` - Fixed `under` API in `Sahi Java driver` to handle `limit` parameter. - Fixed bug causing textarea (`input type = "textarea"`) not to be identified. - Fixed bug in `_fieldset`. \_fieldset API would previously throw an exception if not present on the page. Thus one could not do `_exists(_fieldset("xyz"))` or `_isVisible(_fieldset("xyz")).` - Fixed `Evaluate Expression` smart dropdown in `Controller,` for `IE8.` - `_readCSVFile` can now read the contents of a file specified through a URL. - Fixed bug in Sahi code injection to honour X-UA-Compatible meta tag on `IE10.` - Fixed bug in Sahi code injection when script tag appears above head tag. - `_getSelectionText API` fixed for IE11. - Fixed logs generated on using `_fail` API. \_fail API when used in a script, would get logged thrice. - `_typeKeyCodeNative` fixed to handle special characters (like '$', "@', etc). - `_writeCSVFile` API fixed in case of file overwrite. Previously, an additional blank line was being added as the first line of the csv file in the case of 'overwrite'. - On `Mac`, `.sh` files (`start_dashboard.sh`, `testrunner.sh` etc) are now automatically executable. - If a script is run from `TestNG`/`JUnit` on IE browser, and the proxy settings of the browser were to be reset externally (through a ProxySettings monitor, say), Sahi would not kill the browser and execution would hang. Now Sahi will throw an exception after 150 seconds and the browser will close. - Fixed broken upload functionality through XmlHttpRequest. - Fixed bug to filter columns `Run`, `Passed`, `Failed` correctly on the main `Reports` page when `Show Testcase Summary` is pressed. - Fixed broken `Doc Viewer` functionality in `Script Editor` on Linux. - Fixed closing of new Download window and addToSession window for IE. --- # What is new in Sahi Pro v5.1.0 Sahi Pro v5.1.0 is a major release and contains many new features and bug fixes. ## Key features ### Internet Explorer 11 Support Sahi Pro V5.1.0 adds support for the latest IE 11 browser. ### CORS support Most browsers have implemented/upgraded their CORS support/implementation. Sahi Pro has updated its CORS support to handle HTML5 websites with cross domain AJAX requests. Specifically, Access-Control-Allow-Origin errors that used to happen with older versions of Sahi Pro have been fixed. ### Data Driven Suites Say Hello to the next generation suite! Data Driven suites (.dd.csv) can be used to run scripts, suites, and other data driven suite files, pass data, tag individual scripts/suites and run them selectively. You can now data drive multiple scripts simultaneously. [More Details](https://resources.sahipro.com/docs/using-sahi/data-driven-suites/) ### Brand new documentation Sahi's documentation has been rewritten. APIs have been covered extensively. Documentation is now available locally as part of the installation. It can be accessed by clicking the "Docs" link on Sahi Dashboard. ### Scenario Editor for Excel Framework Sahi's [Excel Framework](https://resources.sahipro.com/docs/using-sahi/sahi-script-editor/#build-tests-in-the-no-code-test-editor) allows business users and subject matter experts to write test scripts in the language of the business and hide away implementation details. The [Scenario Editor](https://resources.sahipro.com/docs/using-sahi/sahi-script-editor/#sheet-view) takes it a step further by providing a web interface to manage such files. It provides autocompletion of function definitions and highlights errors. ### Sahi as a Documentation Tool Sahi Pro can be used to create simple documentation with screenshots. Manual testers can use this as a tool to create a knowledge base for other manual or automation testers. The recorded document contains the script, plus screenshots. It can be run as a normal sahi script too, thus helping automation testers quickly see what needs to be done. [Details](https://resources.sahipro.com/docs/using-sahi/sahi-as-a-documentation-tool/) ![Script as Documentation](https://resources.sahipro.com/docs/assets/images/using-sahi/script-editor/script-editor-docs2.png) ### Script specific object repository files [Object Repository](https://resources.sahipro.com/docs/using-sahi/sahi-controller/#record-with-accessor-repository) files can be configured for individual scripts from the Controller during recording. ![](https://resources.sahipro.com/docs/assets/images/using-sahi/controller/record_ar.webp) ### Upgrading Sahi becomes easier Sahi Pro's Installer can now upgrade installed Sahi to a newer version. During an upgrade, the userdata folder is not overwritten, thus preserving user scripts and settings. [Details](https://resources.sahipro.com/docs/using-sahi/quick-tutorial/#upgrade-sahi) ### Multiple browser sessions in single script Sahi Pro can launch [multiple browsers](https://resources.sahipro.com/docs/sahi-script/functions/multiple-browsers/#_launchnewbrowser) in the same session when needed. [\_launchNewBrowser](https://resources.sahipro.com/docs/sahi-script/functions/multiple-browsers/#_launchnewbrowser) launches a new browser instance. The new instance does not share cookies with the base browser. This allows testing functionality like chat where 2 simultaneous users need to be logged in into the system. Once launched, steps can be directed to different browser instances via [\_selectBrowser](https://resources.sahipro.com/docs/sahi-script/functions/multiple-browsers/#_selectbrowser). ### REST APIs for WebServices With these APIs you can access WebServices easily, instead of using Java code. More details are available [here](https://resources.sahipro.com/docs/sahi-script/functions/rest-api/). FAQ is available [here](https://resources.sahipro.com/docs/faq/webservices/) ### Email notification on Suite execution Emails can be sent on completion of suite. Testrunner, drun and ant can be configured to send an email containing the playback reports on finishing execution. [Details](https://resources.sahipro.com/docs/using-sahi/email-during-playback/) ### Lots of optimizations Database connection pools, thread pools, better memory management etc. have been added to make Sahi Pro lean, fast and stable. If you use mysql or mssql as the reporting database, performance improvements can be significant. ## New APIs - [\_getWindows](https://resources.sahipro.com/docs/sahi-script/functions/popup-windows/#_getwindows): Lists open windows - [\_selectTextRange](https://resources.sahipro.com/docs/sahi-script/functions/actions/#_selecttextrange): Allows selecting of text - [\_selectRange](https://resources.sahipro.com/docs/sahi-script/functions/actions/#_selectrange): Allows selecting of text - [\_embed](https://resources.sahipro.com/docs/sahi-script/functions/browser-accessors/#_embed): Identifies embed tag element - [\_pause](https://resources.sahipro.com/docs/sahi-script/functions/debug-helpers/#_pause): Pauses script for debugging - [\_launchNewBrowser](https://resources.sahipro.com/docs/sahi-script/functions/multiple-browsers/#_launchnewbrowser): Launches new browser without sharing cookies - [\_font](https://resources.sahipro.com/docs/sahi-script/functions/browser-accessors/#_font): Identifies font tag element - [\_lock](https://resources.sahipro.com/docs/sahi-script/functions/script-execution-control/#_lock): Acquire a lock to synchronize scripts, for example when taking screenshots from scripts running in parallel - [\_unlock](https://resources.sahipro.com/docs/sahi-script/functions/script-execution-control/#_unlock): Release lock while synchronizing scripts - [\_copyFile](https://resources.sahipro.com/docs/sahi-script/functions/files/#_copyfile): Copy file - [\_stop](https://resources.sahipro.com/docs/sahi-script/functions/script-execution-control/#_stop): Force stopping a script - [\_mapDomainToIP](https://resources.sahipro.com/docs/sahi-script/functions/http-headers/#_mapdomaintoip): Map domain to IPs - [\_getSelectionText](https://resources.sahipro.com/docs/sahi-script/functions/fetch/#_getselectiontext): Get selected text - [\_collectAttributes](https://resources.sahipro.com/docs/sahi-script/functions/fetch/#_collectattributes): Collect attribute from similar elements - [\_trim](https://resources.sahipro.com/docs/sahi-script/functions/utilities/#_trim): Trim string - [\_setAccessorIgnoreCase](https://resources.sahipro.com/docs/sahi-script/functions/accessor-basics/#_setaccessorignorecase): Ignore case when matching accessor attributes ## Other features - Sahi now integrates with [Robot Framework.](https://resources.sahipro.com/docs/using-sahi/robot-sahi/) - Sahi now integrates with [Microsoft Test Manager](https://resources.sahipro.com/docs/using-sahi/mtm-sahi-integration/)(MTM). - [Ruby Docs](http://sahi.co.in/ruby/doc/) updated. - Added ability to change controller mode from Info tab in the controller. - Added Anchor button on ruby and java controller. - Added "Compare logs" button that compares the logs of 2 script files. - Added support to identify elements using multiple attributes in Sahi Ruby driver. - Added advice on \_setXHRReadyStatesToWaitFor on clicking the "Diagnose" link in the Record tab of the controller. - Fourth argument to specify encoding added to [\_writeToFile](https://resources.sahipro.com/docs/sahi-script/functions/files/#_writetofile) API. - \_expectConfirm and \_expectPrompt APIs can accept regular expression. - \_rightOf, \_leftOf and \_under APIs upgraded to accept bounds in flex. - Added bat file `/userdata/bin/clear-ie-history.bat` to clear IE History. The ant target for clearing IE history has been defined in `/demo.xml` . The target name is "clear-ie". - lock, unlock, selectRange, selectTextRange, hr, font, collect APIs added to Sahi Java driver to reflect \_lock, \_unlock \_selectRange, \_selectTextRange, \_hr, \_font, \_collect APIs respectively. - select\_text\_range, select\_range, selection\_text, left\_of, right\_of, left\_or\_right\_of, above, under, above\_or\_under, collect APIs added to ruby driver to reflect \_selectTextRange, \_selectRange, \_getSelectionText, \_leftOf, \_rightOf, \_leftOrRightOf, \_above, \_under, \_aboveOrUnder and \_collect APIs. - Sahi identifies elements through its label. If the HTMLFor property is specified for the label or if the element is the child of the label, Sahi identifies the element based on the label's name also. - Ability to add bounds added to \_leftOf, \_rightOf, \_leftOrRightOf APIs. - Added third paramter for [\_expectConfirm](https://resources.sahipro.com/docs/sahi-script/functions/javascript-dialogs/#_expectconfirm) API. It defines the scope of the \_expect confirm statement - When scripts fail in a suite `filename.suite`, a file called `filename_failed.suite` is automatically created with failed scripts. Previously, one had to specify the failed suite name. This caused problems in filepaths during distributed runs. We have now removed the older `failedScriptsSuite` parameter from drun, testrunner and ant. A new parameter `originalSuitePath` is added that specifies the original suite path. `originalSuitePath` is used by Sahi to generate the failed suite (after adding `_failed` to the filename). :::caution[Important] You may need to change your existing ant targets to reflect this. Have a look at [playback via ANT](https://resources.sahipro.com/docs/using-sahi/playback-via-ant/) and [jenkins-sample.xml](https://resources.sahipro.com/docs/assets/images/using-sahi/jenkins-sample.xml) for usage. ::: - Added executeSahi API for Sahi Java driver and execute\_sahi API for Sahi Ruby driver. Statements in Sahi script can be executed using this API. eg. `b.executeSahi("_click(_button(\"button1\")"); // Sahi Java Driver @b.execute_sahi("_click(_button('button1')"); // Sahi Ruby Driver` Use this in place of b.execute and @b.execute\_step since you are no longer required to prefix Sahi APIs with "\_sahi". This allows you to directly copy code from the Controller (Sahi mode) and use in your scripts. - [\_windowAction API](https://resources.sahipro.com/docs/sahi-script/functions/actions/#_windowaction) now accepts width and height as additional optional parameters to resize the browser window. - Added db connection pooling through c3p0 - Added ability to create new scenario and new script in Script Explorer (Web TestRunner) - Added ability to show failed scripts in suite report - Recording in Java and Ruby now append `b.` at the start of accessors. While recording, Sahi now uses `b.` instead of `browser.` as prefix. (`b.` saves space/characters while working on the Controller). While using the current `SahiTestSuite.java` both `browser.` and `b.` can be used (existing code will work with new SahiTestSuite.) `browser.` is same as `b.` (browser == b) While using the current `sahi_test.rb` both `browser.` and `b.` can be used (existing code will work with new SahiTestSuite.) `browser.` is same as `b.` (browser == b) ## Bug Fixes - Opening correct file with external script directories. - Fixed showing title for offline script report. - Fixed JS error in Controller during Java playback - Fixed Controller opening in main page. - Fixed update query in persist(). - Fixed Excel Framework reports. - Fixed bug with Illegal characters in download file name - \_cell API fixed for spark grid. - \_cell API fixed for flex grid. - Fixed Controller popup prefix for flex - Fixed \_setValue API compatibility with all HTML5 elements. - Assert button of Controller fixed for applet. - Fixed ++ and -- operators' usage in scripts. - Fix for cookie containing comma issue. - Bug fix for UA compatibility for IE. - Start URL field on Sahi Start Page fixed for Enter key press. - Fixed java and ruby mode to work for controller action with multi domain and pop-up - Fixed \_writeToCSV to append newline if already not there. - \_readCSVFile fixed for files with duplicate column header - \_takeScreenShot fixed for drun. - Fixed \_takeScreenShot on mac. - Fixed apis \_copyFile, \_writeToFile and \_renameFile to work with relative file path --- # What is new in Sahi OS v5.0 Sahi OS v5.0 is a major release and contains many new features and bug fixes. ## New Features - executeSahi API added to Sahi Java and Ruby drivers - calls Sahi script code from Java and Ruby drivers respectively. - BrowserUnresposiveException added. Earlier, when due to some reason, the connection between Sahi and the browser window was broken, the browser window would get stuck and never close. Now, in such a scenario, the browser closes after a fixed time with a BrowserUnresponsiveException. - An alert message comes up on starting Sahi that asks for permission for Sahi to make changes in the proxy of the browser. - Added ability to enable/disable traffic logs through the Sahi Dashboard. - Added domainfix.txt to be configurable through the configure link on the Dashboard. - Sahi OS version now shows up on the Sahi Console, Controller and the Dashboard. - Safari - Proxy is automatically set when the browser window is launched. - Added APIs to the Sahi notepad++ and textpad plugin. - Added tooltip to all the items in the controller. This will help in using the Sahi controller much better. - Added demo pages and scripts for the all the earlier and new APIs. This should be helpful in understand the functionality of an API better. - Sahi Controller modified. Several UI changes made. - Sahi Dashboard and start page modified. Several UI changes made. - Modified Sahi logs page. UI changed. ## New APIs - \_isIE6 : Returns true if the current browser is Internet Explorer 6 - \_isIE7 : Returns true if the current browser is Internet Explorer 7 - \_isIE8 : Returns true if the current browser is Internet Explorer 8 - \_isIE10 : Returns true if the current browser is Internet Explorer 10 - \_isIE11 : Returns true if the current browser is Internet Explorer 11 - \_isIE11Plus : Returns true if the current browser is Internet Explorer 11 or higher - \_fieldset : accessor to identify the fieldset type element on an HTML page. - \_frame : accessor to identify the frame type element on an HTML page. - \_setXHRReadyStatesToWaitFor : Sets what readyStates of an XMLHttpRequest (XHR) Sahi should wait for. Details [here.](https://resources.sahipro.com/docs/sahi-script/functions/script-execution-control/#_setxhrreadystatestowaitfor) - \_font : accessor to identify the font type element on an HTML page. - \_hr : accessor to identify the HR type element on an HTML page. - \_getSelectionText : Returns the text selected by the user (using mouse drag, like we select before copy paste). Details [here.](https://resources.sahipro.com/docs/sahi-script/functions/fetch/#_getselectiontext) - \_copyFile : Copies a file from source filePath to destination filePath - \_selectRange : Simulates selection action of particular text on the webpage based on the start and end index of the selection. Details [here.](https://resources.sahipro.com/docs/sahi-script/functions/actions/#_selectrange) - \_selectTextRange : Simulates selection action of particular text on the webpage based on the text provided. Details [here.](https://resources.sahipro.com/docs/sahi-script/functions/actions/#_selecttextrange) ## Bug Fixes - Fixed Sahi OS compatibility issues with IE10 and IE11. - Fixed Sahi OS compatibility issue with Firefox 20+ versions. - Fixed proxy not being set or reset properly on Mac and Linux OS. - Fixed bug in setting proxy on Opera browser. - Fixed bugs in recording script on firefox - setValue recording bug fixed on Java and Ruby recorder - Browsers installed in Program Files (x86) folder now show up correctly on Dashboard. - Dashboard 'Bin' link can now be seen on Mac OS too. --- # Install and Set Up Sahi Pro Install Sahi Pro, start the Dashboard and add your license, the first step of Getting Started. :::caution[Important] Read the Getting Started pages to get familiar with Sahi Pro before trying the Desktop, Mobile or SAP Engines. ::: ## Prerequisites Java 1.8 or above is needed for running Sahi Pro. ## Download Sahi Pro Download Sahi Pro from the [Download Center](https://resources.sahipro.com/docs/introduction/installers/). You will need a valid license to run Sahi Pro. If you do not have a valid license yet, [book a demo](https://sahipro.com/get-started/) to get a 14 day trial license. ## Upgrade Sahi If you wish to upgrade from an older version of Sahi, refer to [Upgrade](https://resources.sahipro.com/docs/using-sahi/upgrade/) for details. ## Install Sahi 1. Double click on install\_sahi\_pro\_xxx.jar to start the installer. If Java is configured properly, it will launch the installer. The Sahi Pro installer's welcome screen, with Next and Quit buttons :::note If the installer does not launch, or if the jar file is opened as if it is a zip file, cancel the unzip dialog, open a command prompt, cd to where the file is downloaded, and run ```sh java -jar install_sahi_pro_xxx.jar ``` ::: 2. Install Sahi Pro in a folder path without spaces. (If there are spaces, Chrome will have trouble launching correctly.) ## Start Sahi Dashboard The Sahi Pro Dashboard on its Home tab, with Workspace and Tools below Start Sahi Dashboard by any of the following methods 1. Double click on the desktop shortcut or 2. Start from the command line. Windows: - Go to `\userdata\bin` and run `start_dashboard.bat` Linux - Go to `/userdata/bin` and run `./start_dashboard.sh` Click the **Launcher** button to see the installed browsers and engines. The Dashboard Launcher tab, showing the installed browsers and the Desktop, Android and SAP engines :::caution[Important] Sahi looks for browsers in their default install location, and if found, displays it on the Dashboard. If you do not see your browsers, [configure your browser paths correctly](https://resources.sahipro.com/docs/using-sahi/sahi-configuration-basic/#configure-browsers-in-dashboard). ::: :::caution[Important] If you are using Internet Explorer via a VPN or Datacard (like Tata Photon, Reliance etc.), you may need to [explicitly modify the proxy settings](https://resources.sahipro.com/docs/using-sahi/sahi-configuration-basic/#configure-vpn-proxy-settings) for your browser ::: ## Add License Product Key 1. If you have never added your Product Key, you will be presented with Sahi product key popup window. ![](https://resources.sahipro.com/docs/assets/images/using-sahi/sahilicense.webp) - Enter the `Product Key` and click 'OK'. or - Copy the `Product Key` into `userdata\config\productkey.txt` (create the file if needed). If the `Product Key` is valid for selected product, Sahi Pro will start normally. ## Troubleshooting Installation Most first-time problems come from the local machine. If something doesn't work, start here: - [Startup issues](https://resources.sahipro.com/docs/troubleshooting/startup-issues/), such as browsers missing from the Dashboard, or a browser that doesn't load the application - [Check that Sahi Pro is installed correctly](https://resources.sahipro.com/docs/faq/misc-questions/#verifying-sahi-installation) - [Configure browsers on the Dashboard](https://resources.sahipro.com/docs/using-sahi/sahi-configuration-basic/#configure-browsers-in-dashboard) - [Proxy issues](https://resources.sahipro.com/docs/troubleshooting/proxy-issues/), such as no internet access when Sahi Pro isn't running - [Use a license file](https://resources.sahipro.com/docs/faq/using-license-data/) --- # Create Your First Test Scenario Create a project, a scenario file, a test case and keywords, then record, run and edit your first test in Sahi Pro. In Sahi Pro, a test case is made of keywords, and each keyword holds its steps. You record each keyword's steps once, then reuse the keyword in other test cases. This is how Sahi Pro is built to work, called [Business-Driven Test Automation (BDTA)](https://resources.sahipro.com/docs/using-sahi/business-driven-test-automation/). You first describe the test in business terms, as keywords, and then automate each keyword. You can write the keywords before the application is even ready. On this page, you add all the keywords first, then record their steps. On this page, you build a test for Sahi's sample application at `https://sahitest.com/demo/training/login.htm`. The test logs in, adds books to the cart, checks the total, and logs out. ## Create a Project A project keeps a team's tests together. Sahi Pro comes with a default project, `scripts`, which holds example tests you can refer to later. 1. On the Dashboard, click **Test Editor** to open the No-Code Test Editor. 2. Click the project name (`scripts`) at the top left, then click **New**. 3. Name the project `sahi_training` and click **Create**. :::tip If the No-Code Test Editor doesn't open in Chrome, Edge or Brave, see [Editor opening issues](https://resources.sahipro.com/docs/troubleshooting/https-localhost-issues/). ::: The No-Code Test Editor on the default scripts project, with the project picker open and New highlighted next to All Projects ## Create a Scenario File A scenario file (`.s.csv`) holds test cases. A new project comes with a sample one, `MyFirstScenario.s.csv`, in its `Feature` directory. To create your own: 1. Click **Create Test Scenario**, or click **File** > **New** > **Scenario File**. 2. Name it `books` and click **Create**. A new, empty project with its sample scenario file in the Navigator and the Create Test Scenario button highlighted ## Add a Test Case A new scenario file starts with a test case named Default Test Case. You can rename it, or add your own: 1. Click **Add Test Case**. 2. In the **Create Test Case** dialog, name it `Buy Books`, add a description such as `Log in, add books to the cart, check the total and log out`, and click **Create**.
The Create Test Case dialog with the name Buy Books and its description
## Add Keywords The test case needs three keywords: one to log in, one to add books, and one to log out. 1. Under the test case, click **Add Keyword**, type `Login`, and press Enter. A new keyword field opens below it. 2. Type `Add Books` and press Enter, then `Logout` and press Enter. Press Esc to close the empty field. 3. Select **Login**. Sahi Pro asks you to confirm the keyword file path, where the keyword's steps are kept. Keep the suggested file, `books.sah`, and click **Confirm**. The Buy Books test case with the Login, Add Books and Logout keywords, and the panel to confirm the keyword file books.sah The keywords have no steps yet. You record them in the Controller. ## Record the First Keyword 1. With **Login** selected, click **Automate**. 2. In the **Automate with Controller** dialog, choose the browser and set **Start URL** to `https://sahitest.com/demo/training/login.htm`. Check that **Testcase / Global** shows `Buy Books` and **Keyword** shows `Login`. 3. Click **Launch Controller**. The browser opens at the start URL, and the Controller opens on the Login keyword. :::tip If the Controller doesn't open on Linux, see [Controller does not open in Linux](https://resources.sahipro.com/docs/troubleshooting/misc-issues/#controller-does-not-open-in-linux). :::
The Automate with Controller dialog with Google Chrome, the sample application URL, books.s.csv, Buy Books, Login and books.sah
4. In the Controller, click **Record**. The status changes from idle to Recording.
The Controller on the Login keyword of Buy Books, with the Record button highlighted
5. In the browser, enter the username `test` and the password `secret`, and click **Login**. Each action you take in the browser appears as a step in the Controller. Steps that aren't saved yet have an orange dot, and the Save icon next to the test case turns orange. Click **Save**.
The Controller with three recorded Login steps not yet saved, shown by orange dots and an orange Save icon, which is highlighted
:::caution[Save Often] The Controller doesn't save on its own. Click **Save** after you record or edit steps, so you don't lose your changes. ::: ## Add an Assertion While Recording A test checks that the application behaves as expected. In Sahi Pro, these checks are assertions, and you can add them while you record. 1. In the Controller, choose the **Add Books** keyword. 2. In the browser, enter the quantities `2`, `3` and `1` for Core Java, Ruby for Rails and Python Cookbook, and click **Add**. The cart shows the books and the total, 1550. 3. To check the total, open the Controller's **Advanced Editor** tab. 4. Hold Ctrl (⌘ on Mac) and hover over the total field in the browser. The Controller fills in **Element Accessor**. :::caution[Important] On a Mac, the browser window needs to be in focus to receive mouse events. Click its title bar first, or switch to it with Command-Tab. ::: 5. Under **Quick Actions**, choose **Assert Equal**. Set **Value** to `1550`. 6. Click **Evaluate Step** to check that the assertion passes, then click **Add as Step**.
The Advanced Editor tab with the total field's accessor filled in, Assert Equal selected, the value 1550, and the Add as Step button, both highlighted
:::note Actions you take in the Controller aren't recorded. Only actions in the browser are. You can try things out in the Controller while recording without changing the keyword. ::: ## Record the Other Keywords 1. In the Controller, choose the **Logout** keyword. 2. In the browser, click **Logout**. 3. Click **Stop Recording**, then click **Save**. All three keywords now have their steps. ## Run the Test Case from the Controller In the Controller, hover over **Run** and choose **Run this testcase**. Sahi Pro runs the whole Buy Books test case, keyword by keyword, and shows each step's result. The **Run** menu has other options too, such as running only the current keyword, or running up to it.
The Controller on the Add Books keyword with the Run menu open and Run this testcase highlighted
## View the Report Every test run creates a report. When the run finishes, click **Reports**, the second icon from the left in the Controller's bottom bar. The report shows each keyword and step, and the result of your assertion. You can also open **Reports** from the left bar of the No-Code Test Editor, where the latest test runs are listed first. The report for books.s.csv: the Buy Books test case passed, with Login, Add Books and Logout, and the steps of Add Books ## Edit Keyword Steps in the Controller You can change a keyword's steps without recording it again. 1. In the Controller, choose the keyword. 2. Click a step. It opens as **Edit Step**, where you can change its **Action**, **Element** and **Value**. 3. Click **Update**. 4. To move, copy, disable or delete steps, use the toolbar above the steps. To add one, click **Add Step**. 5. Click **Save**. Saved changes go to the keyword's `.sah` file, so every test case that uses the keyword gets them. :::caution[Save Often] Click **Save** after every edit. Unsaved changes are lost when you close the Controller. :::
A step of the Add Books keyword open in Edit Step, with Action, Element and Value, and the Update button highlighted
## Add More Test Cases A scenario file can hold many test cases, and they can reuse the same keywords. 1. In the No-Code Test Editor, click **Add Test Case** and name it, for example, `Buy One Book`. 2. Add the keywords `Login`, `Add Books` and `Logout`, picking them from the list as you type. You can run one test case, or the whole scenario file. --- # Parameters and Data Generators Turn a keyword's recorded values into parameters, so each test run can use new data from a data generator or a test data file. Say you record signing up a user called `john`. The keyword now enters `john` on every test run. The first run works, but the next one fails if the application doesn't allow the same username twice. To avoid this, replace the recorded values with parameters, so each run can use different data. The data comes from one of two places: - **A data generator** makes a new value on every test run, such as a new username each time. This page shows how. - **A test data file** holds the exact values to use, one row per test run. [Loop Through a Test Data File](https://resources.sahipro.com/docs/using-sahi/getting-started/test-data-files/) shows how. On this page, you record a keyword that registers a user on the sample application, and let data generators fill in the form. ## Record the Keyword 1. Create a scenario file named `register`, the same way you created `books`. 2. Add a test case named `Register New User`, with one keyword, `Register User`. Select the keyword and keep the suggested keyword file. 3. With **Register User** selected, click **Automate**. Set **Start URL** to `https://sahitest.com/demo/training/register.htm` and click **Launch Controller**. 4. Click **Record**, then fill in the form in the browser: - Username: `john` - Password and Confirm Password: `secret123` - Address: `12th main street` - the terms checkbox 5. Click **Register**, then click **Stop Recording** and **Save** in the Controller. Sahi Pro records the passwords encrypted. It also records a check that the Registered Successfully message appeared. ## Parameterize the Keyword You can parameterize a keyword in the Controller, right after you record it, or later in the No-Code Test Editor. Both have a **Parameterize** button and open the same dialog. Here, you use the Controller. 1. In the Controller, with **Register User** selected, click **Parameterize**.
The Controller on the Register User keyword, with its recorded steps for the username, both passwords, the address, the terms checkbox, Register, and the check for the Registered Successfully message, and the Parameterize button highlighted
2. The **Parameterize** dialog lists each recorded value, with a parameter name that Sahi Pro suggests, such as `$Username`. You can rename any of them.
The Parameterize dialog for Register User, listing the recorded values john, the encrypted password twice and 12th main street, with the suggested parameters Username, Password, Password1 and Address
3. Select the **Data Generators** checkbox. It's off by default. A **Data Generator** column appears, and each parameter gets a generator, such as **Text**. Each parameter still uses its recorded value until you choose which ones should use their generator.
The Parameterize dialog with the Data Generators checkbox selected and highlighted, and a Data Generator column showing Text for each parameter
4. In **Pass from Scenario File**, choose where each parameter's value comes from: - **Yes, with Step Value** uses the recorded value. Every row starts here. - **Yes, with Scenario Value** uses a value you pass to the keyword from the scenario file. - **No Value, using Data Generator** uses a new value from the generator on every test run. You can choose it when **Data Generators** is selected. Open the list in the `john` row.
The Pass from Scenario File list open in the john row, highlighted, showing Yes, with Step Value, Yes, with Scenario Value and No Value, using Data Generator
Choose **No Value, using Data Generator**. The recorded value `john` is struck through, because the generator replaces it. Leave the other rows on **Yes, with Step Value**, so only the username changes on each test run.
The john row set to No Value, using Data Generator, highlighted, with the recorded value john struck through
:::note If a [test data file](https://resources.sahipro.com/docs/using-sahi/getting-started/test-data-files/) passes a value for a parameter, that value overrides the setting here. ::: 5. Select **Remove Duplicates**. The two password fields have the same value, so they now share one parameter, `$Password`, and always get the same value.
The Parameterize dialog with Remove Duplicates selected and highlighted: one Password row remains, and the Registered Successfully row is now visible
6. A value that never needs to change doesn't need a parameter. For example, the last step checks for the message **Registered Successfully**, which never changes. Clear the checkbox on its row.
The Parameterize dialog with the checkbox on the Registered Successfully row cleared and highlighted
7. To shape the values a generator makes, click the pencil icon in its **Data Generator** cell. For example, for `$Username`, set **Prefix** to `user_` and **Include Timestamp** to **Yes**, then click **Apply**. **Sample Value** shows what a generated username looks like.
The Data Generator dialog for Username, with Data Type Text, Prefix user_ and Include Timestamp Yes highlighted, and a sample value that starts with user_
8. Click **Parameterize**. The parameters appear above the steps, and the steps use them in place of the recorded values. Modified steps get an orange dot until you save. 9. Click **Save**.
The Controller after parameterizing: the parameters Username, Password and Address above the steps, steps 1 to 4 using them with orange unsaved dots, step 7 still expecting Registered Successfully, and the orange Save button highlighted
## Run with Generated Data In the Controller, hover over **Run** and choose **Run this testcase**. Run it again, and open **Reports** after each run. Each test run uses a new username, such as `user_sMz3MHR17944704147700` in one run and `user_kSeFh8zE7x2017944704281100` in the next. The report shows the value used in each step. The report for Register.s.csv: the Register New User test case passed, and step 1 of Register User entered the generated username user_sMz3MHR17944704147700 In the next run, the same step enters a different username:
The steps of Register User in the next run's report, where step 1 entered the generated username user_kSeFh8zE7x2017944704281100
--- # Loop Through a Test Data File Attach a test data file to a test case or keyword, so it runs once for each row of data. Sometimes you want specific values, not generated ones, such as quantities with a known total. Put them in a test data file (`.csv`), one row per test run, and attach the file to a test case or a keyword. Sahi Pro then runs it once for each row. On this page, you run the Buy Books test case with three sets of quantities. ## Parameterize Add Books 1. In the No-Code Test Editor, select the **Add Books** keyword, and click **Parameterize**. 2. Select the three steps that enter the quantities, and the step that checks the total. 3. Name the parameters `$javaQty`, `$rubyQty`, `$pythonQty` and `$total`, and click **Apply**. ## Attach a Test Data File 1. Select the **Buy Books** test case, the one that should loop through the data, and click **Data Drive**. 2. In the **Data Drive** dialog, choose **New File**. 3. Name the test data file `books_data`, and name its group `quantities`. A test data file keeps its rows in groups. 4. Add a column for each parameter, and one row for each test run. Name each column after its parameter, without the `$`: | javaQty | rubyQty | pythonQty | total | |---|---|---|---| | 2 | 3 | 1 | 1550 | | 1 | 0 | 0 | 300 | | 0 | 4 | 2 | 1500 | 5. Click **Confirm**. To loop through only one keyword instead of the whole test case, attach the file to that keyword. ## Run the Test Case Run the Buy Books test case. Sahi Pro runs it three times, once for each row, and the report shows a result for each row. --- # Run Tests in a Suite Create a test suite that holds scenario files, run it with Run Configuration, and read the suite report. A test suite holds scenario files, so you can run many tests together. ## Create a Test Suite 1. Click **File** > **New** > **Test Suite**. 2. Name it `regression` and click **Create**. 3. In the suite, type the name of each scenario file you want to run, such as `books.s.csv` and `register.s.csv`. ## Run the Suite 1. Select the suite and click **Run**. 2. In **Run Configuration**, choose one or more browsers and set **Start URL**. 3. Click **Run**. When the suite run finishes, open **Reports** to see the suite report, with a result for each scenario file and test case. Run Configuration has many more settings, such as running tests in parallel. ## Further Reading 1. [Business Driven Test Automation](https://resources.sahipro.com/docs/using-sahi/business-driven-test-automation/) - IMPORTANT! 2. [Sahi Pro Best Practices](https://resources.sahipro.com/docs/using-sahi/best-practices/) - IMPORTANT! 3. [Understanding object identification for resilient scripts](https://resources.sahipro.com/docs/sahi-script/functions/accessor-basics/) 4. [Using Accessor Repository](https://resources.sahipro.com/docs/using-sahi/sahi-controller/#record-with-accessor-repository) 5. [Analyzing failing Script/Suite](https://resources.sahipro.com/docs/using-sahi/sahi-reports/) 6. [Integrating with Jenkins or other continuous integration](https://resources.sahipro.com/docs/using-sahi/integrate-with-jenkins/) --- # Business-Driven Test Automation (BDTA) Business-Driven Test Automation is how Sahi Pro is built: write tests as business steps first, and automate each step when the application is ready. In many teams, automation can only start once the application is ready. Tests are written after the feature is built, so they fall behind every release, and the people who know the business can't easily check what the tests do. Sahi Pro is built for Business-Driven Test Automation (BDTA). You write a test in the language of the business first, and automate its steps when the application is ready. Tests can be defined as soon as a feature is, and they stay readable to everyone on the team. ## How Sahi Pro Structures a Test Every test in Sahi Pro follows the same structure, which keeps the business view and the technical details apart: - A **scenario file** (`.s.csv`) holds **test cases**. - A **test case** is a list of **keywords**, named after the steps of the business process, such as Login, Add Books and Logout. - Each **keyword** holds its **steps**, the actions on the application. They live in `.sah` files, apart from the test cases that use them. The test cases say what the business does. The keywords say how each step is done. One keyword can be used in many test cases, so a change to a step updates every test that uses it. ## The BDTA Way of Working ### Before the Application Is Ready 1. **Define the flow.** Write test cases as business steps, as keywords. The application doesn't need to exist yet. 2. **Add parameters** to keywords where the test needs data, such as a username. You can refine them later. 3. **Plan the test data.** For data-heavy tests, decide which keywords take their data from a test data file. 4. **Organize the tests.** Group scenario files into test suites, and tag test cases so you can choose what to run. 5. **Review.** Scenarios read like plain test cases, so subject matter experts and managers can check them. Testers can use them as manual test cases until they're automated. 6. **Check them in** to version control. ### When the Application Is Ready 1. **Automate each keyword.** Record its steps in the Controller, or let AI Suggest author the keyword for you. 2. **Keep elements in one place.** Store the elements your keywords use, such as buttons and fields, in the Accessor Repository, so a change in the application is fixed once. 3. **Run the tests** and check the reports. Most of the automation work happens before the feature is ready, so the tests are ready when the feature is. ## Write Good Keywords - **Name keywords after business steps**, such as Add Books, not browser actions, such as Click Add Button. - **Keep keyword names unique**, and agree on a naming convention for your project. - **Split the flow into reusable parts.** Keywords can be reused across test cases and scenario files, so a keyword like Login is written once. ## Keywords in Your Team's Language Keywords can be written in [English](https://youtu.be/QvkSIxk84Vw), [German](https://youtu.be/flmVpoicDik), Dutch, [Chinese (Traditional)](https://youtu.be/5DAnCJgR7Hw) and other business languages. Each linked language opens a video of a test written in it. This is supported since Sahi Pro v10.0.0; older versions support only English. ## Try It The Getting Started pages walk through BDTA step by step, on Sahi's sample application: - [Create Your First Test Scenario](https://resources.sahipro.com/docs/using-sahi/getting-started/first-test-scenario/): add the keywords first, then record and run them. - [Parameters and Data Generators](https://resources.sahipro.com/docs/using-sahi/getting-started/parameters-and-data-generators/): give keywords new data on every test run. - [Loop Through a Test Data File](https://resources.sahipro.com/docs/using-sahi/getting-started/test-data-files/): run a test case once for each row of data. - [Run Tests in a Suite](https://resources.sahipro.com/docs/using-sahi/getting-started/test-suites/): run many scenario files together. To read data from Excel files or databases in keyword code, see [Excel Functions](https://resources.sahipro.com/docs/sahi-script/functions/excel/) and [Data Drive Functions](https://resources.sahipro.com/docs/sahi-script/functions/data-drive/). --- # Best Practices Writing a test is quick. Keeping hundreds of them working as the application changes is the hard part. These practices keep a large suite easy to maintain. ## Basic Recommendations - Keep each team's or application's tests in their own [project](https://resources.sahipro.com/docs/using-sahi/getting-started/first-test-scenario/#create-a-project). - Use [Business Driven Test Automation](https://resources.sahipro.com/docs/using-sahi/business-driven-test-automation/) as much as possible. Thinking about the business first leads to much cleaner and maintainable test automation suites. - In the No-Code Test Editor, create a scenario file and add test cases. Ensure that keywords express business intent. - [Record each keyword in the Controller](https://resources.sahipro.com/docs/using-sahi/getting-started/first-test-scenario/#record-the-first-keyword). AI Suggest (beta) can also author the keyword for you. - While recording, use an [Accessor Repository](https://resources.sahipro.com/docs/using-sahi/sahi-controller/#use-an-accessor-repository): in the Controller, open **File Settings** and turn on **Enable AR**, then use **Update in AR** to save an element's accessor. For an application with a lot of elements, create one AR file per module, so each file stays easy to find your way around. Keep each element in one AR file only. The intent is to have a single place of modification in case an element identifier changes. - Follow a naming convention for files, keywords and parameters. Name keywords in Title Case, such as Add Books To Cart. Sahi Pro names the function behind it, AddBooksToCart. - Keep keyword files (.sah) per module, with a common file for shared keywords. If needed, create sub folders for different modules of your application. - [Attach a test data file with Data Drive](https://resources.sahipro.com/docs/using-sahi/getting-started/test-data-files/) to run a test case with several sets of data. See also [Parameters and Data Generators](https://resources.sahipro.com/docs/using-sahi/getting-started/parameters-and-data-generators/). - To get a better accessor for an element, choose **Run upto this keyword** in the Controller, [identify the element in the Advanced Editor](https://resources.sahipro.com/docs/using-sahi/sahi-controller/#identify-an-element-and-add-a-step) ([anchor it](https://resources.sahipro.com/docs/using-sahi/sahi-controller/#identify-an-element-relative-to-another) if needed), then click **Update in AR**. :::note Scenario files should not contain any Sahi functions. If you choose to move from Sahi to another framework, the Scenario files should be reusable since they are just csv files which specify testcases as a sequence of business functionality. Keep all Sahi code inside keyword files at all times. ::: - Group scenario files in a [test suite (.dd.csv file)](https://resources.sahipro.com/docs/using-sahi/getting-started/test-suites/). Add tags for module, priority, version etc. as needed. See [Test Suites](https://resources.sahipro.com/docs/using-sahi/data-driven-suites/) for all the options. - Run the suite from the Editor's Run Configuration, or from [Ant](https://resources.sahipro.com/docs/using-sahi/playback-via-ant/). The Run Configuration can create the Ant target. - Run with [Autoheal](https://resources.sahipro.com/docs/using-sahi/autoheal/) enabled if the application under test is evolving. Turn it on in the Run Configuration. This will catch and rectify element identification problems and reduce failures. - Use [Suite Analysis](https://resources.sahipro.com/docs/using-sahi/suite-analysis/) to pinpoint errors in the suite run. ## Advanced Team Recommendations - Keep each element in one Accessor Repository file, shared by all tests that use it. - Create a few simple smoke tests which pass through elements of all pages and assert for their existence. - Make sure these smoke tests run with the developers' Continuous Integration build - If these tests fail, the developers need to modify the Accessor Repository file and make the build pass. This ensures that the Accessor Repository reflects any changes that the developer has made to the web application. It also ensures that QA tests fail only for Scenario and flow changes and not for element changes. - Write tests aimed at parallel execution. Most tests can run in parallel once they don't depend on each other's data. - Run your QA builds as frequently as your processes allow (Aim for once a day at least). Tests which have not run for some time invariably become unmaintainable. - If you believe you need to build a framework to make things work, talk to our support team. You can save significant time and money by adapting to what is already available. Sahi Pro has been evolving with various customer requirements and we already have most things that you may need. If you need something that isn't there, tell us. - Check in tests into a Version Control System (VCS) such as Git. The Editor has [built-in Git](https://resources.sahipro.com/docs/using-sahi/git-sahi-integration/). Instead of working on tests in a common shared folder, work on individual versions and use the VCS features like versioning, diff, rollback, merge etc. to your advantage. Data files should also be checked in along with tests. - Use file types which allow easy "diff"ing between versions. When a test fails today which passed yesterday, you may pinpoint the error easily by performing a diff with the older file. However diff may only be possible on text based files. So we recommend using .csv format files instead of Excel files. - Hire good, thinking testers rather than "automation engineers". A thinking tester understands the business and how its users work, so they know what is worth testing, which edge cases can break it, and why a failure matters. With Sahi Pro, they don't need to be programmers to automate those tests. ## Language Recommendation Build tests in the No-Code Test Editor first: anyone on the team can read and change them, and Sahi Pro handles reports, suites, parallel and distributed suite runs, and reusable keywords for you. When a scenario needs logic that no-code can't express, write that keyword in Sahi Script. It is JavaScript, so it needs less programming expertise than Java, and it keeps all of Sahi Pro's reporting, debugging and suite features. Sahi Script can also call and reuse any Java code or libraries, so you can use the power of Java when needed. **If you use the Java driver without Sahi Pro's framework:** The Java driver is a bare-bones library that launches a browser and performs actions on it. Everything else a framework needs is then up to you: logging, reporting and storing reports, a UI for historic reports, building suites, running them in parallel or across machines as distributed suite runs, keeping code and test cases separate, and maintaining object repositories or page objects. Sahi Pro already has all of these. If you use the Java driver, use it with Sahi's scenario files to keep these benefits. --- # Upgrade Sahi Pro Upgrade Sahi Pro by installing the new version over the existing one; your configuration is kept and the changed settings files are backed up. :::note Upgrading Sahi Pro is easier than before. When you upgrade, Sahi Pro installs the latest files and re-applies your existing configuration settings.\ The settings files which are modified by the upgrade, will be backed up in `userdata_dd-MM-yyyy_HH-mm-ss`. ::: 1. Assuming you have Sahi Pro Installed at `C:\SahiPro` ![Install Path](https://resources.sahipro.com/docs/assets/images/using-sahi/upgrade/current-installed-folder.webp) 2. Download the latest version of Sahi Pro from the [Download Center](https://resources.sahipro.com/docs/introduction/installers/). 3. Run the installer and choose the same installation path as the existing Sahi Pro, such as `C:\SahiPro` on Windows or `/Users/User/sahi_pro` on macOS.
The Sahi Pro installer's installation path step, with the path /Users/User/sahi_pro highlighted, a Browse button, and Previous, Next and Quit
4. The installer warns that the directory already exists. Click **Yes**.
The installer's Warning: The directory already exists! Are you sure you want to install here and possibly overwrite existing files? with No and Yes, and Yes highlighted
5. Complete the installation process :::note For updating to the latest version of Sahi Pro (v9.0.0 onwards), refer [here](https://resources.sahipro.com/docs/using-sahi/check-for-updates/). ::: **That's it, you have successfully upgraded Sahi Pro!** --- # Sahi Configuration (Basic) Sahi may need a few configuration tweaks to make it work on your system. ## Configure Browsers in Dashboard Sahi's Dashboard lists the browsers installed on your systems. Sahi tries to look in default installation locations of different browsers. If a particular browser, eg. firefox, is installed but not visible on the Dashboard, do the following: 1. Click **All Settings** on the Dashboard. The All Settings window opens. 2. Click **Sahi Pro Settings**. The Sahi Pro Settings page opens.
The Sahi Pro Dashboard with the All Settings window open, Sahi Pro Settings and the All Settings button highlighted
In the menu on the left, open **Browsers And Devices** and click **Browser Definitions** (`browser_types.xml`). The Sahi Pro Settings page with Browsers And Devices open and Browser Definitions (browser_types.xml) highlighted, showing browser_types.xml in the Raw Text View 3. Look for a browserType node with `firefox` 4. Locate the `path` element and change the value to what is on your machine. For example, Change ```xml "$ProgramFiles\\Mozilla Firefox\\firefox.exe" $ProgramFiles\Mozilla Firefox\firefox.exe ``` to ```xml "C:\\Program Files\\Mozilla Firefox\\firefox.exe" C:\Program Files\Mozilla Firefox\firefox.exe ``` 5. Normally, you do not need to change any other option 6. Click `Save`, close the browser, restart Sahi. You should now see firefox on the Dashboard ### browserType Node ```xml firefox Firefox firefox.png $ProgramFiles\Mozilla Firefox\firefox.exe -profile "$userDir/browser/ff/profiles/sahi$threadNo" -private-window -purgecaches -no-remote firefox.exe 5 false false ```
ElementValue
nameKey by which this browserType will be referred. This can be any value without spaces.
displayNameText displayed on the Dashboard
iconIcon to be displayed. These are bundled inside Sahi
pathPath to the browser executable. If you run this from a command line, it should invoke the browser
optionsBrowser startup options. Sahi launches browsers with some preconfigured settings like proxy, cookie isolation, SSL etc. using the options. There are specific settings for different browsers and should not be modified by the user. Internet Explorer 8+
<options>-noframemerging</options>


Internet Explorer 6,7 options tag needed but is blank
<options> </options>


Firefox
<options>-profile "$userDir/browser/ff/profiles/sahi$threadNo" -private-window -purgecaches -no-remote</options>


Google Chrome
<options>--no-default-browser-check --user-data-dir=$userDir\browser\chrome\profiles\sahi$threadNo --proxy-server=127.0.0.1:$port
--disable-popup-blocking --always-authorize-plugins --allow-outdated-plugins --enable-npapi --incognito</options>


Safari options tag needed but is blank
<options> </options>


Opera options tag needed but is blank
<options> </options>


PhantomJS
<options>--proxy=127.0.0.1:$port $userDir\..\ext\phantomjs\phantomsahi.js</options>


processNameProcess name for looking up PID of process. Sahi will do a tasklist or ps with this name to identify the process to kill
capacityMaximum number of browsers simultaneously executable without overwhelming the system. This depends on your system and you can configure this based on your judgement
useSystemProxytrue/false. Specifies if Windows system proxy settings should be changed to use Sahi Proxy. Needed by Internet Explorer and Safari on Windows
forcetrue/false. Sahi checks to see that the path attribute above is correct and available on the system. On some Operating Systems the path is not really a file path but a command to invoke the browser. Use force=true in those cases
### Variables used in browser\_types.xml | Variable | Value | | --- | --- | | $userDir | Path to Sahi's userdata directory | | $threadNo | Do not modify. Sahi dynamically substitutes this value during the test run. | | $XXX | Sahi looks for a System environment property of name XXX and replaces its value. For example, `$ProgramFiles` will be replaced with `C:\Program Files` on Windows | ## Other browser modifications needed :::note To work with pop-up windows, make sure that browser pop-up blockers are disabled ::: ### Safari You can only run Safari in one thread if you want it to be killed properly. Also make sure no other Safari instances are running before you invoke this. Otherwise, new pages may open in tabs. ## Configure SSL Sahi acts as a proxy between the browser and website. For SSL sites, this means that Sahi behaves like a man in the middle. To make Sahi work properly on SSL sites, a particular Sahi root certificate needs to be accepted. Sahi allows various methods to accept the root certificate 1. Click **All Settings** on the Dashboard. The All Settings window opens. 2. Next to **SSL**, click **Configure**.
The All Settings window on the Dashboard with License Settings, System Proxy, Traffic Logs and SSL, and the Configure button beside SSL highlighted
Sahi will try to use certutil on Windows to add the root certificate. This will work if you have the correct privileges. If it succeeds you will see something like this on your Sahi console. ![](https://resources.sahipro.com/docs/assets/images/using-sahi/ssl/certutil.png) 3. If step 1 does not succeed automatically, a security window will be opened. ![](https://resources.sahipro.com/docs/assets/images/using-sahi/ssl/java-1.png) Click Yes to accept the certificate. 4. If step 2 does not work either, then a different screen would popup. Follow these steps. ![](https://resources.sahipro.com/docs/assets/images/using-sahi/ssl/native-1.webp) ![](https://resources.sahipro.com/docs/assets/images/using-sahi/ssl/native-2.webp) ![](https://resources.sahipro.com/docs/assets/images/using-sahi/ssl/native-3.webp) ![](https://resources.sahipro.com/docs/assets/images/using-sahi/ssl/native-4.webp) ![](https://resources.sahipro.com/docs/assets/images/using-sahi/ssl/native-5.webp) ![](https://resources.sahipro.com/docs/assets/images/using-sahi/ssl/native-6.webp) ### Enabling weaker algorithms on Java 1.7 and later **Symptom:** When connecting to a specific https site, any browser opened from the Sahi Dashboard fails to connect, with an error message `Received fatal alert: handshake_failure`. Sahi can not connect to the desired URL. **Resolution:** Check if you are able to connect to [https://www.google.com](https://www.google.com) via Sahi. If you could access [https://www.google.com](https://www.google.com), but not your other sites, it is possible that these servers have certificates with a weaker algorithm. To fix it, do the following: 1. See what your java path is from the Controller->Info tab. You should see something like this: ```js Java Installed Directory: D:\Dev\Programs\jdk7\jre ``` 2. Open `/lib/security/java.security` file in a text editor. (In our case, it is D:\\Dev\\Programs\\jdk7\\jre\\lib\\security\\java.security) 3. Look for `jdk.certpath.disabledAlgorithms`. In our case, it looks like: ```properties jdk.certpath.disabledAlgorithms=MD2 ``` 4. Comment it out, so that it looks like this: ```js #jdk.certpath.disabledAlgorithms=MD2 ``` 5. Restart Sahi, and check again. ### For Linux - Open a Terminal and navigate to `/userdata/bin`. Run the following command at the prompt. ```sh ./add_ssl_root_cert_linux.sh ``` :::note **Note:** In order to import the Sahi CA certificate, the Linux installation must have the NSS tools installed. To verify if the NSS tools were installed, try executing the `certutil` command. If not installed, use appropriate package dependency manager like `apt-get` or `yum` or any other tool respective to the Linux distribution to install the NSS tools. - Command to install the NSS tools for Debian, Ubuntu : sudo apt-get install libnss3-tools - Command to install the NSS tools for RHEL, CentOS : sudo yum install nss-tools ::: ### For Mac - Sahi should already be running before you run the following command. - Open a Terminal and navigate to `/userdata/bin`. Run the following command at the prompt. ```sh ./add_ssl_root_cert_mac.sh ``` :::note **Note:** In order to import the Sahi CA certificate, the Mac installation must have the NSS tools installed. To verify if the NSS tools were installed, try executing the `certutil` command. If not installed, use package dependency manager like `brew` to install the NSS tools. Run following commands to install and setup NSS tools: 1. `sudo brew install nss` 2. `mkdir ~/.pki` 3. `mkdir ~/.pki/nssdb` 4. `certutil -d sql:$HOME/.pki/nssdb -N --empty-password` 5. `certutil -d $HOME/.pki/nssdb -L` ::: ### For Mobile Device - To configure SSL on mobile device refer [here](https://resources.sahipro.com/docs/using-sahi/playback-mobile-browser/#run-from-mobile-device) and perform the `step 1` to `step 6`. ## External Proxy If you normally need a proxy to access websites, you will have to tell Sahi to use that proxy. You configure the external proxy by editing `/userdata/config/userdata.properties` and setting these properties: ### Proxy AutoConfig Script If you normally use a proxy pac file, you need to tell Sahi to use it. To check, go to Internet Explorer -> Tools -> Internet Options -> Connection -> LAN Settings ![](https://resources.sahipro.com/docs/assets/images/using-sahi/config/proxy-autoconfig.webp) The value in Address is what we want. Open userdata.properties and add ```properties "http://autoconfig/proxy.pac" # Replace http://autoconfig/proxy.pac with your relevant proxy URL ext.http.proxy.pac.url=http://autoconfig/proxy.pac ``` If the Address looks like ```js file://C:/proxy.pac ``` Use ```properties "C:/proxy.pac" ext.http.proxy.pac.url=C:/proxy.pac ``` :::note If directly specifying the proxy.pac URL does not work, 1. Open a browser without Sahi. Navigate to the proxy.pac URL, download and save it on the filesystem, say as C:/proxy.pac 2. Use `ext.http.proxy.pac.url=C:/proxy.pac` ::: ### Fixed Proxy Check if you normally use a fixed proxy ![](https://resources.sahipro.com/docs/assets/images/using-sahi/config/proxy-fixed.webp) If yes, modify userdata.properties like this: ```properties ext.http.proxy.enable=true ext.http.proxy.host=external_proxy_server_hostname_or_ip ext.http.proxy.port=external_proxy_server_port ``` If your proxy needs authorization, you should set these properties too. ```properties ext.http.proxy.auth.enable=true ext.http.proxy.auth.name=proxy_authorization_username ext.http.proxy.auth.password=proxy_authorization_password ``` You should do the same with **ext.https** settings for **https** sites. In addition, if you need to bypass the external proxy for some local sites you need to configure that too in sahi.properties like this ```properties ext.http.both.proxy.bypass_hosts=localhost|127.0.0.1|*.yourinternaldomain.com ``` Note that there is only one bypass setting for both http and https. ## Configuring Proxy on Mac Sahi automatically configures the proxy on Mac before launching a browser. Sahi assumes that your default networkserviceorder is `Wi-Fi` If it is something else, eg. `AirPort`, you need to add ```properties mac.networkserviceorder="AirPort" ``` to `userdata.properties`. Restart Sahi and check. Depending on your Mac version, you may see a prompt to enter username/password like this: ![](https://resources.sahipro.com/docs/assets/images/using-sahi/config/mac-proxy-prompt.webp) You need to disable this prompt using one of the ways specified at this link: [osx - Prevent networksetup from asking password - Stack Overflow](http://stackoverflow.com/questions/11819336/prevent-networksetup-from-asking-password). If Safari is opening more than one window while running the Sahi script than follow solution given here [How to stop Safari reopen on last page - Apple Communities](https://discussions.apple.com/thread/3203884) ## Configure VPN proxy settings - Select your VPN and click on Settings. ![](https://resources.sahipro.com/docs/assets/images/using-sahi/vpn-settings/vpn_connection.png) - Uncheck the checkbox adjacent to "Automatically detect settings". Configure "Proxy Server". Enter the "Address" as "127.0.0.1" and "Port" as "9999" if you have not modified the default port. ![](https://resources.sahipro.com/docs/assets/images/using-sahi/vpn-settings/vpn_proxy_settings.webp) - Click "OK" button. --- # Restrict Remote Access to Sahi Restrict which computers can use Sahi Pro as a master or node, change its settings or see its reports, by IP address and with a login. ## Restrict Remote Access ### Configure IP addresses to Restrict Remote Access Any computer on the network can reach a running Sahi Pro. To control which ones can use it, list IP addresses in **allow** and **deny** lists: `sahi.xxx.remote_access.ip.allow` and `sahi.xxx.remote_access.ip.deny`, in `userdata/config/userdata_hidden.properties`. :::note Set the following property `sahi.remote_access.ip.restrictions.enabled` to `true` in order to use below mentioned IP restrictions related properties. Setting this to false will remove all below restrictions and allow access from any machine. ::: **For all these properties** - Separate IPs with semi-colon. - Wildcard \* can be used for full ip address as well as each part(octet) of ip, \* matches any sequence of number. - square bracket can be used to match range for any part(octet) of IP.\ e.g. 192.168.0.\[0-255\] matches any IP between 192.168.0.0 to 192.168.0.255 - PRIORITY: If same IP is entered in both "allow" and "deny" IP list, then priority will be given to "deny" IP list. :::note After doing any change in `userdata_hidden.properties,` user need to restart Sahi. ::: **Follow the below instructions to use these properties.** 1. `sahi.master.remote_access.ip.allow` and `sahi.master.remote_access.ip.deny` - Master: IPs specified here can access and use this machine as a Master. - The master starts test runs on itself and on its nodes. - The IP of the Initiator, or Jenkins machine should be in the allow list. ```js //Examples to allow the access //'*' remote master access is allowed for all IP address. sahi.master.remote_access.ip.allow=*; //'*' wildcard for last part (octet) of IP address is allowed for remote master access. sahi.master.remote_access.ip.allow=192.168.1.*; // remote master access is allowed only for 192.168.1.143. sahi.master.remote_access.ip.allow=192.168.1.143; // remote master access is allowed only for the range [0-255] of IP address. sahi.master.remote_access.ip.allow=192.168.1.[0-255]; //Examples to deny the access //'*' all the Sahi is restricted for remote master access. sahi.master.remote_access.ip.deny=*; //'*' wildcard for last part (octet) of IP address is restricted for remote master access. sahi.master.remote_access.ip.deny=192.168.1.*; // restriction for remote master access is only for 192.168.1.143. sahi.master.remote_access.ip.deny=192.168.1.143; // restriction for remote master access is only for the range [0-255] of IP address. sahi.master.remote_access.ip.deny=192.168.1.[0-255]; ``` 2. `sahi.slave.remote_access.ip.allow` and `sahi.slave.remote_access.ip.deny` - Node: IPs specified here can use this machine as a node in distributed suite runs. - The IP of the Master should be in the allow list. ```js //Examples to allow the access //'*' remote slave access is allowed for all IP address. sahi.slave.remote_access.ip.allow=*; //'*' wildcard for last part (octet) of IP address is allowed for remote slave access. sahi.slave.remote_access.ip.allow=192.168.1.*; // remote slave access is allowed only for 192.168.1.143. sahi.slave.remote_access.ip.allow=192.168.1.143; // remote slave access is allowed only for the range [0-255] of IP address. sahi.slave.remote_access.ip.allow=192.168.1.[0-255]; //Examples to deny the access //'*' all the Sahi is restricted for remote slave access. sahi.slave.remote_access.ip.deny=*; //'*' wildcard for last part (octet) of IP address is restricted for remote slave access. sahi.slave.remote_access.ip.deny=192.168.1.*; // restriction for remote slave access is only for 192.168.1.143. sahi.slave.remote_access.ip.deny=192.168.1.143; // restriction for remote slave access is only for the range [0-255] of IP address. sahi.slave.remote_access.ip.deny=192.168.1.[0-255]; ``` 3. `sahi.configuration.remote_access.ip.allow` and `sahi.configuration.remote_access.ip.deny` - Configuration: IPs specified here can change configurations of Sahi on this machine. - The IP of Manager or Master should be in the allow list. ```js //Examples to allow the access //'*' remote configuration access is allowed for all IP address. sahi.configuration.remote_access.ip.allow=*; //'*' wildcard for last part (octet) of IP address is allowed for remote configuration access. sahi.configuration.remote_access.ip.allow=192.168.1.*; // remote configuration access is allowed only for 192.168.1.143. sahi.configuration.remote_access.ip.allow=192.168.1.143; // remote configuration access is allowed only for the range [0-255] of IP address. sahi.configuration.remote_access.ip.allow=192.168.1.[0-255]; //Examples to deny the access //'*' all the Sahi is restricted for remote configuration access. sahi.configuration.remote_access.ip.deny=*; //'*' wildcard for last part (octet) of IP address is restricted for remote configuration access. sahi.configuration.remote_access.ip.deny=192.168.1.*; // restriction for remote configuration access is only for 192.168.1.143. sahi.configuration.remote_access.ip.deny=192.168.1.143; // restriction for remote configuration access is only for the range [0-255] of IP address. sahi.configuration.remote_access.ip.deny=192.168.1.[0-255]; ``` 4. `sahi.reports.remote_access.ip.allow` and `sahi.reports.remote_access.ip.deny` - Reports: IPs specified here can access reports on this machine. This is needed on the machine which is configured as Central DB. - IPs/IP ranges of machines of various business stake holders (developer, tester, manager etc.) can be added - Reports profile does not impact on Reports syncing feature. ```js //Examples to allow the access //'*' remote reports access is allowed for all IP address. sahi.reports.remote_access.ip.allow=*; //'*' wildcard for last part (octet) of IP address is allowed for remote reports access. sahi.reports.remote_access.ip.allow=192.168.1.*; // remote reports access is allowed only for 192.168.1.143. sahi.reports.remote_access.ip.allow=192.168.1.143; // remote reports access is allowed only for the range [0-255] of IP address. sahi.reports.remote_access.ip.allow=192.168.1.[0-255]; //Examples to deny the access //'*' all the Sahi is restricted for remote reports access. sahi.reports.remote_access.ip.deny=*; //'*' wildcard for last part (octet) of IP address is restricted for remote reports access. sahi.reports.remote_access.ip.deny=192.168.1.*; // restriction for remote reports access is only for 192.168.1.143. sahi.reports.remote_access.ip.deny=192.168.1.143; // restriction for remote reports access is only for the range [0-255] of IP address. sahi.reports.remote_access.ip.deny=192.168.1.[0-255]; ``` 5. `sahi.reports_sync.remote_access.ip.allow` and `sahi.reports_sync.remote_access.ip.deny` - Reports Sync: IPs specified here can sync their reports to this machine. - This is needed on the machine which is configured as Central DB. - The IP of Master should be in the allow list. ```js //Examples to allow the access //'*' All IP address can sync their reports to this machine. sahi.reports_sync.remote_access.ip.allow=*; //'*' wildcard for last part (octet) of IP address is allowed to sync their reports. sahi.reports_sync.remote_access.ip.allow=192.168.1.*; // Only 192.168.1.143 can sync its reports to this machine.. sahi.reports_sync.remote_access.ip.allow=192.168.1.143; // All IPs address between 192.168.1.0 to 192.168.1.255 can sync their reports to this machine. sahi.reports_sync.remote_access.ip.allow=192.168.1.[0-255]; //Examples to deny the access //'*' No IP address can sync their reports to this machine. sahi.reports_sync.remote_access.ip.deny=*; //'*' wildcard for last part (octet) of IP address is restricted to sync their reports. sahi.reports_sync.remote_access.ip.deny=192.168.1.*; // 192.168.1.143 can not sync its reports to this machine. sahi.reports_sync.remote_access.ip.deny=192.168.1.143; // All IPs address between 192.168.1.0 to 192.168.1.255 can not sync their reports to this machine. sahi.reports_sync.remote_access.ip.deny=192.168.1.[0-255]; ``` 6. `sahi.mobile_execution.remote_access.ip.allow` and `sahi.mobile_execution.remote_access.ip.deny` - Mobile Execution: IPs of Mobile Devices specified here can use this machine as their Sahi proxy. - This is needed for Mobile Web automation on Mobile device. ```js //Examples to allow the access //'*' IPs of all Mobile Devices can use this machine as their Sahi proxy. sahi.mobile_execution.remote_access.ip.allow=*; //'*' wildcard for last part (octet) of IP address is allowed for remote proxy access. sahi.mobile_execution.remote_access.ip.allow=192.168.1.*; // remote proxy access is allowed only for 192.168.1.143. sahi.mobile_execution.remote_access.ip.allow=192.168.1.143; // remote proxy access is allowed only for the range [0-255] of IP address. sahi.mobile_execution.remote_access.ip.allow=192.168.1.[0-255]; //Examples to deny the access //'*' IPs of any Mobile Devices can not use this machine as their Sahi proxy. sahi.mobile_execution.remote_access.ip.deny=*; //'*' wildcard for last part (octet) of IP address is restricted for remote proxy access. sahi.mobile_execution.remote_access.ip.deny=192.168.1.*; // restriction for remote proxy access is only for 192.168.1.143. sahi.mobile_execution.remote_access.ip.deny=192.168.1.143; //restriction for remote proxy access is only for the range [0-255] of IP address. sahi.mobile_execution.remote_access.ip.deny=192.168.1.[0-255]; ``` 7. `sahi.remote_access.ip` - Full Remote Access: This property will make all the Sahi features (master, node, configuration, reports and mobile execution etc.) available to given IPs. This overrides all other settings for the specified IPs. - Do not put the IPs here for which any/ some of the Sahi features needs to be denied. ### Require a Login Anyone who can reach Sahi Pro from another computer could change its settings or read its reports. A login stops that. It doesn't affect distributed suite runs. 1. On the Dashboard, click **All Settings** › **Sahi Pro Settings**, then **Access** › **Access Control**. The Access Control page in Sahi Pro Settings, with Access Control highlighted in the menu: Login Control with Require login to access from other computers and Allow open access from any computer, Admin Password with Change Password, and User Access with Enable, Disable and Change Password 2. Under **Login Control**, choose **Require login to access from other computers**. 3. Under **Admin Password**, click **Change Password**. The **admin** login has full access: it can change settings, and sync and delete reports. 4. Under **User Access**, choose **Enable** to let the **user** login see reports only, or **Disable** to let any computer open reports without a login. Click **Change Password** to set its password. The default passwords are **admin** for admin and **password** for user. Change them. ## Sign In from Another Computer When someone opens a restricted page of Sahi Pro from another computer, Sahi Pro asks them to sign in with the admin or user login. They have to sign in again after Sahi Pro restarts on the host machine. --- # Restrict Files Access This section describes how we can restrict Sahi Pro's access to different files. It is available since Sahi Pro V6.3.1. ## Configure userdata\_hidden.properties By default, Sahi Pro's [file manipulation functions](https://resources.sahipro.com/docs/sahi-script/functions/files/) like `_readFile`,`_writeFile`,`_deleteFile`,`_renameFile`,`_copyFile`etc. have access to all the files on the file system. This can be restricted to only specific directories by configuring the property `file.accessible.dir` in `/userdata/config/userdata_hidden.properties` file. **See the examples below :** ```js // Use wildcard '*' to provide access to all the files. file.accessible.dir=*; // By default, Sahi Pro has access to all the files. ``` ```js // Restrict Sahi Pro's access to only the files inside example directory and its sub-directories. file.accessible.dir=D:/testing/example; // Must use '\\' or '/' as file path separator. ``` ```js // Restrict SahiPro's access to only the files inside Sahi Pro's default scripts directory and its sub-directories. file.accessible.dir=userdata/scripts; // The path here is relative to Sahi Pro installation directory ``` ```js // Provide access to multiple directories by separating multiple directories with semi-colon. // Restrict Sahi Pro's access to only the files inside 'scripts directory and its sub-directories' and 'example directory and its sub-directories'. file.accessible.dir=userdata/scripts; D:/example; ``` ```js // Restrict Sahi Pro's access to only the script directories configured in Sahi Pro. file.accessible.dir=$scripts.dir; ``` :::note 1. Restart Sahi Pro after updating `userdata_hidden.properties`. 2. Ensure that Sahi Pro has access to all the files that will be accessed using file manipulation functions during the test run. If not, then Sahi Pro will show a message as **`"File Access is not allowed for "`** in the logs and the script will fail. 3. Note that these file restrictions are only applicable on file manipulation functions of Sahi Pro. File access can still be accomplished by following ways : - [Calling java code](https://resources.sahipro.com/docs/sahi-script/calling-java/) - [Executing external programs](https://resources.sahipro.com/docs/sahi-script/functions/execute-external-programs/) - Launching your external java applications using [\_launchJavaApplication](https://resources.sahipro.com/docs/sahi-script/functions/java/#_launchjavaapplication), [\_launchJavaWSApplication](https://resources.sahipro.com/docs/sahi-script/functions/java/#_launchjavawsapplication) ::: Refer here for [restricting remote access](https://resources.sahipro.com/docs/using-sahi/restrict-remote-access/). --- # Securing Sahi for Enterprise ## Using custom domain instead of sahi.example.com Sahi can run multiple scripts simultaneously on multiple instances of browsers. In order to do this, Sahi tracks sessions across domains by setting cookies in a common domain. The default domain is `sahi.example.com`. This is a dummy domain which is understood only by the Sahi proxy. Sometimes, for adhering to security policies of an organization, one may need to change this domain to an internal one like `192.168.1.1`. To do this: 1. Open `userdata.properties`: on the Dashboard, click All Settings › **Sahi Pro Settings** › **Configuration** › **User Properties**, or open `sahi/userdata/config/userdata.properties` in a text editor. 2. Add ```properties "192.168.1.1" sahi.common_domain=192.168.1.1 ``` 3. Restart Sahi, clear browser cache. Now the start page, Controller etc. should be using `192.168.1.1` instead of `sahi.example.com` ## Creating Custom SSL Root Certificates To be able to inject Sahi related javascript code into web pages, Sahi needs to behave as a man in the middle. Sahi comes with its own SSL root certificate, with which all other website certificates are signed. When the browser sees these certificates, it accepts them because we have already accepted the root certificate once. This may be a security risk in rare cases of DNS poisoning or if the machine has been hijacked. One way to preempt this is to create your own local root certificate and provide it to Sahi. ### Create the root certificate 1. Open a command prompt, cd to `sahi_pro/certgen` and run create\_root.bat. It will ask for a few prompts, you can either just press enter and accept the defaults or change the parameters. ```text C:\> cd C:\sahi_pro\certgen C:\sahi_pro\certgen> create_root.bat ``` ... ```text Country Name (2 letter code) [IN]: US State or Province Name (full name) [Karnataka]: Georgia Bangalore []: Atlanta Sahi [Sahi]: MyCompany Organizational Unit Name (eg, section) []: Marketing Sahi []: MyCompany CA sahi@example.com []: x@mycompany.com ``` This will create 2 files ```js sahi_pro/certgen/X509CA/ca/new_ca.crt sahi_pro/certgen/X509CA/ca/new_ca.der ``` :::note Accepting defaults will make it easier to deploy the solution on other machines. ::: 2. Delete `sahi_pro/userdata/certgen` folder. On the next start of Sahi, this folder will be recreated. :::caution[Important] Delete `sahi_pro/userdata/certgen` and NOT `sahi_pro/certgen` ::: 3. If you change any of the default properties in step 1, search for ```js -dname "CN=$DOMAIN_NAME, OU=Sahi, O=Sahi, L=Bangalore, S=Karnataka, C=IN" ``` in `sahi_pro/certgen/create_certificate.bat` and `sahi_pro/certgen/create_certificate.sh` and modify it accordingly. Eg. for the values provided in Step 1, we need to use ```js -dname "CN=$DOMAIN_NAME, OU=Marketing, O=MyCompany, L=Atlanta, S=Georgia, C=US" ``` 4. Restart Sahi. The `sahi_pro/userdata/certgen` will be recreated. Now Sahi is ready with the new root certificate. ### Accept the root certificate on browsers Once created, the root certificate needs to be accepted on different browsers. The procedure is the same as specified in [Configure SSL](https://resources.sahipro.com/docs/using-sahi/sahi-configuration-basic/#configure-ssl). However, firefox needs to be configured additionally. #### Configuring Firefox template for new root certificate For cookie isolation, Sahi launches Firefox instances in separate profiles. Profiles are generated in `sahi_pro/userdata/browser/ff/profiles` folder using `sahi_pro/config/ff_profile_template` as a template. To configure Firefox with the new root certificate, do 1. Delete all folders in `sahi_pro/userdata/browser/ff/profiles` 2. Restart Sahi Pro 3. Launch a Firefox instance from the Dashboard. This will launch Firefox with profile `sahi_pro/userdata/browser/ff/profiles/sahi0` 4. Import the newly created root certificate into firefox. ![](https://resources.sahipro.com/docs/assets/images/using-sahi/config/secure/firefox_import_cert1.webp) ![](https://resources.sahipro.com/docs/assets/images/using-sahi/config/secure/firefox_import_cert2.webp) ![](https://resources.sahipro.com/docs/assets/images/using-sahi/config/secure/firefox_import_cert3.webp) Now this particular Firefox profile has the root certificate installed. 5. To make this certificate work for all profiles, we need to copy the relevant modified files into the template profile. Copy ```js sahi_pro/userdata/browser/ff/profiles/sahi0/cert8.db sahi_pro/userdata/browser/ff/profiles/sahi0/key3.db sahi_pro/userdata/browser/ff/profiles/sahi0/cert9.db sahi_pro/userdata/browser/ff/profiles/sahi0/key4.db ``` to ```js sahi_pro/config/ff_profile_template ``` (Take a backup of the older files and overwrite) 6. Again delete all folders in `sahi_pro/userdata/browser/ff/profiles` 7. Restart Sahi. Firefox profiles will be recreated. Now Firefox is ready with the new root certificate. ### Deploying the root certificate changes on other Sahi Pro installations To make other Sahi Pro installations use the created root cert, 1. Copy the following folders and files: ```js sahi_pro/certgen/X509CA/ca/ sahi_pro/certgen/create_certificate.bat sahi_pro/certgen/create_certificate.sh sahi_pro/config/ff_profile_template/ ``` 2. Restart Sahi Pro. The Sahi Pro installation should now be using the custom root certificate. --- # Sahi GUI Less (Silent) Installation For installing Sahi on systems which do not have a GUI or a window manager (say a Linux server) do the following :::note Sahi Pro Runner and the engines install the same way as Sahi Pro. ::: 1. Copy the Sahi Pro installer jar (install\_sahi\_pro\_vxx\_yyyymmdd.jar) to the desired location. ```js Eg. if you want to install Sahi Pro at /home/user1/sahi_pro copy the installer to /home/user1/ ``` Eg. ```js wget http://sahipro.com/static/builds/pro/install_sahi_pro_v750_20171222.jar mkdir sahi_pro mv install_sahi_pro_v750_20171222.jar sahi_pro ``` 2. Copy the contents below into a file named silent\_install.xml **Contents of /home/user1/sahi/silent\_install.xml**: **For Sahi Pro (Windows/Linux OS)** ```xml sahi_pro ``` **For Sahi Pro (Mac OS)** ```xml sahi_pro ``` **For Sahi Pro Runner (Windows/Linux OS)** ```xml sahi_pro_runner ``` **For Sahi Pro Runner (Mac OS)** ```xml sahi_pro_runner ``` **For Sahi Pro Desktop Engine (Windows OS)** ```xml sahi_pro ``` **For Sahi Pro Desktop Engine (Mac/Linux OS)** ```xml sahi_pro ``` **For Sahi Pro Mobile Engine (Windows/Linux OS)** ```xml sahi_pro ``` **For Sahi Pro Mobile Engine (Mac OS)** ```xml sahi_pro ``` **For Sahi Pro SAP Engine (Windows OS)** ```xml sahi_pro ``` **For Sahi Pro Visual Assist Engine** ```xml sahi_pro ``` ```sh cd sahi vi silent_install.xml (Press Esc and i) paste the above contents into it (Esc :wq) ``` 3. Install Sahi Pro using the following command ```sh java -jar install_sahi_pro_v600_20141015.jar silent_install.xml ``` This will install Sahi Pro in /home/user1/sahi\_pro/ :::caution[Important] If you are installing an earlier version of Sahi, it is possible that the installation fails with the above xml content. ::: If the installation fails, run the Sahi installer with GUI once and generate the xml content by clicking on `Generate an automatic installation script` button at the end of the installation, as shown in the image below.
The last step of the Sahi Pro installer: Installation has completed successfully, the uninstaller's location, the Generate an automatic installation script button highlighted, and Done
Use that xml content in the step above. 4. Copy productkey.txt file into /home/user1/sahi\_pro/userdata/config directory. 5. Start Sahi Pro using ```sh cd /home/user1/sahi_pro/userdata/bin ./start_sahi.sh ``` --- # Manage External JAR Files and Configure Nodes Add or delete external JAR files and Sahi Pro support JAR files, and sync them to the nodes of distributed suite runs. Keyword code sometimes needs a Java library, such as a database driver, and Sahi Pro support may send you a JAR file with a fix. Add them on the **External JARs** page, then copy them to the other machines that run your tests. On the Dashboard, click **All Settings** › **Sahi Pro Settings**, then **Configuration** › **External JARs**. The Manage external Jars page in Sahi Pro Settings, with External JARs highlighted in the menu: step 1 lists the JAR files in userdata/extlib and userdata/extlib/support with Refresh, steps 2 and 3 have Choose Files for each folder, step 4 has Apply and Restart Sahi Pro, and step 5 syncs the JARs to nodes, with a Use, Host, Port and Status table, Add New Node and Sync and Restart nodes ## Add or Delete JAR Files There are two folders: - **userdata/extlib:** JAR files your tests need, such as a database driver or a library your keyword code calls. - **userdata/extlib/support:** JAR files from Sahi Pro support for changes made for your team. 1. To delete or replace JAR files, tick them in the list. 2. To add JAR files to `userdata/extlib`, click **Choose Files** under step 2. 3. To add JAR files to `userdata/extlib/support`, click **Choose Files** under step 3. 4. Click **Apply and Restart Sahi Pro**. Changes take effect only after the restart. ## Sync JAR Files to Nodes In distributed suite runs, every node needs the same JAR files. Step 5 copies them for you: 1. Under **Provide nodes to Sync Jars present in userdata/extlib folder**, enter each node's **Host** and **Port**, and tick **Use**. **Add New Node** adds a row. 2. To copy the support JAR files too, tick **Sync Sahi Pro Support Jars present in userdata/extlib/support folder also**. 3. Click **Sync and Restart nodes**. Sahi Pro copies the files and restarts each node, so the changes take effect. **Status** shows each node's progress: a tick when the sync and restart succeed, a cross when they fail. Hover over the cross to see why. --- # Auto Threading Auto thread intelligently prevents your browser from launching if CPU usage exceeds a configurable threshold value. It allows to launch browser only if enough CPU is available. This ensures stability for your script execution. Auto thread feature checks the CPU usage of the machine before launching each browser instance and allows it to launch only if enough CPU is available. Auto thread helps in adjusting the thread number as per your machine capacity.\ Provide your thread number as 0 so that maximum thread launched will be equal to the capacity provided in browser\_types :::note If auto thread is enabled, the maximum number of browser opens is equal to the count specified as Thread number to the suite. ::: ## Configure Two properties control auto thread. Set them in `userdata.properties` (on the Dashboard, All Settings › **Sahi Pro Settings** › **Configuration** › **User Properties**): - `sahi.auto_thread.enabled`: turns auto thread on (`true`) or off (`false`). It is `true` in `config/sahi.properties`. - `sahi.threshold.cpu_usage`: the CPU usage, in percent, below which a browser can be launched. The default is `90`. For one suite run, turn on **Enable Autothread** in the Run Configuration's [Advanced Settings](https://resources.sahipro.com/docs/using-sahi/run-tests-via-editor/#advanced-run-settings). --- # Manage Sahi Pro Version Updates, Rollbacks, Engines and Support Patches Update Sahi Pro to a new version, roll back to an earlier one, install engines and apply support patches. ## Open Product Updates 1. Click **All Settings** on the Dashboard. The All Settings window opens. 2. Click **Sahi Pro Settings**. The Sahi Pro Settings page opens.
The Sahi Pro Dashboard with the All Settings window open, Sahi Pro Settings and the All Settings button highlighted
3. In the menu on the left, open **Configuration** and click **Product Updates**. The **Update Sahi Pro** page shows your version and any update, the engines, and support patches. Sahi Pro Settings with Product Updates highlighted in the menu, showing the Sahi Pro card with version 12.6.0.0 available and a Download button, and the Engines section with the Desktop, Mobile, SAP and Visual Assist Engines ## Install Updates When a newer version is out, the **Sahi Pro** card shows **Update Available**. ### Install a Major Version 1. Open Product Updates. 2. Next to the new version, click **Download**. The download starts at once, with no confirmation, and takes a few minutes. The Sahi Pro card with Update Available, version 12.6.0.0 released 16 January 2027 with What's new?, and its Download button highlighted 3. When the download finishes, the button changes to **Install**. Click it. 4. Back up your database, then click **Install** in the **Install Major Update?** dialog. Sahi Pro backs up its current directory, installs the new version and restarts. Save any scripts you're editing first; scripts that are running stop. ![Confirmation dialog](https://resources.sahipro.com/docs/assets/images/using-sahi/major-version-confirmation.webp) ### Install a Minor Version 1. Open Product Updates. When an update is out, you can also click **Update available** at the bottom of the Dashboard.
The Sahi Pro Dashboard on the Launcher tab, with browsers, engines, Workspace and Tools, and Update available highlighted at the bottom, next to the installed version
2. Click **View Intermediate Versions**, then **Install** next to the version you want. The Sahi Pro card with the intermediate versions 12.5.0.0, 12.1.0.0 and 12.0.1.0 listed under 12.6.0.0, each with its release date and What's new?, and the Install button for 12.5.0.0 highlighted 3. In the **Install Update?** dialog, click **Install Update**. Sahi Pro updates and restarts. Save any scripts you're editing first; scripts that are running stop.
The Install Update? dialog with the Install Update button highlighted
4. A new Sahi Pro console opens for each engine installed on your computer. ## Roll Back If an update or a patch causes problems, undo it. Sahi Pro undoes changes one at a time, the latest first: first the patches applied to the current version, then the version itself. With nothing to undo, the button reads **No Previous Version to Rollback** and can't be clicked. 1. Open Product Updates, or refresh it if it's open. 2. Click **Rollback to Previous Version**. The **Rollback** list opens under it, newest first. Only the first row can be rolled back; the others wait until the newer changes are undone. 3. Click **Rollback This Patch** next to a patch, or **Rollback to This Version** next to an earlier version. A version row says which patch comes back with it. The Sahi Pro card with Rollback to Previous Version open: the Rollback list, newest first, with patches sahi_pro_v12009_patch_2 and patch_1, then version 12.0.0.6 with patch sahi_pro_v12006_patch_1; Rollback This Patch is highlighted on the first row, and the other rows' buttons are greyed out 4. In the dialog, check what will change, then click **Rollback**. Sahi Pro restarts. Save any scripts you're editing first; scripts that are running stop.
The Rollback Patch sahi_pro_v12009_patch_2? dialog: the patch will be removed, Sahi Pro stays on its version, the next patch in line, a Sahi Pro will restart notice, and the Rollback button highlighted
## Install Engines Install the Desktop, Mobile, SAP and Visual Assist Engines from the **Engines** section. Each engine needs its own license. 1. Open the Product Updates page. 2. Under **Engines**, click **Install** next to the engine. An engine that's already installed shows **Uninstall** instead. The Engines section listing the Desktop, Mobile, SAP and Visual Assist Engines, each with an Install or Uninstall button 3. In the **Install** dialog, click **Install**. Sahi Pro restarts once the engine is installed, so save any scripts you're editing first. Scripts that are running stop. Engines you installed earlier are synced to the latest update at the same time. 4. To remove an engine you no longer need, click **Uninstall** next to it. The Engines section with the Uninstall button next to Desktop Engine highlighted 5. In the dialog, click **Uninstall**. Sahi Pro restarts once the engine is removed.
The Uninstall Desktop Engine? dialog with the Uninstall button highlighted
## Sync Engines After an Update Engines installed from the Product Updates page are updated along with Sahi Pro. An engine installed from its own installer file stays on its version when you update Sahi Pro. **Engines** then marks it **Out of sync** and names it in a message, such as "Desktop Engine is out of sync with Sahi Pro 12.0.0.10." 1. Open the Product Updates page, or refresh it if it's open. 2. Click **Sync Add-ons**. 3. Back up your database, then click **Sync Add-ons** in the dialog. Sahi Pro restarts, so save any scripts you're editing first. Scripts that are running stop. ## Install Patches Apply a support patch that Sahi Pro support sends you, either as a file or as a link. The Install Patches section, with Install Patch from File and Install Patch from URL - **From a file:** under **Install Patch from File**, click **Choose File**, pick the `.zip` patch, then click **Apply Patch**. In the **Apply Patch?** dialog, click **Apply Patch**. - **From a link:** under **Install Patch from URL**, paste the `https://` link, then click **Apply Patch**. In the **Install Update?** dialog, click **Install Update**. Sahi Pro restarts once the patch is applied. Save any scripts you're editing first; scripts that are running stop. --- # Test Scenario Editor Build and organise tests in the Test Scenario Editor: projects, the Navigator, scenario files in the No-Code Test Editor, running a scenario file, the Sheet View, scenarios with Java, and the Tools menu. A test suite grows into hundreds of files: scenario files, the keyword files behind them, test data, suites and accessor repositories. The Test Scenario Editor keeps them in one place. You build test cases without code in the No-Code Test Editor, write keyword code in the script view when you need it, and run anything from the same window. It replaces the Scenario Editor of older Sahi Pro versions. ## Open the Editor - **From the Dashboard:** click **Test Editor**. - **From the Controller:** click **Sahi Editor** in the Controller's bottom bar. The Editor opens in one browser tab at a time. If it's already open somewhere, Sahi Pro asks before it opens another tab. ## The Editor at a Glance The Test Editor with the sahi_training project open: numbered badges mark the project picker, the File, Automate, Run and Tools menus, the left bar, the Navigator, the open file tabs, the No-Code Test Editor with a test case and its keywords, the selected keyword's steps, and Notifications, Docs and Help 1. **Project picker:** the project you're working in. See [Projects](#projects). 2. **Menus:** **File** creates and saves files, **Automate** opens the Controller on the selected keyword, **Run** opens the [Run Configuration](https://resources.sahipro.com/docs/using-sahi/run-tests-via-editor/), and **Tools** holds the [utilities](#tools). 3. **Left bar:** **Scripts** (the Navigator), **Logs** (test run reports), **Git Configuration** and **Settings**. 4. **Navigator:** the files in the project. See [Navigator](#navigator). 5. **Tabs:** the files you have open. See [Tabs](#tabs). 6. **No-Code Test Editor:** the open scenario file, with its test cases and keywords. 7. **Keyword steps:** the steps of the selected keyword. 8. **Notifications, Docs and Help.** ## Projects Tests for different applications, or from different teams, get in each other's way when they share one folder. A project keeps each set of tests, data and reports on its own. Click the project name at the top left to switch projects. Type in **Search** to find one, or click **New** to create a project.
The project picker open, with Search, All Projects and the New button highlighted, and the projects scripts, Linear, Sample and sahi_training
Sahi Pro comes with a default project, `scripts`, which holds example tests. For a walkthrough, see [Create a Project](https://resources.sahipro.com/docs/using-sahi/getting-started/first-test-scenario/#create-a-project). ## Navigator The Navigator lists the files and folders in the project. Click a file to open it. - **Search** filters the list as you type. - **Collapse All**, **Link with Editor** and **Refresh Navigator** sit at the top. **Link with Editor** keeps the open file selected in the list, and **Refresh Navigator** shows files added outside the Editor. - **+** adds a **Sub Folder**, **Scenario File**, **Test Data** file, **Test Suite**, **Accessor Repo**, **Script**, **Property File** or **Data Gen File**.
The Navigator with the + button highlighted and its menu open: Sub Folder, Scenario File, Test Data, Test Suite, Accessor Repo, Script, Property File and Data Gen File
Right-click a file to **Run** it, open its **Reports**, or **Rename**, **Cut**, **Copy**, **Paste** or **Delete** it. Select several files to create a **Test Suite** or an **Accessor Repo** from them, or to cut, copy or delete them together.
The right-click menu on visual_books.s.csv in the Navigator: Run, Reports, Rename, Cut, Copy, Paste and Delete
### Tabs Each open file has a tab. Right-click a tab for **Refresh tab**, **Close tab**, **Close other tabs**, **Close tabs to the left** and **Close all tabs**. When you move between files, such as by Ctrl-clicking (⌘-clicking on Mac) a keyword to open its file, it's easy to lose your place. The left and right arrows at the right of the tabs, **Previous Location** and **Next Location**, take you back and forward through the places you've been, like a browser's back and forward buttons. The open file tabs books.s.csv, Register.s.csv, Register.sah and visual_books.s.csv, with the right-click menu on visual_books.s.csv: Refresh tab, Close tab, Close other tabs, Close tabs to the left and Close all tabs; the Previous Location and Next Location arrows at the right are highlighted With many files open, the tabs don't all fit. Click the button in the corner, after the arrows, to list all open tabs. Type in **Search** to find one, click it to switch to it, or hover over it and click **×** to close it.
The list of all open tabs from the corner button: Search, then books.s.csv, Register.s.csv, Register.sah with a close button on hover, and visual_books.s.csv
## Create and Save Files **File** > **New** creates a **Scenario File** (Alt + N), a **Test Data** file or a **Test Suite**. To create one inside a folder, use **+** in the Navigator instead. **File** also has **Save** (Ctrl + S, or ⌘ + S on Mac), **Save As** (Alt + F2) and **Save All** (Ctrl + Shift + S, or ⌘ + Shift + S on Mac). A test suite is a `.dd.csv` file that lists scenario files to run together. See [Test Suites](https://resources.sahipro.com/docs/using-sahi/data-driven-suites/). ## Build Tests in the No-Code Test Editor A scenario file opens in the No-Code Test Editor. Each test case is a list of keywords, written in business terms such as Add Books To Cart, and each keyword holds the steps that do the work. Select a keyword to see its steps beside the test case. The No-Code Test Editor with the Buy Books Using Button Images test case and its keywords, and the Add Books To Cart keyword selected, its steps listed on the right; numbered badges mark Add Keyword, Add Test Case, Data Drive, a keyword in the test case, the keyword's steps, Add Parameter, Parameterize and Add Step 1. **Add Keyword:** adds a keyword to the test case. 2. **Add Test Case:** adds a test case to the scenario file. 3. **Data Drive:** attaches a test data file, to run the test case with several sets of data. See [Test Data Files](https://resources.sahipro.com/docs/using-sahi/test-data-files/). 4. **A keyword in the test case.** Values it passes to the keyword's parameters show at the right, such as `test, secret`. They're passed by name (`Username:test`), so their order doesn't matter. 5. **The selected keyword's steps.** 6. **Add Parameter:** adds a parameter to the keyword. 7. **Parameterize:** turns recorded values into parameters. See [Parameters and Data Generators](https://resources.sahipro.com/docs/using-sahi/getting-started/parameters-and-data-generators/). 8. **Add Step:** adds a step to the keyword. ### Write a Keyword 1. Click **Add Keyword** and type its name, such as `Add Books To Cart`. 2. Add its steps. To record them, select the keyword and click **Automate**: the [Controller](https://resources.sahipro.com/docs/using-sahi/sahi-controller/) opens on the keyword, and each action you take in the browser becomes a step. To add a step by hand, click **Add Step**. 3. In the **Add Step** panel, choose the **Action**, such as **Set Value** or **Click**, and the **Element** it acts on. Enter a **Value** if the action needs one. **Step Options** has more settings for the step. The dropdown at the top right switches the step type: **Actions**, **Rest Client** for a call to a Rest API (see [REST Client - Getting Started](https://resources.sahipro.com/docs/using-sahi/rest-api/getting-started/)), or **Sahi Script / JS Code** for a line of code. 4. Click **Add Step**, then save with Ctrl + S (⌘ + S on Mac).
The Add Books To Cart keyword's steps with the Add Step panel open below them: Actions, Action Set Value, Element, Value, Props, Step Options, and the Cancel and Add Step buttons
To change a step, double-click it: it opens in **Edit Step**, with the same fields. For a full walkthrough, see [Your First Test Scenario](https://resources.sahipro.com/docs/using-sahi/getting-started/first-test-scenario/). ### Keyword Code Behind every keyword is a Sahi Script function in a keyword file (`.sah`). When a keyword needs logic that no-code can't express, open its file and write the code in the script view. See [Write Keywords in Sahi Script](https://resources.sahipro.com/docs/sahi-script/script-view/). ## Test Data, Suites and Runs - **[Test Data Files](https://resources.sahipro.com/docs/using-sahi/test-data-files/):** run a test case with many sets of data. - **[Test Suites](https://resources.sahipro.com/docs/using-sahi/data-driven-suites/):** run many scenario files together. - **[Run Tests via Editor](https://resources.sahipro.com/docs/using-sahi/run-tests-via-editor/):** the Run Configuration, distributed suite runs, scheduling and debugging. ## Tools The **Tools** menu holds utilities you need now and then while working on tests.
The Tools menu open: Stop All, REST Client, Password Encoder, Find Usage, Clear Break Points and Git Configuration
### Stop All A suite started by mistake, or a run that hangs, keeps browsers busy until it ends. **Stop All** stops every test running from the Editor straight away. ### REST Client Many applications have Rest APIs behind their screens, and checking them directly is faster and more stable than going through the user interface. **Tools** › **REST Client** opens the REST Client to build a request, send it, and check its response with assertions and variables. From here it ends with **Generate Sahi Script**, which writes the request and its checks as Sahi Script, for keywords written in code. To add a REST step to a keyword in the No-Code Test Editor instead, open the REST Client from **Add Step**. See [REST Client - Getting Started](https://resources.sahipro.com/docs/using-sahi/rest-api/getting-started/). ### Password Encoder A password typed into a test is readable by anyone who opens the file. Encode it, and use the encoded string with [\_setPassword](https://resources.sahipro.com/docs/sahi-script/functions/actions/#_setpassword) instead: 1. Choose **Tools** > **Password Encoder**. 2. Type the password under **Enter Password** and click **Generate**. 3. Click **Copy** to copy the **Encoded Password String**.
The Password Encoder dialog with Enter Password and the Generate button, and Encoded Password String with the Copy button
:::note A **salt** is used to encrypt the password. You can change it with the property `script.salt_for_password_encryption` in `userdata/config/userdata.properties`. If the property is also in `userdata/config/userdata_hidden.properties`, the value there is used. ::: ### Find Usage When you rename a keyword or a variable, every file that uses it has to change too. **Find Usage** searches all the files in the project and can replace the name everywhere at once. See [Find Usage Across Files](https://resources.sahipro.com/docs/sahi-script/script-view/#find-usage-across-files). The Find Usage - Keywords and Variables panel at the bottom of the Editor, with Find, Replace With, and the filters Exact match, Keyword, Variable and Pattern match ### Clear Break Points Breakpoints left behind in keyword files stop a later debug run where you don't expect it. **Clear Break Points** removes every breakpoint in every file. See [Debug a Test](https://resources.sahipro.com/docs/using-sahi/run-tests-via-editor/#debug-a-test). ### Git Configuration To share tests with your team and keep their history, connect the project to a Git repository. **Git Configuration** sets: - **Remote Path** and **Branch:** the repository and the branch to clone. - **Author Name** and **Author Email:** the name and email used for your commits. - **Authentication Type:** how Sahi Pro signs in to the repository, such as **HTTPS Authentication** with a **User Name** and **Password**. - **Git Directory:** the folder the repository is cloned into. - **Git Log Integration:** **Enable** adds Git details, such as the commit, to reports. Click **Save**. For staging, committing and viewing history, see [Integration with Git](https://resources.sahipro.com/docs/using-sahi/git-sahi-integration/). ## Editor Shortcuts | **Shortcut** | **Explanation** | | --- | --- | | Ctrl + S (⌘ + S on Mac) | Save the current file | | Ctrl + Shift + S (⌘ + Shift + S on Mac) | Save all files | | Alt + F2 | Save As | | Alt + N | New scenario file | For shortcuts while editing keyword code, see [Write Keywords in Sahi Script](https://resources.sahipro.com/docs/sahi-script/script-view/#editor-shortcuts). ## Run a Scenario File Run a scenario file like any other test. See [Run Tests via Editor](https://resources.sahipro.com/docs/using-sahi/run-tests-via-editor/). Its report lists each test case with its keywords, and you can expand a keyword to see the Sahi steps it ran. Reports open from **Reports** in the Controller's bottom bar, or at http://localhost:9999/logs. ## Sheet View Users moving from older Sahi Pro versions may be used to editing scenario files as a sheet, with a row for each step. The Sheet View shows the file that way. To open scenario files in the Sheet View by default, add this line to `userdata/config/userdata.properties`: ```properties scenario.grid.view.default=true ``` It applies to scenario files that haven't been opened in a view before. The Sheet View's toolbar has: - **Insert:** a **Testcase** (Alt + Insert), a **Tags Column** (Alt + T) or a **Comment Column** (Alt + C). - **Load Sahi Library** (Alt + S): adds a `loadSahi` row for a keyword file. Its functions are then listed as you type in the **Key Word** column. - **Function Details:** shows the selected keyword's function and its parameters, so you can see how many values it takes. - **Import:** imports functions as CSV. - **Find and Replace**, **Save File**, more options (**Keyboard Shortcuts**, Shift + F10) and **Script Information**. Cells with a mistake turn red: a `loadSahi` path that doesn't exist, a keyword that isn't defined in the loaded files, or more values than the function takes.
Sheet View shortcuts If one of these shortcuts is taken by your operating system, turn it off there. For example, on Ubuntu, go to **System Settings** › **Keyboard** › **Shortcuts** › **Navigation**. #### Ctrl (⌘ on Mac) combination shortcut keys | Shortcut | Action | | --- | --- | | Ctrl + A (⌘ + A on Mac) | Select all contents of the worksheet. | | Ctrl + HOME (⌘ + HOME on Mac) | Move to column header cell. | | Ctrl + C (⌘ + C on Mac) | Copies the selected cells. | | Ctrl + X (⌘ + X on Mac) | Cuts the selected cells. | | Ctrl + V (⌘ + V on Mac) | Pastes in the selected cell. | | Ctrl + Y (⌘ + Y on Mac) | Repeats the last command or action, if possible. | | Ctrl + Z (⌘ + Z on Mac) | Uses the Undo command to reverse the last command or to delete the last entry you typed. | | Ctrl + / (⌘ + / on Mac) | Comment/ Un-comment the selected row/s. | | Ctrl + DELETE (⌘ + DELETE on Mac) | Deletes the selected row/s. | #### ALT combination shortcut keys | Shortcut | Action | | --- | --- | | ALT + ENTER | While typing text in a cell pressing Alt + Enter will move to the next line allowing for multiple lines of text in one cell. | | ALT + N | Loads the new worksheet. | | ALT + O | Opens the dialog to load existing scenario. | | ALT + F2 | Displays the Save As dialog box. | | ALT + SHIFT + E | Displays the names of the feature developers. | | ALT + INSERT | Insert Testcase shortcut. | | ALT + S | Load Sahi library shortcut. | | ALT + 1 | Insert new row above the current row. | | ALT + 2 | Insert new row below the current row. | | ALT + T | Inserts Tag column shortcut. | | ALT + C | Insert Comment column shorcut. | #### Function keys | Shortcut | Action | | --- | --- | | F2 | Edit the selected cell. | | ALT + F2 | Displays the Save As dialog box. | | SHIFT + F10 | Displays the shortcut information pop-up. | #### Other useful shortcut keys | Shortcut | Action | | --- | --- | | ARROW KEYS | Move one cell up, down, left, or right in a worksheet. | | SHIFT + ARROW KEY | Extends the selection of cells by one cell. | | DOWN ARROW | Selects the next command when a context menu or Auto-complete option is open. | | UP ARROW | Selects the previous command when a context menu or Auto-complete option is open. | | BACKSPACE | Deletes one character to the left in the Formula Bar. Also clears the content of the active cell. | | DELETE | Removes the cell contents from selected cells. In cell editing mode, it deletes the character to the right of the insertion point. | | Ctrl + DELETE (⌘ + DELETE on Mac) | Deletes the selected row/s. | | END | Moves to the last cell in the same row. Also selects the last command on the menu when a menu is visible. | | Ctrl + END (⌘ + END on Mac) | Moves to the last cell in same column | | Ctrl + SHIFT + END (⌘ + SHIFT + END on Mac) | Extends the selection of cells to the last used cell on the worksheet (lower-right corner). | | ENTER | Completes a cell entry from the cell, and selects the cell below (by default). Edits the selected cell. Selects the selected command when a context menu or Auto-complete option is open. In a dialog box, it performs the action for the default command button in the dialog box (the button with the bold outline, ofte | | Alt + Enter | While typing text in a cell pressing Alt + Enter will move to the next line allowing for multiple lines of text in one cell. | | ESC | Cancels an entry in the cell or Formula Bar. It also closes an open menu dialog box or message window. | | HOME | Moves to the beginning of a row in a worksheet. Selects the first command on the menu when a context menu is visible. | | Ctrl + HOME (⌘ + HOME on Mac) | Move to column header cell. | | PAGE DOWN | Moves to the last cell in the same column. | | PAGE UP | Moves to the first cell in the same column. | | TAB | Moves one cell to the right in a worksheet. Moves to the next option in the context menu. | | SHIFT + TAB | Moves to the previous cell in a worksheet. |
## Scenarios with Java The keywords in a scenario file can also be methods of Java classes, for teams that write their automation code in Java. In the scenario file, `importJava` takes the place of `loadSahi`, and each keyword calls a method as `$className.methodName`. A scenario file with Java keywords in the Sheet View: importJava rows for demo.training.UserModule and other classes, then the test cases valid user and invalid user calling $userModule.login, $userModule.addBooks, $userModule.verifyTotal, $userModule.logout, $userModule.verifyNotLoggedIn and $userModule.verifyErrorMessage, with $total set from [ReturnValue] ### Set Up the Java Directory Keep your Java code in `userdata/scripts/java`: ```text Folder structure: |- Sahi |- userdata |-scripts |-java |- src |- classes |- lib | | | | ``` With this structure, Sahi Pro picks up the methods when you run tests, and sends them to the nodes in distributed suite runs. In your Java project: 1. Add `sahi.jar`, from `sahi/lib`, to the classpath. 2. Name the source directory `src`. 3. Name the default output directory `classes`. 4. Name the library directory `lib`. ### Write a Java Class 1. To list a class's `public` methods as you type a keyword, do one of these: - Make the class implement `SahiMarkerInterface`, with `import com.sahipro.lang.java.client.SahiMarkerInterface;`. - Add the class's fully qualified name to `userdata/scripts/java/exposed_classes.txt`, one per line. Lines starting with `#` or `//` are comments. 2. Declare instance variables for the Sahi capabilities the class needs, such as `com.sahipro.lang.java.client.Browser`, `Windows`, `Applet` and `JavaApplication`, and a constructor that sets them. For example, for a class `UserModule`: ```java Browser browser = null; Windows window = null; JavaApplication javaApplication = null; public UserModule(SahiCapabilities sahiCapabilities) { this.b = sahiCapabilities.getBrowser(); //to retrieve Browser instance this.window = sahiCapabilities.getWindows(); //to retrieve Windows instance this.javaApplication = sahiCapabilities.getJavaApplication(); //to retrieve JavaApplication instance } ``` A template: ```java package demo.training; public class UserModule implements SahiMarkerInterface { Browser b = null; Windows w = null; JavaApplication javaApplication = null; public UserModule(SahiCapabilities sahiCapabilities) { this.b = sahiCapabilities.getBrowser(); this.w = sahiCapabilities.getWindows(); this.javaApplication = sahiCapabilities.getJavaApplication(); } } ``` A class for the training book store: ```java package demo.training; public class UserModule implements SahiMarkerInterface { Browser b = null; public UserModule(SahiCapabilities sahiCapabilities) { this.b = sahiCapabilities.getBrowser(); } public void login(String username, String password) { String baseURL = "https://sahitest.com/"; b.navigateTo(baseURL + "/demo/training/login.htm"); b.textbox("user").setValue(username); b.password("password").setValue(password); b.click(b.submit("Login")); } public void addBooks(int java, int ruby, int python) { b.setValue(b.textbox("q").near(b.cell("Core Java")), java+""); b.setValue(b.textbox("q").near(b.cell("Ruby for Rails")), ruby+""); b.setValue(b.textbox("q").near(b.cell("Python Cookbook")), python+""); b.click(b.button("Add")); } public void verifyTotal(int total) { b.areEqual(total+"", b.textbox("total").getValue()); } public void logout() { b.click(b.button("Logout")); } public void verifyNotLoggedIn() { b.assertExists(b.textbox("user")); } public void verifyErrorMessage(String message) { b.assertVisible(b.div("errorMessage")); b.assertText(b.div("errorMessage"), message); } public void addBooksAndVerifyTotal(int java, int ruby, int python, int total){ addBooks(java, ruby, python); verifyTotal(total); } } ``` ### Call Java Methods `importJava` creates an instance of the class and keeps it in a variable named after the class, with a lowercase first letter. Call its methods as `$className.methodName`. For example, `importJava "demo.training.UserModule"` sets `$userModule`, and `$userModule.login` calls `login(String userName, String password)`:
TestCaseKey WordArgument1Argument2Argument3
importJava"demo.training.UserModule"
Check shopping cart total[Documentation]Smoke test for add books
$userModule.login"test""secret"
$userModule.addBooks321
$userModule.verifyTotal1640
$userModule.logout
Test login error message[Documentation]Checks Invalid login message
$userModule.login"test""bad password"
$userModule.verifyNotLoggedIn
$userModule.verifyErrorMessage"Invalid username or password"
A `Comments` and a `Tags` column can come before `TestCase`, as in any scenario file. To run only some test cases, filter by tags when you run, such as `admin || user`:
CommentsTagsTestCaseKey WordArgument1Argument2Argument3
Load the function library fileimportJava"demo.training.UserModule"
First Testcasesmoke, adminCheck shopping cart total[Documentation]Smoke test for add books
$userModule.login"test""secret"
$userModule.addBooks321
$userModule.verifyTotal1640
$userModule.logout
Second Testcaseall, smoke, userTest login error message[Documentation]Checks Invalid login message
$userModule.login"test""bad password"
$userModule.verifyNotLoggedIn
$userModule.verifyErrorMessage"Invalid username or password"
The rules, with a note on each row: | Test Case | Key word | Argument 1 | Argument 2 | Argument 3 | Very first line of sheet | | --- | --- | --- | --- | --- | --- | | | | | | | Blank lines are ignored | | | importJava | "demo.training.UserModule" | | | Creats a new instance of the java class and sets it into a presumed variable name ($userModule in this case). | | | | | | | | | Test Case One | Step One | Param1 | Param2 | | New test case started.StepOne(Param1, Param2) is called. | | | Step Two | Param3 | | | StepTwo(Param3) is called | | | | | | | | | Test Case Two | Step One | 25 | "age" | | New test case started.String values are quoted | | | Step Two | Param5 | | | | | | | | | | | | Test Case Three | \[Documentation\] | Some description about the test case | | | \[Documentation\] is useful for, well, documentation | | | Step One | 25 | "age" | | New test case started.String values are quoted | | // | Step Two | Param5 | | | Commented step using // | | | Step Two | Param6 | | | | | | | | | | | ### What to Know - Reports log the Java code that ran in the browser. Click a step in the report to see its stack trace. - Java methods can run across machines in distributed suite runs. - One scenario file or keyword file can call Sahi functions and Java methods together. - You don't need to restart Sahi Pro when classes or JAR files change. It runs the changed code. - Assertions in Java work like those in Sahi Script, with the same automatic wait and retry. A failed assertion doesn't stop the run. - Not supported: Java classes with the same name in different packages, and running a test that calls Java methods from a URL. --- # Sahi Controller Record a keyword's steps, identify elements, try steps before you add them, and run your test case from the Controller. The Controller is a small window that works alongside your browser. You use it to record a keyword's steps, identify elements on the page, try a step before you add it, and run the test case. ## Open the Controller Open the Controller from the keyword you want to record. It then knows where your steps belong: what you record goes into that keyword, and the browser starts at the right page. **From a keyword** (the usual way): 1. In the No-Code Test Editor, select the keyword and click **Automate**. 2. In the **Automate with Controller** dialog, choose the browser and set **Start URL**. Check that **Testcase / Global** and **Keyword** show the ones you want. 3. Click **Launch Controller**. The browser opens at the start URL, and the Controller opens on that keyword.
The Automate with Controller dialog with Google Chrome, the sample application URL, books.s.csv, Buy Books, Login and books.sah
**From any page:** in a browser opened by Sahi Pro, hold Alt (Option on Mac) and double-click the page. The Controller doesn't know which keyword you're working on, so it opens on a **Draft Keyword**. Steps you record there can be saved to a keyword file later. ## The Controller at a Glance The Controller has two tabs: - **Automate:** record, edit, save and run the keyword's steps. - **Advanced Editor:** identify an element on the page and build one step for it. At the top right are the mode the Controller works in (such as Browser, Java, Android or iOS), **Minimize** and **Exit Controller**. The bar at the bottom opens the **Sahi Editor**, **Reports** and the **Clipboard**, and **⋮** holds **Diagnose**, **Controller Info** and **Help Docs**. ## Record a Keyword Writing each step of a keyword by hand is slow, and it's easy to get an element's accessor wrong. Recording writes the steps for you: you use the application in the browser as a user would, and each action becomes a step with the right accessor. 1. Open the Controller on the keyword. 2. Click **Record**. The status changes from idle to Recording.
The Controller on the Login keyword of Buy Books, with the Record button highlighted
3. Work in the browser. Each action you take appears as a step in the Controller. 4. Click **Save**. Steps not yet saved are marked with an orange dot, and the **Save** icon turns orange until you save.
The Controller with three recorded Login steps not yet saved, shown by orange dots and an orange Save icon, which is highlighted
The Controller doesn't save on its own, so save after you record or edit steps. Actions you take in the Controller itself aren't recorded, only actions in the browser. :::tip[AI Suggest (Beta Preview)] **Suggest** reads the page and writes the keyword's steps for you. It's powered by [Sahi Pro Atlas](https://resources.sahipro.com/docs/introduction/sahi-pro-atlas/). Recording the keyword yourself works as always. ::: ## Edit Steps When a recorded step isn't quite right, or the application changes, you don't have to record the whole keyword again. Change just that step: 1. Choose the keyword. Use the arrows next to it to go to the previous or next keyword. 2. Click a step. It opens as **Edit Step**, where you can change its **Action**, **Element** and **Value**. 3. Click **Update**. 4. Click **Save**.
A step of the Add Books keyword open in Edit Step, with Action, Element and Value, and the Update button highlighted
To work on several steps at once, tick them. The toolbar above the steps then moves them up or down, disables or enables them, cuts, copies, pastes or deletes them, and undoes or redoes a change. To try selected steps on the page without running the whole keyword, click **Evaluate Selected Steps**.
The Add Books To Cart keyword in the Controller with its first two steps ticked and the step toolbar above them highlighted: move up, move down, disable, enable, cut, copy, paste, delete, undo and redo
## Parameterize a Keyword A recorded keyword keeps the exact values you typed, such as one user name, so every run uses the same data. **Parameterize** turns those values into parameters, so each test case can pass its own data. The dialog lists the recorded values and the parameters it suggests for them. You can pass parameters as an object, give each one a Data Generator, and remove duplicates. The Parameterize dialog for Register User, listing the recorded values john, the encrypted password twice and 12th main street, with the suggested parameters Username, Password, Password1 and Address For a walkthrough, see [Parameters and Data Generators](https://resources.sahipro.com/docs/using-sahi/getting-started/parameters-and-data-generators/). ## Identify Elements Every step needs an accessor, which is how Sahi finds an element on the page, such as `_textbox("user")`. You identify an element in the Controller's **Advanced Editor** to see its accessor, check that Sahi finds the one you mean, and turn it into a step. ### Identify an Element and Add a Step Recording only captures what you do in the browser, so some steps can't be recorded, such as a check that the total is 1550, or storing a value to use later. Build these in the Advanced Editor: 1. Open the **Advanced Editor** tab. 2. Hold Ctrl (⌘ on Mac) and hover over the element in the browser. **Element Accessor** shows its accessor. :::caution[On a Mac] The browser window needs to be in focus to receive mouse events. Click its title bar first, or switch to it with Command-Tab. ::: 3. Under **Quick Actions**, choose what to do with the element, such as **Click**, **Set Value**, **Store** or **Assert Equal**. **Other Actions** has the rest. 4. Enter a **Value** if the action needs one. 5. Click **Evaluate Step** to try it on the page, then **Add as Step**. The step is added to the keyword. **Discard** clears it instead. 6. Click **Save** in the Automate tab. Like recorded steps, it isn't saved until you do.
The Advanced Editor with _textbox("user") identified, Set Value chosen with the value test, and Set Value and Add as Step highlighted
To check a value, choose **Assert Equal** and enter the expected value, as in [Your First Test Scenario](https://resources.sahipro.com/docs/using-sahi/getting-started/first-test-scenario/). ### The Advanced Editor's Buttons The top of the Advanced Editor with numbered controls: 1 Highlight, 2 Identify parent element, 3 Identify previous child element, 4 Visual Assist, 5 Session info, 6 View Element Properties, 7 Copy accessor to Evaluator, 8 Element Accessor, 9 Anchor, 10 Window or Domain Prefix 1. **Highlight:** shows the element on the page. 2. **Identify parent element:** moves to the element around it. 3. **Identify previous child element:** moves back to the element inside. 4. **Visual Assist:** turns on Visual Assist identification (see [Visual Assist](#visual-assist)). 5. **Session info:** shows the session the Controller works with. 6. **View Element Properties:** opens the element's properties and methods. 7. **Copy accessor to Evaluator:** puts the accessor in the [Evaluator](#evaluate-code-in-the-evaluator). 8. **Element Accessor:** the accessor for the element. Its list holds the alternatives. 9. **Anchor:** identifies another element relative to this one. 10. **Window or Domain Prefix:** for popups and pages from other domains. For Windows applications, start the Desktop Engine first. See [Start Windows Desktop Automation](https://resources.sahipro.com/docs/using-sahi/windows-desktop/#start-windows-desktop-automation). ### Identify an Element Relative to Another Some elements look the same to Sahi, such as the quantity box in each row of a table. Sahi then tells them apart by position (the third box), which breaks if the rows change. Anchor the element to a unique label next to it, such as the book's title, instead: 1. Hold Ctrl (⌘ on Mac) and hover over the element to anchor to, such as the text Python Cookbook. 2. Click **Anchor**. 3. Hold Ctrl (⌘ on Mac) and hover over the element you want. Its accessor is now relative to the anchor, for example `_textbox("q", _near(_cell("Python Cookbook")))`. An animation of the three steps, with the browser above the Controller. The cursor hovers over Python Cookbook in the books table, and the Controller shows _cell("Python Cookbook"). It moves down and clicks Anchor in the Controller. It moves back up to the quantity box in the Python Cookbook row, and the Controller shows _textbox("q", _near(_cell("Python Cookbook"))). ### See an Element's Properties and Methods Sometimes the check you need isn't an element's text or value but one of its properties, such as whether a field is disabled or how many characters it allows. Element Properties lists them all. Identify the element, then click **View Element Properties**, the third of the four icons at the top right of the Advanced Editor (6 in the picture above). The **Properties** tab lists the element's properties and their values, and **Methods** lists what the element supports. Select properties and click **Assert** or **Store** to turn them into steps.
The Element Properties dialog for _textbox("user") on the Properties tab, listing form, formAction, maxLength, minLength, name and size, with Assert, Store, Create Element and Done
### Visual Assist Some elements can't be found from the page's code, such as a button that's only an image, or text inside a picture. Visual Assist finds them by how they look instead. It needs the [Visual Assist Engine](https://resources.sahipro.com/docs/introduction/sahi-pro-visual-assist-addon/). 1. In the Advanced Editor, click **Visual Assist** (4 in the picture above). The **Visual Assist** panel appears. 2. Choose how to find the element: **Image Recognition** finds it by its picture, and **Optical Character Recognition** finds it by its text.
The Advanced Editor with Visual Assist turned on and its list open, showing None, Image Recognition and Optical Character Recognition, with the Visual Assist button and the list highlighted
3. For Image Recognition, click **Capture an image to identify** to capture the image to look for. The number beside it delays the capture by that many seconds, so you can bring the right window to the front first. **Open the images directory** shows the images you've captured. The Visual Assist panel with Image Recognition chosen, the capture delay 0, and the Capture an image to identify button highlighted For a walkthrough, see [Visual Assist Automation - Getting Started](https://resources.sahipro.com/docs/using-sahi/visual-assist-getting-started/). ## Evaluate Code in the Evaluator When a step fails, it's hard to tell whether the accessor is wrong or the page isn't ready yet. The Evaluator runs a piece of Sahi code on the page straight away and shows the result, so you can test an idea without running the whole test. 1. In the Advanced Editor, click **Open Evaluator**, and select **Show Script**. 2. Type the code, for example `_exists(_textbox("user"))`. 3. Choose the mode, then click **Evaluate**. The result appears below. The mode is the kind of application the code runs against, such as Browser, Windows or Java. Choose **JS** to run plain JavaScript instead of Sahi code. To run only part of the code, select it before you click **Evaluate**. The box can hold several statements, so you can keep a few checks there and run one at a time.
The Evaluator with _exists(_textbox("user")) and the result true, with the Evaluate button highlighted
- **Search API List:** start typing a function name and press Enter. The function is added with its parameters. - **Action:** select part of the code, such as an accessor, and choose an action for it, such as **Get Value**, **Get Text**, **Exists** or **Is Visible**. The result shows for just that part.
The Evaluator with _textbox("user") selected in the code and the Action button highlighted, its list open below it, showing Click, Get Value, Get ARValue, Get Text, Get toJSON, Exists and Is Visible
- **Highlight** shows the element in the code on the page. - **History** lists your recent recording actions. - **x,y:** select it, then hold Ctrl+Shift (⌘+Shift on Mac) and move the mouse over the page to see the point's clientX and clientY. ## Run and Debug Hover over **Run** to run the keyword, part of the test case or all of it, and use **Pause**, **Play**, **Step** and **Stop** while it runs. See [Run Tests via Controller](https://resources.sahipro.com/docs/using-sahi/run-tests-via-controller/). ## Use an Accessor Repository When an element on the page changes, every script that uses its accessor stops finding it, and you'd have to fix each one. An Accessor Repository (AR) keeps accessors in one place, so you update an accessor once and every script that uses it gets the change. An AR is a Sahi script whose name ends in `_AR.sah`. 1. In the Automate tab, click **File Settings**. 2. Turn on **Enable AR**, and choose the file under **Accessor Repo**.
The Controller with the File Settings panel open at the bottom, showing Script Directory, Scenario File, Keyword Repo and Accessor Repo, with the Enable AR switch highlighted
With AR on, the Advanced Editor shows an **Accessor Name** for the element, and **Update in AR** saves its accessor to the repository. Once an element is in the AR, Sahi identifies it by its AR entry first, even when you aren't recording. So the same element isn't identified in different ways in different tests, and an element someone already anchored, for example with `_near`, keeps that accessor for everyone. :::caution Write AR names in capitals with underscores, such as `$_LOGIN_BUTTON`. Tests still run with other names, but their values don't show properly in the Editor's context panel. ::: **File Settings** also shows the script directory, the scenario file and the keyword repository the Controller records into. You can't change them while recording. The script directories come from `scripts.dir` in `userdata/config/userdata.properties`, one per project, separated by semicolons. Relative paths are relative to the `userdata` directory: ```properties scripts.dir=scripts;D:\my_custom_folder ``` ## Clipboard and Controller Info - **Clipboard** in the bottom bar keeps small pieces of text while you work. - **Controller Info** in the **⋮** menu shows the versions of Sahi Pro and its engines, the Controller mode, and details of the browser, operating system and Java. --- # Test Data Files Keep test data in groups in a .csv test data file, edit it as a sheet, and attach it to a test case or keyword with Data Drive. A test case that runs with one set of values only checks one case. To check the same flow with many sets of data, such as several orders, put the values in a test data file. Sahi Pro then runs the test case once for each row. A test data file is a `.csv` file that keeps its rows in **groups**, so one file can hold several sets of data, such as everyday orders and bulk orders. ## Create a Test Data File 1. Choose **File** > **New** > **Test Data**, or click **+** in the Navigator and choose **Test Data**. 2. Enter the **Test Data File Name**, such as `book_orders`, and click **Create**. The file is created in the project, shown under **File Location**.
The Create Test Data dialog with Test Data File Name book_orders followed by .csv, File Location sahi_training/, and the Cancel and Create buttons
3. The file opens as a sheet. Enter each group: book_orders.csv open as a sheet with two groups: valid_orders with the columns Username, Password, javaQty, rubyQty, pythonQty and total and three rows of orders, a blank row, then bulk_orders with the same columns and two rows; numbered badges mark the group name, the column names, the rows and the blank row 1. **Group name**, in the first column of the group's first row, such as `valid_orders`. 2. **Column names**, in the same row. Name each column after the parameter it fills, without the `$`, such as `Username` for `$Username`. 3. **Rows**, one for each run, with the first column left empty. 4. **A blank row** before the next group, such as `bulk_orders`. 4. Save with Ctrl + S (⌘ + S on Mac). The toolbar above the sheet has: The toolbar above the test data sheet, with numbered badges on Find and Replace, Save File, the more-options button and Script Information 1. **Find and Replace:** finds and replaces values in the sheet. 2. **Save File:** saves the file. It's available once you've made a change. 3. **More options:** **Keyboard Shortcuts** (Shift + F10) lists the sheet's shortcuts. 4. **Script Information:** shows the file's path. Right-click a column letter to insert a column to its left or right, or remove the column: Column D selected in the test data sheet, with its right-click menu: Insert column left, Insert column right and Remove column available, and Insert row above, Insert row below, Remove rows, Undo and Redo greyed out Right-click a cell, or a row number, to insert a row above or below it, insert a column to its left or right, or remove its row or column. **Undo** and **Redo** undo and redo your last changes. A cell in the pythonQty column selected in the test data sheet, with its right-click menu: Insert row above, Insert row below, Insert column left, Insert column right, Remove row, Remove column, Undo and Redo ## Attach It to a Test Case 1. In the No-Code Test Editor, tick the test case that should loop through the data, and click **Data Drive**. To loop through only one keyword, tick that keyword instead. 2. Choose **Existing File** and pick the **Test Data File**. 3. Choose the **Group Name**. **+** beside it adds a new group to the file. 4. Under **Column Name**, the columns that match the test case's parameters are ticked. Check that each parameter has a column. 5. Click **Confirm**.
The Data Drive - Link Test Data Sheet dialog with Existing File chosen, Test Data File book_orders.csv, File Path sahi_training/, Group Name valid_orders highlighted with a + button beside it, Generate New Values chosen, and the columns Username and Password ticked with the values test and secret
When you run the test case, it runs once for each row of the group, and the report shows a result for each row. **New File** in the same dialog creates a test data file and its group without leaving the test case. **Generate Values** applies only to cells with a data generator: **Reuse Previous Values** lets a verification keyword check the values an earlier keyword created. For a walkthrough, see [Loop Through a Test Data File](https://resources.sahipro.com/docs/using-sahi/getting-started/test-data-files/). --- # Test Suites Group scenario files into a test suite (.dd.csv) to run them together, with tags, dependencies, values to pass, prerequisites and timeouts. Running scenario files one at a time is slow, and it's easy to forget one before a release. A test suite lists the scenario files to run together, so one run covers them all, in parallel or across machines. A test suite is a `.dd.csv` file with one row for each scenario file. ## Create a Test Suite **From the File menu:** 1. Choose **File** > **New** > **Test Suite**, or click **+** in the Navigator and choose **Test Suite**. 2. Enter the **Test Suite File Name**, such as `book_store_regression`, and click **Create**.
The Create Test Suite dialog with Test Suite File Name book_store_regression followed by .dd.csv, File Location sahi_training/, and the Cancel and Create buttons
**From scenario files you select:** tick the scenario files in the Navigator, then click **Test Suite** in the bar that appears at the bottom. The new suite lists the files you ticked.
The Navigator with books.s.csv, Register.s.csv and visual_books.s.csv ticked, and the bar at the bottom showing Selected (3) with the Test Suite button highlighted, followed by Accessor Repo, Cut, Copy and Delete
## Add Scenario Files The suite opens as a sheet. Its first row names the columns, and each row below it is a scenario file to run: book_store_regression.dd.csv open as a sheet with the columns #script, url, tags and depends, and three rows: visual_books.s.csv and books.s.csv starting at the training login page with the tags smoke,books and books, and Register.s.csv starting at the register page with the tag register - **#script:** the scenario file, with its path from the suite's folder. - **url:** the page the scenario file starts on. - **tags:** labels such as `smoke` or `books`, separated by commas. In the Run Configuration, **Filter** by tags to run only some of the suite. - **depends:** a scenario file that has to pass before this one runs, such as `books.s.csv`. Leave it empty if there's none. The sheet has the same toolbar and right-click options as a [test data file](https://resources.sahipro.com/docs/using-sahi/test-data-files/#create-a-test-data-file). Save with Ctrl + S (⌘ + S on Mac), then select the suite and click **Run** (see [Run Tests via Editor](https://resources.sahipro.com/docs/using-sahi/run-tests-via-editor/)). For more columns, such as a timeout or values to pass to each scenario file, see [Suite File Structure](#structure). For a walkthrough, see [Run Tests in a Suite](https://resources.sahipro.com/docs/using-sahi/getting-started/test-suites/). ## What a Suite Can Do A suite can: 1. run scenario files, keyword files (`.sah`), and other suites 2. pass values to each file it runs 3. tag files, so a run can pick only the ones with some tags 4. run a file only after others it depends on have finished, or passed ## Suite File Structure
ABCDEFGH
1#scripturltagsdependsprerequisitestimeout_minutesArgument1Argument2
2ScriptName.sahStartURL"tag1,tag2"Browser5Argument1_ValueArgument2_Value
3ScriptName1.sahStartURL"tag1,tag2"ScriptName.sahWindows10Argument1_ValueArgument2_Value
## Structure Explained ddcsv can be used to run the same script file with different sets of arguments. eg. invalidLogin.sah in the example above.
ABCDEFGH
1#scripturltagsdependsprerequisitestimeout_minutesusernamepasswordempIdHeader Row
2login.sahhttp://sahi.co.in/demo/training/login.htmuser,highBrowser5testsecret12345
3invalidLogin.sahhttp://sahi.co.in/demo/training/login.htmuser,mediumlogin.sahBrowser10tests123446789
4
5#scripturltagsusernamepasswordHeader Row
6invalidLogin.sahhttp://sahi.co.in/demo/training/login.htmuser,mediumaadd
7
8#scriptHeader Row
9scriptWithoutTags.sah
10
11#scripttagsdependsHeader Row
12parent.dd.csvadmin,high
13ddcsv.dd.csvuserparent.dd.csv
14suiteInsideddcsv.suiteadmin,highPREV
1. Header Rows give Sahi an outline format about the coming rows. They start with #script. There are 4 predefined header values. | Header | Meaning | | --- | --- | | #script | Signifies a new header row. The value under this column header is the name of the Sahi script to be run. | | url | The start URL for the script | | tags | Specifies the tags applicable to this script | | depends | Specifies the scripts/suites/csv to which this scripts/suites/csv to be depended | | prerequisites | Specifies the prerequisites required to run the script. Start mode is considered as one of the prerequisites for all the scripts specified in a suite. | Any other values in a Header Row are considered data variable names. Eg. username, password and empId are considered variable names. To explain line 2,
2login.sahhttp://sahi.co.in/demo/training/login.htmuser,hightestsecret12345
`login.sah` will be executed with start URL `http://sahi.co.in/demo/training/login.htm` with variables ```js $username = "test"; $password = "secret"; $empId = "12345"; ``` 2. For any script, if the argument name, number of arguments or the order of arguments needs to be changed, a new `#script` row needs to be added to specify the intended change to Sahi. This can be seen in line number 5, 8 and 11. eg. In line 3,
ABCDEFGH
1#scripturltagsdependsprerequisitestimeout_minutesusernamepasswordempIdHeader Row
2login.sahhttp://sahi.co.in/demo/training/login.htmuser,highBrowser5testsecret12345
3invalidLogin.sahhttp://sahi.co.in/demo/training/login.htmuser,mediumlogin.sahBrowser10tests123446789
4
5#scripturltagsusernamepasswordHeader Row
6invalidLogin.sahhttp://sahi.co.in/demo/training/login.htmuser,mediumaadd
invalidLogin.sah username, password and empId are needed where as empId is not passed in line 6. So we need to add line number 5 to inform Sahi regarding this change. 3. In line 9,
8#scriptHeader Row
9scriptWithoutTags.sah
we have simply passed a script file without any other information. In this case start url is the base url passed to this dd.csv file while running. The base URL is specified in testrunner.bat or drun.bat. Running dd.csv files has been covered in the next topic. 4. Suites, test\_case csv, and other data driven suites can also be invoked from dd.csv file. This is shown in above table (rows 11-14).
11#scripttagsdependsHeader Row
12parent.dd.csvadmin,high
13ddcsv.dd.csvuserparent.dd.csv:SUCCESS
14suiteInsideddcsv.suiteadmin,highPREV:ANY
5. `tags`, `url`, `depends`, `prerequisites` and any variables passed to a ddcsv file get cascaded to all ddcsvs and scripts inside it. For example, all scripts/ddcsvs inside `parent.dd.csv` will also be assigned `admin` and `high` tags 6. `depends` is used to specify the name of the scripts/suites/csv to which the current script/suite/csv is dependent and the status to which it needs to be depends. Eg `login.sah:SUCCESS` The current script/suite/csv will start executing only if all the dependent scripts/suites/csv have executed completely. The script can start to execute or be moved to SKIPPED status depending on what status it depends on. If the dependent status is SUCCESS and if any of the depended scripts/suites/csv is FAILED or ABORTED or SKIPPED the current script will be moved to SKIPPED status. If the dependent status is not specified, by default it depends on SUCCESS status. `PREV` command can be used instead of mentioning the immediate previous script/suite/csv name. `script:ANY` implies the script will execute irrespective of the dependent status once the dependent execution is completed. Consider lines 12, 13 and 14, the parent.dd.csv:SUCCESS mentioned under depends column in line 13 indicate that the ddcsv.dd.csv is dependent on SUCCESS status of parent.dd.csv. So ddcsv.dd.csv will wait for the completion of parent.dd.csv and will start execution only if the status is SUCCESS. If any of the scripts inside parent.dd.csv is FAILED or ABORTED, ddcsv.dd.csv will not get executed and labeled as SKIPPED status. The `PREV:ANY` command in the line 14 refers to ddcsv.dd.csv if the main suite executes with no tags. The suiteInsideddcsv.suite will start executing once ddcsv.dd.csv execution is completed irrespective of the status. If the main suite is executed with admin or high tag, the `PREV` command will be referred to parent.dd.csv as the ddcsv.dd.csv will not be considered for execution due to the tags mismatch. :::note `script:ANY` is introduced from Sahi Pro v11.0.0.8 ::: 7. `prerequisites` is used to specify the requirement of the script. In distributed suite runs, script will be run on that node only, which has all the specified capabilities to run the script.\ Consider lines 2, login.sah requires `BROWSER` and `ANDROID` mode to run the script. ```js //Specify multiple modes for a particular script. //The script will run only on the node that has both Browser and Android automation enabled. Browser,Android ``` | 15 | #script | tags | prerequisites | Header Row | | --- | --- | --- | --- | --- | | 16 | login.sah | admin,high | Browser,Android | | ```js //Specify multiple modes with the instances for a particular script. //The script will run only on the node with both Browser and Android automation enabled. //Here Android mode requires 2 device instances. Browser,Android:2 ``` | 17 | #script | tags | prerequisites | Header Row | | --- | --- | --- | --- | --- | | 18 | login.sah | admin,high | Browser,Android:2 | | ```js //Specify multiple browsers with the instances for a particular script. //Here script requires 1 chrome instance and 2 firefox instances. //The script will be run on that node only, which has 1 chrome instance and 2 firefox instances capacity available to run the script. //The script execution will start with the default browser type. ``` | 19 | #script | tags | prerequisites | Header Row | | --- | --- | --- | --- | --- | | 20 | login.sah | admin,high | chrome:1,firefox:2 | | ```js //specify the node tags. //here script will run only on the node with "windows10" tag. windows10 ``` | 21 | #script | tags | prerequisites | Header Row | | --- | --- | --- | --- | --- | | 22 | login.sah | admin,high | windows10 | | :::note Note: one can set the node tags in `sahi.node.tags` in `sahi.properties` ::: 8. `timeout_minutes` is used to specify the maximum duration the script/suite can run. Sahi aborts the script/suite once the time is up.\ In the example, if login.sah did not finish in 5 minutes, Sahi will abort the script and mark it as ABORTED\_TIMEOUT. :::note If 'timeout' is provided for both suite and a script, Sahi aborts script when any of the time is elapsed first ::: Refer [here](https://resources.sahipro.com/docs/using-sahi/run-tests-via-editor/#advanced-run-settings) to provide timeout for the whole suite execution. ## Data Driven Suites with testcases :::caution[Important] This feature was added to run only the failed scenarios when running a failed scripts suite. The `testcases` column is automatically added to the failed scripts suite. It should not ideally be added or modified by testers in their original suites. ::: From Sahi Pro V6.2.0 onwards, along with three predefined header values (#script, url, tags) the `testcases` header is also recognized. Only those testcases which are specified in this column will run during the test run. For example, `test.dd.csv` is a data driven suite. | #script | url | tags | **testcases** | | --- | --- | --- | --- | | scenario.s.csv | https://sahitest.com/demo/ | auth | **testLoginLogout** | | another.s.csv | https://sahitest.com/demo/ | admin | | Here's how `scenario.s.csv` looks like. | Comment | Tags | TestCase | Keyword | Argument1 | Argument2 | Argument3 | | --- | --- | --- | --- | --- | --- | --- | | | | | loadSahi | sample\_lib.sah | | | | | | | | | | | | Simple test for adding books and verifying total | auth,bookspage | checkShoppingCartTotal | \[Documentation\] | Smoke test | | | | | | | login | test | secret | | | | | | addBooks | 3 | 2 | 1 | | | | | verifyTotal | 1650 | | | | | | | logout | | | | | | | | | | | | | Test for login logout | auth | **testLoginLogout** | \[Documentation\] | Check Invalid | | | | | | | login | test | bad password | | | | | | logout | | | | Only `testLoginLogout` testcase will be run when the above `test.dd.csv` is executed. No other scripts or scenario files or testcases will be run. :::note In scenario file, the column is `TestCase` while in the data driven suite the column header is `testcases` ::: :::note Since `Sahi Pro v11.2.0`, the `suite.retry_only_failed_testcases_for_scenario` property is introduced to include the `testcases` column header for the failed scripts suite of the scenario file in the data-driven suite. The default value is `true`. If property value is set to `false`, the `testcases` column header for the failed scripts suite of scenario file will not be included in the data-driven suite. ::: :::caution[Important] Specifying `testcases` will cause the `tags` attribute to be ignored. Testcases will run even if the tags are not matched. ::: ## Running Data Driven Suites Data Driven Suites are run the same way as normal suites. They can be run from command prompt using testrunner or drun or ant the same way as .suite files are run. The steps to run a dd.csv file are mentioned below. 1. Open cmd prompt by clicking on the "bin" link on "Sahi Dashboard". 2. Run the following cmd ```js testrunner sahitests/ddcsv/test.dd.csv http://sahi.co.in/demo/ ie "admin||medium" ``` or for distributed run: ```js drun demo/ddcsv/test.dd.csv http://sahi.co.in/demo/ ie "admin||medium" ``` The parameters passed in the above commands are explained below: | Parameter | Description | | --- | --- | | sahitests/ddcsv/test.dd.csv | path and file name of Data Driven Suite | | http://sahi.co.in/demo/ | Start URL | | ie | browser on which the scripts will run | | "admin\|\|medium" | This specifies the tags and hence the scripts that need to be run. Here scipts on line 3,6,12,14 will run. | Note: If the user specifies the last parameter as "admin&&medium" script files associated with BOTH the tags will run i.e. none of the scripts in the above example. More information on suite execution via [command line](https://resources.sahipro.com/docs/using-sahi/playback-commandline/) or through [ant](https://resources.sahipro.com/docs/using-sahi/playback-via-ant/) ## Variable $isDataPassed and \_isDataPassed() Along with user defined variables, Sahi passes a variable named `$isDataPassed` to the script with value `true` if user variables are passed to script. `$isDataPassed` is useful during development of scripts which take arguments. When scripts are played back from Sahi Controller, arguments can not be passed to the script file. In such cases, default values of variables can be defined as given below. ```js if(typeof $isDataPassed == "undefined"){ // entered if executed from Controller // NOT entered if run from dd.csv $username = "default_name"; $password = "default_pwd"; } // or if(!_isDataPassed()){ // entered if executed from Controller // NOT entered if run from dd.csv $username = "default_name"; $password = "default_pwd"; } ``` A script with the above code behaves thus: 1. if it is run from the Controller, `$isDataPassed` will be `undefined` and `_isDataPassed()` will return `false`. So the `if` block will be executed and `$username` and `$password` will be assigned `"default_name"` and `"default_pwd"` respectively. 2. if it is run from a `dd.csv` file, `$isDataPassed` and `_isDataPassed()` will be `true`. So the `if` block will not be executed. --- # Java Controller Sahi's Controller allows you to interact with Sahi and easily experiment and debug on the browser. This section explains using the Controller in Java mode, for writing scripts in Java instead of Sahi script (javascript) ## Accessor Spy ![](https://resources.sahipro.com/docs/assets/images/using-sahi/controller/sahi-pro-java-controller-record-tab.webp) Java Controller for Sahi Pro. ## Identify Elements To identify an element, press the Ctrl (⌘ on Mac) key and hover over any element Modes available in Sahi Pro for recording or identification: 1. `Browser:` This mode is always enabled in Sahi Pro. Uncheck the checkbox for recording or identification in Browser mode only. 2. `Windows:` Check the checkbox to enable recording or identification for Windows. Sahi Pro Desktop Engine should be installed for this. ![](https://resources.sahipro.com/docs/assets/images/using-sahi/controller/choose.png) 3. `Java Applet:` For recording or identification in Java Applet mode Sahi Pro Desktop Engine should be installed. 4. `Java Web Start:` For recording or identification in Java Web Start mode Sahi Pro Desktop Engine should be installed. ![](https://resources.sahipro.com/docs/assets/images/using-sahi/controller/java-hover.webp) - `Accessor:` shows the Java accessor for that element - `Alternatives:` shows all alternative accessors for that element - `Value/Text:` shows the value of the current element. Mostly this is the input text or the visible text. - `Prefix:`Populates the prefix as needed when working with popup windows and multiple domains. Eg. on a popup window, this may be populated with `_popup("New Window")` - `Mode:` shows mode of application for which element is recording or identifying (not present in Sahi Pro). ## Action Buttons These buttons perform various actions on the element and also show the generated script in the "Evaluate Expression" box. These are used to quickly work with elements during debugging/script generation. - `Click` clicks on the identified element. Invokes the `.click()` API. - `Hilight` highlights the identified element (shows a red 1 pixel border briefly). Invokes the `.highlight()` API. - `Set` sets the value in "Value:" field on the identified element. Invokes the `.setValue("")` API. - `Hover` does a mouse over on the element. Invokes the `.mouseOver()` API. - `Assert` assert the behaviour of the system is as expected or not. ## Assertions Assertions are used to verify that the behaviour of the system is as expected. To add assertions using Sahi Java controller, ![](https://resources.sahipro.com/docs/assets/images/using-sahi/controller/java-assert.webp) 1. Ctrl-hover (⌘-hover on Mac) on the element to identify it and then click on `Assert` button 2. A few possible assertions for that element will be populated in the `Evaluate Expression` box 3. Select mode for evaluate application of which it identified 4. Click on Append button to append the assertions to the script. ## Evaluate Expression Evaluate Expression box is used to evaluate snippets of Sahi Java code. It helps while identifying elements or while debugging. ![](https://resources.sahipro.com/docs/assets/images/using-sahi/controller/java-evaluate-expression.webp) - `Set mode for evaluate` Select appropriate application mode before evaluate the expression. - `Test →` Put a valid Sahi expression in the Evaluate Expression box and click on Test →. The result will be seen in the bottom box. - `Append` While recording, selecting and clicking on `Append` will append the steps to the currently recording script. This is mainly used for manually append any step from Evaluate Expression to the currently recording script. - `Highlight` Can be used on selected text to highlights the element (shows a red 1 pixel border briefly). Invokes the `.highlight` API. - `Click` Can be used on selected text to click the element. Invokes the `.click` API. :::note Note: Selecting some text and pressing "→" will only evaluate the selected text. User may evaluate more than one statement at a time. ::: ## Record a script 1. Choose the type of application for recording or identification. 2. Click on 'Record' button and perform desired actions on the web page. ![](https://resources.sahipro.com/docs/assets/images/using-sahi/controller/java_record.webp) 3. Click on 'Stop' button to stop recording. 4. Then click on 'Recorded Steps' button and it will show all the recorded steps. ![](https://resources.sahipro.com/docs/assets/images/using-sahi/controller/java_recorded_steps.webp) 5. 'Clear' button is used to clear all the recorded steps. --- # REST Client - Getting Started Test Rest APIs with the REST Client: add a REST step to a keyword, or generate Sahi Script from a request. Many applications have Rest APIs behind their screens. Checking an API directly is faster and more stable than going through the user interface, and it can set up data for the tests that do. The REST Client is where you build a request, send it, check the response and keep values from it. ## Two Ways to Use It It's the same REST Client either way; only the button at the bottom differs: | Open it from | What you get | Use it when | | --- | --- | --- | | **Add Step** in a keyword, then **Rest Client** | **Add Rest Step** adds a REST step to the keyword, with its assertions and variables | You build tests in the No-Code Test Editor. This is the usual way. | | **Tools** › **REST Client** | **Generate Sahi Script** writes Sahi Script code that sends the request and checks the response | Your keywords are written in Sahi Script, as in tests from older Sahi Pro versions | ## Add a REST Step to a Keyword 1. In the No-Code Test Editor, select the keyword and click **Add Step**. 2. In the dropdown at the top right of the **Add Step** panel, change **Actions** to **Rest Client**.
The Add Step panel with its dropdown open, showing Actions, Rest Client and Sahi Script / JS Code, and Rest Client highlighted
3. The REST Client opens. [Build the request](https://resources.sahipro.com/docs/using-sahi/rest-api/build-a-request/), [set up authorization](https://resources.sahipro.com/docs/using-sahi/rest-api/authorization/) if the API needs it, and click **Send Request**. 4. [Read the response](https://resources.sahipro.com/docs/using-sahi/rest-api/read-the-response/), and [add assertions and variables](https://resources.sahipro.com/docs/using-sahi/rest-api/assertions-and-variables/). 5. Click **Add Rest Step**. The request is added to the keyword as a step, with its assertions and variables. Save the file.
The REST Client opened from Add Step, with Import Request and History at the top, the Request, Assertions and Variables tabs, an empty GET request, a Response area, and the Add Rest Step button highlighted
To change a REST step later, open it from the keyword's steps. The REST Client opens with the request, its assertions and variables, and the button reads **Update Rest Step**. When the step runs, its results appear in [Reports](https://resources.sahipro.com/docs/using-sahi/rest-api/reports/). ## For Keywords in Sahi Script Tests from older Sahi Pro versions often have keywords written in Sahi Script. To support them, the REST Client also opens from **Tools** › **REST Client**. There it ends with **Generate Sahi Script** instead of **Add Rest Step**, and writes the request and its checks as Sahi Script code for you to copy into a keyword file. --- # Build a Request Set the method, URL, parameters, body, headers, authorization and settings of a REST request, import one, or reuse one from History. A request is built on the **Request** tab of the REST Client. To add it to a keyword, open the REST Client from **Add Step** (see [Add a REST Step to a Keyword](https://resources.sahipro.com/docs/using-sahi/rest-api/getting-started/#add-a-rest-step-to-a-keyword)).
The REST Client opened from Add Step, with a GET request to https://dummyjson.com/products?limit=3 on the Parameters tab, the response below it in the Tree view, and the Add Rest Step button at the bottom
## Method and URL Choose the method and enter the URL. The methods are `GET`, `POST`, `PUT`, `DELETE`, `PATCH` and `QUERY`. ## Parameters Add query parameters as **Key** and **Value** rows. They're sent in the URL's query string. ## Body Choose how to enter the body: - **Raw:** type the body as it should be sent, such as JSON or XML. - **Parameters:** enter form fields as key and value rows. ## Header Add request headers as **Key** and **Value** rows, such as `Content-Type`. ## Authorization Choose how the request authenticates: **No Auth**, **Basic Auth**, **OAuth 1.0** or **OAuth 2.0**. See [Authorization](https://resources.sahipro.com/docs/using-sahi/rest-api/authorization/). ## Settings **Reset Cookies** (**Yes** or **No**) sets whether the request's cookies are reset before it's sent. ## Upload a File To test a file upload, send the file the way a browser's upload form does: 1. Choose `POST` and enter the upload URL. It's usually the `action` URL of the upload form, or the URL the page sends the upload to. For example: `https://sahitest.com/demo/php/fileUpload.php`. 2. Under **Header**, add `Content-Type` with the value `multipart/form-data; boundary=--boundary123456abcd`. The boundary is any random string that starts with two hyphens. 3. Under **Body**, choose **Parameters**, add the file field, and choose the file with the browse button beside it, or type its full path: | OS | Example path | | --- | --- | | Windows | `C:\Users\user\Desktop\upload.txt` | | macOS | `/Users/user/Desktop/upload.txt` | | Linux | `/home/user/Desktop/upload.txt` | 4. Add any other fields the upload form needs. 5. Click **Send Request**. The response depends on the application, such as a page confirming the upload. ## Import a Request Instead of building a request by hand, click **Import Request** and choose **Import from HAR** or **Import from Postman**.
The REST Client with the Import Request menu open and highlighted, showing Import from HAR and Import from Postman, and the Add Rest Step button at the bottom
### From a HAR File A HAR file records the requests a browser makes. To get one, open the browser's developer tools, go to **Network**, right-click the requests and choose **Save all as HAR** (the wording varies by browser). 1. Choose **Import Request** › **Import from HAR**. 2. Paste the `request` section of the request you want, and click **Import**. It must be valid JSON, with its opening and closing braces; otherwise an alert says so. A `request` section looks like this: ```json { "request": { "method": "GET", "url": "https://sahitest.com/demo/", "httpVersion": "HTTP/1.1", "headers": [ { "name": "Host", "value": "sahitest.com" }, { "name": "Connection", "value": "keep-alive" }, { "name": "Cache-Control", "value": "max-age=0" } ], "queryString": [], "cookies": [], "headersSize": 585, "bodySize": 0 } } ``` ### From Network Activity in a Report A test can record the requests the application makes while it runs, so you can turn one of them into a REST step: 1. Wrap the steps with [\_startHarLogging](https://resources.sahipro.com/docs/sahi-script/functions/logging/#_startharlogging) and [\_stopHarLogging](https://resources.sahipro.com/docs/sahi-script/functions/logging/#_stopharlogging), and run the test. 2. In the test run report, click **Show Network Activity**. 3. Click **Copy HAR** on the request you want, then paste it into **Import from HAR** as above. ## History **History** keeps the requests you've sent, so you can open one again and reuse it. --- # Authorization Authenticate REST requests with Basic Auth, OAuth 1.0 or OAuth 2.0. An API that holds private data asks who's calling. Choose how a request authenticates on the **Authorization** tab: **No Auth**, **Basic Auth**, **OAuth 1.0** or **OAuth 2.0**. ## No Auth The request is sent without credentials. ## Basic Auth Enter the **Username** and **Password** the API accepts. ## OAuth 1.0 Signs the request with OAuth 1.0. Set: - **Credentials:** choose saved credentials, or **Add New**. Give them a name you'll recognise, and enter the **Consumer Key**, **Consumer Secret**, **Token** and **Token Secret** from the API provider. - **Signature Method:** `HMAC-SHA1` or `HMAC-SHA256`, as the API requires. - **Version** and **Realm:** as the API requires.
The REST Client opened from Add Step, with the Authorization tab showing OAuth 1.0 chosen: Credentials with Add New, Signature Method HMAC-SHA1, Version and Realm, and the Add Rest Step button at the bottom
## OAuth 2.0 If you already have an access token, enter it in **Access Token** and send the request. Otherwise, click **Get Access Token** to open the **OAuth2 Consent & Access Token Wizard**, and choose how to get the token: | Option | When to use it | | --- | --- | | Get Access Token without playback or recording the consent | The token can be obtained without a user signing in and giving consent | | Playback of already recorded consent script | You already recorded the steps of signing in and giving consent | | Record a new consent script | You haven't recorded those steps yet | | Get Access Token from Refresh Token | You have a refresh token to exchange for a new access token |
The OAuth2 Consent and Access Token Wizard open in the middle of the REST Client, with four options: Get Access Token without playback or recording the consent, Playback of already recorded consent script, Record a new consent script, and Get Access Token from Refresh Token, with Cancel and Proceed; the Add Rest Step button shows at the bottom of the REST Client
### Record a Consent Script Many APIs only give a token after a user signs in and agrees to share their data. A consent script records those steps once, so later runs get a fresh token without anyone signing in by hand: 1. In the wizard, choose **Record a new consent script** and name it. 2. Click **Proceed**. A browser window opens and asks for the authorization details from the API provider. 3. On the provider's sign-in page, enter the user name and password, and allow the permissions it asks for. 4. The **Access Token Request** form opens with the authorization code filled in. Fill in the other details and click **Get Access Token**. 5. The **Access Token** field in the REST Client is filled in. Click **Send Request**: the API now answers with its result. To test other APIs from the same provider, choose **Playback of already recorded consent script** next time. :::note New to OAuth 2? Read [OAuth 2 Simplified](https://aaronparecki.com/oauth-2-simplified/) by Aaron Parecki. The standard is [RFC 6749](https://tools.ietf.org/html/rfc6749). ::: --- # Read the Response Send a request and read its body, status and headers in the REST Client. Click **Send Request**. The **Response** area below the request shows what the API returned, on three tabs: - **Body:** the response body, in one of three views: | View | Shows | | --- | --- | | Raw | The response exactly as received | | HTML | An HTML response rendered as a page | | Tree | The structure of a JSON or XML response, with keys you can expand and collapse | - **Status:** the status code and text, such as **200 OK**. - **Header:** the response headers, with their values. The **Tree** view is where you pick the values to check or keep: each key has a checkbox, and hovering over a key shows **Assert** and **Store**. See [Assertions and Variables](https://resources.sahipro.com/docs/using-sahi/rest-api/assertions-and-variables/).
The REST Client after sending a GET request to https://dummyjson.com/products?limit=3, with the Response in the Body tab and Tree view, listing products with a checkbox beside each key, and the Add Rest Step button at the bottom
--- # Assertions and Variables Check values in a REST response, keep them in variables for later steps, and add the REST step to the keyword. A request that returns *something* isn't proof that the API works. Assertions check that the response holds the values you expect, and variables keep values from it, such as an ID or a token, for the steps that follow. Here, the request `GET https://dummyjson.com/products?limit=3` returns three products and a `total` of `194`. The steps check the total and keep it in a variable. ## Check a Value and Keep It 1. Send the request, and in the **Response**, open **Body** › **Tree**. 2. Tick the key you want, such as `total`, and hover over it. **Assert** and **Store** show on its row.
The REST Client's Tree view with the total key ticked and Assert and Store highlighted on its row, and the Add Rest Step button at the bottom
3. Click **Assert**. The **Assertions** tab opens with a row for `total`: the **Assertion Type** is **Equals**, and the **Expected Value** is the value in the response, `194`. A green check shows that the response passes.
The Assertions tab, marked 1, with the row total, Equals, 194 and a green check highlighted, and the Add Rest Step button at the bottom
4. The response stays below. Hover over `total` again and click **Store**. The **Variables** tab opens with a row for `total`, kept in the variable `$vartotal`. Change the **Variable Name** if you like.
The Variables tab, marked 1, with the row total and Variable Name $vartotal highlighted, and the Add Rest Step button at the bottom
5. Click **Add Rest Step**. The request is added to the keyword as a step, with its assertions and variables. Save the file. To tick several keys at once, use **Assert** and **Store** in the **Response** header instead of on a row. The number on the **Assertions** and **Variables** tabs shows how many each holds. ## Assertion Types | Assertion Type | Passes when the value | | --- | --- | | Equals | is the expected value | | Contains | contains the expected value | | Not Null | has any value | To add an assertion by hand, click **New Assertion** and choose what it checks: **Body**, **Header**, **Status** or **Raw Response**. Click the bin on a row to remove it. ## Variables Later steps use a variable by its name, such as `$vartotal`. To add one by hand, click **New Variable** and choose **Body**, **Header**, **Status** or **Raw Response**. ## Change a REST Step Open the step from the keyword's steps. The REST Client opens with the request, its assertions and variables, and the button reads **Update Rest Step**. When the step runs, its results appear in [Reports](https://resources.sahipro.com/docs/using-sahi/rest-api/reports/). :::note[For keywords in Sahi Script] Opened from **Tools** › **REST Client**, the REST Client ends with **Generate Sahi Script** instead of **Add Rest Step**. It writes the request and its checks as Sahi Script code, with **Copy** and **Save**, for keywords written in code. ::: --- # REST Steps in Reports See which assertions passed or failed and which variables were stored. In Reports, a REST step shows its assertions and stored variables, each with a **Passed** or **Failed** result. They appear: - In the Inspector. - In the PDF export. - In the Excel export. --- # Run Tests You can run the scripts and suites you create. Scripts can run on the machine that starts the run, or be distributed to other machines. You can run tests from the [Test Scenario Editor](https://resources.sahipro.com/docs/using-sahi/run-tests-via-editor/), the [Controller](https://resources.sahipro.com/docs/using-sahi/run-tests-via-controller/), [Ant](https://resources.sahipro.com/docs/using-sahi/playback-via-ant/), [Gradle](https://resources.sahipro.com/docs/using-sahi/playback-via-gradle/), [Maven](https://resources.sahipro.com/docs/using-sahi/playback-via-maven/) and the [command line](https://resources.sahipro.com/docs/using-sahi/playback-commandline/). :::note The `drun.auto_rerun_scripts_if_internal_aborted` property sets whether a script runs again if the connection between the Sahi master and a node is lost while it runs. The default value is true. If property value is set to false, script status will be set `INTERNAL_ABORTED` and will be aborted. In Default scenario script status will be set to `INTERNAL_ABORTED_RETRY` status and will be tried to execute again. ::: --- # Run Tests via Editor Run scenario files, keyword files and suites from the Test Scenario Editor: the Run Configuration, parallel and distributed suite runs, advanced settings, scheduling, export to Ant or Gradle, and debugging. The Test Scenario Editor runs anything you open or select in it: one scenario file, a keyword file or a whole suite. One Run Configuration sets where the tests run, which of them run, and how. ## Open the Run Configuration Click **Run** in the top menu to open the **Run Configuration** for the open file. To run several files, select them in the Navigator first: Sahi Pro puts them in a suite, `selectedScripts.suite`, and runs that.
The Run Configuration dialog for visual_books.s.csv, with Run Settings (Start Mode, Browser, Android Device, iOS Device, Start URL), Run Context (Scenario File, Filter, Run Type), and the Export Run Config and Start Run buttons
## Run Settings - **Start Mode:** what the test starts on: **Browser**, **Java**, **Android Browser**, **Android**, **iOS Browser** or **iOS**. **Generic** starts in the mode the test sets itself with [\_setMode](https://resources.sahipro.com/docs/sahi-script/functions/script-execution-control/#_setmode). Engines you install add their modes, such as Windows and SAP. - **Browser:** one or more browsers to run in. For distributed suite runs, it lists the browsers on all nodes. - **Android Device** and **iOS Device:** the device for Android and iOS modes. - **Start URL:** the page the test starts on. - **Filter:** for a scenario file or a suite, run only some **Test Case**s, or the test cases with some **Tags**. Tags can be combined, as in `(admin||customer)&&smoke`. ## Run Type - **Run in parallel:** runs as many tests at once as **No. of Threads** (5 by default), each in its own browser. With 1 thread, the tests run one after another, each in a new browser. - **Run sequentially in single browser session:** runs the tests one after another in the same browser, which closes only at the end. Use it with care: one test can leave the browser in a state the next one doesn't expect. - **Run distributed (multiple machines):** see [Distributed Suite Runs](#distributed-suite-runs). Click **Start Run** to run. ## Distributed Suite Runs A large suite takes hours on one machine. Spread it across machines to finish sooner: 1. Choose **Run distributed (multiple machines)**. 2. In **Distribution nodes**, click the edit button and add each machine's name and port. Uncheck **Use** to leave a node out without deleting it. 3. Set **Threads Per Node**. 4. To run the suite from another machine than this one, turn on **Use Different Master** and enter its name and port (9999 by default). 5. Turn on **Sync Configurations** to copy these settings files to every node for this run:
Files that are synced - download\_urls.txt, donot\_download\_urls.txt, download\_contenttypes.txt - response\_headers\_remove.txt, streaming\_urls.txt, streaming\_contenttypes.txt - passthrough\_ws\_ssh\_domains.txt, block\_ssl\_domains.txt, ssl\_host\_port.txt - content\_detection.txt, exclude\_inject.txt, force\_inject.txt - code\_coverage\_js.txt, code\_coverage\_js\_exclude.txt - substitutions.xml, user\_extensions.js, user\_extension\_android.js - sync\_db.properties, email.properties, sync\_email\_trigger.txt - xhr\_ready\_states\_wait\_for\_urls.txt - accessor\_metadata: metadata.properties, flex.json, html.json, java.json, mswindows.json, oracle.json, polymer.json, salesforce.json, sap.json, android.json, ios.json
Run distributed (multiple machines) chosen in the Run Configuration, with Distribution nodes set to localhost:9999, Use Different Master, Sync Configurations and Threads Per Node 5
## Advanced Run Settings Open **Advanced Settings** at the bottom of the Run Configuration.
Advanced Settings in the Run Configuration: Offline Reports, Retry Count with Aborted and Failure, Show Periodic Report Summary, Timeout (Minutes), Enable Autoheal, Enable Autothread, Send Email Reports, JS Code Coverage, Extra Parameters and User Defined ID
- **Offline Reports:** saves reports as files, such as HTML or JUnit. Click the edit button, check **Use** for each type you want and set its folder. - **Retry Count:** runs a test again straight away if it ends **Aborted** or as a **Failure**, up to the number you set (0 by default). - **Show Periodic Report Summary:** shows the suite's progress while it runs. See [Periodic Summary during Script Runs](#periodic-summary-during-script-runs). - **Timeout (Minutes):** stops a suite that runs longer than this, with the status ABORTED\_TIMEOUT. To set a timeout per suite or test, see [Test Suites](https://resources.sahipro.com/docs/using-sahi/data-driven-suites/#structure-explained). - **Enable Autoheal:** finds an element another way when its accessor no longer matches. Turn it on when the application changes often. See [Autoheal](https://resources.sahipro.com/docs/using-sahi/autoheal/). - **Enable Autothread:** stops launching new browsers while CPU use is above a threshold. - **Send Email Reports:** emails the report on success, failure or both, after each sub suite, or at intervals while a long suite runs. The settings are in `userdata/config/email.properties`, and none are set by default. See [Email Properties and Templates](https://resources.sahipro.com/docs/using-sahi/email-during-playback/). - **JS Code Coverage:** collects JavaScript code coverage. See [JavaScript Code Coverage](https://resources.sahipro.com/docs/using-sahi/javascript-code-coverage/). - **Extra Parameters:** passes name and value pairs to the tests. Check **Mask** to hide a value, such as a password, from reports. - **User Defined ID:** an ID of your own for the run. To show it in reports, set `showUserDefinedId` to `'true'` in `userdata/config/reports/suites_list.xsl`. Other settings show when they apply: **Avoid Skipping** runs a test even if a test it depends on failed (see [Test Suites](https://resources.sahipro.com/docs/using-sahi/data-driven-suites/#structure-explained)), and **Git Log Integration** adds Git details to reports. ## Export to Ant or Gradle To run the same configuration from a build server, click **Export Run Config** and choose **Ant Target**, **Gradle Task (Groovy)** or **Gradle Task (Kotlin)**. See [Run Tests via Ant](https://resources.sahipro.com/docs/using-sahi/playback-via-ant/) and [Run Tests via Gradle](https://resources.sahipro.com/docs/using-sahi/playback-via-gradle/). ## Schedule a Run To run tests later, such as overnight, open the arrow on **Start Run** and choose **Schedule Run**. Pick the **Date and Time**, add a **Description** if you like, and click **Schedule**. A notification confirms it.
The Schedule Run dialog with Script Directory, File visual_books.s.csv, Date and Time, Description and the Schedule button
## Debug a Test When a test fails partway, stop it just before the failing step and look at the page: 1. In a keyword file, click left of a line number to add a breakpoint. A red dot marks it. 2. Open the arrow on **Start Run** and choose **Run in Debug Mode**. 3. The run stops at the breakpoint and the Controller opens. Click **Step** to run the next line, or **Play** to go on. See [Pause and Step Through a Run](https://resources.sahipro.com/docs/using-sahi/run-tests-via-controller/#pause-and-step-through-a-run). :::caution In debug mode, a run waits at a breakpoint until you click **Step** or **Play**. ::: To remove all breakpoints in all files, choose **Tools** > **Clear Break Points**. ## Periodic Summary during Script Runs When you run tests from the Editor, Ant, Testrunner or Drun, Sahi Pro prints a summary each time a test's status changes: in the console, or as a notification in the Editor. A sample periodic summary in the Ant, Testrunner or Drun console looks like this: ```text INFO: #### Running Script: D:/dev/temp/Nov18/userdata/scripts/sahitests/label.sah INFO: Acquired available browser instance after retries:0 threadNo:1 Rhino lib: startMode = BROWSER Rhino lib:Setting mode: BROWSER INFO: #### Running Script: D:/dev/temp/Nov18/userdata/scripts/sahitests/screenSize.sah Rhino lib: startMode = BROWSER Rhino lib:Setting mode: BROWSER Killing D:/dev/temp/Nov18/userdata/scripts/sahitests/label.sah Killing D:/dev/temp/Nov18/userdata/scripts/sahitests/screenSize.sah ``` There are two kinds of messages: ```js [timestamp] [status: scriptname] [BROWSER: browsername] [timestamp] [Testcases: passed/total_ran] [Scripts: passed/total_ran] [BROWSER: browsername] ``` | Field | Meaning | | --- | --- | | timestamp | Time Stamp of the Initiator machine. | | status: scriptname | Status of the script (STARTED, PASSED, FAILED) followed by script name. | | Testcases: passed / total\_ran | Total number of testcases passed / Total number of testcases executed. | | Scripts: passed / total\_ran | Total number of scripts passed / Total number of scripts executed. | | BROWSER: browsername | Browser on which the script was executed. | --- # Run Tests via Controller Run a keyword, part of a test case or all of it from the Sahi Controller while you build it, step through a run, fill in missing variables and see the result. While you build a keyword, the [Sahi Controller](https://resources.sahipro.com/docs/using-sahi/sahi-controller/) runs it straight away in the browser you're recording in, so you can check your work without leaving it. ## Run Part of a Test Case You don't always need to run the whole test case to check your work. Run only the part you're working on, or all of it. Hover over **Run** and choose: - **Run upto this keyword** - **Run this keyword** - **Run from next keyword** - **Run this testcase** - **Run everything**
The Controller on the Add Books keyword with the Run menu open and Run this testcase highlighted
## Pause and Step Through a Run If a run fails and you can't see why, pause it and go one step at a time to find the step that goes wrong. While it runs, use **Pause**, **Play**, **Step** (one step at a time) and **Stop**. ## Fill In Missing Variables A keyword often gets its values from somewhere else: its parameters from the test case or a test data file, or a value stored by an earlier keyword. Run that keyword on its own, such as Login To Book Store with **Run this keyword**, and nothing passes those values in. **Missing Variables** lists them so you can type a value for each, then click **Continue**.
The Controller on the Login To Book Store keyword, with the Missing Variables panel listing $Username and $Password, a Value box for each, and Cancel and Continue buttons
## See the Result When the run finishes, **View Last Run Result** shows each step's result, and **Reports** in the bottom bar opens the full report.
The Controller on the Login To Book Store keyword with View Last Run Result highlighted and the Last Run Result panel open, listing the four steps that ran and Stopped Playback: SUCCESS
If a run waits for a long time, **Diagnose** in the **⋮** menu helps find out why. See [Debugging slowness using Diagnose](https://resources.sahipro.com/docs/faq/diagnose/). --- # Run Tests via Ant Run Sahi Pro tests and suites with Apache Ant, on one machine or across several, with the Ant XML exported from the Run Configuration. ## Run on a Single Machine The Test Scenario Editor writes the Ant XML for you. Select the suite and click **Run** to open the [Run Configuration](https://resources.sahipro.com/docs/using-sahi/run-tests-via-editor/), then: 1. Choose **Run in parallel**. 2. Click **Export Run Config** and choose **Ant Target**.
The Run Configuration for book_store_regression.dd.csv with Run in parallel chosen and the Export Run Config menu open, Ant Target highlighted, above Gradle Task (Groovy) and Gradle Task (Kotlin)
3. The **Ant Target** window shows the Ant XML. To add a target that runs the failed tests again, tick **Add Retry Target**. Click **Copy to Clipboard**.
The Ant Target window with the generated Ant XML, the Add Retry Target checkbox, and the Help docs and Copy to Clipboard buttons
Paste the XML into an empty file and save it as an XML file, such as `demo.xml`, in your ``. You can now run the default ANT target in the xml file as ```sh ant -f demo.xml ``` NOTE: The main target is the default target, so you do not need to specify the target when running the xml. The above UI would generate an ANT xml that looks like the following. ```xml ``` :::note If you choose the `Run sequentially in single browser session` option, singlesession attribute would be set to true. Everything else remains the same. ::: :::danger[Caution] NOTE: The above XML content is for illustration purposes only. Use the [Editor UI](https://resources.sahipro.com/docs/using-sahi/run-tests-via-editor/) to generate the ANT xml content and create an xml with that content in your ``. ::: Let us look at the important attributes used in the ANT xml target (specified in **bold** above). **Attributes and their description** :::note taskdef classpath is relative to where ant is run from. ::: | Attribute | Description | | --- | --- | | scriptDir | Specifies the path to the scripts folder. Can be the absolute path or a path relative to the userdata folder | | scriptName | Relative path to the script/suite/data driven suite. It is relative to scriptDir. | | browser | The browser on which the suite file plays back | | baseurl | Specifies URL which is the starting URL for all the scripts in the suite | | host | Hostname of the server where Sahi is running (Can be IP as well) | | port | Port on which Sahi is running | | threads | Number of simultaneous browser instances on which sahi tests will be run. | | singlesession | Since this is a parallel run, it will be "false". If "true", runs all scripts in a single browser without closing it between scripts. | | showPeriodicSummary | Takes "true" or "false". If "true", a periodic summary of script status is logged in the Ant Console. | | isAutohealEnabled | Takes "true" or "false". If "true", allows scripts to pick element using Sahi auto intelligence when element provided in script is not found. Refer [Autoheal](https://resources.sahipro.com/docs/using-sahi/autoheal/) section for more details. | | sendemail | Takes "true" or "false". If "true", Sahi sends an email summarizing the test run. | | emailtrigger | Takes "success" or "failure" or "success,failure". Triggers email in case of SUCCESS, FAILURE and both cases respectively. | | emailproperties | Path to the properties file that contains details about the mail viz. information about the sender, receiver, host, port, subject, content etc. Path can be the absolute path or relative to where this ant target is run from. | | sendemailperiodically | Takes "true" or "false". If "true", Sahi will send emails periodically till the suite run is complete. | | sendemailperiodicallytime | Specifies the interval in minutes at which periodic emails are to be sent. | | failedSuiteName | Name of the failed suite. It is of the form `_failed_.suite`. | | failedsuite | Relative path to the failed suite. It is relative to scriptDir. | | tags | Tags should be specified only for dd.csv and .csv suites. Tags are specified so that it is easy to choose which scripts/testcases to run. eg. in the target above, all the scripts which have 'medium' tag and 'admin' or 'user' (or both) tag will be run. | | userdefinedid | The unique id that the user can pass to differentiate a suite from others. This is an optional attribute. | | customfield | Custom fields can be passed to the scripts using the customfield attribute. More than one custom field can be passed, by specifying additional customfield entries. Replace the custom field keys and values as appropriate. This is an optional attribute. | | report | Sahi can set offline logs to be generated in `xml`, `html`, `junit`, `tm6` and `excel` types. The default type is `html`. Add separate entries for each report type as required. This is an optional attribute. | **Command to execute the above ANT target** ```sh ant -f demo.xml ``` ## Distributed Suite Runs via ANT Distributed suite runs work through ANT targets as well. These targets can be used from Jenkins to distribute the scripts of a suite on multiple machines. The machine which distributes the scripts and manages the distributed run is referred to as the `Master`. All logs are visible from the `Master`. The other machines are called `Slaves`. Any machine in the distributed environment can serve as the `Master`. The machine which launches the distributed run is referred to as the `Initiator`. ### Distributed run on the same Master In the [Run Configuration](https://resources.sahipro.com/docs/using-sahi/run-tests-via-editor/): 1. Choose **Run distributed (multiple machines)** and set the **Distribution nodes**. Leave **Use Different Master** off.
Run Type in the Run Configuration with Run distributed (multiple machines) highlighted, and below it Distribution nodes localhost:9999, Use Different Master off, Sync Configurations off and Threads Per Node 5
2. Click **Export Run Config**, choose **Ant Target**, and click **Copy to Clipboard**. Tick **Add Retry Target** first to add a target that runs the failed tests again. Paste the XML into an empty file and save it as an XML file, such as `demo.xml`, in your ``. You can now run the default ANT target in the xml file as ```sh ant -f demo.xml ``` NOTE: The main target is the default target, so you do not need to specify the target when running the xml. The above UI would generate an ANT xml that looks like the following. ```xml ``` :::danger[Caution] NOTE: The above XML content is for illustration purposes only. Use the [Editor UI](https://resources.sahipro.com/docs/using-sahi/run-tests-via-editor/) to generate the ANT xml content and create an xml with that content in your ``. ::: Let us look at the important attributes used in the ANT xml target (specified in **bold** above). **Attributes and their description** :::note taskdef classpath is relative to where ant is run from. ::: | Attribute | Description | | --- | --- | | scriptDir | Specifies the path to the scripts folder. Can be the absolute path or a path relative to the userdata folder | | host | Hostname of the server where Sahi is running (Can be IP as well). Leave this as localhost | | port | Port on which Sahi is running | | scriptName | Relative path to the script/suite/data driven suite. It is relative to scriptDir. | | browser | The browser on which the suite file plays back | | threads | Number of simultaneous browser instances on which sahi tests will be run. | | showPeriodicSummary | Takes "true" or "false". If "true", a periodic summary of script status is logged in the Ant Console. | | isAutohealEnabled | Takes "true" or "false". If "true", allows scripts to pick element using Sahi auto intelligence when element provided in script is not found. Refer [Autoheal](https://resources.sahipro.com/docs/using-sahi/autoheal/) section for more details. | | baseurl | Specifies URL which is the starting URL for all the scripts in the suite | | sendemail | Takes "true" or "false". If "true", Sahi sends an email summarizing the test run. | | emailtrigger | Takes "success" or "failure" or "success,failure". Triggers email in case of SUCCESS, FAILURE and both cases respectively. | | emailproperties | Path to the properties file that contains details about the mail viz. information about the sender, receiver, host, port, subject, content etc. Path can be the absolute path or relative to where this ant target is run from. | | sendemailperiodically | Takes "true" or "false". If "true", Sahi will send emails periodically till the suite run is complete. | | sendemailperiodicallytime | Specifies the interval in minutes at which periodic emails are to be sent. | | failedSuiteName | Name of the failed suite. It is of the form `_failed_.suite`. | | failedsuite | Relative path to the failed suite. It is relative to scriptDir. | | tags | Tags should be specified only for dd.csv and .csv suites. Tags are specified so that it is easy to choose which scripts/testcases to run. eg. in the target above, all the scripts which have 'medium' tag and 'admin' or 'user' (or both) tag will be run. | | userdefinedid | The unique id that the user can pass to differentiate a suite from others. This is an optional attribute. | | node | Each node attribute specifies a machine on which the tests should run. Add as many node entries as there are machines to run. The nodes may or may not include the `Master` machine (localhost). If the `Master` machine is not included, scripts will not be run on the `Master`. There can be 1 or more nodes. | | customfield | Custom fields can be passed to the scripts using the customfield attribute. More than one custom field can be passed, by specifying additional customfield entries. Replace the custom field keys and values as appropriate. This is an optional attribute. | | report | Sahi can set offline logs to be generated in `xml`, `html`, `junit`, `tm6` and `excel` types. The default type is `html`. Add separate entries for each report type as required. This is an optional attribute. | **Command to execute the above ANT target** ```sh ant -f demo.xml ``` ### Distributed run on a different Master In the [Run Configuration](https://resources.sahipro.com/docs/using-sahi/run-tests-via-editor/): 1. Choose **Run distributed (multiple machines)**, turn on **Use Different Master**, and enter the master's host and port.
Run distributed (multiple machines) chosen in the Run Configuration, with Use Different Master turned on and highlighted, the master host 192.168.1.20 and port 9999
2. Click **Export Run Config**, choose **Ant Target**, and click **Copy to Clipboard**. Tick **Add Retry Target** first to add a target that runs the failed tests again. Paste the XML into an empty file and save it as an XML file, such as `demo.xml`, in your ``. You can now run the default ANT target in the xml file as ```sh ant -f demo.xml ``` NOTE: The main target is the default target, so you do not need to specify the target when running the xml. The above UI would generate an ANT xml that looks like the following. ```xml ``` :::danger[Caution] NOTE: The above XML content is for illustration purposes only. Use the [Editor UI](https://resources.sahipro.com/docs/using-sahi/run-tests-via-editor/) to generate the ANT xml content and create an xml with that content. ::: Let us look at the important attributes used in the ANT xml target (specified in **bold** above). **Attributes and their description** :::note taskdef classpath is relative to where ant is run from. ::: | Attribute | Description | | --- | --- | | scriptDir | Specifies the path to the scripts folder on the Initiator machine. This can be an absolute path or a path relative to where Ant is run from | | masterhost | Hostname of the different Master server where Sahi is running (Can be IP as well) | | masterport | Port on which Sahi is running | | scriptName | Relative path to the script/suite/data driven suite. It is relative to scriptDir. | | browser | The browser on which the suite file plays back | | baseurl | Specifies URL which is the starting URL for all the scripts in the suite | | threads | Number of simultaneous browser instances on which sahi tests will be run. | | showPeriodicSummary | Takes "true" or "false". If "true", a periodic summary of script status is logged in the Ant Console. | | isAutohealEnabled | Takes "true" or "false". If "true", allows scripts to pick element using Sahi auto intelligence when element provided in script is not found. Refer [Autoheal](https://resources.sahipro.com/docs/using-sahi/autoheal/) section for more details. | | sendemail | Takes "true" or "false". If "true", Sahi sends an email summarizing the test run. | | emailtrigger | Takes "success" or "failure" or "success,failure". Triggers email in case of SUCCESS, FAILURE and both cases respectively. | | emailproperties | Path to the properties file that contains details about the mail viz. information about the sender, receiver, host, port, subject, content etc. Path can be the absolute path or relative to where this ant target is run from. | | sendemailperiodically | Takes "true" or "false". If "true", Sahi will send emails periodically till the suite run is complete. | | sendemailperiodicallytime | Specifies the interval in minutes at which periodic emails are to be sent. | | failedSuiteName | Name of the failed suite. It is of the form `_failed_.suite`. | | failedsuite | Relative path to the failed suite. It is relative to scriptDir. | | tags | Tags should be specified only for dd.csv and .csv suites. Tags are specified so that it is easy to choose which scripts/testcases to run. eg. in the target above, all the scripts which have 'medium' tag and 'admin' or 'user' (or both) tag will be run. | | userdefinedid | The unique id that the user can pass to differentiate a suite from others. This is an optional attribute. | | node | Each node attribute specifies a machine on which the tests should run. Add as many node entries as there are machines to run. The nodes may or may not include the `Master` machine. If the `Master` machine is not included, scripts will not be run on the `Master`. There can be 1 or more nodes. | | customfield | Custom fields can be passed to the scripts using the customfield attribute. More than one custom field can be passed, by specifying additional customfield entries. Replace the custom field keys and values as appropriate. This is an optional attribute. | **Command to execute the above ANT target** ```sh ant -f demo.xml ``` ## Ability to register Nodes externally (from Sahi Pro V6.1.0) It is now possible to register a new Node for a currently running distributed run. **Using registerNodes.bat/registerNodes.sh** 1. Open a command prompt and cd to sahi/userdata/bin (or click on the "Bin" link on the Sahi Dashboard) 2. Run register\_nodes.bat to see the syntax ```text D:\sahi_pro\userdata\bin>register_nodes.bat -- Usage: register_nodes.bat - extnodes is a comma separated string of host:port combos, example: "machine1:9999,machine2:9999". If multiple nodes are specified, enclose them in double quotes. - userDefinedId is the User defined Id specified while running the original suite - suiteId is the SuiteId of the running suite, and can be found from Suite Info section in the Suite Report log - NOTE: Only one of suiteId or userDefinedId is required. If both suiteId and userDefinedId are passed, suiteId will be used to identify the running suite. -- Example: 1. Registering one machine using userDefinedId (say abc1234). register_nodes.bat machine1:9999 abc1234 2. Registering more than one machine using userDefinedId. register_nodes.bat "machine1:9999,machine2:9999" abc1234 3. Registering one machine using suiteId (say sahi_a0ba301605a8f04cb10881e0ddcd96f9dfbd). NOTE: Some value HAS to be passed for the second parameter - userDefinedId. Pass "". register_nodes.bat machine1:9999 "" sahi_a0ba301605a8f04cb10881e0ddcd96f9dfbd 4. Registering more than one machine using suiteId. NOTE: Some value HAS to be passed for the second parameter - userDefinedId. Pass "". register_nodes.bat "machine1:9999,machine2:9999" "" sahi_a0ba301605a8f04cb10881e0ddcd96f9dfbd -- D:\sahi_pro\userdata\bin> ``` 3. Nodes can be registered for a currently running suite. The suite can be specified either using userDefinedId or suiteId. If both are specified, suiteId will be used. suiteId for the current run can be found from the `Suite Info` section of the Suite report logs. - To register using userDefinedId, use something like the following ```sh register_nodes.bat "192.168.1.100:9999,192.168.1.101:9999" myUserDefinedId ``` :::note Multiple nodes can be specified using comma separator. If more than one node is specified, use double quotes for the nodes. ::: Note that these values are indicative. Please use your own values. - To register using suiteId, use something like the following ```sh register_nodes.bat "192.168.1.100:9999,192.168.1.101:9999" "" sahi_a0ba301605a8f04cb10881e0ddcd96f9dfbd ``` :::note - Pass "" as the second parameter for userDefinedId. - Multiple nodes can be specified using comma separator. If more than one node is specified, use double quotes for the nodes. ::: Note that these values are indicative. Please use your own values. **Using an ANT target** Copy the following content to an empty file and save the file as an xml, say `registernodes.xml` in your ``. You can now run the default ANT target in the xml file as ```sh ant -f registernodes.xml ``` ```xml ``` Note that all these values are indicative. **Attributes and their description** :::note taskdef classpath is relative to where ant is run from. ::: | Attribute | Description | | --- | --- | | sahihost | Hostname of the Master where Sahi is running (Can be IP as well). | | sahiport | Port on which Sahi is running | | userDefinedId | UserDefinedId specified while running the original suite | | suiteId | SuiteId of the running suite. Get this value from the Suite Info section of the Suite Report logs | | node | Specify one entry each for every node that you want to register. | :::note Specify either userDefinedId or suiteId. If both are specified, suiteId will be used. ::: **Command to execute the above ANT target** ```sh ant -f registernodes.xml ``` ## Killing a running script/suite :::caution[Important] WARNING: Killing a suite (or all running suites) in the middle of a run is not a routine task. You would kill a suite only if something went wrong and you wish to stop the suite execution. ::: `Stop All` from the Editor can be used to kill all running scripts/suites. This is now possible through an ANT target as well. The ANT target gives the ability to kill a specific running suite or kill all the running suites. Copy the following content to an empty file and save the file as an xml, say `killall.xml` in your ``. You can now run the default ANT target in the xml file as ```sh ant -f killall.xml ``` ```xml ``` **Attributes and their description** :::note taskdef classpath is relative to where ant is run from. ::: | Attribute | Description | | --- | --- | | sahihost | Hostname of the Master where Sahi is running (Can be IP as well). | | sahiport | Port on which Sahi is running | | userDefinedId | UserDefinedId specified while running the original suite | | suiteId | SuiteId of the running suite. Get this value from the Suite Info section of the Suite Report logs | :::note - If neither suiteId nor userDefinedId is specified, all running suites on this Master will be killed. - If you wish to kill a specific suite, use suiteId or userDefinedId. If both are specified, suiteId would be used. ::: **Command to execute the above ANT target** ```sh ant -f killall.xml ``` --- # Run Tests via Gradle Run Sahi Pro tests and suites with Gradle, on one machine or across several, with the Gradle script exported from the Run Configuration. ## Run on a Single Machine The Test Scenario Editor writes the Gradle script for you. Select the suite and click **Run** to open the [Run Configuration](https://resources.sahipro.com/docs/using-sahi/run-tests-via-editor/), then: 1. Choose **Run in parallel**. 2. Click **Export Run Config** and choose **Gradle Task (Groovy)** or **Gradle Task (Kotlin)**.
The Run Configuration for book_store_regression.dd.csv with the Export Run Config menu open, Gradle Task (Groovy) and Gradle Task (Kotlin) highlighted
3. The **Gradle Task** window shows the script. To add a task that runs the failed tests again, tick **Add Retry Task**. Click **Copy to Clipboard**.
The Gradle Task window with the generated Gradle script, the Add Retry Task checkbox, and the Help docs and Copy to Clipboard buttons
Paste the script into an empty file. If groovy was selected for gradle script, save the file as build.gradle, and for Kotlin, save the file as build.gradle.kts in your ``. You can now run the default task in the gradle script file as ```js gradle ``` :::note By default Gradle suppresses the info logs generated by Sahi. To view these logs execute the script using `gradle --info` or, create a file named `gradle.properties` alongside `build.gradle` and add this line: ```properties org.gradle.logging.level=info ``` ::: :::note When running large suites, you may face heap overflow issues gradle. This can be resolved by increasing the heap size of gradle. eg., to set heap size to 2048MB - run gradle with `gradle -Dorg.gradle.jvmargs=-Xmx2048m` - create a file named `gradle.properties` alongside `build.gradle` and add this line: ```properties org.gradle.jvmargs=-Xmx2048m ``` ::: NOTE: The main target `runsahitests` is the default target, so you do not need to specify the target when running the xml. The above UI would generate a gradle script that looks like the following. ```java # groovy apply plugin: 'base' apply plugin: 'java' buildscript { repositories { flatDir name: 'localRepository', dirs: 'lib' } dependencies { classpath ':ant-sahi' } } static def getFormattedDateTime() { DateFormat df = new SimpleDateFormat("yyyy_MM_dd__HH_mm_ss", new Locale("en", "IN")) return df.format(new Date()) } tasks.register("set_timestamp") { group = "Sahi" description = "Set timestamp" extensions.add("timestamp", getFormattedDateTime()) } tasks.register("setpropertieschrome") { group = "Sahi" description = "Initialize properties for run" dependsOn "set_timestamp" def ts = tasks.named("set_timestamp").get().timestamp def browser = "chrome" def scriptDir = "D:/SahiPro/userdata/scripts/" def props = [ threads: "5", abortedRetryCount: "1", failureRetryCount: "2", isAvoidSkipping: "true", isAutohealEnabled: "true", suiteTimeOut: "0.0", failedSuiteName: "demo_failed_${browser}.dd.csv", browser: "chrome", baseurl: "https://sahitest.com/demo", jsCodeCoverage: "false", autoThread: "false", scriptDir: "${scriptDir}", scriptsPathMaster: "${scriptDir}", suite: "sahitests/demo.dd.csv", sendemailForSubSuite: "true", sendemailperiodically: "false", sendemailperiodicallytime: "", port: "9999", extraParam: "user=test;mask_password=secret;", host: "localhost", sendemail: "true", emailtrigger: "", emailattachment: "", emailproperties: "D:\\SahiPro\\userdata\\config\\email.properties", emailPasswordHidden: "true", tags: "(user||admin)&&medium", testcases: "", userDefinedId: "gradle-run", reports: "junit,xml:D:/reports/xml,html:D:/reports/html", singlesession: "false", showPeriodicSummary: "true", failedSuite: "sahitests/demo_failed_${browser}.dd.csv", failedSuiteName: "demo_failed_${browser}.dd.csv", startWith: "BROWSER", testcaseFailureRetryCount: "0", testcaseAbortedRetryCount: "0" ] project.ext.propschrome = props } def buildUtils_chrome = new BuildUtils() tasks.register("runtestschrome") { group = "Sahi" description = "Run tests on chrome browser" dependsOn "setpropertieschrome" def props_chrome_provider = project.provider {project.ext.propschrome} doLast { def properties = props_chrome_provider.get() as HashMap def argsMap = [:] properties.each {key,value -> argsMap.put(key as String, value as String) } argsMap.put("reports", "junit,xml:D:/reports/xml,html:D:/reports/html") def status = buildUtils_chrome.execute(argsMap , true) println "runtestschrome STATUS: ${status}" runtestschrome.ext.status = status } finalizedBy "retrytestschrome" } tasks.register("retrytestschrome") { group = "Sahi" description = "Retry failed scripts on chrome Browser" dependsOn "setpropertieschrome" onlyIf { runtestschrome.ext.status != "SUCCESS" } def props_chrome_provider = project.provider {project.ext.propschrome} doLast { def properties = props_chrome_provider.get() as HashMap def argsMap = [:] properties.each {key,value -> argsMap.put(key as String, value as String) } argsMap.put("reports", "junit,xml:D:/reports/xml/retry,html:D:/reports/html/retry") def status = buildUtils_chrome.retry(argsMap) println "retrytestschrome STATUS: ${status}" if (!"SUCCESS".equalsIgnoreCase(status)) { throw new GradleException("sahi retry tests failed on browser ${properties.browser} with status ${status}") } } } tasks.register("runsahitests") { group = "Sahi" description = "Run all tests" dependsOn "runtestschrome" } defaultTasks 'runsahitests' ``` ```java # kotlin plugins { id ("base") id("java") } buildscript { dependencies { classpath(files("lib/ant-sahi.jar")) } } fun getFormattedDateTime(): String { val df = SimpleDateFormat("yyyy_MM_dd__HH_mm_ss", Locale.of("en", "IN")) return df.format(Date()) } tasks.register("settimestamp") { group = "Sahi" description = "Set timestamp" extensions.add("timestamp", getFormattedDateTime()) } val propschrome: MapProperty = project.objects.mapProperty(String::class.java, String::class.java) tasks.register("setpropertieschrome") { group = "Sahi" description = "Initialize properties for run" dependsOn("settimestamp") val ts = tasks.named("settimestamp").get().extensions.findByName("timestamp") val browser = "chrome" val scriptDir = "D:/SahiPro/userdata/scripts/" val props = mutableMapOf( "threads" to "5", "abortedRetryCount" to "1", "failureRetryCount" to "2", "isAvoidSkipping" to "true", "isAutohealEnabled" to "true", "suiteTimeOut" to "0.0", "failedSuiteName" to "demo_failed_${browser}.dd.csv", "browser" to "chrome", "baseurl" to "https://sahitest.com/demo", "jsCodeCoverage" to "false", "autoThread" to "false", "scriptDir" to "${scriptDir}", "scriptsPathMaster" to "${scriptDir}", "suite" to "sahitests/demo.dd.csv", "sendemailForSubSuite" to "true", "sendemailperiodically" to "false", "sendemailperiodicallytime" to "", "port" to "9999", "extraParam" to "user=test;mask_password=secret;", "host" to "localhost", "sendemail" to "true", "emailtrigger" to "", "emailattachment" to "", "emailproperties" to "D:\\SahiPro\\userdata\\config\\email.properties", "emailPasswordHidden" to "true", "tags" to "(user||admin)&&medium", "testcases" to "", "userDefinedId" to "gradle-run", "reports" to "junit,xml:D:/reports/xml,html:D:/reports/html", "singlesession" to "false", "showPeriodicSummary" to "true", "failedSuite" to "sahitests/demo_failed_${browser}.dd.csv", "failedSuiteName" to "demo_failed_${browser}.dd.csv", "startWith" to "BROWSER", "testcaseFailureRetryCount" to "0", "testcaseAbortedRetryCount" to "0" ) propschrome.set(props) } val buildUtils_chrome = BuildUtils() tasks.register("runtestschrome") { group = "Sahi" description = "Run tests on chrome browser" dependsOn("setpropertieschrome") doLast { val properties = propschrome.get() val argsMap = mutableMapOf() properties.forEach { (key: String, value: String) -> argsMap.put(key, value) } argsMap.put("reports", "junit,xml:D:/reports/xml,html:D:/reports/html") val status = buildUtils_chrome.execute(argsMap , true) println("runtestschrome STATUS: ${status}") project.extra.set("runtestschromestatus", status) } finalizedBy("retrytestschrome") } tasks.register("retrytestschrome") { group="Sahi" description="Retry failed scripts on chrome browser" dependsOn("setpropertieschrome") onlyIf { !(project.extra.get("runtestschromestatus") as String).equals("SUCCESS", ignoreCase=true) } doLast { val properties = propschrome.get() val argsMap = mutableMapOf() properties.forEach { (key: String, value: String) -> argsMap.put(key as String, value as String) } argsMap["suite"] = argsMap["failedSuite"] ?: "" argsMap.put("reports", "junit,xml:D:/reports/xml/retry,html:D:/reports/html/retry") val status = buildUtils_chrome.retry(argsMap) println("retrytestschrome STATUS: ${status}") if (!"SUCCESS".equals(status, ignoreCase = true)) { throw GradleException("sahi retry tests failed on browser ${properties.get("browser")} with status ${status}") } } } tasks.register("runsahitests") { group = "Sahi" description = "run all tests" dependsOn("runtestschrome") } defaultTasks("runsahitests") ``` :::note If you choose the `Run sequentially in single browser session` option, singlesession attribute would be set to true. Everything else remains the same. ::: :::danger[Caution] NOTE: The above Gradle script is for illustration purposes only. Use the [Editor UI](https://resources.sahipro.com/docs/using-sahi/run-tests-via-editor/) to generate the gradle script content and save it to a file in your ``. ::: Let us look at the important attributes used in the gradle task (specified in **bold** above). **Attributes and their description** :::note gradle classpath is relative to where gradle is invoked from. ::: | Attribute | Description | | --- | --- | | scriptDir | Specifies the path to the scripts folder. Can be the absolute path or a path relative to the userdata folder | | scriptName | Relative path to the script/suite/data driven suite. It is relative to scriptDir. | | browser | The browser on which the suite file plays back | | baseurl | Specifies URL which is the starting URL for all the scripts in the suite | | host | Hostname of the server where Sahi is running (Can be IP as well) | | port | Port on which Sahi is running | | threads | Number of simultaneous browser instances on which sahi tests will be run. | | singlesession | Since this is a parallel run, it will be "false". If "true", runs all scripts in a single browser without closing it between scripts. | | showPeriodicSummary | Takes "true" or "false". If "true", a periodic summary of script status is logged in the Gradle Console. | | isAutohealEnabled | Takes "true" or "false". If "true", allows scripts to pick element using Sahi auto intelligence when element provided in script is not found. Refer [Autoheal](https://resources.sahipro.com/docs/using-sahi/autoheal/) section for more details. | | sendemail | Takes "true" or "false". If "true", Sahi sends an email summarizing the test run. | | emailtrigger | Takes "success" or "failure" or "success,failure". Triggers email in case of SUCCESS, FAILURE and both cases respectively. | | emailproperties | Path to the properties file that contains details about the mail viz. information about the sender, receiver, host, port, subject, content etc. Path can be the absolute path or relative to where this gradle task is run from. | | sendemailperiodically | Takes "true" or "false". If "true", Sahi will send emails periodically till the suite run is complete. | | sendemailperiodicallytime | Specifies the interval in minutes at which periodic emails are to be sent. | | failedSuiteName | Name of the failed suite. It is of the form `_failed_.suite`. | | failedsuite | Relative path to the failed suite. It is relative to scriptDir. | | tags | Tags should be specified only for dd.csv and .csv suites. Tags are specified so that it is easy to choose which scripts/testcases to run. eg. in the target above, all the scripts which have 'medium' tag and 'admin' or 'user' (or both) tag will be run. | | userdefinedid | The unique id that the user can pass to differentiate a suite from others. This is an optional attribute. | | extraParam | Custom fields can be passed to the scripts using the extraParam attribute. More than one custom field can be passed, by specifying additional customfield entries. Replace the custom field keys and values as appropriate. This is an optional attribute. | | reports | Sahi can set offline logs to be generated in `xml`, `html`, `junit`, `pdf` and `excel` types. The default type is `html`. Add separate entries for each report type as required. This is an optional attribute. | **Command to execute the above Gradle task** ```js gradle ``` ## Distributed Suite Runs via Gradle Distributed suite runs work through Gradle scripts as well. These targets can be used from Jenkins to distribute the scripts of a suite on multiple machines. The machine which distributes the scripts and manages the distributed run is referred to as the `Master`. All logs are visible from the `Master`. The other machines are called `Slaves`. Any machine in the distributed environment can serve as the `Master`. The machine which launches the distributed run is referred to as the `Initiator`. ### Distributed run on the same Master In the [Run Configuration](https://resources.sahipro.com/docs/using-sahi/run-tests-via-editor/): 1. Choose **Run distributed (multiple machines)** and set the **Distribution nodes**. Leave **Use Different Master** off.
Run Type in the Run Configuration with Run distributed (multiple machines) highlighted, and below it Distribution nodes localhost:9999, Use Different Master off, Sync Configurations off and Threads Per Node 5
2. Click **Export Run Config**, choose **Gradle Task (Groovy)** or **Gradle Task (Kotlin)**, and click **Copy to Clipboard**. Tick **Add Retry Task** first to add a task that runs the failed tests again. Paste the script into an empty file and save it in your ``. You can now run the default task in the gradle script as ```js gradle ``` NOTE: The main task is the default task, so you do not need to specify the task when running the xml. The above UI would generate a gradle script that looks like the following. ```java #groovy apply plugin: 'base' apply plugin: 'java' buildscript { repositories { flatDir name: 'localRepository', dirs: 'lib' } dependencies { classpath ':ant-sahi' } } static def getFormattedDateTime() { DateFormat df = new SimpleDateFormat("yyyy_MM_dd__HH_mm_ss", new Locale("en", "IN")) return df.format(new Date()) } tasks.register("set_timestamp") { group = "Sahi" description = "Set timestamp" extensions.add("timestamp", getFormattedDateTime()) } tasks.register("setpropertieschrome") { group = "Sahi" description = "Initialize properties for run" dependsOn "set_timestamp" def ts = tasks.named("set_timestamp").get().timestamp def browser = "chrome" def scriptDir = "D:/SahiPro/userdata/scripts/" def props = [ isDRun: "true", threads: "5", abortedRetryCount: "1", failureRetryCount: "2", isAvoidSkipping: "true", isAutoHealEnabled: "true", suiteTimeOut: "0.0", failedSuiteName: "demo_failed_${browser}.dd.csv", browser: "chrome", baseurl: "https://sahitest.com/demo", jsCodeCoverage: "false", autoThread: "false", scriptDir: "${scriptDir}", scriptsPathMaster: "${scriptDir}", suite: "sahitests/demo.dd.csv", thresendemailForSubSuiteads: "true", sendemailperiodically: "false", sendemailperiodicallytime: "", port: "9999", extraParam: "user=test;mask_password=secret;", host: "localhost", sendemail: "true", emailtrigger: "", emailattachment: "", emailproperties: "D:\\SahiPro\\userdata\\config\\email.properties", emailPasswordHidden: "true", tags: "(user||admin)&&medium", testcases: "", userDefinedId: "gradle-run", reports: "junit,xml:D:/reports/xml,html:D:/reports/html", singlesession: "false", showPeriodicSummary: "true", tfailedSuitehreads: "sahitests/demo_failed_${browser}.dd.csv", failedSuiteName: "demo_failed_${browser}.dd.csv", startWith: "BROWSER", testcaseFailureRetryCount: "0", testcaseAbortedRetryCount: "0", nodes: "192.168.1.92:9999,192.168.1.93:9999" ] project.ext.propschrome = props } def buildUtils_chrome = new BuildUtils() tasks.register("runtestschrome") { group = "Sahi" description = "Run tests on chrome browser" dependsOn "setpropertieschrome" def props_chrome_provider = project.provider {project.ext.propschrome} doLast { def properties = props_chrome_provider.get() as HashMap def argsMap = [:] properties.each {key,value -> argsMap.put(key as String, value as String) } argsMap.put("reports", "junit,xml:D:/reports/xml,html:D:/reports/html") def status = buildUtils_chrome.execute(argsMap , true) println "runtestschrome STATUS: ${status}" runtestschrome.ext.status = status } finalizedBy "retrytestschrome" } tasks.register("retrytestschrome") { group = "Sahi" description = "Retry failed scripts on chrome Browser" dependsOn "setpropertieschrome" onlyIf { runtestschrome.ext.status != "SUCCESS" } def props_chrome_provider = project.provider {project.ext.propschrome} doLast { def properties = props_chrome_provider.get() as HashMap def argsMap = [:] properties.each {key,value -> argsMap.put(key as String, value as String) } argsMap["suite"] = argsMap["failedSuite"] argsMap.put("reports", "junit,xml:D:/reports/xml/retry,html:D:/reports/html/retry") def status = buildUtils_chrome.retry(argsMap) println "retrytestschrome STATUS: ${status}" if (!"SUCCESS".equalsIgnoreCase(status)) { throw new GradleException("sahi retry tests failed on browser ${properties.browser} with status ${status}") } } } tasks.register("runsahitests") { group = "Sahi" description = "Run all tests" dependsOn "runtestschrome" } defaultTasks 'runsahitests' ``` ```java # Kotlin plugins { id ("base") id("java") } buildscript { dependencies { classpath(files("lib/ant-sahi.jar")) } } fun getFormattedDateTime(): String { val df = SimpleDateFormat("yyyy_MM_dd__HH_mm_ss", Locale.of("en", "IN")) return df.format(Date()) } tasks.register("settimestamp") { group = "Sahi" description = "Set timestamp" extensions.add("timestamp", getFormattedDateTime()) } val propschrome: MapProperty = project.objects.mapProperty(String::class.java, String::class.java) tasks.register("setpropertieschrome") { group = "Sahi" description = "Initialize properties for run" dependsOn("settimestamp") val ts = tasks.named("settimestamp").get().extensions.findByName("timestamp") val browser = "chrome" val scriptDir = "D:/SahiPro/userdata/scripts/" val props = mutableMapOf( "isDRun" to "true", "threads" to "5", "abortedRetryCount" to "1", "failureRetryCount" to "2", "isAvoidSkipping" to "true", "isAutoHealEnabled" to "true", "suiteTimeOut" to "0.0", "failedSuiteName" to "demo_failed_${browser}.dd.csv", "browser" to "chrome", "baseurl" to "https://sahitest.com/demo", "jsCodeCoverage" to "false", "autoThread" to "false", "scriptDir" to "${scriptDir}", "scriptsPathMaster" to "${scriptDir}", "suite" to "sahitests/demo.dd.csv", "thresendemailForSubSuiteads" to "true", "sendemailperiodically" to "false", "sendemailperiodicallytime" to "", "port" to "9999", "extraParam" to "user=test;mask_password=secret;", "host" to "localhost", "sendemail" to "true", "emailtrigger" to "", "emailattachment" to "", "emailproperties" to "D:\\SahiPro\\userdata\\config\\email.properties", "emailPasswordHidden" to "true", "tags" to "(user||admin)&&medium", "testcases" to "", "userDefinedId" to "gradle-run", "reports" to "junit,xml:D:/reports/xml,html:D:/reports/html", "singlesession" to "false", "showPeriodicSummary" to "true", "tfailedSuitehreads" to "sahitests/demo_failed_${browser}.dd.csv", "failedSuiteName" to "demo_failed_${browser}.dd.csv", "startWith" to "BROWSER", "testcaseFailureRetryCount" to "0", "testcaseAbortedRetryCount" to "0", "nodes" to "192.168.1.92:9999,192.168.1.93:9999" ) propschrome.set(props) } val buildUtils_chrome = BuildUtils() tasks.register("runtestschrome") { group = "Sahi" description = "Run tests on chrome browser" dependsOn("setpropertieschrome") doLast { val properties = propschrome.get() val argsMap = mutableMapOf() properties.forEach { (key: String, value: String) -> argsMap.put(key, value) } argsMap.put("reports", "junit,xml:D:/reports/xml,html:D:/reports/html") val status = buildUtils_chrome.execute(argsMap , true) println("runtestschrome STATUS: ${status}") project.extra.set("runtestschromestatus", status) } finalizedBy("retrytestschrome") } tasks.register("retrytestschrome") { group="Sahi" description="Retry failed scripts on chrome browser" dependsOn("setpropertieschrome") onlyIf { !(project.extra.get("runtestschromestatus") as String).equals("SUCCESS", ignoreCase=true) } doLast { val properties = propschrome.get() val argsMap = mutableMapOf() properties.forEach { (key: String, value: String) -> argsMap.put(key as String, value as String) } argsMap["suite"] = argsMap["failedSuite"] ?: "" argsMap.put("reports", "junit,xml:D:/reports/xml/retry,html:D:/reports/html/retry") val status = buildUtils_chrome.retry(argsMap) println("retrytestschrome STATUS: ${status}") if (!"SUCCESS".equals(status, ignoreCase = true)) { throw GradleException("sahi retry tests failed on browser ${properties.get("browser")} with status ${status}") } } } tasks.register("runsahitests") { group = "Sahi" description = "run all tests" dependsOn("runtestschrome") } defaultTasks("runsahitests") ``` :::danger[Caution] NOTE: The above Gradle Script is for illustration purposes only. Use the [Editor UI](https://resources.sahipro.com/docs/using-sahi/run-tests-via-editor/) to generate the Gradle script content and save it to a file in your ``. ::: Let us look at the important attributes used in the Gradle task (specified in **bold** above). **Attributes and their description** :::note Gradle script classpath is relative to where gradle is invoked from. ::: | Attribute | Description | | --- | --- | | scriptDir | Specifies the path to the scripts folder. Can be the absolute path or a path relative to the userdata folder | | host | Hostname of the server where Sahi is running (Can be IP as well). Leave this as localhost | | port | Port on which Sahi is running | | scriptName | Relative path to the script/suite/data driven suite. It is relative to scriptDir. | | browser | The browser on which the suite file plays back | | threads | Number of simultaneous browser instances on which sahi tests will be run. | | showPeriodicSummary | Takes "true" or "false". If "true", a periodic summary of script status is logged in the Gradle Console. | | isAutohealEnabled | Takes "true" or "false". If "true", allows scripts to pick element using Sahi auto intelligence when element provided in script is not found. Refer [Autoheal](https://resources.sahipro.com/docs/using-sahi/autoheal/) section for more details. | | baseurl | Specifies URL which is the starting URL for all the scripts in the suite | | sendemail | Takes "true" or "false". If "true", Sahi sends an email summarizing the test run. | | emailtrigger | Takes "success" or "failure" or "success,failure". Triggers email in case of SUCCESS, FAILURE and both cases respectively. | | emailproperties | Path to the properties file that contains details about the mail viz. information about the sender, receiver, host, port, subject, content etc. Path can be the absolute path or relative to where this gradle task is run from. | | sendemailperiodically | Takes "true" or "false". If "true", Sahi will send emails periodically till the suite run is complete. | | sendemailperiodicallytime | Specifies the interval in minutes at which periodic emails are to be sent. | | failedSuiteName | Name of the failed suite. It is of the form `_failed_.suite`. | | failedsuite | Relative path to the failed suite. It is relative to scriptDir. | | tags | Tags should be specified only for dd.csv and .csv suites. Tags are specified so that it is easy to choose which scripts/testcases to run. eg. in the target above, all the scripts which have 'medium' tag and 'admin' or 'user' (or both) tag will be run. | | userdefinedid | The unique id that the user can pass to differentiate a suite from others. This is an optional attribute. | | nodes | nodes specify the machines on which the tests should run. Add as many node entries as there are machines to run. The nodes may or may not include the `Master` machine (localhost). If the `Master` machine is not included, scripts will not be run on the `Master`. There can be 1 or more nodes. | | extraParam | Custom fields can be passed to the scripts using the extraParam attribute. More than one custom field can be passed, by specifying additional customfield entries. Replace the custom field keys and values as appropriate. This is an optional attribute. | | reports | Sahi can set offline logs to be generated in `xml`, `html`, `junit`, `tm6` and `excel` types. The default type is `html`. Add separate entries for each report type as required. This is an optional attribute. | **Command to execute the above Gradle task** ```js gradle ``` ### Distributed run on a different Master In the [Run Configuration](https://resources.sahipro.com/docs/using-sahi/run-tests-via-editor/): 1. Choose **Run distributed (multiple machines)**, turn on **Use Different Master**, and enter the master's host and port.
Run distributed (multiple machines) chosen in the Run Configuration, with Use Different Master turned on and highlighted, the master host 192.168.1.20 and port 9999
2. Click **Export Run Config**, choose **Gradle Task (Groovy)** or **Gradle Task (Kotlin)**, and click **Copy to Clipboard**. Tick **Add Retry Task** first to add a task that runs the failed tests again. Paste the script into an empty file and save it in your ``. You can now run the default task in the gradle script as ```js gradle ``` NOTE: The main task is the default task, so you do not need to specify the task when running the gradle script. The above UI would generate a gradle script that looks like the following. ```java # groovy apply plugin: 'base' apply plugin: 'java' buildscript { repositories { flatDir name: 'localRepository', dirs: 'lib' } dependencies { classpath ':ant-sahi' } } static def getFormattedDateTime() { DateFormat df = new SimpleDateFormat("yyyy_MM_dd__HH_mm_ss", new Locale("en", "IN")) return df.format(new Date()) } tasks.register("set_timestamp") { group = "Sahi" description = "Set timestamp" extensions.add("timestamp", getFormattedDateTime()) } tasks.register("setpropertieschrome") { group = "Sahi" description = "Initialize properties for run" dependsOn "set_timestamp" def ts = tasks.named("set_timestamp").get().timestamp def browser = "chrome" def scriptDir = "D:/SahiPro/userdata/scripts/" def props = [ isDRun: "true", isDifferentMaster: "true", threads: "5", abortedRetryCount: "1", failureRetryCount: "2", isAvoidSkipping: "true", isAutoHealEnabled: "true", suiteTimeOut: "0.0", failedSuiteName: "demo_failed_${browser}.dd.csv", browser: "chrome", baseurl: "https://sahitest.com/demo", jsCodeCoverage: "false", autoThread: "false", scriptDir: "${scriptDir}", scriptsPathInitiator: "${scriptDir}", scriptsPathMaster: "temp/scripts/staging/${ts}_${browser}", suite: "sahitests/demo.dd.csv", sendemailForSubSuite: "true", sendemailperiodically: "false", sendemailperiodicallytime: "", extraParam: "user=test;mask_password=secret;", sahiport: "9999", sahihost: "192.168.1.94", sendemail: "true", emailtrigger: "", emailattachment: "", emailproperties: "D:\\SahiPro\\userdata\\config\\email.properties", emailPasswordHidden: "true", tags: "(user||admin)&&medium", testcases: "", userDefinedId: "gradle-run", reports: "", singlesession: "false", showPeriodicSummary: "true", failedSuite: "sahitests/demo_failed_${browser}.dd.csv", failedSuiteName: "demo_failed_${browser}.dd.csv", startWith: "BROWSER", testcaseFailureRetryCount: "0", testcaseAbortedRetryCount: "0", nodes: "192.168.1.92:9999,192.168.1.93:9999" ] project.ext.propschrome = props } def buildUtils_chrome = new BuildUtils() tasks.register("runtestschrome") { group = "Sahi" description = "Run tests on chrome browser" dependsOn "setpropertieschrome" def props_chrome_provider = project.provider {project.ext.propschrome} doLast { def ts = tasks.named("set_timestamp").get().timestamp def properties = props_chrome_provider.get() as HashMap def argsMap = [:] properties.each {key,value -> argsMap.put(key as String, value as String) } argsMap.put("reports", "junit:logs/temp/junit/${ts},xml:logs/temp/xml/${ts},html:logs/temp/html/${ts}".toString()) def syncParams = [ originFolder: argsMap.scriptsPathInitiator, destFolder: argsMap.scriptsPathMaster, ignorePattern: argsMap.ignorePattern, suitePath: argsMap.scriptsPathInitiator + "/" + argsMap.suite, csvSeparator: ",", scriptExtensions: "sah;sahi;js;ar.csv", scenarioExtensions: ".s.csv;xls;xlsx", javaDir: "java", exposedJavaClasses: "exposed_classes.txt", isSyncConfig: argsMap.isSyncConfig, configPath: argsMap.configPath, isAutohealEnabled: argsMap.isAutohealEnabled ] BuildUtils.syncSuiteToMaster(false, argsMap.sahihost, argsMap.sahiport, syncParams); def status = buildUtils_chrome.execute(argsMap , true) println "runtestschrome STATUS: ${status}" def deleteParams = [ scriptDir: argsMap.scriptsPathInitiator, filePath: argsMap.scriptsPathMaster, isAutohealEnabled: argsMap.isAutohealEnabled, isSyncConfig: argsMap.isSyncConfig ] BuildUtils.deleteSuiteFromMasterStaging(argsMap.sahihost, argsMap.sahiport, deleteParams) def logs = [ file("logs/junit").absolutePath, "D:/reports/xml", "D:/reports/html" ] BuildUtils.pullOfflineLogsFromMaster(argsMap.sahihost, argsMap.sahiport, argsMap.ignorePattern, logs, argsMap.reports) runtestschrome.ext.status = status } finalizedBy "retrytestschrome" } tasks.register("retrytestschrome") { group = "Sahi" description = "Retry failed scripts on chrome Browser" dependsOn "setpropertieschrome" onlyIf { runtestschrome.ext.status != "SUCCESS" } def props_chrome_provider = project.provider {project.ext.propschrome} doLast { def ts = tasks.named("set_timestamp").get().timestamp def properties = props_chrome_provider.get() as HashMap def argsMap = [:] properties.each {key,value -> argsMap.put(key as String, value as String) } argsMap["scriptsPathMaster"] = "${argsMap["scriptsPathMaster"]}_retry".toString() argsMap["suite"] = argsMap["failedSuite"] argsMap.put("reports", "junit:logs/temp/junit/${ts}/retry,xml:logs/temp/xml/${ts}/retry,html:logs/temp/html/${ts}/retry".toString()) def syncParams = [ originFolder: argsMap.scriptsPathInitiator, destFolder: argsMap.scriptsPathMaster, ignorePattern: argsMap.ignorePattern, suitePath: argsMap.scriptsPathInitiator + "/" + argsMap.suite, csvSeparator: ",", scriptExtensions: "sah;sahi;js;ar.csv", scenarioExtensions: ".s.csv;xls;xlsx", javaDir: "java", exposedJavaClasses: "exposed_classes.txt", isSyncConfig: argsMap.isSyncConfig, configPath: argsMap.configPath, isAutohealEnabled: argsMap.isAutohealEnabled ] BuildUtils.syncSuiteToMaster(false, argsMap.sahihost, argsMap.sahiport, syncParams); def status = buildUtils_chrome.retry(argsMap) println "retrytestschrome STATUS: ${status}" def deleteParams = [ scriptDir: argsMap.scriptsPathInitiator, filePath: argsMap.scriptsPathMaster, isAutohealEnabled: argsMap.isAutohealEnabled, isSyncConfig: argsMap.isSyncConfig ] BuildUtils.deleteSuiteFromMasterStaging(argsMap.sahihost, argsMap.sahiport, deleteParams) def logs = [ file("logs/junit/retry").absolutePath, "D:/reports/xml/retry", "D:/reports/html/retry" ] BuildUtils.pullOfflineLogsFromMaster(argsMap.sahihost, argsMap.sahiport, argsMap.ignorePattern, logs, argsMap.reports) if (!"SUCCESS".equalsIgnoreCase(status)) { throw new GradleException("sahi retry tests failed on browser ${properties.browser} with status ${status}") } } } tasks.register("runsahitests") { group = "Sahi" description = "Run all tests" dependsOn "runtestschrome" } defaultTasks 'runsahitests' ``` ```java # kotlin plugins { id ("base") id("java") } buildscript { dependencies { classpath(files("lib/ant-sahi.jar")) } } fun getFormattedDateTime(): String { val df = SimpleDateFormat("yyyy_MM_dd__HH_mm_ss", Locale.of("en", "IN")) return df.format(Date()) } tasks.register("settimestamp") { group = "Sahi" description = "Set timestamp" extensions.add("timestamp", getFormattedDateTime()) } val propschrome: MapProperty = project.objects.mapProperty(String::class.java, String::class.java) tasks.register("setpropertieschrome") { group = "Sahi" description = "Initialize properties for run" dependsOn("settimestamp") val ts = tasks.named("settimestamp").get().extensions.findByName("timestamp") val browser = "chrome" val scriptDir = "D:/SahiPro/userdata/scripts/" val props = mutableMapOf( "isDRun" to "true", "isDifferentMaster" to "true", "threads" to "5", "abortedRetryCount" to "1", "failureRetryCount" to "2", "isAvoidSkipping" to "true", "isAutoHealEnabled" to "true", "suiteTimeOut" to "0.0", "failedSuiteName" to "demo_failed_${browser}.dd.csv", "browser" to "chrome", "baseurl" to "https://sahitest.com/demo", "jsCodeCoverage" to "false", "autoThread" to "false", "scriptDir" to "${scriptDir}", "scriptsPathInitiator" to "${scriptDir}", "scriptsPathMaster" to "temp/scripts/staging/${ts}_${browser}", "suite" to "sahitests/demo.dd.csv", "sendemailForSubSuite" to "true", "sendemailperiodically" to "false", "sendemailperiodicallytime" to "", "extraParam" to "user=test;mask_password=secret;", "sahiport" to "9999", "sahihost" to "192.168.1.94", "sendemail" to "true", "emailtrigger" to "", "emailattachment" to "", "emailproperties" to "D:\\SahiPro\\userdata\\config\\email.properties", "emailPasswordHidden" to "true", "tags" to "(user||admin)&&medium", "testcases" to "", "userDefinedId" to "gradle-run", "reports" to "", "singlesession" to "false", "showPeriodicSummary" to "true", "failedSuite" to "sahitests/demo_failed_${browser}.dd.csv", "failedSuiteName" to "demo_failed_${browser}.dd.csv", "startWith" to "BROWSER", "testcaseFailureRetryCount" to "0", "testcaseAbortedRetryCount" to "0", "nodes" to "192.168.1.92:9999,192.168.1.93:9999" ) propschrome.set(props) } val buildUtils_chrome = BuildUtils() tasks.register("runtestschrome") { group = "Sahi" description = "Run tests on chrome browser" dependsOn("setpropertieschrome") doLast { val ts = tasks.named("settimestamp").get().extensions.findByName("timestamp") val properties = propschrome.get() val argsMap = mutableMapOf() properties.forEach { (key: String, value: String) -> argsMap.put(key, value) } argsMap.put("reports", "junit:logs/temp/junit/${ts},xml:logs/temp/xml/${ts},html:logs/temp/html/${ts}".toString()) val syncParams = mutableMapOf( "originFolder" to "${argsMap["scriptsPathInitiator"]}", "destFolder" to "${argsMap["scriptsPathMaster"]}", "ignorePattern" to "${argsMap["ignorePattern"]}", "suitePath" to "${argsMap["scriptsPathInitiator"]}/${argsMap["suite"]}", "csvSeparator" to ",", "scriptExtensions" to "sah;sahi;js;ar.csv", "scenarioExtensions" to ".s.csv;xls;xlsx", "javaDir" to "java", "exposedJavaClasses" to "exposed_classes.txt", "isSyncConfig" to "${argsMap["isSyncConfig"]}", "configPath" to "${argsMap["configPath"]}", "isAutohealEnabled" to "${argsMap["isAutohealEnabled"]}" ) BuildUtils.syncSuiteToMaster(false, argsMap["sahihost"], argsMap["sahiport"], syncParams); val status = buildUtils_chrome.execute(argsMap , true) println("runtestschrome STATUS: ${status}") val deleteParams = mutableMapOf( "scriptDir" to "${argsMap["scriptsPathInitiator"]}", "filePath" to "${argsMap["scriptsPathMaster"]}", "isAutohealEnabled" to "${argsMap["isAutohealEnabled"]}", "isSyncConfig" to "${argsMap["isSyncConfig"]}" ) BuildUtils.deleteSuiteFromMasterStaging(argsMap["sahihost"], argsMap["sahiport"], deleteParams) val logs = arrayOf( file("logs/junit").absolutePath, "D:/reports/xml", "D:/reports/html" ).toMutableList() BuildUtils.pullOfflineLogsFromMaster(argsMap["sahihost"], argsMap["sahiport"], argsMap["ignorePattern"], logs, argsMap["reports"]) project.extra.set("runtestschromestatus", status) } finalizedBy("retrytestschrome") } tasks.register("retrytestschrome") { group="Sahi" description="Retry failed scripts on chrome browser" dependsOn("setpropertieschrome") onlyIf { !(project.extra.get("runtestschromestatus") as String).equals("SUCCESS", ignoreCase=true) } doLast { val ts = tasks.named("settimestamp").get().extensions.findByName("timestamp") val properties = propschrome.get() val argsMap = mutableMapOf() properties.forEach { (key: String, value: String) -> argsMap.put(key as String, value as String) } argsMap["scriptsPathMaster"] = "${argsMap["scriptsPathMaster"]}_retry".toString() argsMap["suite"] = argsMap["failedSuite"] ?: "" argsMap.put("reports", "junit:logs/temp/junit/${ts}/retry,xml:logs/temp/xml/${ts}/retry,html:logs/temp/html/${ts}/retry".toString()) val syncParams = mutableMapOf( "originFolder" to "${argsMap["scriptsPathInitiator"]}", "destFolder" to "${argsMap["scriptsPathMaster"]}", "ignorePattern" to "${argsMap["ignorePattern"]}", "suitePath" to "${argsMap["scriptsPathInitiator"]}/${argsMap["suite"]}", "csvSeparator" to ",", "scriptExtensions" to "sah;sahi;js;ar.csv", "scenarioExtensions" to ".s.csv;xls;xlsx", "javaDir" to "java", "exposedJavaClasses" to "exposed_classes.txt", "isSyncConfig" to "${argsMap["isSyncConfig"]}", "configPath" to "${argsMap["configPath"]}", "isAutohealEnabled" to "${argsMap["isAutohealEnabled"]}" ) BuildUtils.syncSuiteToMaster(false, argsMap["sahihost"], argsMap["sahiport"], syncParams); val status = buildUtils_chrome.retry(argsMap) println("retrytestschrome STATUS: ${status}") val deleteParams = mutableMapOf( "scriptDir" to "${argsMap["scriptsPathInitiator"]}", "filePath" to "${argsMap["scriptsPathMaster"]}", "isAutohealEnabled" to "${argsMap["isAutohealEnabled"]}", "isSyncConfig" to "${argsMap["isSyncConfig"]}" ) BuildUtils.deleteSuiteFromMasterStaging(argsMap["sahihost"], argsMap["sahiport"], deleteParams) val logs = arrayOf( file("logs/junit/retry").absolutePath, "D:/reports/xml/retry", "D:/reports/html/retry" ).toMutableList() BuildUtils.pullOfflineLogsFromMaster(argsMap["sahihost"], argsMap["sahiport"], argsMap["ignorePattern"], logs, argsMap["reports"]) if (!"SUCCESS".equals(status, ignoreCase = true)) { throw GradleException("sahi retry tests failed on browser ${properties.get("browser")} with status ${status}") } } } tasks.register("runsahitests") { group = "Sahi" description = "run all tests" dependsOn("runtestschrome") } defaultTasks("runsahitests") ``` :::danger[Caution] NOTE: The above Gradle script is for illustration purposes only. Use the [Editor UI](https://resources.sahipro.com/docs/using-sahi/run-tests-via-editor/) to generate the gradle script and save it to a file. ::: Let us look at the important attributes used in the gradle task (specified in **bold** above). **Attributes and their description** :::note Gradle script classpath is relative to where gradle is invoked from. ::: | Attribute | Description | | --- | --- | | scriptDir | Specifies the path to the scripts folder on the Initiator machine. This can be an absolute path or a path relative to where Gradle is run from | | sahihost | Hostname of the different Master server where Sahi is running (Can be IP as well) | | sahiport | Port on which Sahi is running | | scriptName | Relative path to the script/suite/data driven suite. It is relative to scriptDir. | | browser | The browser on which the suite file plays back | | baseurl | Specifies URL which is the starting URL for all the scripts in the suite | | threads | Number of simultaneous browser instances on which sahi tests will be run. | | showPeriodicSummary | Takes "true" or "false". If "true", a periodic summary of script status is logged in the Gradle Console. | | isAutohealEnabled | Takes "true" or "false". If "true", allows scripts to pick element using Sahi auto intelligence when element provided in script is not found. Refer [Autoheal](https://resources.sahipro.com/docs/using-sahi/autoheal/) section for more details. | | sendemail | Takes "true" or "false". If "true", Sahi sends an email summarizing the test run. | | emailtrigger | Takes "success" or "failure" or "success,failure". Triggers email in case of SUCCESS, FAILURE and both cases respectively. | | emailproperties | Path to the properties file that contains details about the mail viz. information about the sender, receiver, host, port, subject, content etc. Path can be the absolute path or relative to where this gradle task is run from. | | sendemailperiodically | Takes "true" or "false". If "true", Sahi will send emails periodically till the suite run is complete. | | sendemailperiodicallytime | Specifies the interval in minutes at which periodic emails are to be sent. | | failedSuiteName | Name of the failed suite. It is of the form `_failed_.suite`. | | failedsuite | Relative path to the failed suite. It is relative to scriptDir. | | tags | Tags should be specified only for dd.csv and .csv suites. Tags are specified so that it is easy to choose which scripts/testcases to run. eg. in the target above, all the scripts which have 'medium' tag and 'admin' or 'user' (or both) tag will be run. | | userdefinedid | The unique id that the user can pass to differentiate a suite from others. This is an optional attribute. | | nodes | nodes attribute specify the machines on which the tests should run. Add as many node entries as there are machines to run. The nodes may or may not include the `Master` machine. If the `Master` machine is not included, scripts will not be run on the `Master`. There can be 1 or more nodes. | | extraParam | Custom fields can be passed to the scripts using the extraParam attribute. More than one custom field can be passed, by specifying additional customfield entries. Replace the custom field keys and values as appropriate. This is an optional attribute. | | reports | Sahi can set offline logs to be generated in `xml`, `html`, `junit`, `tm6` and `excel` types. The default type is `html`. Add separate entries for each report type as required. This is an optional attribute. | **Command to execute the above Gradle task** ```js gradle ``` ## Ability to register Nodes externally (from Sahi Pro V6.1.0) It is now possible to register a new Node for a currently running distributed run. **Using registerNodes.bat/registerNodes.sh** 1. Open a command prompt and cd to sahi/userdata/bin (or click on the "Bin" link on the Sahi Dashboard) 2. Run register\_nodes.bat to see the syntax ```text D:\sahi_pro\userdata\bin>register_nodes.bat -- Usage: register_nodes.bat - extnodes is a comma separated string of host:port combos, example: "machine1:9999,machine2:9999". If multiple nodes are specified, enclose them in double quotes. - userDefinedId is the User defined Id specified while running the original suite - suiteId is the SuiteId of the running suite, and can be found from Suite Info section in the Suite Report log - NOTE: Only one of suiteId or userDefinedId is required. If both suiteId and userDefinedId are passed, suiteId will be used to identify the running suite. -- Example: 1. Registering one machine using userDefinedId (say abc1234). register_nodes.bat machine1:9999 abc1234 2. Registering more than one machine using userDefinedId. register_nodes.bat "machine1:9999,machine2:9999" abc1234 3. Registering one machine using suiteId (say sahi_a0ba301605a8f04cb10881e0ddcd96f9dfbd). NOTE: Some value HAS to be passed for the second parameter - userDefinedId. Pass "". register_nodes.bat machine1:9999 "" sahi_a0ba301605a8f04cb10881e0ddcd96f9dfbd 4. Registering more than one machine using suiteId. NOTE: Some value HAS to be passed for the second parameter - userDefinedId. Pass "". register_nodes.bat "machine1:9999,machine2:9999" "" sahi_a0ba301605a8f04cb10881e0ddcd96f9dfbd -- D:\sahi_pro\userdata\bin> ``` 3. Nodes can be registered for a currently running suite. The suite can be specified either using userDefinedId or suiteId. If both are specified, suiteId will be used. suiteId for the current run can be found from the `Suite Info` section of the Suite report logs. - To register using userDefinedId, use something like the following ```sh register_nodes.bat "192.168.1.100:9999,192.168.1.101:9999" myUserDefinedId ``` :::note Multiple nodes can be specified using comma separator. If more than one node is specified, use double quotes for the nodes. ::: Note that these values are indicative. Please use your own values. - To register using suiteId, use something like the following ```sh register_nodes.bat "192.168.1.100:9999,192.168.1.101:9999" "" sahi_a0ba301605a8f04cb10881e0ddcd96f9dfbd ``` :::note - Pass "" as the second parameter for userDefinedId. - Multiple nodes can be specified using comma separator. If more than one node is specified, use double quotes for the nodes. ::: Note that these values are indicative. Please use your own values. **Using Gradle Task** ```sh gradle registernodes -Phost= -Pport= -PsuiteId= -PuserDefinedId= -Pnodes="" ``` **Parameters and their description** | Parameter | Description | | --- | --- | | host | Hostname of the Master where Sahi is running (Can be IP as well). | | port | Port on which Sahi is running | | userDefinedId | UserDefinedId specified while running the original suite | | suiteId | SuiteId of the running suite. Get this value from the Suite Info section of the Suite Report logs | | nodes | Comma-separated list of host:node combos. Specify one entry each for every node that you want to register. | :::note Specify either userDefinedId or suiteId. If both are specified, suiteId will be used. ::: :::note This task is only avaiable in Gradle scripts for drun and drun with different master ::: ## Killing a running script/suite :::caution[Important] WARNING: Killing a suite (or all running suites) in the middle of a run is not a routine task. You would kill a suite only if something went wrong and you wish to stop the suite execution. ::: `Stop All` from the Editor can be used to kill all running scripts/suites. This is possible through Gradle task as well. This Gradle task gives the ability to kill a specific running suite or kill all the running suites. ```sh gradle kill -Phost= -Pport= -PsuiteId= -PuserDefinedId= ``` **Parameters and their description** | Parameter | Description | | --- | --- | | sahihost | Hostname of the Master where Sahi is running (Can be IP as well). | | sahiport | Port on which Sahi is running | | userDefinedId | UserDefinedId specified while running the original suite | | suiteId | SuiteId of the running suite. Get this value from the Suite Info section of the Suite Report logs | :::note - If neither suiteId nor userDefinedId is specified, all running suites on this Master will be killed. - If you wish to kill a specific suite, use suiteId or userDefinedId. If both are specified, suiteId would be used. ::: --- # Run Tests via Maven This section describes how to run tests from Apache Maven ## Run Tests via Maven ### Pre-requisites Maven should be configured in your **System Environment Variables**, to verify type the following in a terminal or in a command prompt ```sh mvn --version ``` 1. Create a new Maven project in Eclipse. - From the **File** menu, choose **New**, and then choose **Project**. - In the **New Project** window, choose **Maven Project**. - In the **New Maven Project** window, choose **Create a simple project**, and leave other default selections. - In the **New Maven Project, Configure project windows**, type the following **Artifact** information: - **Group Id:** sahi-example - **Artifact Id:** sahi-integration-maven - **Version:** 0.0.1-SNAPSHOT - **Packaging:** jar - **Name:** sahi-integration-maven ![](https://resources.sahipro.com/docs/assets/images/using-sahi/create-maven-project.webp) - Click **Finish** 2. Add JDK to the project - Open the context (right-click) menu for the **Maven Project**, choose **Build Path**, and then choose **Configure Build Path**. - In the **Java Build Path** windows, select **JRE System Library** under **Libraries**. ![](https://resources.sahipro.com/docs/assets/images/using-sahi/maven-jdk-config.webp) - Click **Edit** then select **Alternate JRE** and browse JDK path installed in your System. ![](https://resources.sahipro.com/docs/assets/images/using-sahi/maven-jdk-path.webp) - Click **Finish** 3. Edit the **pom.xml** from ```xml 4.0.0 sahi-examples sahi-integration-example 0.0.1-SNAPSHOT sahi-integration-example ``` to ```xml 4.0.0 sahi-examples sahi-integration-example 0.0.1-SNAPSHOT sahi-integration-example maven-antrun-plugin 1.7 generate-sources run ``` :::note Copy only the build tag in the project tag ::: :::note Change **SahiInstallationDir, target name** and **antfile** accroding to your Configuration. ::: :::note To know more about [Create ant file](https://resources.sahipro.com/docs/using-sahi/playback-via-ant/) ::: 4. Run : open the context (right-click) menu for the project, choose **Run As**, and then choose **Maven generate-sources**, **Maven test** etc. --- # Email Properties and Templates This section describes sending status emails during suite execution. :::note For details about sending emails via a Sahi script, refer [Sending Emails](https://resources.sahipro.com/docs/sahi-script/sending-emails/). ::: ## Email.properties file explained ### Configuration file for javax.mail If a value for an item is not provided, then system defaults will be used. | Property | Type | Description | | --- | --- | --- | | mail.smtp.starttls.enable | boolean | If true, enables the use of the STARTTLS command (if supported by the server) to switch the connection to a TLS-protected connection before issuing any login commands. Note that an appropriate trust store must configured so that the client will trust the server's certificate. | | mail.smtp.ssl.protocols | String | This property is a configuration setting used in JavaMail to specify the SSL/TLS protocols enabled for secure SMTP connections. | | mail.host | String | The server to connect to. | | mail.port | int | The server port to connect to. | | mail.user | String | Default user name. | | mail.password | String | Password. This is ignored if encrypted password is provided. | | mail.encrypted.password | String | Encrypted password. Salt for encryption is as per properties. If encrypted password is provided, mail.password is ignored. | | mail.smtp.auth | boolean | If true, attempt to authenticate the user using the AUTH command. | | mail.isSSL | boolean | If true, uses SSL to connect and use the SSL port by default. | | mail.from | String | Email address of the sender | | mail.to | String | Email address of the sender's To field. For multiple address separate by comma(,). | | mail.cc | String | Email address of the sender's CC field, for multiple address separate by comma(,). | | mail.bcc | String | Email address of the sender's BCC field. for multiple address separate by comma(,). | | mail.subject.prefix | String | The subject prefix for the email. | ### Sample properties file ```properties mail.smtp.starttls.enable=true mail.smtp.ssl.protocols=TLSv1.2 mail.host=smtp.gmail.com mail.port=587 mail.user=your_email@gmail.com mail.password=your_password #mail.encrypted.password=your_encrypted_password mail.smtp.auth=true mail.isSSL=false mail.from=your_email@gmail.com mail.to=recepient1@gmail.com,recepient2@gmail.com,recepient3@gmail.com mail.cc=recepient4@gmail.com,recepient5@gmail.com mail.bcc=recepient6@gmail.com,recepient7@gmail.com mail.subject.prefix=my subject ``` ## Email template Emails that get sent out at the end of a suite run, use a template. This email template file `email_template.xsl` is present in the `/config` directory. The layout, format and content of this template can be modified. To add modifications, copy the email template file `email_template.xsl` to `/userdata/config` directory. Now make changes as necessary to this copied file. With regard to content, the following information can be added. - Value of any column in SUITEREPORTS table that is not already present in the template can be added using $COLUMNNAME, for example: $SUITEPATH - The SUITEINFO column contains a bunch of information as key-value pairs. This information can be viewed under the `Suite Info` section in the Suite Report log. A value can be added using $SUITEINFO\_KEY. For example, the BaseUrl can be added using $SUITEINFO\_BASEURL. If custom fields were specified for the suite, they will be available in SUITEINFO so they can be added to the email template as well. For example, if a custom field "RELEASEID" was specified while running the suite, its value can be added in the email template using $SUITEINFO\_RELEASEID :::caution[Important] The variable names are to be specified in UPPER case. ::: To provide a subject in the email template, add the below mentioned code at line number 2 in `/config/email_template.xsl`. ```xml ``` If a subject is provided in `email_template.xsl` then `mail.subject.prefix` property will not be prefixed for the mail. If a subject is not provided in `email_template.xsl` then the default subject will be set in the mail. :::caution[Important] Email template file `email_template.xsl` is available since Sahi Pro v7.5.0. For versions prior to Sahi Pro v7.5.0, use `email_template.txt`. Refer [here]() for details. ::: --- # Autoheal Autoheal allows automatic healing and recovery of failing scripts based on the data from previous runs. Autoheal is the ability of the automation script to heal itself when it encounters a failure. When an element is not found by Sahi, it will try to look for a viable alternate based on the data of its previous runs. If the alternative works fine, Sahi will mark the change in the logs and continue execution. This can reduce failures and reduce effort spent in stopping, analyzing and rerunning scripts. Autoheal is currently available only for web automation. ## Autoheal related settings Autoheal is disabled by default. - To enable Autoheal globally, set `sahi.autoheal.enabled=true` in `userdata/config/userdata.properties` - To enable at suite execution level, - In the [Run Configuration](https://resources.sahipro.com/docs/using-sahi/run-tests-via-editor/#advanced-run-settings), open **Advanced Settings** and turn on **Enable Autoheal**. - From ANT target, add ``Suite level setting overrides global setting. - `sahi.autoheal.disabled_apis`: userdata property is provided to disable autoheal for functions for which autoheal is not desired. Default value is `_assertVisible,_assertNotVisible,_assertExists,_assertNotExists,_assertNotNull,_assertNull,_exists,_isVisible`. - `sahi.autoheal.autoheal_probability_percentage`: userdata property is provided to set autoheal probability. Increase value when scripts are not able to pick an alternative element. Decrease value when Autoheal is causing false positives. Default value is 50. Highly experimental: better not touch it. --- # Integrate with Jenkins Jenkins and other Continuous Integration systems can trigger Sahi scripts as part of the build process using Sahi's ANT and Gradle target. ## Using ANT Target Automation is useless without Continuous Integration. Sahi suites should be periodically executed and CI systems can trigger suites when code changes happen. Sahi suites can be triggered via ANT. We configure Jenkins to call Sahi's ANT target and then make Sahi's logs accessible from Jenkins. Sahi Pro needs real browsers to run test scenarios. But most Jenkins/build machines run in server mode and do not have a GUI. This forces end users to either try with headless browsers or to execute Sahi scripts remotely. With Sahi, this is what you can do: **Jenkins machine (J)**: Run Jenkins on server. No Sahi installed.\ **Sahi Master machine (SM)**: Sahi Pro Runner (or Sahi Pro) runs on this machine and behaves as Master\ **Sahi slave machines (SL1, SL2, SL3)**: These are slave machines with Sahi Pro Runner (or Sahi Pro) running on them.\ **Central Database**: Sync all the logs from Sahi Master to this machine. For more info, look at [Sahi Sync DB](https://resources.sahipro.com/docs/using-sahi/sahi-syncdb/#auto-sync). ![](https://resources.sahipro.com/docs/assets/images/using-sahi/jenkins/jenkins_with_centraldb.webp) During the build process: Jenkins pulls the latest scripts from the Source Control Management (SCM) system. It calls the Sahi ant target. Sahi target copies over the scripts from Jenkins (J) to master (SM). SM then copies scripts to SL1, SL2, SL3, distributes the execution and collects all reports. Sahi ant target then pulls reports from SM to Jenkins. This allows Jenkins to remain a headless server and does not need Sahi installed on it. Also all distribution of scripts and pulling of reports happens through Sahi's ant target itself. :::note We recommend using [Sahi Pro Runner](https://resources.sahipro.com/docs/introduction/sahi-pro-runner/) on master, slave and central reports database machines ::: ### Prerequisites Before integration, you will first need an ant target to run the suite file. [You can create the ANT target from the Editor's Run Configuration](https://resources.sahipro.com/docs/using-sahi/playback-via-ant/). Save the file in any path accessible by Jenkins (say `C:\jenkins_sahi`) and lets call it `build.xml`. :::note At the end of the configuration steps in this page, your folder structure should look like this: ```js C: |--jenkins_sahi | |--build.xml |--email.properties |--lib | |--ant-sahi.jar ``` ::: In the build.xml make sure that: - `scriptDir` points to where your Sahi scripts will reside on your Jenkins machine. This will mostly be the local directory where the scripts are checked out via Git or SVN. If your checkout directory is `E:/automation/scripts/` your build.xml should have ```xml ``` - Offline reports path should be configured correctly. The path in report tag in build.xml should be the same as that used in Publish HTML Reports in Jenkins configuration In this example, we use `` - If email is configured to be sent at the end of a build, the path to `email.properties` in `build.xml` should point to the correct location. You will need to copy `SahiPro/userdata/config/email.properties` into `C:/jenkins_sahi/email.properties` and have this in `build.xml` ```xml ``` Also Install the [HTML Publisher plugin](https://wiki.jenkins-ci.org/display/JENKINS/HTML+Publisher+Plugin) if you wish to see HTML logs via Jenkins UI. Let us assume that Jenkins is available in `C:\.jenkins\` ### Configure Jenkins - :::note Note: If you are using Jenkins 1.625.3 or above, and if you are not able to view [HTML Reports](#view-sahi-pro-html-logs-in-jenkins) correctly, read the Content Security Policy [here](https://wiki.jenkins-ci.org/display/JENKINS/Configuring+Content+Security+Policy) As these versions of Jenkins has introduced Content-Security-Policy to protect Jenkins users from malicious HTML/JS files in workspaces, /userContent, or archived artifacts. ::: - From the Jenkins dashboard, click on `New job` (or `New item`). - Enter job (or item) name as `SahiFunctionalTests` (This will be the name of the job identified by Jenkins.) - Select `Build a free-style software project`. Click OK. - At this point, you should be directed to the Configure page. Click on `Add build step`. Select `invoke Ant` - Type `-f C:/jenkins_sahi/build.xml` in the ANT target textbox. ![](https://resources.sahipro.com/docs/assets/images/using-sahi/jenkins/jenkins_ant_target.webp) - Copy `SahiPro/lib/ant-sahi.jar` from your Sahi Pro Runner installation folder into `C:/jenkins_sahi/lib/ant-sahi.jar` - To publish HTML reports after build, click on `Add Post Build Action` button and select `Publish HTML Reports`. :::note Note: You need to install [HTML Publisher plugin](https://wiki.jenkins-ci.org/display/JENKINS/HTML+Publisher+Plugin) for this step. To learn more, use this [link](https://wiki.jenkins-ci.org/display/JENKINS/Plugins#Plugins-Howtoinstallplugins) ::: Provide Logs directory and other details. ![](https://resources.sahipro.com/docs/assets/images/using-sahi/jenkins/jenkins_html_log.webp) In the field of "HTML directory to archive" you need to provide the same path defined in the report attribute of Sahi task in build.xml. e.g. ``. This is configured via the `Offline Reports` in the Editor's Run Configuration. - On the Jenkins dashboard, click `Build now`. :::note - If you are using distributed suite runs with a different Master, make sure that Sahi Pro Runner is installed and running on the Master and relevant slaves. Sahi Pro Runner installation is not required on Jenkins machine in this case. (RECOMMENDED) - If you are using parallel or single session or distributed run with same master, make sure Sahi Pro Runner is installed and running on the Jenkins machine and on relevant slaves. ::: ## Using Gradle Task Automation is useless without Continuous Integration. Sahi suites should be periodically executed and CI systems can trigger suites when code changes happen. Sahi suites can be triggered via Gradle. We configure Jenkins to call Sahi's Gradle target and then make Sahi's logs accessible from Jenkins. Sahi Pro needs real browsers to run test scenarios. But most Jenkins/build machines run in server mode and do not have a GUI. This forces end users to either try with headless browsers or to execute Sahi scripts remotely. With Sahi, this is what you can do: **Jenkins machine (J)**: Run Jenkins on server. No Sahi installed.\ **Sahi Master machine (SM)**: Sahi Pro Runner (or Sahi Pro) runs on this machine and behaves as Master\ **Sahi slave machines (SL1, SL2, SL3)**: These are slave machines with Sahi Pro Runner (or Sahi Pro) running on them.\ **Central Database**: Sync all the logs from Sahi Master to this machine. For more info, look at [Sahi Sync DB](https://resources.sahipro.com/docs/using-sahi/sahi-syncdb/#auto-sync). ![](https://resources.sahipro.com/docs/assets/images/using-sahi/jenkins/jenkins_with_centraldb.webp) During the build process: Jenkins pulls the latest scripts from the Source Control Management (SCM) system. It calls the Sahi gradle target. Sahi target copies over the scripts from Jenkins (J) to master (SM). SM then copies scripts to SL1, SL2, SL3, distributes the execution and collects all reports. Sahi gradle target then pulls reports from SM to Jenkins. This allows Jenkins to remain a headless server and does not need Sahi installed on it. Also all distribution of scripts and pulling of reports happens through Sahi's gradle target itself. :::note We recommend using [Sahi Pro Runner](https://resources.sahipro.com/docs/introduction/sahi-pro-runner/) on master, slave and central reports database machines ::: ### Prerequisites Before integration, you will first need a Gradle task to run the suite file. [You can create the Gradle target from the Editor's Run Configuration](https://resources.sahipro.com/docs/using-sahi/playback-via-gradle/). Save the file in any path accessible by Jenkins (say `C:\jenkins_sahi`) and lets call it `build.gradle (for Groovy scripts) or build.gradle.kts (for Kotlin Scripts)`. :::note At the end of the configuration steps in this page, your folder structure should look like this: ```js C: |--jenkins_sahi | |--build.gradle or build.gradle.kts |--email.properties |--lib | |--ant-sahi.jar ``` ::: In the build.gradle or build.gradle.kts make sure that: - `scriptDir` points to where your Sahi scripts will reside on your Jenkins machine. This will mostly be the local directory where the scripts are checked out via Git or SVN. If your checkout directory is `E:/automation/scripts/` your build.gradle or build.gradle.kts should have ```js def scriptDir = "E:/automation/scripts/" ``` - Offline reports path should be configured correctly. The path in report tag in build.gradle or build.gradle.kts should be the same as that used in Publish HTML Reports in Jenkins configuration In this example, we use `reports: "html:C:/sahi_Jenkins/Logs"` - If email is configured to be sent at the end of a build, the path to `email.properties` in `build.gradle or build.gradle.kts` should point to the correct location. You will need to copy `SahiPro/userdata/config/email.properties` into `C:/jenkins_sahi/email.properties` and have this in `build.gradle or build.gradle.kts` ```js emailproperties: "C:/sahi_Jenkins/userdata/config/email.properties" ``` Also Install the [HTML Publisher plugin](https://wiki.jenkins-ci.org/display/JENKINS/HTML+Publisher+Plugin) if you wish to see HTML logs via Jenkins UI. Let us assume that Jenkins is available in `C:\.jenkins\` ### Configure Jenkins with Gradle - :::note Note: If you are using Jenkins 1.625.3 or above, and if you are not able to view [HTML Reports](#view-sahi-pro-html-logs-in-jenkins) correctly, read the Content Security Policy [here](https://wiki.jenkins-ci.org/display/JENKINS/Configuring+Content+Security+Policy) As these versions of Jenkins has introduced Content-Security-Policy to protect Jenkins users from malicious HTML/JS files in workspaces, /userContent, or archived artifacts. ::: :::note Note: In earlier versions of Gradle (up to Gradle 8), we could use a build script with any file name, such as custom.gradle.\ From Gradle 9 onwards, the build script is expected to use the standard file names like **build.gradle or build.gradle.kts.** ::: - From the Jenkins dashboard, click on `New job` (or `New item`). - Enter job (or item) name as `SahiFunctionalTests` (This will be the name of the job identified by Jenkins.) - Select `Build a free-style software project`. Click OK. - At this point, you should be directed to the Configure page. Click on `Add build step`. Select `invoke Gradle script` - Specify the task name in the Gradle script Tasks textbox,to execute the specific task. ![](https://resources.sahipro.com/docs/assets/images/using-sahi/jenkins/withouttask_gradle.webp) :::note Note: The task name was not specified in the above image;therefore, Sahi looks for the default task defined in build.gradle or build.gradle.kts\ You can also specify the specific task name as shown in the image below. ![](https://resources.sahipro.com/docs/assets/images/using-sahi/jenkins/invoke_gradle.webp) ::: - Click on Advanced and enter your build.gradle or build.gradle.kts script directory. `e.g. C:/sahi_Jenkins/` ![](https://resources.sahipro.com/docs/assets/images/using-sahi/jenkins/rootfolder_gradle.webp) - Copy `SahiPro/lib/ant-sahi.jar` from your Sahi Pro Runner installation folder into `C:/jenkins_sahi/lib/ant-sahi.jar` - To publish HTML reports after build, click on `Add Post Build Action` button and select `Publish HTML Reports`. :::note Note: You need to install [HTML Publisher plugin](https://wiki.jenkins-ci.org/display/JENKINS/HTML+Publisher+Plugin) for this step. To learn more, use this [link](https://wiki.jenkins-ci.org/display/JENKINS/Plugins#Plugins-Howtoinstallplugins) ::: Provide Logs directory and other details. ![](https://resources.sahipro.com/docs/assets/images/using-sahi/jenkins/report_gradle.webp) In the field of "HTML directory to archive" you need to provide the same path defined in the report attribute of Sahi task in build.xml. e.g. `reports: "html:C:/sahi_Jenkins/Logs"`. This is configured via the `Offline Reports` in the Editor's Run Configuration. - On the Jenkins dashboard, click `Build now`. :::note - If you are using distributed suite runs with a different Master, make sure that Sahi Pro Runner is installed and running on the Master and relevant slaves. Sahi Pro Runner installation is not required on Jenkins machine in this case. (RECOMMENDED) - If you are using parallel or single session or distributed run with same master, make sure Sahi Pro Runner is installed and running on the Jenkins machine and on relevant slaves. ::: ## View Sahi Pro HTML Logs in Jenkins :::note Note: You need to have [HTML Publisher plugin](https://wiki.jenkins-ci.org/display/JENKINS/HTML+Publisher+Plugin) installed. Make sure you have configured HTML Reports as described in the section above. Also, If you are using Jenkins 1.625.3 or above, and if you are not able to view HTML Reports correctly, follow the below steps. :::caution[Important] Read the Content Security Policy [here](https://wiki.jenkins-ci.org/display/JENKINS/Configuring+Content+Security+Policy) As these versions of Jenkins has introduced Content-Security-Policy to protect Jenkins users from malicious HTML/JS files in workspaces, /userContent, or archived artifacts. ::: - If starting Jenkins using jenkins.war file then use the below command. ```sh java -Dhudson.model.DirectoryBrowserSupport.CSP= -jar jenkins.war ``` - If starting Jenkins as a service on a Windows machine: - Go to `/.jenkins/jenkins.xml` file, and add `"-Dhudson.model.DirectoryBrowserSupport.CSP=\"\""` under the `` Tag. After adding the property in the `` tag, the tag will look as below. ```xml -Xrs -Xmx256m -Dhudson.lifecycle=hudson.lifecycle.WindowsServiceLifecycle "-Dhudson.model.DirectoryBrowserSupport.CSP=\"\"" -jar "%BASE%\jenkins.war" --httpPort=8080 --webroot="%BASE%\war" ``` - Save the file, Restart Jenkins. - If starting Jenkins as a service on a Linux machine: - Create a new directory with name `init.groovy.d` in Jenkins home directory `/var/jenkins_home`. - Within `init.groovy.d` directory create a new groovy script. Say `startup-properties.groovy` - Copy the below content to the `startup-properties.groovy` file. ```java import jenkins.model.Jenkins import java.util.logging.LogManager /* Jenkins home directory */ def jenkinsHome = Jenkins.instance.getRootDir().absolutePath def logger = LogManager.getLogManager().getLogger("") /* Replace the Key and value with the values you want to set.*/ /* System.setProperty(key, value) */ System.setProperty("hudson.model.DirectoryBrowserSupport.CSP", "") logger.info("Jenkins Startup Script: Successfully updated the system properties value for hudson.model.DirectoryBrowserSupport.CSP . Script location : ${jenkinsHome}/init.groovy.d ") ``` - Save the file, Restart the Jenkins server. ::: Once HTML Reports are configured, one can view Sahi's report logs by clicking on the "HTML Reports" link on the left side navigation links on the Jenkins project page. ![](https://resources.sahipro.com/docs/assets/images/using-sahi/jenkins/jenkins_html_menu.webp) The Sahi Pro HTML report looks like this: The Sahi Pro HTML suite report for book_store_regression.dd.csv: the suite and its three scenario files on the left, Suite Details with status Failure, time taken, browser chrome, start and end times and nodes, and the Test Scenario Summary (2 passed, 1 error) and Test Cases Summary (3 passed, 1 error) charts --- # Integrate with Azure DevOps Azure DevOps and other Continuous Integration systems can trigger Sahi scripts as part of the build process using Sahi's ANT target. Automation is useless without Continuous Integration. Sahi suites should be periodically executed and CI systems can trigger suites when code changes happen. Sahi suites can be triggered via ANT. We configure Azure DevOps to call Sahi's ANT target and then make Sahi's logs accessible from Azure DevOps. ## Prerequisites - Sahi Pro should be installed on say `C:\sahi_pro` and running. - Before integration, you will first need an ant target to run the suite file. [You can create the ANT target from the Editor's Run Configuration](https://resources.sahipro.com/docs/using-sahi/playback-via-ant/). Save the file in any path accessible by Azure DevOps (say `C:\sahi_pro`) and lets call it `build.xml`. :::note Your folder structure should look like this: ```js C: |--sahi_pro | |--build.xml ``` ::: - Create a file `azure-pipelines.yml` and copy the below content into it. ```js # Ant # Build your Java projects and run tests with Apache Ant. # Add steps that save build artifacts and more: # https://docs.microsoft.com/azure/devops/pipelines/languages/java trigger: - main pool: name: Default steps: - task: Ant@1 inputs: buildFile: 'C:/sahi_pro/build.xml' continueOnError: true - task: PublishBuildArtifacts@1 inputs: PathtoPublish: 'C:/sahi_pro/sahi_reports' ArtifactName: 'Sahi HTML Reports' publishLocation: 'Container' ``` ## Configure Azure DevOps with GitHub ### Configure GitHub - After successfully setting up GitHub account, login to your account. You will see the screen as below. ![](https://resources.sahipro.com/docs/assets/images/using-sahi/azure_devops/github-home.webp) - Click on the **New repository** option. ![](https://resources.sahipro.com/docs/assets/images/using-sahi/azure_devops/create-new-repo.webp) - After clicking new repository option, you will have to initialize some things like, naming our project, choosing the visibility etc. After performing these steps click **Create Repository** button. ![](https://resources.sahipro.com/docs/assets/images/using-sahi/azure_devops/new-repo-details.webp) - After clicking the button, you will be directed to below page. ![](https://resources.sahipro.com/docs/assets/images/using-sahi/azure_devops/repo-home.webp) - Now click on the **uploading an existing file** link and upload **azure-pipeline.yml** file which you have created in `Prerequisites` ### Configure Self-hosted Agent pool Azure DevOps #### Personal access token (PAT) generation - Sign in with the user account in your Azure DevOps organization ```js https://dev.azure.com/{your_organization} ``` - From your home page, open your user settings, and then select **Personal access tokens**. ![](https://resources.sahipro.com/docs/assets/images/using-sahi/azure_devops/select-personal-access-tokens.jpg) - Create a personal access token. ![](https://resources.sahipro.com/docs/assets/images/using-sahi/azure_devops/select-new-token.webp) - For the scope select **Agent Pools (read, manage)** and make sure all the other boxes are cleared. If it's a deployment group agent, for the scope select **Deployment group (read, manage)** and make sure all the other boxes are cleared. - Select **Show all scopes** at the bottom of the **Create a new personal access token window** window to see the complete list of scopes. - **Copy the token**. You'll use this token when you configure the agent. - Choose **Azure DevOps**, **Organization settings**. ![](https://resources.sahipro.com/docs/assets/images/using-sahi/azure_devops/organization-settings.webp) - Choose **Agent pools**. ![](https://resources.sahipro.com/docs/assets/images/using-sahi/azure_devops/agent-pools.webp) - Select the **Default** pool, select the **Agents** tab, and choose **New agent**. - On the **Get the agent** dialog box, choose **Windows**. ![](https://resources.sahipro.com/docs/assets/images/using-sahi/azure_devops/get-agent-pool-instruction.webp) - Select the processor architecture of the installed Windows OS version on your machine. The x64 agent version is intended for 64-bit Windows, whereas the x86 version is intended for 32-bit Windows. If you aren't sure which version of Windows is installed. - Click the **Download** button and follow the instructions given on the page to configure the agent. :::note We strongly recommend you configure the agent from an elevated PowerShell window. If you want to configure as a service, this is **required**. You must not use **Windows PowerShell ISE** to configure the agent. ::: :::note For security reasons we strongly recommend making sure the agents folder `(C:\agents)` is only editable by admins. ::: ### Configure Azure DevOps 1. Create Project with Basic Process in Azure DevOps - Click on the **New Project** button on the top right corner. ![](https://resources.sahipro.com/docs/assets/images/using-sahi/azure_devops/create-new-project.webp) - Enter information into the Panel that opens: - Enter the name of your project. - Enter the description this field is optional. - Choose the visibility of either public or private. - Choose the right version control for detail refer Git and TFVC version control. - Choose the Work Item Process. ![](https://resources.sahipro.com/docs/assets/images/using-sahi/azure_devops/create-project.webp) - Click **Create project** button. Navigated to Welcome page. ![](https://resources.sahipro.com/docs/assets/images/using-sahi/azure_devops/project-dashboard.webp) 2. Create your first pipeline - Go to Pipelines, and then select **Create pipeline**. ![](https://resources.sahipro.com/docs/assets/images/using-sahi/azure_devops/create-new-pipeline.webp) - Do the steps of the wizard by first selecting **GitHub** as the location of your source code. You might be redirected to GitHub to sign in. If so, enter your GitHub credentials. ![](https://resources.sahipro.com/docs/assets/images/using-sahi/azure_devops/select-source-code-repo.webp) - When you see the list of repositories, select your repository. You might be redirected to GitHub to install the Azure Pipelines app. If so, select Approve & install. ![](https://resources.sahipro.com/docs/assets/images/using-sahi/azure_devops/select-repo.webp) ![](https://resources.sahipro.com/docs/assets/images/using-sahi/azure_devops/approve-azure-pipelines.webp) - Review your pipeline YAML ![](https://resources.sahipro.com/docs/assets/images/using-sahi/azure_devops/pipeline-yml-code.webp) :::note Please update `pool name` if you changed while configuration of agent pool ::: - Take a look at the YAML to see what it does. When you're ready, select **Save**. ![](https://resources.sahipro.com/docs/assets/images/using-sahi/azure_devops/save-pipeline.webp) - Now, Navigated to commit to the repository page. Enter the commit message and Click on **Save**. ![](https://resources.sahipro.com/docs/assets/images/using-sahi/azure_devops/pipeline-first-commit.webp) 3. Running pipeline - Click on **Run pipeline** and then click on **Run**. ![](https://resources.sahipro.com/docs/assets/images/using-sahi/azure_devops/run-pipeline.webp) - To provide permissions to pipeline, click on **View** and then **Permit**. ![](https://resources.sahipro.com/docs/assets/images/using-sahi/azure_devops/pipeline-permission.webp) - After providing the permission to pipeline, pipeline job will start. ![](https://resources.sahipro.com/docs/assets/images/using-sahi/azure_devops/pipeline-console.webp) 4. View Sahi Pro HTML Logs in Azure Devops - Click on **Job Number** and then click on **1 published**. ![](https://resources.sahipro.com/docs/assets/images/using-sahi/azure_devops/offline-html-report.webp) ![](https://resources.sahipro.com/docs/assets/images/using-sahi/azure_devops/sahi-report-azure.webp) --- # Integrate with TeamCity TeamCity and other Continuous Integration systems can trigger Sahi scripts as part of the build process using Sahi's ANT target. ## Sahi with TeamCity Automation is useless without Continuous Integration. Sahi suites should be periodically executed and CI systems can trigger suites when code changes happen. Sahi suites can be triggered via ANT. We configure TeamCity to call Sahi's ANT target and then make Sahi's logs accessible from TeamCity. ## Prerequisites Before integration, you will first need an ant target to run the suite file. [You can create the ANT target from the Editor's Run Configuration](https://resources.sahipro.com/docs/using-sahi/playback-via-ant/). Save the file in any path accessible by TeamCity (say `C:\teamcity_sahi`) and lets call it `build.xml`. :::note At the end of the configuration steps in this page, your folder structure should look like this: ```js C: |--teamcity_sahi | |--build.xml |--email.properties |--lib | |--ant-sahi.jar ``` ::: In the build.xml make sure that: - `scriptDir` points to where your Sahi scripts will reside on your TeamCity machine. This will mostly be the local directory where the scripts are checked out via Git or SVN. If your checkout directory is `E:/automation/scripts/` your build.xml should have ```xml ``` - Offline reports path should be configured correctly. The path in report tag in build.xml should be the same as that used in Publish HTML Reports in Jenkins configuration In this example, we use `` - If email is configured to be sent at the end of a build, the path to `email.properties` in `build.xml` should point to the correct location. You will need to copy `SahiPro/userdata/config/email.properties` into `C:/teamcity_sahi/email.properties` and have this in `build.xml` ```xml ``` ## Configure TeamCity - Create a new project with name as `sahi_automation` (This will be the name of the project identified by TeamCity.) - Now edit project settings ![](https://resources.sahipro.com/docs/assets/images/using-sahi/teamcity/teamcity-create-build.webp) - Click on `Create build configuration`. Specify build configuration name as `run_sahi_scripts` and click on `Create` ![](https://resources.sahipro.com/docs/assets/images/using-sahi/teamcity/teamcity-build-config.webp) - Now go to build configuration settings and add build steps ![](https://resources.sahipro.com/docs/assets/images/using-sahi/teamcity/teamcity-build-steps.webp) - Choose `Runner type` as `Ant` and specify the path to the build.xml file ![](https://resources.sahipro.com/docs/assets/images/using-sahi/teamcity/teamcity-build-ant.webp) - To publish HTML reports after build, go to build configuration settings. Edit general settings and specify `Artifact paths` ![](https://resources.sahipro.com/docs/assets/images/using-sahi/teamcity/teamcity-artifacts-path.webp) ## View Sahi Pro HTML Logs in TeamCity Once Artifacts are configured, one can find Sahi's report logs by hovering over on the "Artifacts" icon on the right side for that specific build number on the TeamCity project page. ![](https://resources.sahipro.com/docs/assets/images/using-sahi/teamcity/teamcity-html-report.webp) --- # Sahi headless execution with PhantomJS :::caution[Important] NOTE: We do not recommend headless execution. Troubleshooting scripts in a headless environment can be tricky. In many cases failures happen in PhantomJS which do not happen in real browsers. Troubleshooting and fixing them may not be worthwhile, since your customers are using real browsers. Google Chrome is as fast or faster than PhantomJS in most cases. ::: :::caution[Important] If you are looking at headless execution for integration with your CI server, read our [recommended Jenkins/CI setup](https://resources.sahipro.com/docs/using-sahi/integrate-with-jenkins/) without headless test runs. ::: [PhantomJS](http://www.phantomjs.org/) is a headless browser based on WebKit. (A headless browser runs without a user interface) ## Documentation since Sahi Pro V4.3.2 ### For Windows: 1. Download phantomjs-1.9.x-windows.zip from [http://code.google.com/p/phantomjs/downloads/list](http://code.google.com/p/phantomjs/downloads/list) (Or choose the correct one from [http://phantomjs.org/download.html](http://phantomjs.org/download.html)) and make sure the version is 1.9.0 or above. 2. Unzip it and copy phantomjs.exe to sahi/ext/phantomjs folder such that you have sahi/ext/phantomjs/phantomjs.exe 3. On the Dashboard, click **Add Browser**. In `browser_types.xml`, which opens, add this entry if it isn't there: ```xml phantomjs PhantomJS phantomjs.png $sahiDir\ext\phantomjs\sahi_phantomjs.bat --proxy=127.0.0.1:$port $sahiDir\ext\phantomjs\phantomsahi.js phantomjs.exe 100 false ``` 4. Save and restart Sahi. 5. To run a test in PhantomJS: Click on "Bin" on the dashboard (or navigate to sahi/userdata/bin on a command prompt) and run the command ```sh testrunner.bat sahitests/sahi_demo.sah http://sahi.co.in/demo/ phantomjs ``` ### For Linux: 1. To install phantomjs, open terminal and enter the following command ```js sudo apt-get install phantomjs ``` To check if completed, just type (without quotes): "phantomjs --version" and it must appear 1.9 or above. If the version is below 1.9 then follow the below steps or directly perform the below steps to get the version 1.9 or above. ```sh cd /usr/local/share sudo wget https://phantomjs.googlecode.com/files/phantomjs-1.9.0-linux-x86_64.tar.bz2 tar xjf phantomjs-1.9.0-linux-x86_64.tar.bz2 sudo ln -s /usr/local/share/phantomjs-1.9.0-linux-x86_64/bin/phantomjs /usr/local/share/phantomjs sudo ln -s /usr/local/share/phantomjs-1.9.0-linux-x86_64/bin/phantomjs /usr/local/bin/phantomjs sudo ln -s /usr/local/share/phantomjs-1.9.0-linux-x86_64/bin/phantomjs /usr/bin/phantomjs ``` 2. On the Dashboard, click **Add Browser**. In `browser_types.xml`, which opens, add this entry if it isn't there: ```xml phantomjs PhantomJS phantomjs.png $sahiDir/ext/phantomjs/sahi_phantomjs.sh --proxy=127.0.0.1:$port $sahiDir/ext/phantomjs/phantomsahi.js phantomjs 100 false ``` 3. Save and restart Sahi. 4. To run a test in PhantomJS: Open terminal, navigate to sahi/userdata/bin and run the command ```sh sh testrunner.sh sahitests/sahi_demo.sah http://sahi.co.in/demo/ phantomjs ``` This will run the Sahi script without opening a browser. ### For Mac: 1. To install phantomjs, open terminal and enter the following command ```js brew install phantomjs ``` To check if completed, just type (without quotes): "phantomjs -v" and it must appear 1.9 or above. To install Homebrew on Mac OS. ```js ruby -e "$(curl -fsSL https://raw.githubusercontent.com/Homebrew/install/master/install)" ``` 2. On the Dashboard, click **Add Browser**. In `browser_types.xml`, which opens, add this entry if it isn't there: ```xml phantomjs PhantomJS phantomjs.png $sahiDir/ext/phantomjs/sahi_phantomjs.sh --proxy=127.0.0.1:$port $sahiDir/ext/phantomjs/phantomsahi.js phantomjs 100 false ``` 3. Save and restart Sahi. 4. To run a test in PhantomJS: Open terminal, navigate to sahi/userdata/bin and run the command ```sh sh testrunner.sh sahitests/sahi_demo.sah http://sahi.co.in/demo/ phantomjs ``` This will run the Sahi script without opening a browser. ## Older Documentation (before Sahi Pro V4.3.2) 1. Download phantomjs-1.x.x-win32-dynamic.zip from this [link](https://storage.googleapis.com/google-code-archive-downloads/v2/code.google.com/phantomjs/phantomjs-1.4.1-win32-dynamic.zip). 2. Unzip it to, say C:\\phantomjs-1.x.x-win32 such that phantomjs.exe is available at C:\\phantomjs-1.x.x-win32\\phantomjs.exe 3. Create a file sahi.js in C:\\phantomjs-1.x.x-win32 with the content below: For version 1.2.0 onwards, use: ```js if (phantom.args.length === 0) { console.log('Usage: sahi.js '); phantom.exit(); } else { // var address = unescape(phantom.args[0]); // use if < v1.7 var address = phantom.args[0]; console.log('Loading ' + address); var page = new WebPage(); page.open(address, function(status) { if (status === 'success') { var title = page.evaluate(function() { return document.title; }); console.log('Page title is ' + title); } else { console.log('FAIL to load the address'); } }); } ``` For version 1.1.0, use: ```js if (phantom.state.length === 0) { if (phantom.args.length === 0) { console.log('Usage: sahi.js '); phantom.exit(); } else { var address = unescape(phantom.args[0]); phantom.state = "sahi script running"; console.log('Loading ' + address); phantom.open(address); } } else { if (phantom.loadStatus == 'success') { console.log('Page title is ' + document.title); } else { console.log('FAIL to load the address'); } } ``` The above code is based on the example provided by PhantomJS 4. On the Dashboard, click **Add Browser**. In `browser_types.xml`, which opens, add: ```xml phantomjs PhantomJS phantomjs.png C:\phantomjs-1.1.0-win32\phantomjs.exe --proxy=localhost:9999 C:\phantomjs-1.1.0-win32\sahi.js phantomjs.exe 100 true ``` before the ending tag in browser\_types.xml 5. Save and restart Sahi. 6. To run a test in PhantomJS: Click on "Bin" on the dashboard (or navigate to sahi/userdata/bin on a command prompt) and run the command ```sh testrunner.bat sahitests/sahi_demo.sah http://sahi.co.in/demo/ phantomjs ``` This will run the Sahi script without opening a browser. --- # Sahi headless execution with Google Chrome :::caution[Important] NOTE: We do not recommend headless execution. Troubleshooting scripts in a headless environment can be tricky. In many cases, failures happen in headless which do not happen in real browsers. Troubleshooting and fixing them may not be worthwhile since your customers are using real browsers. ::: :::caution[Important] If you are looking at headless execution for integration with your CI server, read our [recommended Jenkins/CI setup](https://resources.sahipro.com/docs/using-sahi/integrate-with-jenkins/) without headless test runs. ::: :::note Caution: Headless mode is available on Mac and Linux in Chrome 59+. Windows support is coming in Chrome 60+. To check what version of Chrome you have, open chrome://version. (A headless browser runs without a user interface) ::: ## Turn On CDP Headless Chrome needs the Chrome DevTools Protocol (CDP) to take page screenshots. Turn it on before you set up headless Chrome: 1. Add this line to `/userdata/config/userdata.properties` and save the file: ```properties sahi.browser.cdp.enable = true ``` 2. In `/userdata/config/browser_types.xml`, add `--remote-debugging-port=0 --remote-allow-origins=*` to the end of the `` of normal Chrome, then save the file. For example, on Windows: ```xml chrome Chrome chrome.png $ProgramFiles\Google\Chrome\Application\chrome.exe --no-default-browser-check --user-data-dir=$userDir\browser\chrome\profiles\sahi$threadNo --proxy-server=127.0.0.1:$port --disable-popup-blocking --always-authorize-plugins --allow-outdated-plugins --enable-npapi --incognito --disable-background-networking --disable-component-update --disable-renderer-backgrounding --disable-backgrounding-occluded-windows --disable-features=OptimizationGuideModelDownloading,OptimizationHintsFetching,OptimizationTargetPrediction,OptimizationHints --remote-debugging-port=0 --remote-allow-origins=* chrome.exe 5 ``` The `chromeHL` (headless) entries below already end with these options. ## For Windows: 1. Download the latest version of Google Chrome from [https://www.google.com/chrome/](https://www.google.com/chrome/) 2. On the Dashboard, click **Add Browser**. In `browser_types.xml`, which opens, add: ```xml chromeHL ChromeHL chrome.png $ProgramFiles\Google\Chrome\Application\chrome.exe --no-default-browser-check --user-data-dir=$userDir/browser/chrome/profiles/sahi$threadNo --proxy-server=127.0.0.1:$port --disable-popup-blocking --headless --disable-gpu --no-sandbox --remote-debugging-port=0 --remote-allow-origins=* chrome.exe 5 ``` 3. Save and restart Sahi. 4. To run a test in Chrome headless: Click on "Bin" on the dashboard (or navigate to Sahi/userdata/bin on a command prompt) and run the command ```sh testrunner.bat sahitests/sahi_demo.sah http://sahi.co.in/demo/ chromeHL ``` ## For Linux: 1. To install chrome, open terminal and enter the following command ```js sudo apt-get install libxss1 libappindicator1 libindicator7 wget https://dl.google.com/linux/direct/google-chrome-stable_current_amd64.deb sudo dpkg -i google-chrome*.deb ``` 2. If error messages pop up after running the command **"sudo dpkg -i google-chrome\*.deb"** then run the command ```js sudo apt-get install -f ``` 3. and then re-run the previous command. The error messages mentioned should include something similar to **"google-chrome-stable depends on \[lib-example\]; however; Package \[lib-example\] is not installed."** 4. To check if completed, just type (without quotes): "google-chrome --version" and it must appear Google Chrome 59 or above. 5. On the Dashboard, click **Add Browser**. In `browser_types.xml`, which opens, add this entry if it isn't there: ```xml chromeHL ChromeHL chrome.png /usr/bin/google-chrome --no-default-browser-check --user-data-dir=$userDir/browser/chrome/profiles/sahi$threadNo --proxy-server=127.0.0.1:$port --disable-popup-blocking --headless --disable-gpu --no-sandbox --remote-debugging-port=0 --remote-allow-origins=* chrome 5 ``` 6. Save and restart Sahi. 7. To run a test in Chrome headless: Open terminal, navigate to Sahi/userdata/bin and run the command ```sh sh testrunner.sh sahitests/sahi_demo.sah http://sahi.co.in/demo/ chromeHL ``` ## For Mac: 1. To check Google Chrome version, Open terminal and type (without quotes): "google-chrome --version" and it must appear Google Chrome 59 or above. 2. On the Dashboard, click **Add Browser**. In `browser_types.xml`, which opens, add this entry if it isn't there: ```xml chromeHL ChromeHL chrome.png open -n -a "Google Chrome.app" --args --no-default-browser-check --no-first-run --user-data-dir=$userDir/browser/chrome/profiles/sahi$threadNo --proxy-server=127.0.0.1:$port --disable-popup-blocking --headless --disable-gpu --no-sandbox --remote-debugging-port=0 --remote-allow-origins=* "Google Chrome" 5 true ``` 3. Save and restart Sahi. 4. To run a test in Chrome headless: Open terminal, navigate to Sahi/userdata/bin and run the command ```sh sh testrunner.sh sahitests/sahi_demo.sah http://sahi.co.in/demo/ chromeHL ``` This will run the Sahi script without opening a browser. ## Take Screenshots in Headless Chrome In headless Chrome, take screenshots on errors and failures with `_cdpTakePageScreenShot()`. This needs CDP turned on (see [Turn On CDP](#turn-on-cdp)). Add this code at the start of every script you run in `chromeHL`: ```js onScriptError = function($e){ _cdpTakePageScreenShot(); } onScriptFailure = onScriptError; ``` Or, to do it for every script, change these two functions in `/userdata/scripts/global_include.sah`. From: ```js function onScriptError($e) { if(_sahi.isTFCModeEnabled()) _tfcLog($__tfcix+ "__tfc__:onScriptError", "NO_LOG"); return onScriptErrorDefault($e); } function onScriptFailure($e) { if(_sahi.isTFCModeEnabled()) _tfcLog($__tfcix+ "__tfc__:onScriptFailure", "NO_LOG"); onScriptFailureDefault($e); } ``` To: ```js function onScriptError($e) { _cdpTakePageScreenShot(); } function onScriptFailure($e) { _cdpTakePageScreenShot(); } ``` Then run the scripts in `chromeHL`. --- # Sahi headless execution with Mozilla Firefox :::caution[Important] NOTE: We do not recommend headless execution. Troubleshooting scripts in a headless environment can be tricky. In many cases, failures happen in headless which do not happen in real browsers. Troubleshooting and fixing them may not be worthwhile since your customers are using real browsers. ::: :::caution[Important] If you are looking at headless execution for integration with your CI server, read our [recommended Jenkins/CI setup](https://resources.sahipro.com/docs/using-sahi/integrate-with-jenkins/) without headless test runs. ::: :::note Caution: Headless mode is available on Mac and Linux in Firefox 55+. Windows support is coming in Chrome 56+. (A headless browser runs without a user interface) To check what version of Firefox Type **about:support** in the **URL** and hit enter. You should see a page titled Troubleshooting Information, which displays the version number underneath Application Basics. ::: ## For Windows: 1. Download latest version of Mozilla Firefox from [https://www.mozilla.org/en-US/firefox/new/](https://www.mozilla.org/en-US/firefox/new/) 2. On the Dashboard, click **Add Browser**. In `browser_types.xml`, which opens, add: ```xml firefoxHL firefoxHL firefox.png $ProgramFiles\Mozilla Firefox\firefox.exe -profile "$userDir/browser/ff/profiles/sahi$threadNo" -no-remote -headless firefox.exe 5 ``` 3. Save and restart Sahi. 4. To run a test in Firefox headless: Click on "Bin" on the dashboard (or navigate to sahi/userdata/bin on a command prompt) and run the command ```sh testrunner.bat sahitests/sahi_demo.sah http://sahi.co.in/demo/ firefoxHL ``` ## For Linux: 1. To check Firefox version, Open terminal and type (without quotes): "firefox --version" or "firefox -v" and it must appear Mozilla Firefox 55, or above. 2. On the Dashboard, click **Add Browser**. In `browser_types.xml`, which opens, add this entry if it isn't there: ```xml firefoxHL firefoxHL firefox.png /usr/bin/firefox -profile "$userDir/browser/ff/profiles/sahi$threadNo" -no-remote -headless firefox 5 ``` 3. Save and restart Sahi. 4. To run a test in Firefox headless: Open terminal, navigate to sahi/userdata/bin and run the command ```sh sh testrunner.sh sahitests/sahi_demo.sah http://sahi.co.in/demo/ firefoxHL ``` ## For Mac: 1. To check Firefox version, Open terminal and type (without quotes): "firefox --version" or "firefox -v" and it must appear Mozilla Firefox 55, or above. 2. On the Dashboard, click **Add Browser**. In `browser_types.xml`, which opens, add this entry if it isn't there: ```xml firefoxHL FirefoxHL firefox.png open -n -a Firefox.app --args -profile "$userDir/browser/ff/profiles/sahi$threadNo" -no-remote -headless Firefox 5 true ``` 3. Save and restart Sahi. 4. To run a test in Firefox headless: Open terminal, navigate to sahi/userdata/bin and run the command ```sh sh testrunner.sh sahitests/sahi_demo.sah http://sahi.co.in/demo/ firefoxHL ``` This will run the Sahi script without opening a browser. --- # Configuring Sahi with Xvfb :::caution[Important] NOTE: We do not recommend headless execution. Troubleshooting scripts in a headless environment can be tricky. ::: :::caution[Important] If you are looking at headless execution for integration with your CI server, read our [recommended Jenkins/CI setup](https://resources.sahipro.com/docs/using-sahi/integrate-with-jenkins/) without headless test runs. ::: ## What is xvfb? From wikipedia ([http://en.wikipedia.org/wiki/Xvfb](http://en.wikipedia.org/wiki/Xvfb)): Xvfb or X virtual framebuffer is an X11 server that performs all graphical operations in memory, not showing any screen output. From the point of view of the client, it acts exactly like any other server, serving requests and sending events and errors as appropriate. However, no output is shown. This virtual server does not require the computer it is running on to even have a screen or any input device. Only a network layer is necessary. ## Installing Xvfb ### Ubuntu run `apt-get install Xvfb` ### For Fedora run `yum install Xvfb` ### For other linux Download xvfb.tgz from [http://ftp.xfree86.org/pub/XFree86/4.6.0/binaries/FreeBSD-4.x/](http://ftp.xfree86.org/pub/XFree86/4.6.0/binaries/FreeBSD-4.x/) Let us consider that the downloaded file is at ~/Downloads. 1) cd / 2) tar xvf ~/Downloads/xvfb.tgz 3) cd /usr 4) sudo mkdir X11R6 5) sudo cp ~/Downloads/xvfb/**.** /usr/X11R6/ 6) chmod +x bin/Xvfb 7) cd bin 8) create a new file Xvfb and add the below script, ```js #!/bin/sh mode=$1 case "$mode" in 'start') if [ -f /usr/X11R6/bin/Xvfb ]; then echo "Starting up the Virtual Frame Buffer on Screen 1" /usr/X11R6/bin/Xvfb :1 -screen 0 1152x900x8 & fi ;; *) echo " Usage: " echo " $0 start (start XVFB)" echo " $0 stop (stop XVFB - not supported)" exit 1 ;; esac exit 0 ``` 9) chmod +x Xvfb ## Setting up Xvfb on display 1 - login as `root` user. - run following commands. ```sh export DISPLAY=:1 firefox //for firefox export DISPLAY=:1 chrome //for chrome startx -- `which Xvfb` :1 -screen 0 1024x768x24& ``` :::note - if you get following error: ![](https://resources.sahipro.com/docs/assets/images/using-sahi/xvfb_start_error.webp) - then run ```js startx -- `[Xvfb Path]` :1 -screen 0 1024x768x24& ``` - for `[Xvfb Path]` run ```js which Xvfb ``` ![](https://resources.sahipro.com/docs/assets/images/using-sahi/xvfb_which.webp) - Example: ```js startx -- `/bin/Xvfb` :1 -screen 0 1024x768x24& ``` ::: ## Running test in Xvfb headless browser through Sahi 1) Configure sahi/userdata/config/browser\_types.xml to have browser entries as below,- Chrome: ```xml chrome-xvfb Chrome chrome.png env DISPLAY=:1 google-chrome --no-sandbox --no-default-browser-check --no-first-run --start-maximized --user-data-dir=$userDir/browser/chrome/profiles/sahi$threadNo --proxy-server=127.0.0.1:$port --disable-popup-blocking --always-authorize-plugins --allow-outdated-plugins --enable-npapi --incognito chrome true 5 ``` - Firefox: ```xml firefox-xvfb Firefox firefox.png env DISPLAY=:1 firefox -height 768 -width 1024 -profile "$userDir/browser/ff/profiles/sahi$threadNo" -no-remote firefox true 5 ``` or, on the Dashboard, click **Add Browser** and add the entries above before the closing tag in `browser_types.xml`. 2) Save and restart Sahi. 3) To run a test in Xvfb: navigate to sahi/userdata/bin on terminal and run the command ```sh ./testrunner.sh demo/sahi_demo.sah http://sahi.co.in/demo/ firefox-xvfb ``` --- # Running Sahi Scripts from Java ## Problem In an enterprise application, some times the web application may be only a small part of an other wise larger use case. One may be invoking a lot of test Java code for setting up a database, verifying infrastructure, making SOAP calls, copying over files, invoking shell commands and then, eventually verifying the application state via a web interface. In such cases it may make sense to write normal Java code for anything other than web, and then invoke a Sahi script when needed. This brings in a necessity to invoke a Sahi script from Java. The main class for invoking Sahi from Java is `in.co.sahi.distributed.DSahiRunner`. ## Java code invoking DSahiRunner ```java package in.co.sahi.sample; public class SahiScriptLauncher { public static void main(String[] args) { final String host = "localhost"; final String port = "9999"; final String suiteName = "sahitests/integration.sah"; final String browserType = "firefox"; String baseURL = "https://sahitest.com/demo/training/"; String threads = "1"; SuiteInfo suiteInfo = new SuiteInfo(); suiteInfo.setHost(host); suiteInfo.setPort(port); suiteInfo.setStartWith("BROWSER"); // you can pass other modes like, WINDOWS, JAVA, ANDROID, IOS, SAP suiteInfo.setThreads(threads); suiteInfo.setBaseURL(baseURL); suiteInfo.setBrowserType(browserType); suiteInfo.setScriptsPathMaster("scripts"); suiteInfo.setSuitePath(suiteName); // use this to set deviceId in suiteInfo // suiteInfo.setAndroidDevice("XXXX"); // for Android // suiteInfo.setIOSDevice("XXXX"); // for IOS // add nodes in suiteInfo for distributed run // suiteInfo.addNode("10.10.2.50", "9999"); // suiteInfo.addNode("10.10.2.53", "9999"); DSahiRunner dSahiRunner = new DSahiRunner(suiteInfo); HashMap variableHashMap = new HashMap(); variableHashMap.put("$user", "test"); variableHashMap.put("$pwd", "secret"); dSahiRunner.setInitJS(variableHashMap); String status = dSahiRunner.executeNonDistributed(); // execute this for distributed run // String status = dSahiRunner.execute(); System.out.println(status); } } ``` ## Java code invoking TestRunner :::danger[Caution] DEPRECATED: Use [Java code invoking DSahiRunner](#java-code-invoking-dsahirunner) instead. ::: ```java package in.co.sahi.sample; public class SahiScriptLauncher { public static void main(String[] args) throws IOException, InterruptedException { final String suiteName = "scripts/sahitests/integration.sah"; final String browserType = "firefox"; String base = "https://sahitest.com/demo/training/"; String threads = "1"; TestRunner testRunner = new TestRunner(suiteName, browserType, base, threads); HashMap variableHashMap = new HashMap(); variableHashMap.put("$user", "test"); variableHashMap.put("$pwd", "secret"); testRunner.setInitJS(variableHashMap); String status = testRunner.execute(); System.out.println(status); } } ``` NOTE: The ant-sahi.jar file needs to be added to your classpath. It is located in sahi/lib folder. ## The Sahi script being invoked The script we are invoking is this: ```js // Test Manager can pass in data to this script via "initJS" parameter. // initJS will be "eval"ed before a script starts // Pass String "$user='test';$pwd='secret';" as parameter "initJS" // Or pass a HashMap of variable name and value as called in above Java code _setValue(_textbox("user"), $user); _setValue(_password("password"), $pwd); _click(_submit("Login")); _setValue(_textbox("q"), "2"); _setValue(_textbox("q[1]"), "1"); _setValue(_textbox("q[2]"), "1"); _click(_button("Add")); _click(_cell("Rs.200[1]")); _assertExists(_textbox("total")); _assert(_isVisible(_textbox("total"))); _assertEqual("1150", _textbox("total").value); _click(_button("Logout")); ``` ## Passing parameters into Sahi script from Java Parameters can be passed in as a simple string which contains the Javascript to be executed before a script starts. In the above example. notice how we pass in two variables $user and $pwd from the Java code into Sahi code. ## Passing data values from the Script back to Java This is best done via writing into a file in the Script and then reading the file in Java to obtain the parameters. To write to a file, use "\_writeFile":miscellaneous-apis ```js _writeFile($filePath, $text); ``` To read it in your Java code, you can write your own custom code to read file contents, or use Sahi's Utils class ```js String contents = net.sf.sahi.util.Utils.readFileAsString(new File(filePath)); ``` This class is also part of ant-sahi.jar which you would have already added to your classpath to invoke TestRunner. --- # Run Tests from the Command Line Run tests and suites from the command line with testrunner, or across machines with drun and drun_different_master, using the batch and shell files in userdata/bin. :::caution[Important] We recommend using the ANT target over using the command line. This section is for backward compatibility. ::: ## Run via testrunner :::danger[Caution] DEPRECATED: Use [Distributed Suite Runs via drun](#distributed-suite-runs-via-drun) instead. ::: `testrunner.bat` and `testrunner.sh` files allow running scripts from the command line. 1. Open a command prompt and cd to sahi/userdata/bin (or click on the "Bin" link on the Sahi Dashboard) 2. Run testrunner.bat to see the syntax ```text D:\sahi_pro\userdata\bin>testrunner.bat -- Usage: testrunner File path is relative to userdata/scripts Multiple browsers can be specified using +. Eg. ie+firefox browserDeviceParams can be specified as the combinations of StartMode, Browser, AndroidDevice and iOSDevice Eg. "Browser:chrome;AndroidDevice:XXXX;iOSDevice:YYYY;StartMode:BROWSER" tags are used only if the input file is a .s.csv file or a .dd.csv file test cases can be specified in tags argument as "testcases:testcase1,testcase2" -- Example: testrunner.bat sahitests/demo.suite https://sahitest.com/demo/ firefox testrunner.bat sahitests/sahi_demo.sah https://sahitest.com/demo/ ie testrunner.bat sahitests/sahi_demo.sah https://sahitest.com/demo/ ie+firefox testrunner.bat sahitests/demo.dd.csv https://sahitest.com/demo/ firefox "win||all" testrunner.bat sahitests/testcases/testcases_sample.csv https://sahitest.com/demo/ ie "(user||admin)&&medium" testrunner.bat sahitests/ddcsv/test.dd.csv https://sahitest.com/demo/ ie "(user||admin)&&medium" testrunner.bat sahitests/framework/sample.xls https://sahitest.com/demo/training/ ie testrunner.bat sahitests/framework/scenario_new.s.csv https://sahitest.com/demo/training/ ie "all" testrunner.bat sahitests/framework/scenario_sample.s.csv https://sahitest.com/demo/training/ ie "testcases:Check shopping cart total,Test login error message" testrunner.bat script_name.sah https://sahitest.com/demo/ "AndroidDevice:xyz;StartMode:ANDROID" testrunner.bat script_name.sah https://sahitest.com/demo/ "AndroidDevice:xyz;StartMode:ANDROID_BROWSER" testrunner.bat script_name.sah https://sahitest.com/demo/ "iOSDevice:abc;StartMode:IOS" testrunner.bat script_name.sah https://sahitest.com/demo/ "iOSDevice:abc;StartMode:IOS_BROWSER" testrunner.bat script_name.sah https://sahitest.com/demo/ "AndroidDevice:xyz;iOSDevice:abc;StartMode:GENERIC" testrunner.bat script_name.sah https://sahitest.com/demo/ "Browser:chrome;StartMode:WINDOWS" testrunner.bat script_name.sah " " "StartMode:WINDOWS" testrunner.bat script_name.sah " " "StartMode:JAVA" testrunner.bat script_name.sah " " "StartMode:SAP" -- D:\sahi_pro\userdata\bin> ``` 3. Parameters other than suite, startURL and browserType can be modified by editing `testrunner.bat` 1. To set the number of parallel browsers to execute the script in, modify ```js SET THREADS=5 ``` To run in one thread only, ie. to run scripts one after the other sequentially, use ```js SET THREADS=1 ``` 2. Sahi normally opens and closes the browser for each script. To execute all scripts sequentially without closing and reopening browsers, use ```js SET THREADS=1 SET SINGLE_SESSION=true ``` 3. Sahi, by default, writes logs to the database only. To force it to write logs to the filesystem, use ```js SET LOGS_INFO=html,xml ``` html and xml logs will be created in the `sahi/userdata/logs/playback` folder To force it to write logs to specific file locations, use, ```js SET LOGS_INFO=html:D:/reports/htmllogs/,xml:D:/reports/xmllogs/ ``` Output formats available are html,xml,junit,excel The format to specify LOGS\_INFO is ```js reportType1:filePath1,reportType2,reportType3:filePath3,... ``` 4. When a Sahi suite is run, some scripts may fail because of environment reasons or due to browser crashes. A natural next step for testers is to verify the failure by running the script again. Sahi now automatically creates a suite of all failed scripts. The name of the failed suite has `_failed_` appended to the filename. For example if you ran a suite `admin/admin.suite` on Firefox, failed suite will be created as `admin/admin_failed_firefox.suite` For `admin/admin.dd.csv`, it will be `admin/admin_failed_firefox.dd.csv` This failed suite file can then be run to verify only the failed testcases. 5. Sahi can send out emails at the end of a suite run. Set the following properties in testrunner.bat file. ```js SET SEND_EMAIL_REPORT=true SET EMAIL_TRIGGER=success,failure SET EMAIL_PROPERTIES=email.properties SET EMAIL_PASSWORD_HIDDEN=true ``` Email specific parameters like username, password etc. are defined in `sahi/userdata/bin/[email.properties](https://resources.sahipro.com/docs/using-sahi/email-during-playback/#emailproperties-file-explained)` file. 6. For a long running suite, Sahi can send periodic emails indicating progress. To enable periodic emails, set the following property in testrunner.bat file. ```js SET SEND_EMAIL_REPORT_PERIODICALLY=true ``` To set time interval (in minutes), set the following property in testrunner.bat file. ```js SET SEND_EMAIL_REPORT_PERIODICALLY_TIME=30 ``` 7. Custom fields can be passed to the scripts using the CUSTOM\_FIELDS variable. More than one custom field can be passed. Replace the custom field keys and values as appropriate. For Windows: ```js SET CUSTOM_FIELDS=-customField customValue -anotherCustomField "another value" ``` For Linux: ```sh export CUSTOM_FIELDS="-customField customValue -anotherCustomField another value" ``` :::note Specifying custom fields is not mandatory. ::: 8. Sahi Pro v6.3.0 onwards, a summary of the script run status is written to the Testrunner console while the script is running. You can read more on Periodic Summary [here](https://resources.sahipro.com/docs/using-sahi/run-tests-via-editor/#periodic-summary-during-script-runs). To disable these messages in Windows, set the following property in testrunner.bat file. ```js SET SHOW_PERIODIC_SUMMARY=false ``` For Mac and Linux, you need to set the following property in testrunner.sh ```sh export SHOW_PERIODIC_SUMMARY=false ``` 9. Sahi Pro 9.0.0 onwards, Set value to true to allow scripts to pick element using Sahi auto intelligence when element provided in script is not found. Refer [Autoheal](https://resources.sahipro.com/docs/using-sahi/autoheal/) section for more details. For Windows: ```js SET ISAUTOHEALENABLED=true ``` For Mac and Linux: ```sh export ISAUTOHEALENABLED=true ``` :::note Browser names are defined in sahi/userdata/browser-types-xml testrunner.bat and testrunner.sh use the TestRunner java class internally. ::: ## Distributed Suite Runs via drun Sahi Pro can distribute and run tests on multiple machines (nodes). The machine which distributes the scripts and manages the distributed run is referred to as the `Master`. All Dashboard logs are visible from the `Master`. The other machines are called `Slaves`. Any machine in the distributed environment can serve as the `Master`. The machine which launches the distributed run is referred to as the `Initiator`. Sahi provides a couple of batch files - `drun.bat` and `drun_different_master.bat` (and equivalent shell scripts). They allow running test scripts on multiple machines from the command line. - `drun.bat` should be used when the `Master` and `Initiator` are the same machine. - `drun_different_master.bat` should be used when the `Master` is different from the `Initiator`. :::danger[Caution] Ensure that the same Sahi Pro version has been installed on all the machines participating in the distributed run. ::: ### drun 1. Sahi distributes the scripts to different machines based on their capacity and availability of browsers. Note that Sahi should be running on each of the nodes. Also, on each machine, the browser paths must be correctly specified. 2. Open `sahi_pro/userdata/bin/drun.bat` (drun.sh on linux) using any editor. 3. SOURCE\_SCRIPTS\_PATH points to the folder that contains ALL the scripts to be run. It should be relative to `sahi_pro/userdata` folder OR it should be an absolute path. For Windows: ```js SET SOURCE_SCRIPTS_PATH=scripts ``` For Linux: ```sh export SOURCE_SCRIPTS_PATH=scripts ``` 4. Configure the NODES variable to contain all the machines on which the tests should run. The command to set the nodes in Windows and Linux respectively are: For Windows: ```js SET NODES=localhost:9999,othermachine:9999,thirdmachine:9999 ``` For Linux: ```sh export NODES=localhost:9999,othermachine:9999,thirdmachine:9999 ``` :::note The nodes may or may not include the `Master` machine (localhost). If the `Master` machine is not included, scripts will not be run on the `Master`. ::: :::caution[Important] "othermachine" and "thirdmachine" are placeholders to illustrate usage. Replace them with actual machine names. The nodes can contain 1 or more machines. ::: 5. From Sahi Pro 6.1.0 onwards, it is possible to specify the number of threads that the scripts of the suite would run in. The number of maximum parallel browsers would be the minimum of two values - threads, and capacity of the browser specified in browser\_types.xml. To set the number of parallel browsers to execute the script in, modify ```js SET THREADS=5 ``` To run in one thread only, ie. to run scripts one after the other sequentially, use ```js SET THREADS=1 ``` Note that this would affect the number of parallel browsers on each Node. 6. When a Sahi suite is run, some scripts may fail because of environment reasons or due to browser crashes. A natural next step for testers is to verify the failure by running the script again. Sahi now automatically creates a suite of all failed scripts. The name of the failed suite has `_failed_` appended to the filename. For example if you ran a suite `admin/admin.suite` in Chrome, failed suite will be created as `admin/admin_failed_chrome.suite` For `admin/admin.dd.csv`, it will be `admin/admin_failed_chrome.dd.csv` This failed suite file can then be run to verify only the failed scripts. 7. Sahi can send a mail summarizing the test run. The variable SEND\_EMAIL\_REPORT can be set as true or false. If true, Sahi sends the mail. For Windows: ```js SET SEND_EMAIL_REPORT=true ``` For Linux: ```sh export SEND_EMAIL_REPORT=true ``` 8. Sahi can send a mail based on success or failure or in both the cases. This condition can be set using the EMAIL\_TRIGGER variable. For Windows: ```js SET EMAIL_TRIGGER=success,failure ``` For Linux: ```sh export EMAIL_TRIGGER=success,failure ``` 9. For a long running suite, Sahi can send periodic emails indicating progress. To enable periodic emails, set the following property. For Windows: ```js SET SEND_EMAIL_REPORT_PERIODICALLY=true ``` For Linux: ```sh export SEND_EMAIL_REPORT_PERIODICALLY=true ``` To set time interval (in minutes), use SET SEND\_EMAIL\_REPORT\_PERIODICALLY\_TIME variable. For Windows: ```js SET SEND_EMAIL_REPORT_PERIODICALLY_TIME=30 ``` For Linux: ```sh export SEND_EMAIL_REPORT_PERIODICALLY_TIME=30 ``` 10. The relative path to the properties file containing information about the mail such as sender, recipient, host, port etc. can be set using the EMAIL\_PROPERTIES variable. 11. Passwords can be hidden or shown from the console and logs by toggling the EMAIL\_PASSWORD\_HIDDEN variable. It can be set as true or false. If true, Sahi hides the password from Sahi console and logs. 12. Custom fields can be passed to the scripts using the CUSTOM\_FIELDS variable. More than one custom field can be passed. Replace the custom field keys and values as appropriate. For Windows: ```js SET CUSTOM_FIELDS=-customField customValue -anotherCustomField "another value" ``` For Linux: ```sh export CUSTOM_FIELDS="-customField customValue -anotherCustomField another value" ``` :::note Specifying custom fields is not mandatory. ::: 13. The end user can pass a specific id for each suite/script run using the USER\_DEFINED\_ID variable. For Windows: ```js SET USER_DEFINED_ID=-userDefinedId "Some Id" ``` For Linux: ```sh export USER_DEFINED_ID="-userDefinedId Some Id" ``` Replace the value "Some Id" as appropriate. :::caution[Important] The key should remain as userDefinedId. ::: :::note Specifying user defined id is not mandatory. ::: 14. Sahi can set offline logs to be generated in `xml`, `html`, `junit`, `pdf` and `excel` types. The default type is `html`. For Windows: ```js SET LOGS_INFO=xml,html ``` For Linux: ```sh export LOGS_INFO=xml,html ``` 15. Sahi Pro v6.3.0 onwards, a summary of the script run status is written to the Drun console while the script is running. You can read more on Periodic Summary [here](https://resources.sahipro.com/docs/using-sahi/run-tests-via-editor/#periodic-summary-during-script-runs). To disable these messages in Windows, set the following property in drun.bat file. ```js SET SHOW_PERIODIC_SUMMARY=false ``` For Mac and Linux, you need to set the following property in drun.sh ```sh export SHOW_PERIODIC_SUMMARY=false ``` 16. Sahi Pro 9.0.0 onwards, Set value to true to allow scripts to pick element using Sahi auto intelligence when element provided in script is not found. Refer [Autoheal](https://resources.sahipro.com/docs/using-sahi/autoheal/) section for more details. For Windows: ```js SET ISAUTOHEALENABLED=true ``` For Mac and Linux: ```sh export ISAUTOHEALENABLED=true ``` 17. To execute the scripts using drun.bat, open a command window and go to the `/userdata/bin` directory. This can also be done easily by clicking the bin link on the dashboard. 18. Run drun.bat to see the syntax. ```text D:\sahi_pro\userdata\bin>drun.bat -- NOTE: Use this batch file only if you are running it on the Master machine. If you wish to use a different Master, use drun_different_master.bat instead. -- Usage: drun File path is relative to userdata/scripts Multiple browsers can be specified using +. Eg. ie+firefox browserDeviceParams can be specified as the combinations of StartMode, Browser, AndroidDevice and iOSDevice Eg. "Browser:chrome;AndroidDevice:XXXX;iOSDevice:YYYY;StartMode:BROWSER" tags are used only if the input file is a .s.csv file or a .dd.csv file test cases can be specified in tags argument as "testcases:testcase1,testcase2" -- Example: drun.bat sahitests/demo.suite https://sahitest.com/demo/ firefox drun.bat sahitests/sahi_demo.sah https://sahitest.com/demo/ ie drun.bat sahitests/sahi_demo.sah https://sahitest.com/demo/ ie+firefox drun.bat sahitests/demo.dd.csv https://sahitest.com/demo/ firefox "win||all" drun.bat sahitests/testcases/testcases_sample.csv https://sahitest.com/demo/ ie "(user||admin)&&medium" drun.bat sahitests/ddcsv/test.dd.csv https://sahitest.com/demo/ ie "(user||admin)&&medium" drun.bat sahitests/framework/sample.xls https://sahitest.com/demo/training/ ie drun.bat sahitests/framework/scenario_new.s.csv https://sahitest.com/demo/training/ ie "all" drun.bat sahitests/framework/scenario_sample.s.csv https://sahitest.com/demo/training/ ie "testcases:Check shopping cart total,Test login error message" drun.bat script_name.sah https://sahitest.com/demo/ "AndroidDevice:xyz;StartMode:ANDROID" drun.bat script_name.sah https://sahitest.com/demo/ "AndroidDevice:xyz;StartMode:ANDROID_BROWSER" drun.bat script_name.sah https://sahitest.com/demo/ "iOSDevice:abc;StartMode:IOS" drun.bat script_name.sah https://sahitest.com/demo/ "iOSDevice:abc;StartMode:IOS_BROWSER" drun.bat script_name.sah https://sahitest.com/demo/ "AndroidDevice:xyz;iOSDevice:abc;StartMode:GENERIC" drun.bat script_name.sah https://sahitest.com/demo/ "Browser:chrome;StartMode:WINDOWS" drun.bat script_name.sah " " "StartMode:WINDOWS" drun.bat script_name.sah " " "StartMode:JAVA" drun.bat script_name.sah " " "StartMode:SAP" -- D:\sahi_pro\userdata\bin> ``` :::danger[Caution] NOTE:  Refer to the Notes below for actual details. ::: In the usage above, - The first argument is the suite or script path. This path can be relative to the path set in SOURCE\_SCRIPTS\_PATH, or it can be an absolute path contained in SOURCE\_SCRIPTS\_PATH. - The second argument is the Start URL. - The third argument is the Browser Type. - Tags (the fourth argument) will be used only when running a scenario file, a data driven suite (.dd.csv) or a CSV as suite with tags. Tags are specified to run specific scripts/testcases from the suite/scenario. eg. If tags are specified as "(user||admin)&&medium", all the scripts which have 'medium' tag and 'admin' or 'user' (or both) tag will be run ### drun\_different\_master This should be used when the `Master` is different from the `Initiator`. A typical case where you would use this or the ANT equivalent, is when you have a continuous integration build server that is not capable of launching any UI. The build server will contain all the scripts but since it cannot launch any UI, it cannot run Sahi tests. In such a case, Sahi can be run on other machines and `drun_different_master` can be used on the integration build server to trigger the Sahi tests on these machines. `drun_different_master` does the following. - It first syncs the contents of scripts folder from the `Initiator` to a staging folder on the `Master`. - It then distributes the scripts from the staging folder of the `Master` to various nodes and runs the tests. - If offline logs are requested, the logs are copied over from the `Master` to the `Initiator` after the run is over. Let us look at `drun_different_master` in more detail. 1. Sahi (running on the `Master`) distributes the scripts to different machines based on their capacity and availability of browsers. Note that Sahi should be running on each of the nodes. Also, on each machine, the browser paths must be correctly specified. :::note Sahi does not need to be installed on the `Initiator` machine. ::: 2. The following directory structure is assumed on the `Initiator` machine. The requisite files like ant-sahi.jar should be copied over from a Sahi Pro installation. The directory structure of the files is the same in the SahiPro installation. ```xml lib ant-sahi.jar logs userdata bin drun_different_master.bat setjava.bat config email.properties scripts ``` 3. Open `/userdata/bin/drun_different_master.bat` (drun\_different\_master.sh on linux) using any Editor. 4. MASTER\_HOST should point to the Master machine. For Windows: ```js SET MASTER_HOST=machine2 ``` For Linux: ```sh export MASTER_HOST=machine2 ``` :::danger[Caution] Make sure you change "machine2" to the actual machine name ::: 5. INITIATOR\_ORIGIN\_FOLDER is the path to the base folder containing the various scripts. With the above assumed directory structure, it would point to `/userdata/scripts`. :::note The default value need not be changed. ::: 6. MASTER\_STAGING\_PATH refers to the Staging folder on the Master machine to which the contents of INITIATOR\_ORIGIN\_FOLDER will be first synced to. Distribution of scripts will happen from MASTER\_STAGING\_PATH. :::note The default value need not be changed. ::: 7. Configure the NODES variable to contain all the machines on which the tests should run. The command to set the nodes in Windows and Linux respectively are: For Windows: ```js SET NODES=machine2:9999,machine3:9999,machine4:9999 ``` For Linux: ```sh export NODES=machine2:9999,machine3:9999,machine4:9999 ``` :::note The nodes may or may not include the `Master` machine. If the `Master` machine is not included, scripts will not be run on the `Master`. ::: :::danger[Caution] Do not include localhost (the `Initiator`) here since Sahi may not be installed on the `Initiator`. If you want localhost as one of the nodes, run drun instead. ::: :::caution[Important] "machine2", "machine3" and "machine4" are placeholders to illustrate usage. Replace them with actual machine names. The nodes can contain 1 or more machines. ::: 8. From Sahi Pro 6.1.0 onwards, it is possible to specify the number of threads that the scripts of the suite would run in. The number of maximum parallel browsers would be the minimum of two values - threads, and capacity of the browser specified in browser\_types.xml. To set the number of parallel browsers to execute the script in, modify ```js SET THREADS=5 ``` To run in one thread only, ie. to run scripts one after the other sequentially, use ```js SET THREADS=1 ``` Note that this would affect the number of parallel browsers on each Node. 9. When a Sahi suite is run, some scripts may fail because of environment reasons or due to browser crashes. A natural next step for testers is to verify the failure by running the script again. Sahi now automatically creates a suite of all failed scripts. The name of the failed suite has `_failed_` appended to the filename. For example if you ran a suite `admin/admin.suite` in Chrome, failed suite will be created as `admin/admin_failed_chrome.suite` For `admin/admin.dd.csv`, it will be `admin/admin_failed_chrome.dd.csv` This failed suite file can then be run to verify only the failed scripts. 10. Sahi can send a mail summarizing the test run. The variable SEND\_EMAIL\_REPORT can be set as true or false. If true, Sahi sends the mail. For Windows: ```js SET SEND_EMAIL_REPORT=true ``` For Linux: ```sh export SEND_EMAIL_REPORT=true ``` 11. Sahi can send a mail based on success or failure or in both the cases. This condition can be set using the EMAIL\_TRIGGER variable. For Windows: ```js SET EMAIL_TRIGGER=success,failure ``` For Linux: ```sh export EMAIL_TRIGGER=success,failure ``` 12. For a long running suite, Sahi can send periodic emails indicating progress. To enable periodic emails, set the following property. For Windows: ```js SET SEND_EMAIL_REPORT_PERIODICALLY=true ``` For Linux: ```sh export SEND_EMAIL_REPORT_PERIODICALLY=true ``` To set time interval (in minutes), use SET SEND\_EMAIL\_REPORT\_PERIODICALLY\_TIME variable. For Windows: ```js SET SEND_EMAIL_REPORT_PERIODICALLY_TIME=30 ``` For Linux: ```sh export SEND_EMAIL_REPORT_PERIODICALLY_TIME=30 ``` 13. The relative path to the properties file containing information about the mail such as sender, recipient, host, port etc. can be set using the EMAIL\_PROPERTIES variable. 14. Passwords can be hidden or shown from the console and logs by toggling the EMAIL\_PASSWORD\_HIDDEN variable. It can be set as true or false. If true, Sahi hides the password from Sahi console and logs. 15. Custom fields can be passed to the scripts using the CUSTOM\_FIELDS variable. More than one custom field can be passed. Replace the custom field keys and values as appropriate. For Windows: ```js SET CUSTOM_FIELDS=-customField customValue -anotherCustomField "another value" ``` For Linux: ```sh export CUSTOM_FIELDS=-customField customValue -anotherCustomField "another value" ``` :::note Specifying custom fields is not mandatory. ::: 16. The end user can pass a specific id for each suite/script run using the USER\_DEFINED\_ID variable. For Windows: ```js SET USER_DEFINED_ID=-userDefinedId "Some Id" ``` For Linux: ```sh export USER_DEFINED_ID=-userDefinedId "Some Id" ``` Replace the value "Some Id" as appropriate. :::caution[Important] The key should remain as userDefinedId. ::: :::note Specifying user defined id is not mandatory. ::: 17. Sahi can set offline logs to be generated in `xml`, `html`, `junit`, `pdf` and `excel` types. The default type is `html`. These logs will be generated on the `Master` and pulled back to the `Initiator`, since the user would want to see the logs on the `Initiator`. The following set of commands illustrate how HTML and XML logs can be generated. For Windows: ```js SET UNIQUE_ID=%DATE%__%TIME% SET UNIQUE_ID=%UNIQUE_ID: =_% SET UNIQUE_ID=%UNIQUE_ID::=_% SET UNIQUE_ID=%UNIQUE_ID:/=_% SET MASTER_HTMLLOGS_DIR=logs/temp/html/%UNIQUE_ID% SET MASTER_XMLLOGS_DIR=logs/temp/xml/%UNIQUE_ID% SET LOGS_INFO=html:%MASTER_HTMLLOGS_DIR%,xml::%MASTER_XMLLOGS_DIR% SET INITIATOR_OUTPUT_HTMLLOGS_DIR=%TOP_LEVEL_FOLDER%/logs/html/%UNIQUE_ID% SET INITIATOR_OUTPUT_XMLLOGS_DIR=%TOP_LEVEL_FOLDER%/logs/xml/%UNIQUE_ID% ``` For Linux: ```sh export UNIQUE_ID=$(date +"%m_%d_%Y")__$(date +"%I_%M_%S") export MASTER_HTMLLOGS_DIR=logs/temp/html/$UNIQUE_ID export MASTER_XMLLOGS_DIR=logs/temp/xml/$UNIQUE_ID export LOGS_INFO=html:$MASTER_HTMLLOGS_DIR,xml:$MASTER_XMLLOGS_DIR export INITIATOR_OUTPUT_HTMLLOGS_DIR=$TOP_LEVEL_FOLDER/logs/html/$UNIQUE_ID export INITIATOR_OUTPUT_XMLLOGS_DIR=$TOP_LEVEL_FOLDER/logs/xml/$UNIQUE_ID ``` :::note The default values can be left as is. ::: 18. Sahi Pro v6.3.0 onwards, a summary of the script run status is written to the Drun\_Different\_Master console while the script is running. You can read more on Periodic Summary [here](https://resources.sahipro.com/docs/using-sahi/run-tests-via-editor/#periodic-summary-during-script-runs). To disable these messages in Windows, set the following property in drun\_different\_master.bat file. ```js SET SHOW_PERIODIC_SUMMARY=false ``` For Mac and Linux, you need to set the following property in drun\_different\_master.sh ```sh export SHOW_PERIODIC_SUMMARY=false ``` 19. Sahi Pro 9.0.0 onwards, Set value to true to allow scripts to pick element using Sahi auto intelligence when element provided in script is not found. Refer [Autoheal](https://resources.sahipro.com/docs/using-sahi/autoheal/) section for more details.. For Windows: ```js SET ISAUTOHEALENABLED=true ``` For Mac and Linux: ```sh export ISAUTOHEALENABLED=true ``` 20. To execute the scripts using drun\_different\_master.bat, open a command window and go to the `/userdata/bin` directory. This can also be done easily by clicking the bin link on the dashboard. 21. Run drun\_different\_master.bat to see the syntax. ```text D:\sahi_pro\userdata\bin>drun_different_master.bat -- NOTE: Use this batch file only if you plan to use a different Master machine. Else, use drun.bat instead. -- Usage: drun_different_master.bat File path is relative to userdata/scripts Multiple browsers can be specified using +. Eg. ie+firefox browserDeviceParams can be specified as the combinations of StartMode, Browser, AndroidDevice and iOSDevice Eg. "Browser:chrome;AndroidDevice:XXXX;iOSDevice:YYYY;StartMode:BROWSER" tags are used only if the input file is a .s.csv file or a .dd.csv file test cases can be specified in tags argument as "testcases:testcase1,testcase2" -- Example: drun_different_master.bat sahitests/demo.suite https://sahitest.com/demo/ firefox drun_different_master.bat sahitests/sahi_demo.sah https://sahitest.com/demo/ ie drun_different_master.bat sahitests/sahi_demo.sah https://sahitest.com/demo/ ie+firefox drun_different_master.bat sahitests/testcases/testcases_sample.csv https://sahitest.com/demo/ ie "(user||admin)&&medium" drun_different_master.bat sahitests/ddcsv/test.dd.csv https://sahitest.com/demo/ ie "(user||admin)&&medium" drun_different_master.bat sahitests/framework/sample.xls https://sahitest.com/demo/training/ ie drun_different_master.bat sahitests/framework/scenario_new.s.csv https://sahitest.com/demo/training/ ie "all" drun_different_master.bat sahitests/framework/scenario_sample.s.csv https://sahitest.com/demo/training/ ie "testcases:Check shopping cart total,Test login error message" drun_different_master.bat script_name.sah https://sahitest.com/demo/ "AndroidDevice:xyz;StartMode:ANDROID" drun_different_master.bat script_name.sah https://sahitest.com/demo/ "AndroidDevice:xyz;StartMode:ANDROID_BROWSER" drun_different_master.bat script_name.sah https://sahitest.com/demo/ "iOSDevice:abc;StartMode:IOS" drun_different_master.bat script_name.sah https://sahitest.com/demo/ "iOSDevice:abc;StartMode:IOS_BROWSER" drun_different_master.bat script_name.sah https://sahitest.com/demo/ "AndroidDevice:xyz;iOSDevice:abc;StartMode:GENERIC" drun_different_master.bat script_name.sah https://sahitest.com/demo/ "Browser:chrome;StartMode:WINDOWS" drun_different_master.bat script_name.sah " " "StartMode:WINDOWS" drun_different_master.bat script_name.sah " " "StartMode:JAVA" drun_different_master.bat script_name.sah " " "StartMode:SAP" -- D:\sahi_pro\userdata\bin> ``` :::danger[Caution] NOTE:  Refer to the notes below for actual details. ::: In the usage above, - The first argument is the suite or script path. This path can be relative to the path set in INITIATOR\_ORIGIN\_FOLDER, or it can be an absolute path contained in INITIATOR\_ORIGIN\_FOLDER. - The second argument is the Start URL. - The third argument is the Browser Type. - Tags (the fourth argument) will be used only when running a data driven suite (.dd.csv) or a CSV as suite with tags. Tags are specified to run specific scripts/testcases from the suite. eg. If tags are specified as "(user||admin)&&medium", all the scripts which have 'medium' tag and 'admin' or 'user' (or both) tag will be run. --- # Sahi Integration Support Sahi can be integrated to external tools using some predefined URL calls to Sahi. This document provides a comprehensive step by step list of all URL calls that might be required for a complete integration with Sahi. This document is divided into various sections in order of steps you need to perform while executing a script or suite from an external tool. By modifying the parameters in the page, you can generate a URL for your environment. :::note **Test** sends the request to the Sahi Pro server at the host and port below, so start Sahi Pro first. The reply shows in **Response**. If your browser doesn't let this page reach Sahi Pro, the request opens in a new tab and the reply shows there. Buttons that run, stop or clean up a suite ask before they send anything. ::: ## Set Sahi Server By default Sahi server runs on localhost:9999. In case you are using a Sahi server from another machine, modify the host and port accordinglly and click on Update button. Host: Port: ## Get Script Directory To get the script path specified in the sahi.properties file, you can use the following Request URL. You will get the scripts path as response as shown below.
Request URL:Response:
## Get All Scripts Path In The Given Directory To get the full path for all the scripts in a given directory, you can use a request URL like this: ```js http://localhost:9999/_s_/dyn/SahiEndPoint_scriptsList ?suites=true &dir=C%3A%2Fsahi_pro%2Fuserdata%2Fscripts%2F ``` You will get an array containing the paths of all the scripts in the directory.
NameDescriptionValue
suitesIf set to true, suite paths will be fetched as well. To ignore suites, set it as false.
dirDirectory Path from which the scripts will be fetched. Example: C:/sahi_pro/userdata/scripts/
Request URL:Response:
## Get Available Modes To get the list of available modes, you can use the following request URL. The response is an array with names of all available modes.
Request URL:Response:
## Get All Available Browsers To get the list of browsers available to Sahi, you can use the following request URL. The response is an array with names of all browsers.
Request URL:Response:
## Get All Available Android Devices/Emulators To get the list of Android devices available to Sahi, you can use the following request URL. The response is a list of Android Devices/Emulators in JSON format OR null (in case of Android automation is not supported).
NameDescriptionValue
refreshIf set to true, devices list will be refreshed.
Request URL:Response:
:::note NOTE: Provide any of the key (name, displayName, deviceName, deviceId) as 'AndroidDevice' in the URL of running script/suite. ::: ## Get All Available iOS Devices/Simulators To get the list of Android devices available to Sahi, you can use the following request URL. The response is a list of iOS Devices/Simulators in JSON format OR null (in case of iOS automation is not supported).
NameDescriptionValue
refreshIf set to true, devices list will be refreshed.
Request URL:Response:
:::note NOTE: Provide any of the key (name, displayName, deviceName, deviceId, deviceParams) as 'iOSDevice' in the URL of running script/suite. ::: ## Running the Script/Suite To execute a suite or script, you can use a URL like this: ```js http://localhost:9999/_s_/dyn/SahiEndPoint_run?a=a &suite=C%3A%2Fsahi_pro%2Fuserdata%2Fscripts%2Fsahitests%2Fsmall.suite &startWith=BROWSER &browserType=chrome &baseURL=http%3A%2F%2Fsahitest.com%2Fdemo%2F &androidDevice=XXXX &iOSDevice=XXXX &threads=5 &isSingleSessionS=false &jsCodeCoverage=false &abortedRetryCount=0 &failureRetryCount=0 &logsInfo= &tags= &userDefinedId=2June2015__12_1_36_338 &suiteTimeOut=0.0 &isAutoHealEnabled=false ```
NameDescriptionValue
threadsNumber of simultaneous browser instances that can be executed. Example: 3
isSingleSessionSIf "true", runs all scripts in a single browser without closing it between scripts. Example: false
startWithSpecify the start mode. Example: BROWSER
browserTypeBrowser on which scripts will be executed. Example: chrome
suiteExample : C:/sahi_pro/userdata/scripts/sahitests/small.suite
baseURLSets a default Start URL for scripts. Example: https://sahitest.com/demo/
AndroidDeviceAndroid device in which script will be executed.
iOSDeviceiOS device in which script will be executed.
jsCodeCoverageIf "true", collect the JS Code Coverage. Example: false
abortedRetryCountSpecify the retry count for aborted script.
failureRetryCountSpecify the retry count for failed script.
logsInfologsInfo format is type:filePath,type2:filePath2 [Example: html:D:/logs/html,xml:D:/logs/xml ]
tagstags seperated by '&&', '||', '!' operators. [Example: (user||admin)&&medium ]
userDefinedIdThe unique id that the user can pass to differentiate a suite from other. You can click on 'Generate Id' button to generate a unique id.
Time Out (Minutes)Specify the time out in minutes for script.
Enable autohealing of elements if not found.
Click on Generate URL button below to generate the request URL as per the values set in the above table. Click on Test button to execute the script.
Request URL:
## Check the status of Script/Suite A script or suite can have seven types of status, INITIAL, RUNNING, SUCCESS, FAILURE, ABORTED, SKIPPED and USER\_ABORTED. To get the current status of a script or suite under execution, you can use a URL like this: ```js http://localhost:9999/_s_/dyn/SahiEndPoint_status?userDefinedId=2June2015__12_1_36_338 ```
NameDescriptionValue
userDefinedIdThe unique id that the user can pass to differentiate a suite from other. Example : 2June2015__12_1_36_338
Click on Generate URL button below to get the request URL which will check the status of script/suite identified by the user defined id provided above. Click on Test to check the status.
Request URL:Response:
## Get the Suite logs To get the logs for a suite, you can use a URL like this: ```js http://localhost:9999/_s_/dyn/SahiEndPoint_suiteReport ?userDefinedId=2June2015__12_1_36_338 &type=xml ```
NameDescriptionValue
userDefinedIdThe unique id that the user can pass to differentiate a suite from other. Example: 2June2015__12_1_36_338
typeResponse type of URL. This is the type of logs you want. Example: xml
Click on the Generate URL below to get the request URL for the user defined id used above. Click on Test button to get the response which also contains all the script Ids. Click on Get Ids button to get the script Ids from the suite log.
Request URL:Response:
Script Ids
Get scriptIds from XML :
## Get the Script Log To get the logs for a script, you can use a URL like this: ```js http://localhost:9999/_s_/dyn/SahiEndPoint_scriptReport? id=label_firefox__02Jun2015__12_10_13_955 &type=xml ``` The ids are fetched using SahiEndPoint\_suiteReport as mentioned in previous section
NameDescriptionValue
idThe unique id that differentiate a script from other. Example: label_firefox__02Jun2015__12_10_13_955. This is autogenerated by Sahi, and needs to be queried first using SahiEndPoint_suiteReport as mentioned in previous section.
typeResponse type of URL. This is the type of logs you want. Example: xml
Click on the Generate URL below to get the request URL for the user defined id used above. Click on Test button to get the response, which is the logs for the script run.
Request URL:Response:
## Running the Script/Suite - Distributed Run To execute a suite or script distributed across nodes, you can use a URL like this: ```js http://localhost:9999/_s_/dyn/SahiEndPoint_runDistributed?a=a &host=localhost &port=9999 &scriptsPathMaster=C%3A%2Fsahi_pro%2Fuserdata%2Fscripts &suite=sahitests%2Fsmall.suite &browserType=chrome &baseURL=http%3A%2F%2Fsahitest.com%2Fdemo%2F &androidDevice=XXXX &iOSDevice=XXXX &tags= &threads=5 &jsCodeCoverage=false &abortedRetryCount=0 &failureRetryCount=0 &logsInfo= &nodes=node1%3A9999%2Cnode2%3A9999 &userDefinedId=2June2015__12_1_36_338 &suiteTimeOut=0.0 &isAutoHealEnabled=false ```
NameDescriptionValue
suiteThe suite should be relative to scriptsPathMaster. Example : sahitests/small.suite
scriptsPathMasterThe scriptsPathMaster is the parent folder which contains all script and suite files that need to be run. Example : C:/sahi_pro/userdata/scripts
startWithSpecify the start mode. Example: BROWSER
threadsNumber of simultaneous browser instances that can be executed. Example: 3
browserTypeBrowser on which scripts will be executed. Example: chrome
baseURLSets a default Start URL for scripts. Example: https://sahitest.com/demo/
AndroidDeviceAndroid device in which script will be executed.
iOSDeviceiOS device in which script will be executed.
jsCodeCoverageIf "true", collect the JS Code Coverage. Example: false
abortedRetryCountSpecify the retry count for aborted script.
failureRetryCountSpecify the retry count for failed script.
logsInfologsInfo format is type:filePath,type2:filePath2 [Example: html:D:/logs/html,xml:D:/logs/xml ]
tagstags seperated by '&&', '||', '!' operators. [Example: (user||admin)&&medium ]
nodesComma separated value of node:port combinations. Example: node1:9999,node2:9999
userDefinedIdThe unique id that the user can pass to differentiate a suite from other. You can click on 'Generate Id' button to generate a unique id.
Time Out (Minutes)Specify the time out in minutes for script.
Enable autohealing of elements if not found.
Click on Generate URL button below to generate the request URL as per the values set in the above table. Click on Test button to execute the script.
Request URL:
## Register Nodes to a running Suite Nodes can be added to an already running distributed run. ```js http://localhost:9999/_s_/dyn/SahiEndPoint_registerNodes ?userDefinedId=2June2015__12_1_36_338 &extNodes=node1%3A9999%2Cnode2%3A9999 ```
NameDescriptionValue
userDefinedIdThe unique id that the user can pass to differentiate a suite from other. Example : 2June2015__12_1_36_338
nodesComma separated value of node:port combinations. Example: node1:9999,node2:9999
Click on Generate URL button below to get the request URL. Running the URL will register nodes to suite run associated with the userDefinedId provided above. Click on Test to run the URL.
Request URL:
## Cleanup after executing script After a script or suite has been executed, cleanup task should be performed to avoid memory leak issues. ```js http://localhost:9999/_s_/dyn/SahiEndPoint_cleanup?userDefinedId=2June2015__12_1_36_338 ```
NameDescriptionValue
userDefinedIdThe unique id that the user can pass to differentiate a suite from other. Example : 2June2015__12_1_36_338
Click on Generate URL button below to get the request URL for cleanup of suite.
Request URL:
## Kill a running Script/Suite A suite or script can be kill during execution ```js http://localhost:9999/_s_/dyn/SahiEndPoint_killAll?userDefinedId=2June2015__12_1_36_338 ```
NameDescriptionValue
userDefinedIdThe unique id that the user can pass to differentiate a suite from other. Example : 2June2015__12_1_36_338 If left blank, all running suites will be killed.
Click on Generate URL button below to get the request URL for killing a suite.
Request URL:
## Load Testing To execute load tests on your application, you can use a URL like this: ```js http://localhost:9999/_s_/dyn/SahiEndPoint_runDistributedLoad?a=a &scriptsPathMaster=C%3A%2FUsers%2FTyto2Fsahi_proP112%2Fuserdata%2Fscripts &suitePath=sahitests%2Fload%2Fsubject.sah &noisepath=sahitests%2Fload%2Fnoise.sah &noiseBrowserType=chromeHL &nodes=localhost%3A9999 &port=9999 &startWith=BROWSER &browserType=firefox &min=1 &incrementBy=2 &host=localhost &isDifferentMasterS=null &max=9 &ignorePattern=.*%28svn%7Ccopied%29.* &logsInfo=html &baseURL=http%3A%2F%2Fsahitest.com%2Fdemo%2Ftraining%2F &subjectRepeatCount=3 &interval=5 ```
NameDescriptionValue
scriptsPathMasterThe scriptsPathMaster is the parent folder which contains all script and suite files that need to be run. Example : C:/sahi_pro/userdata/scripts
noiseThe noise script should be relative to scriptsPathMaster. Example : sahitests/load/noise.sah
subjectThe subject script should be relative to scriptsPathMaster. Example : sahitests/load/subject.sah
noiseBrowserTypeThe browser on which the noise script is run (default chromeHL)
nodesComma separated value of node:port combinations. Example: node1:9999,node2:9999
startWithSpecify the start mode. Example: BROWSER
browserTypeBrowser on which scripts will be executed. Example: chrome
baseURLSets a default Start URL for scripts. Example: https://sahitest.com/demo/
minThreadThe minimum number of noise browsers to run initially
maxThreadThe maximum number of noise browsers to run finally
incrementThe number of noise browsers to be run incrementally after the specified interval
intervalThe interval after which to increment the noise browsers by
subjectRepeatCountNumber of times the subject script should be run at every noise level. It is good to run it more than 1 time to average out any random behaviour.
Click on Generate URL button below to generate the request URL as per the values set in the above table. Click on Test button to execute the script.
Request URL:
--- # Reports Every test run creates a report. Learn how to open reports, how they are organised, and what each status means. When a test fails, you need to know which step failed, what the page looked like and whether it failed before, without running it again. Every test run in Sahi Pro creates a report that answers these questions. Sahi Pro saves the report as the test runs, so you can watch a long suite run while it's still going. ## Open Reports Open **Reports** in any of these ways: - In the No-Code Test Editor, click **Reports** in the left bar. - In the Controller, click **Reports** in the bottom bar. - In a browser, go to [http://localhost:9999/logs](http://localhost:9999/logs). Reports opens on the [reports list](https://resources.sahipro.com/docs/using-sahi/reports-list/), with the latest test runs first. ## How Reports Are Organised Reports have three levels. Each one opens the next: | Level | What it shows | | --- | --- | | [Reports list](https://resources.sahipro.com/docs/using-sahi/reports-list/) | Every test run, newest first, with its status and a summary of results. Select runs here to compare, consolidate, download, sync or delete them. | | [Suite report](https://resources.sahipro.com/docs/using-sahi/suite-report/) | One run of a suite: its details, charts of the results, the time each scenario file took, and every scenario file and test case in it. Its other tabs hold the [Suite Analysis](https://resources.sahipro.com/docs/using-sahi/suite-analysis/) and the [JS Code Coverage](https://resources.sahipro.com/docs/using-sahi/javascript-code-coverage/) report. | | [Script report](https://resources.sahipro.com/docs/using-sahi/script-report/) | One scenario file or script: each test case, keyword and step, with the error message, the element and the screenshot for each step that failed. | Running a single scenario file creates a suite report too, with that one file in it. ## Statuses Each scenario file or script ends a run with one status, shown as a coloured pill, so you can see at a glance what needs attention. A suite takes the worst status of the files in it. | Status | Colour | What happened | | --- | --- | --- | | Success (`SUCCESS`) | Green | Every step and test case passed. | | Failure (`FAILURE`) | Red | At least one step or test case failed, usually an assertion, and the run wasn't aborted or stopped by an error. | | Error (`ERROR`) | Red | At least one step or test case hit an error, such as an element that wasn't found or a syntax error, and the run wasn't aborted. | | Aborted (`ABORTED`) | Orange | The browser stopped responding for too long, 90 seconds by default. | | User Aborted (`USER_ABORTED`) | Orange | Someone stopped the run by hand, for example with **Tools** › **Stop All** in the Editor, or **Stop** in the Controller while a test runs. | | Aborted Timeout (`ABORTED_TIMEOUT`) | Orange | The scenario file ran longer than the time it was given. Set a time limit in the suite file's `timeout_minutes` column (see [Test Suites](https://resources.sahipro.com/docs/using-sahi/data-driven-suites/)) or for the whole suite in the run's [Advanced Settings](https://resources.sahipro.com/docs/using-sahi/run-tests-via-editor/#advanced-run-settings). | | Skipped (`SKIPPED`) | Grey | It wasn't run, because a scenario file it depends on didn't pass. See `depends` in [Test Suites](https://resources.sahipro.com/docs/using-sahi/data-driven-suites/). | | Not Supported (`NOT_SUPPORTED`) | Light grey | It wasn't run, because something it needs, such as a browser or device, wasn't available. | | Internal Aborted Retry (`INTERNAL_ABORTED_RETRY`) | Orange | In a distributed run, the master lost contact with the node running it, and `drun.auto_rerun_scripts_if_internal_aborted` is `true`, so it runs again. | | Internal Aborted (`INTERNAL_ABORTED`) | Orange | In a distributed run, the master lost contact with the node running it, and `drun.auto_rerun_scripts_if_internal_aborted` is `false`. | | Running (`RUNNING`) | Blue | It's still running. | The charts in a suite report say **Passed** and **Failed** for Success and Failure. They're the same statuses. ## Intermediate Statuses A final status doesn't say what happened along the way. A scenario file can pass after Sahi Pro healed one of its steps, or end as a Failure after an earlier error. The intermediate status records the most serious thing that happened during the run: | Intermediate status | What happened | | --- | --- | | Healed | At least one step or test case was [healed](https://resources.sahipro.com/docs/using-sahi/autoheal/): an element wasn't found, so Sahi Pro used a matching one instead. | | Error | At least one step or test case hit an error, including syntax errors. | | Failure | At least one step or test case failed, such as an assertion failure. | | NA | Nothing was healed, and nothing failed or hit an error. | You'll find it in the **Intermediate Statuses** column of a [suite report](https://resources.sahipro.com/docs/using-sahi/suite-report/#scenario-files-and-scripts) and in the [Script Summary](https://resources.sahipro.com/docs/using-sahi/script-report/#script-summary). ## Where Reports Are Kept Sahi Pro saves every report in its own database, as the test runs. You can also: - keep reports in [another database](https://resources.sahipro.com/docs/using-sahi/storing-reports-in-mysql/), such as MySQL, MSSQL, Oracle or PostgreSQL - [sync reports](https://resources.sahipro.com/docs/using-sahi/sahi-syncdb/) to a central database, to see the runs from several machines in one place - save reports as files, such as HTML, JUnit or Excel, when a run ends (see [Customize Reports](https://resources.sahipro.com/docs/using-sahi/customize-reports/)) To change what reports look like, or to delete old reports, see [Customize Reports](https://resources.sahipro.com/docs/using-sahi/customize-reports/). --- # Reports List Find a test run in the reports list, filter and arrange its columns, and compare, consolidate, download, sync or delete reports. The reports list is the first page that opens in [Reports](https://resources.sahipro.com/docs/using-sahi/sahi-reports/#open-reports). It lists every test run, newest first, so you can find the run you need, check how a suite has done over several runs, and share results with others. The reports list with the All Reports, Suite Reports and Script Reports tabs, the Compare, Delete, Consolidate Report, Download and Sync actions, Apply Filters, Clear All Filters and Manage Columns, a filter row under the column headings, and rows for book_store_nightly.dd.csv and cart_button.s.csv runs with their status, browser, Status Summary pills, number of test scripts and test cases, and start time; numbered badges mark the tabs, the actions, the filter buttons, the filter row, the Status Summary and the page size 1. **Tabs:** **All Reports** shows every run. **Suite Reports** shows only suite runs, and **Script Reports** only scenario files and scripts run on their own. 2. **Actions** for the reports you select: [Compare](#compare-runs), [Delete](#delete-reports), [Consolidate Report](#consolidate-reports), [Download](#download-reports) and [Sync](#sync-reports). 3. **Apply Filters**, **Clear All Filters** and **Manage Columns** (see [Find a Run](#find-a-run)). 4. **Filter row:** a filter under each column. 5. **Status Summary:** how many scenario files ended with each status. 6. **Reports in each page:** 10, 25, 50 or 100, with the page controls next to it. ## What Each Column Shows | Column | What it shows | | --- | --- | | Test Suite Name | The suite, scenario file or script, with the start URL under it. Click it to open its [suite report](https://resources.sahipro.com/docs/using-sahi/suite-report/). | | Status | The run's final [status](https://resources.sahipro.com/docs/using-sahi/sahi-reports/#statuses). | | Browser | The browser the run used. | | Android, iOS | The device the run used, for mobile runs. Hidden until you turn them on in **Manage Columns**. | | Status Summary | A pill for each status, with the number of scenario files that ended with it: **P** passed, **F** failure, **E** error, **Sk** skipped, **Ab** aborted, **AbT** aborted timeout, **NS** not supported and **InAb** internal aborted. Healed files show in brackets, such as **P 1 (1 Healed)**. Click a pill to open the suite report with only those files. | | No. of Test Scripts | The number of scenario files and scripts in the run. | | No. of Test Cases | The number of test cases in the run. | | Start Date/Time, End Date/Time | When the run started and ended. | | Time Taken | How long the run took. | | Origin Machine | The machine the run came from. Runs synced from other machines show their machine name here. | | Comment | A note anyone can add to a run, such as "Known issue in the payment page". Click **Add Comment**, type the note and click **Save**. |
The Add Comment dialog with a text box and the Cancel and Save buttons
## Find a Run The list holds every run ever saved, so it grows fast. Filter it to find the runs you need: 1. Set a filter under any column. For example, choose the statuses you want under **Status**:
The Status filter open under the Status column, with checkboxes for All, Success, Failure, Aborted Timeout, User Aborted and Running
The filters are: | Filter | Choices | | --- | --- | | Test Suite Name | Type part of the name. | | Status, Browser, Status Summary, Origin Machine | The values in the list, such as the statuses and browsers your runs have used. | | No. of Test Scripts, No. of Test Cases | 1, 2 - 5, 6 - 10, More than 10. | | Start Date/Time | Any, Today, Yesterday, Last 7 days, Last 30 days, or a Custom range with From and To dates. | | Time Taken | Under 1 min, 1 - 5 min, 5 - 10 min, Over 10 min. | | Comment | Type part of the comment. | 2. The list narrows straight away, to the runs on the page. Click **Apply Filters** to search every saved report. 3. Click **Clear All Filters** to see all runs again. To show or hide columns, click **Manage Columns**, tick the columns you want and click **Save**:
The Manage Columns menu open with checkboxes for All, Browser, Android, iOS, No. of Test Scripts, No. of Test Cases, Start and End Time, Time Taken, Origin Machine and Comment, and the Cancel and Save buttons
## Select Reports The actions work on the reports you select. Tick the box at the start of each row, or the box in the heading row to select every report on the page: Two book_store_nightly.dd.csv runs ticked in the reports list, below the Compare, Delete, Consolidate Report, Download and Sync actions ## Compare Runs When a run fails, the first question is often whether it failed the last time too. Select two or more runs of the same suite and click **Compare**. The newest one opens as a [suite report](https://resources.sahipro.com/docs/using-sahi/suite-report/), with the navigator's menu set to **All Runs**, so the runs you selected are listed one below the other. Click a run to open its report:
The suite report navigator with its menu open and All Runs ticked below Latest Run, listing two book_store_nightly.dd.csv runs: the first expanded to shop.dd.csv, accounts.dd.csv and api.dd.csv, the second collapsed
## Consolidate Reports To share the results of several runs at once, such as every suite run of a release, select the runs and click **Consolidate Report**. It shows each run's **Status Summary**, **No. of Scripts**, **Test Case Status Summary**, **No. of Test Cases** and **Origin Machine**, with a **Total** row: The Consolidated Suite Report for 2 suites, with a row for each book_store_nightly.dd.csv run and a Total row, showing the Status Summary, No. of Scripts, Test Case Status Summary, No. of Test Cases and Origin Machine, and a Download as Excel button Click **Download as Excel** to save it as a spreadsheet. ## Download Reports To keep reports outside Sahi Pro, or to attach them to an email or a CI build, download them as files: 1. Select the reports. 2. Click **Download**. 3. In **Download As**, choose a format and click **Download**:
The Download As dialog with the formats excel, junit, pdf, xml, html, email and html_classic, and a Download button
| Format | Gives you | | --- | --- | | html | The reports as web pages you can open without Sahi Pro. | | html_classic | The same reports in a simpler layout. | | pdf | A PDF of each report. | | excel | A spreadsheet of the results. | | junit | JUnit XML, for CI tools such as Jenkins. | | xml | The report data as XML. | | email | A short HTML summary, the kind sent in report emails. | To download the reports of some scenario files inside a suite, use **Download Reports** in the [suite report](https://resources.sahipro.com/docs/using-sahi/suite-report/#scenario-files-and-scripts). To add your own format, see [Customize Reports](https://resources.sahipro.com/docs/using-sahi/customize-reports/#add-a-report-type). ## Sync Reports When tests run on several machines, each machine keeps its own reports. Sync sends them to one central Sahi Pro, so everyone can see all the runs in one list: 1. Select the reports. 2. Click **Sync**. 3. Fill in the dialog and click **Sync**:
The Sync to Central Server / Target Machine dialog with the fields Host, Port 9999 and Your Machine Name, ticked boxes for Sync Script Steps, Sync Steps Images and Sync Artifacts, Number of Images at one request 20, Number of Artifacts at one request 20, and the Cancel and Sync buttons
| Field | What to enter | | --- | --- | | Host, Port | The central Sahi Pro machine, such as `reports.internal` and `9999`. | | Your Machine Name | The name this machine's runs get in **Origin Machine** on the central machine. | | Sync Script Steps | Send each step, not only the totals. | | Sync Steps Images | Send the screenshots, in batches of **Number of Images at one request**. | | Sync Artifacts | Send the other files saved with the run, in batches of **Number of Artifacts at one request**. | To sync every run automatically when it ends, see [Sync Reports to Central Database](https://resources.sahipro.com/docs/using-sahi/sahi-syncdb/). ## Delete Reports Old reports take space in the database. Select the reports you no longer need and click **Delete**. Sahi Pro asks first, because a deleted report can't be brought back:
The confirmation Delete 1 report(s)?, saying this will permanently delete 1 suite reports and cannot be undone, with the Go back and Delete buttons
To delete reports by age or by time taken, from the command line, see [Delete Old Reports](https://resources.sahipro.com/docs/using-sahi/customize-reports/#delete-old-reports). --- # Suite Report Read a suite report: the navigator, Suite Details, the result charts, the time each scenario file took, and every scenario file and test case in the run. A suite report shows one run of a suite. It starts with the big picture, how many scenario files and test cases passed, and lets you drill down to the one that failed. Click a suite in the [reports list](https://resources.sahipro.com/docs/using-sahi/reports-list/) to open it. The suite report for book_store_nightly.dd.csv: the navigator on the left with Latest Run and the suite tree of shop.dd.csv, accounts.dd.csv and api.dd.csv, a tab for the suite, the Overall Report, Suite Analysis and JS Code Coverage tabs, Hide Suite Summary, Auto Refresh and Export, Suite Details, and the Test Scenario Summary and Test Cases Summary charts; numbered badges mark each part 1. **Latest Run / All Runs:** which runs the navigator shows. 2. **Navigator tools:** expand or collapse the tree, show the open report in the tree, and turn on Auto Refresh for the navigator. 3. **Report tabs:** each report you open, suite or scenario file, opens in its own tab. Click **Show all open tabs** at the right to list them. 4. **Report views:** **Overall Report**, [Suite Analysis](https://resources.sahipro.com/docs/using-sahi/suite-analysis/) and [JS Code Coverage](https://resources.sahipro.com/docs/using-sahi/javascript-code-coverage/). 5. **Hide Suite Summary**, **Auto Refresh** and **Export**. 6. [Suite Details](#suite-details). 7. [Test Scenario Summary and Test Cases Summary](#result-charts). 8. [Execution Summary](#execution-summary), followed by the [scenario files](#scenario-files-and-scripts) in the run. ## The Navigator The navigator on the left shows the suite as a tree, with the same nesting as the suite file: a suite holds the scenario files and scripts in it, and a suite inside a suite shows as a branch of its own. A status icon next to each item shows how it ended. Click an item to open its report in a tab. - **Latest Run** shows the latest run of the suite. Choose **All Runs** to list the earlier runs below it, and open any of them:
The Latest Run menu open in the navigator, with Latest Run ticked and All Runs
- **Search** narrows the tree to the items whose names match. Switch to **Find** to keep the whole tree and highlight the matches instead, then move between them with the arrows. - **Collapse Navigator**, at the far left, hides the navigator to give the report more room. The tabs and the navigator stay as you left them, even after you reload the page. ## Suite Details **Suite Details** shows the suite file, the run's [status](https://resources.sahipro.com/docs/using-sahi/sahi-reports/#statuses), the time taken, the browser, and when the run started and ended. Suite Details for book_store_nightly.dd.csv: Status Failure, Time Taken 02:38.356, Browser chrome, Start 02:09:05 PM and End 02:11:44 PM on Nov 17, 2026, Suite Info with View Detailed Info outlined, and Nodes Info localhost:9999 - Click the icon next to the suite's name to open the suite file. - **View Detailed Info**, under **Suite Info**, lists every setting the run used, such as the start URL, the browser, the retry counts and whether Autoheal was on. Check it when a run behaves differently from the last one. - **Nodes Info** lists the machines that ran the suite. A distributed run shows each node. ## Result Charts **Test Scenario Summary** counts the scenario files and scripts that ended with each status. **Test Cases Summary** counts the test cases. Each status shows its number and its share of the total, and the ring in the middle shows the total. Test Scenario Summary with 7 in total: Passed 3 (43%), Failed 1, Error 1, Aborted Timeout 1 and Skipped 1 (14% each), and Aborted, Internal Aborted and Not Supported 0; Test Cases Summary with 9 in total: Passed 6 (67%), Failed 1, Error 1 and Aborted Timeout 1 (11% each), and Aborted, Skipped and Not Supported 0 ## Execution Summary **Execution Summary** shows how long each scenario file took, as a bar in its status colour. Use it to find the slow ones, or a file that took far longer than usual. Hover a bar to see its name and time. The Execution Summary for 7 scenario files: a bar chart of time taken in minutes with one bar per file in its status colour, a Find a Scenario / Script box, buttons for horizontal and vertical bars, and Execution Order - **Find a Scenario / Script** picks out one file in the chart. - The two buttons switch between horizontal and vertical bars. - **Execution Order** sorts the bars by the order the files ran in. Click it again to sort by time taken, longest first. ## Scenario Files and Scripts Below the charts, every scenario file and script in the run is listed with its result. A suite inside the suite shows as a row of its own, with the number of scripts and test cases in it. Click the arrow at the start of a row to see its test cases: The scripts table under Download Reports, with the columns Test, Tags, Final Status and Test Cases (Failed, Error), a search box and filters; shop.dd.csv is expanded to checkout.s.csv (Skipped), books.s.csv (Success) with its Buy Books test cases, and book_orders.s.csv (Failure) with its Order Books at Cart Prices test case | Column | What it shows | | --- | --- | | Test | The scenario file or script, with its start URL. Click it to open its [script report](https://resources.sahipro.com/docs/using-sahi/script-report/). Under it, each test case with its description. | | Tags | The file's tags. Sahi Pro also adds the file's name and the suite it's in. | | Final Status | How the file ended. | | Test Cases | How many test cases failed or hit an error, the success rate and the total. | | Start Time, Time Taken | When the file started and how long it took. | | Intermediate Statuses | The [intermediate status](https://resources.sahipro.com/docs/using-sahi/sahi-reports/#intermediate-statuses), such as FAILURE or HEALED. | | Node | The machine that ran the file. | | Load | The machine's load, for distributed runs. | The columns on the right scroll into view: The right side of the scripts table with the columns Time Taken, Intermediate Statuses, Node and Load and their filters; checkout.s.csv shows NA, books.s.csv 00:11.186 and NA, and both ran on localhost:9999 with Load Not Applicable Each column has a filter, such as **All Tags**, **All Status**, durations (Under 1 min, 1 - 5 min, 5 - 10 min, Over 10 min), intermediate statuses and nodes. The search box finds a file or test case by name. **Expand All** opens every row. To download the reports of only some files, tick them and click **Download Reports**. ## Watch a Running Suite Turn on **Auto Refresh** to follow a suite while it runs. The report reloads every 2 seconds until the run ends. ## Export **Export** saves the report as a file:
The Export menu open, with Export to PDF, Export to Excel and Download all Artifacts
- **Export to PDF** saves the report as a PDF, for sharing with people who don't use Sahi Pro. - **Export to Excel** saves the results as a spreadsheet. - **Download all Artifacts** downloads the files the run saved, such as screenshots. ## Suite Analysis and JS Code Coverage - **Suite Analysis** shows which scenario files failed in this run and how they did in earlier runs, and which steps caused failures or were healed. See [Suite Analysis](https://resources.sahipro.com/docs/using-sahi/suite-analysis/). - **JS Code Coverage** shows how much of the application's JavaScript the run used. See [Javascript Code Coverage](https://resources.sahipro.com/docs/using-sahi/javascript-code-coverage/). --- # Script Report Read a script report: each test case, keyword and step, the error and screenshot for a failed step, healed steps, data sets and retries. A script report shows one scenario file or script from a run, down to each step. It's where you find out why a test failed: which step, what Sahi Pro expected, what it found, and what the page looked like. Open it from a [suite report](https://resources.sahipro.com/docs/using-sahi/suite-report/): click the scenario file in the navigator or in the list of scenario files. It opens in a tab of its own. The script report for book_orders.s.csv in the suite report: the header with Failure, 1 test case passed, 1 failed and 0 errors, Chrome, the time taken, the start time and localhost:9999; Filters, Script Summary, Auto Refresh and Export; the test case Order Books at Cart Prices with the data chip nightly_orders.csv - cart_totals and 3 sets executed, a table of data sets with their status, and the keywords of each set; the failed keyword Check Cart Total is open in the steps panel on the right; numbered badges mark each part 1. **Header:** the [status](https://resources.sahipro.com/docs/using-sahi/sahi-reports/#statuses), how many test cases passed, failed and hit an error, and the browser, time taken, start time and node. 2. **Filters** for what the report shows (see [Choose What to Show](#choose-what-to-show)). 3. **Script Summary**, **Auto Refresh** and **Export**. 4. **Test data:** the data file and group a data-driven test case used, and how many sets ran. 5. **Data sets:** each set's status and values. 6. **Steps panel:** the steps of the keyword you clicked. 7. **A failed keyword**, in red. ## Test Cases, Keywords and Steps The report lists the scenario file the way it's built: - **INCLUDES/GLOBAL** comes first, with the keyword files the scenario file loads, such as `store.sah`. - Then each **test case**, with its description and a status icon. - Under each test case, its **keywords**, with the values passed to them in grey on the right, such as `test, secret`. Click a test case's arrow to open or close it. Click a keyword to see its steps in the panel on the right. Each step reads as a sentence, such as "Enter value 2 in q textbox", with the time it took. A keyword's parameters, such as `$total`, show above its steps. ## Find Why a Step Failed A failed or errored keyword is red, and so is its test case. Click the keyword, then click the red step in the panel to open its details:
The steps panel for the keyword Check Cart Total with the step Assert that value of total textbox is 800 open: Failed at 02:09:42.858 pm, STEP 1; the Failure Message [Assertion Failed] Expected:800 Actual:"850" at /sahi_training/store.sah&n=29 CheckCartTotal at /sahi_training/book_orders.s.csv&n=7; the Element _getValue(_textbox("total")); and the actions Lock the window, Bring window into focus and Take page screen shot
- **Failed** or **Error**, the time and the step number. - **Failure Message** or **Error Message**: what went wrong, such as an assertion that expected 800 and found 850, or an element that wasn't found. Under it, the line in the keyword file and in the scenario file where it happened, such as `store.sah&n=29` for line 29 of `store.sah`. - **Element**: the element the step acted on, such as `_getValue(_textbox("total"))`. - **Screenshot:** when a step fails or hits an error, Sahi Pro locks the browser window, brings it into focus and takes a screenshot, so you can see what the page looked like. An error looks the same, with **Error Message** in place of **Failure Message**:
The steps panel for the keyword Open Forgot Password Page: step 1 Navigate to https://sahitest.com/demo/training/login.htm passed; step 2 Click on Forgot Password? link is open, with Error at 02:10:22.730 pm, STEP 2, the Error Message Error: _link("Forgot Password?") was not found on the browser, the lines in store.sah and login_errors.s.csv, the Element _link("Forgot Password?"), and the actions Lock the window, Bring window into focus, Take page screen shot (blurred here) and Unlock the window
:::note If Sahi Pro can't find the browser window on the screen, it shows **Unable to detect the browser viewport** with the screen size, and takes a screenshot of the whole screen instead. That screenshot can show other windows on the machine, so check it before you share the report. ::: ## Healed Steps When an element isn't found, [Autoheal](https://resources.sahipro.com/docs/using-sahi/autoheal/) can find a matching one, so the test carries on instead of failing. This happens when the application changes, for example when a button's label changes from "Add" to "Add to Cart". A healed step passes, but you need to know about it, because the test should be updated. Healed steps are marked **Healed** on the test case, the keyword and the step, and the header counts them, such as **1 healed**. Open the step to see what changed:
The steps panel for the keyword Add Books To Order with 1 healed; step 4 Click on Add button is open, marked Passed and Healed, with Result Step completed successfully, Element _button("Add"), and under Auto Heal: Original element _button("Add"), Healed element _button("form-btn"), Executed step _click(_button("form-btn")), and Recommendation Reason might be page update. Please update script with new value, with a link to /sahi_training/store.sah&n=22
- **Original element**: the element in your test, which wasn't found. - **Healed element**: the element Sahi Pro used instead. - **Executed step**: the step as it actually ran. - **Recommendation**: what to do, with a link to the line in the keyword file to update. ## Data-Driven Test Cases A test case that runs with a [test data file](https://resources.sahipro.com/docs/using-sahi/test-data-files/) runs once for each row. The report shows the data file and group under the test case, such as **nightly_orders.csv - cart_totals**, and how many sets ran, such as **3 sets executed**. Each set has its own row in a table, with its status and the values it used, one column for each column of the data file: The test case Order Books at Cart Prices with the data chip nightly_orders.csv - cart_totals and 3 sets executed, above a table with the columns Status, Username, Password, javaQty, rubyQty, pythonQty and total: Success with test, secret, 2, 3, 1 and 1550; Failure with test, secret, 1, 1, 1 and 800; Success with test, secret, 0, 2, 2 and 1100 So when one set out of many fails, you can see straight away which values it used, such as `1`, `1`, `1` and `800`. Click the arrow at the start of a row to see the keywords that ran with those values, or the arrows above the table to open or close every set. ## Retried Test Runs When a run is set to retry failed scenario files (**Retry Count** in the run's [Advanced Settings](https://resources.sahipro.com/docs/using-sahi/run-tests-via-editor/#advanced-run-settings)), the report keeps every attempt. The header shows which one you're looking at. Click it to switch:
The retry menu open in the script report header: 1 Retry No. 1 (final), Failure, 00:30, 02:17:11 pm; and Actual execution, Failure Retry, 00:30, 02:16:36 pm
- **Actual execution** is the first attempt. - **Retry No. 1**, **Retry No. 2** and so on are the retries. The last one is marked **(final)**, and its status is the file's final status. ## Choose What to Show Click **Filters** to choose what the report shows. The number on the button is how many are on:
The Filters menu open with Show Failed unticked, and Show Screenshots and No Code View ticked
- **Show Failed** shows only the test cases that failed or hit an error. Turn it on in a long report to go straight to the problems. - **Show Screenshots** shows the screenshots in each step's details. - **No Code View** shows the steps as sentences, such as "Enter value 2 in q textbox". Turn it off to see each step as Sahi Script, such as `_setValue(_textbox("q"), "2")`. ## Script Summary Click **Script Summary** for an overview of the file: The Script Summary for book_orders.s.csv, 2 test cases, 1 failed: Script Info with Browser Version Chrome 157.0.8103.79 and the User Agent, and Test Cases with Order Books at Cart Prices (Failure, intermediate status FAILURE) and Place Bulk Orders (Success), with their tags, start and end times - **Script Info**: the browser version and user agent the file ran in. - **Test Cases**: each test case with its tags, final status, [intermediate status](https://resources.sahipro.com/docs/using-sahi/sahi-reports/#intermediate-statuses), and start and end time. - **Artifacts**: the files the run saved, such as screenshots, when there are any. ## Watch a Running Test and Export - Turn on **Auto Refresh** to follow a scenario file while it runs. The report reloads every 2 seconds until the file ends. - **Export** has **Export to PDF**, **Export to Excel** and **Download all Artifacts**, the same as in the [suite report](https://resources.sahipro.com/docs/using-sahi/suite-report/#export). --- # Javascript Code Coverage Sahi Pro can measure how much of the web application's JavaScript your tests run, by function and by decision point, for each JavaScript file. Passing tests don't tell you how much of the application they checked. JS Code Coverage measures how much of the application's JavaScript your tests actually ran: which functions were called, and which branches of each decision, such as both sides of an `if`, were taken. Parts that no test reaches are the ones to write tests for next. :::note If a test goes to more than one domain, add [\_addToSession](https://resources.sahipro.com/docs/sahi-script/functions/actions/#_addtosession) for each domain in the test. Otherwise, Sahi Pro collects JS Code Coverage only for the first domain. ::: ## Turn On JS Code Coverage ### For All Test Runs Set this in `userdata/config/userdata.properties`: ```properties js.code_coverage.enabled.default=true ``` ### For One Test Run In the Run Configuration, open **Advanced Settings** and tick **JS Code Coverage**:
Advanced Settings in the Run Configuration: Offline Reports, Retry Count with Aborted and Failure, Show Periodic Report Summary, Timeout (Minutes), Enable Autoheal, Enable Autothread, Send Email Reports, JS Code Coverage, Extra Parameters and User Defined ID
See [Run Tests via Editor](https://resources.sahipro.com/docs/using-sahi/run-tests-via-editor/#advanced-run-settings) for the other settings. ## JS Code Coverage Report Open the [suite report](https://resources.sahipro.com/docs/using-sahi/suite-report/) of the run, and click the **JS Code Coverage** tab: The JS Code Coverage tab for codecoverage_test.sah: Total Scripts 5, Total Functions 5, Total Decision Points 10, Total Functions Covered 5, Total Decision Points Covered 5, Total Functions Covered 100% in green with a thumbs-up and Total Decision Points Covered 50% in red with a thumbs-down; below, a table of the five JavaScript files script1.js to script5.js on sahitest.com, each with Functions Covered 1 of 1 (100%) and Decision Points Covered 1 of 2 (50%) The summary at the top shows, for the whole run: - **Total Scripts**: the number of JavaScript files the run loaded. - **Total Functions** and **Total Functions Covered**: how many functions the files have, and how many the run called. - **Total Decision Points** and **Total Decision Points Covered**: how many branches the files have, such as each side of an `if` or `else`, and how many the run took. Below it, the table shows the same numbers for each JavaScript file. A percentage above 50% is green with a thumbs-up. 50% or less is red with a thumbs-down. Click a file to see its code, with the number of times each function and branch ran next to it. A count of 0, in red, is code that no test ran: script1.js with performAction1() marked 1 in green, the if (flag) branch marked 1 in green, and the else branch marked 0 in red In this example, the test clicked the button that calls `performAction1()`, so the function and its `if` branch ran once. The `else` branch never ran, so half the decision points are covered. --- # Suite Analysis Suite Analysis shows which steps caused the failures and healed steps in a suite run, which scenario files they affected, and how each file has done across earlier runs. When a suite fails, a lot of time can go into going through the results to find the real problem. Often many failures come from very few steps: when you know that 23 failing scenario files all fail because of the same 3 steps, fixing and rerunning is quick. Suite Analysis finds those steps for you, and shows how each scenario file has done in earlier runs. ## Open Suite Analysis Open the [suite report](https://resources.sahipro.com/docs/using-sahi/suite-report/) of a run, and click the **Suite Analysis** tab: The Suite Analysis tab of the book_store_nightly.dd.csv suite report: Suite Details, the Test Scenario Summary with 7 in total, 5 passed, 1 error and 1 aborted timeout, and the start of the Failed Script History table It starts with the Suite Details and the Test Scenario Summary, then has three parts: the [Failed Script History](#failed-script-history), the [Passed Scripts With Failure History](#failed-script-history), and the [Failure & Healed Report](#failure--healed-report). ## Failure & Healed Report The Failure & Healed Report lists each step that failed or was healed in this run, and how many scenario files it affected: The Failure & Healed Report with Failure Report and Healed Report ticked: the step _click(_link("Forgot Password?")) Caused 1 Failures in 1 Scripts, with View Impact Tree outlined; the Impact Tree below goes from _click(_link("Forgot Password?")) at line 66 to OpenForgotPasswordPage at line 60 to login_errors.s.csv at line 8, and Affected Script Reports lists login_errors.s.csv - **Step**: the step that failed, such as `_click(_link("Forgot Password?"))`. Click the arrow next to it to show or hide its impact tree. - **Impact**: how many failures the step caused, in how many scenario files, such as "Caused 1 Failures in 1 Scripts". - **View Impact Tree** shows the path from the step to each scenario file it broke: the step and its line, the keywords or functions that called it, and the scenario files. A step inside a keyword used by many scenario files shows a branch for each one, so you can see that fixing this one step fixes all of them. - **Affected Script Reports** lists the scenario files that failed because of the step. Click one to open its [script report](https://resources.sahipro.com/docs/using-sahi/script-report/). Healed steps are listed the same way, as Autoheals, such as "Caused 1 Autoheals in 1 Scripts". Each one is a step to update in your tests, before the page changes again: The Failure & Healed Report for cart_button.s.csv: the step _click(_button("Add")) Caused 1 Autoheals in 1 Scripts, with View Impact Tree Untick **Failure Report** or **Healed Report** at the top right to hide failures or healed steps. ## Failed Script History Is a scenario file failing for the first time, or has it been failing for a while? The **Failed Script History** answers this for each file that failed in this run. **Passed Scripts With Failure History** does the same for files that passed this time but failed before, which can point to tests that pass and fail at random: Failed Script History with slow_search.s.csv and login_errors.s.csv at 0% pass within the same suite and across all suites, with a row of red status icons for each; and Passed Scripts With Failure History with Register.s.csv (100% in the suite, 89.5% across all suites), books.s.csv (80% and 72.7%) and book_orders.s.csv (20% and 20%), with green and red status icons from recent to old Each table shows the history twice: 1. **Within the same Suite**: the runs of the file in this suite only. 2. **Across all Suites**: every run of the file, in any suite. For each, **Pass %** is the share of those runs that passed, and **Status (Recent to Old)** shows a status icon for each run, starting with the latest. A small number next to an icon means the file was retried in that run: it shows how many times it ran. For example, if a file fails, is retried once with [Retry Count](https://resources.sahipro.com/docs/using-sahi/run-tests-via-editor/#advanced-run-settings) and fails again, its icon shows 2. :::note Scenario files that ended as Aborted or Error count as failures in these tables. ::: To change how many runs the tables show, set this in `userdata/config/userdata.properties`. The default is 10: ```properties sahi.count.script_status_to_be_shown=10 ``` --- # Customize Reports How Sahi Pro builds reports, and how to change a report type, add your own, add custom fields, set a pass threshold, keep offline reports and delete old reports. Reports work as they are, but teams often need more: a company layout, a field such as the build number in the suite report, or a format another tool can read. This page explains how reports are made, and how to change them. ## How Reports Are Made 1. As a test runs, Sahi Pro saves each step in its database. 2. When a suite ends, Sahi Pro reads the data from the database and turns it into XML. 3. The XML is turned into the report you see, or into report files, with XSL transformations. Sahi Pro ships with XSL files for the **html**, **xml**, **junit**, **excel**, **email** and **pdf** report types. They're in `config/reports/`, in a directory for each type, such as `config/reports/html`. ## Report Types A report type is a directory of XSL files and a `report.properties` file. The names `html` and `xml` aren't special keywords: a report type is simply the name of its directory. When a report of type `html` is needed, Sahi Pro looks for `userdata/config/reports/html` first, then for `config/reports/html`. The main XSL files in a report type: | File | Output | | --- | --- | | `suites_list.xsl` | The [reports list](https://resources.sahipro.com/docs/using-sahi/reports-list/). Only needed for the reports you view in Sahi Pro. | | `suite_report.xsl` | A [suite report](https://resources.sahipro.com/docs/using-sahi/suite-report/). | | `testcase_report.xsl` | A suite report with a summary of test cases. | | `script_report.xsl` | A [script report](https://resources.sahipro.com/docs/using-sahi/script-report/). | | `failure_report.xsl` | The failure and healed reports in [Suite Analysis](https://resources.sahipro.com/docs/using-sahi/suite-analysis/). | | `js_code_coverage_report.xsl` | The [JS Code Coverage](https://resources.sahipro.com/docs/using-sahi/javascript-code-coverage/) report. | | `reconciled_report.xsl` | Another view of the data, such as the time of each step across a load test. | `report.properties` sets the names of the report files and what's copied with them. For example, in `config/reports/html/report.properties`: ```properties script_file.name=.html suite_file.name=index.html testcase_summary_file.name=testcase_summary.html images.copy=true images.dir=images files.copy=all ``` - `` and `` in a file name are replaced with the real values. - `images.copy` sets whether screenshots are copied with the report files, and `images.dir` the directory they're copied to. - `files.copy` sets which files are saved: `summary` for the suite report and test case summary only, `failed_scripts` to add the reports of failed scripts, and `all` for every report. ## Change a Report Type To change a report type without touching the files Sahi Pro ships with, copy them to `userdata/config/reports/` and change the copies. Sahi Pro uses a file in `userdata/config/reports/` when there is one, and the one in `config/reports/` otherwise. For example, to change `config/reports/html/suites_list.xsl`: 1. Copy `suites_list.xsl` and `report.properties` from `config/reports/html/` to `userdata/config/reports/html/`. Both files must be there. 2. Edit the copied `suites_list.xsl`. ## Add a Report Type 1. Copy `config/reports/html` to `userdata/config/reports/mytype`. 2. Edit the XSL files as you need. 3. Try your XSL on a report you already have: open the report, and add `&type=mytype` to the end of its address. For example, change ```text http://localhost:9999/_s_/dyn/pro/DBReports_scriptReport?id=book_orders_chrome__243e73c20d63804cff09d1807d124f0d5cde ``` to ```text "&type=mytype" http://localhost:9999/_s_/dyn/pro/DBReports_scriptReport?id=book_orders_chrome__243e73c20d63804cff09d1807d124f0d5cde&type=mytype ``` The report then uses the XSL files in `mytype`. 4. When the report looks right, save reports in your type at the end of each run. In `testrunner.bat`, `testrunner.sh`, `drun.bat` or `drun.sh` in `userdata/bin`, set `LOGS_INFO`, which the file passes to `-logsInfo`: ```bash export LOGS_INFO=mytype ``` In the `.bat` files, write `set LOGS_INFO=mytype`. To also choose where the files are saved, add a path after a colon, such as `mytype:D:/reports`. Separate several types with commas, such as `html,mytype`. ## Sort the Suite Report by Name A suite report lists its scenario files by start time. To list them by name instead: 1. Back up `config/reports/html/suite_report.xsl`. 2. Open `config/reports/html/suite_report.xsl`, find ```xml ``` and remove the comment marks, so it reads ``. ## Add Custom Fields to the Suite Report You can show your own values in the suite report, such as a build number or the environment a suite ran in. For example, to add two fields called `customField` and `anotherCustomField`: 1. Back up `config/reports/html/suite_report.xsl`. 2. Open `config/reports/html/suite_report.xsl`. 3. **Add the headings.** Find ```xml ``` and ```xml ``` and change them to ```xml Custom Field Another Custom Field ``` and ```xml ``` 4. **Add the values.** Find ```xml ``` and change it to ```xml
``` Add one heading and one value for each custom field. To pass the values when a suite runs, see [How to show custom fields in reports](https://resources.sahipro.com/docs/faq/how_to_show_custom_fields_in_reports/). ## Set a Pass Threshold By default, a suite is a Success only if every scenario file in it passes. To call a suite a Success when most of its files pass, such as 75% of them, set a pass threshold: 1. Open `userdata/config/userdata.properties`. 2. Add `sahi.pass_threshold_percentage` with the percentage you want. The default is 100: ```properties sahi.pass_threshold_percentage=75 ``` The suite report then shows the suite as a Success when at least that share of its scenario files pass. Each file still shows its own result in the suite report. ## Save Report Files for Runs from the Controller Runs from the Controller are saved in the database, but no report files are made for them. To also save report files, set `controller.offline_logs.type` in `userdata/config/userdata.properties` to a report type: ```properties # Sets the type of offline reports created when a test is run from the Controller. Leave it blank for none. controller.offline_logs.type=html ``` ## Delete Old Reports To delete a few reports, select them in the [reports list](https://resources.sahipro.com/docs/using-sahi/reports-list/#delete-reports) and click **Delete**. To clear out many old reports and keep the database small, use `delete_reports`: 1. Stop Sahi Pro if it's running. 2. Open a command prompt or terminal and go to `userdata/bin` in the Sahi Pro installation directory. 3. Run `delete_reports.bat` (Windows) or `./delete_reports.sh` (macOS and Linux) with one of these: | To delete | Run | | --- | --- | | Reports older than 30 days | `delete_reports.bat "-duration=30"` | | Script reports that took 3 minutes or less | `delete_reports.bat "-time_taken<=00:03:00"` | | Script reports that took 3 minutes or more | `delete_reports.bat "-time_taken>=00:03:00"` | The number of days must be 0 or more. Run it without anything after it to see these options: ```text D:\SahiPro\userdata\bin>delete_reports.bat -- Usage: delete_reports.bat "-duration=" Example: To delete reports older than 30 days: delete_reports.bat "-duration=30" The duration_in_number_of_days is greater than or equal to 0. delete_reports.bat "-time_taken<=" Example: To delete script reports which took time less than or equal to 3 minutes: delete_reports.bat "-time_taken<=00:03:00" delete_reports.bat "-time_taken>=" Example: To delete script reports which took time greater than or equal to 3 minutes: delete_reports.bat "-time_taken>=00:03:00" -- ``` `delete_reports.bat` and `delete_reports.sh` have three settings you can change by editing the file: | Setting | What it does | Default | | --- | --- | --- | | `IS_LARGE_DB` | Deletes reports in batches of `BATCH_DURATION` days, which works better for a large database. `DELETE_FILES` and `BATCH_DURATION` only apply when this is `true`. | `true` | | `DELETE_FILES` | Also deletes the files that belong to the deleted reports, such as screenshots. Set it to `false` to keep them. | `true` | | `BATCH_DURATION` | The number of days in each batch. | `10` | For example, in `delete_reports.bat`: ```bat SET IS_LARGE_DB=true SET DELETE_FILES=false SET BATCH_DURATION=24 ``` --- # Storing Log Reports in MySQL By default Sahi stores its reports in a H2 database which is bundled in Sahi. For custom reporting it may be necessary to store it into a central MySQL database or another database. To store in a MySQL database do the following: ## Create a Database Create a database in MySQL using any MySQL client. Let us assume that the name of the database is **sahireports** Note that minimum mysql version required is `5.6.4` ## Creating Tables The tables will be created automatically, once Sahi is restarted after performing the following steps. There is no need to run the db script manually. ## Add MySQL Driver Jars to Sahi Classpath [Download the MySQL Connector/J pack](http://dev.mysql.com/downloads/connector/j/), extract and copy **mysql-connector-java-x.x.x-bin.jar** to `sahi/userdata/extlib` folder (create if needed). Note that minimum mysql java connector version required is either `5.1.47` or `8.0.17` ## Point Sahi to use the MySQL Database :::note While creating schema, chooose the charset/collations as Latin1. ::: **For version 8.X.X onwards, use:** - Add the following to `userdata.properties` in `sahi/userdata/config` folder ```properties "mysql" "com.mysql.cj.jdbc.Driver" "jdbc:mysql://localhost/sahireports?allowMultiQueries=true&sessionVariables=sql_mode=NO_BACKSLASH_ESCAPES,group_concat_max_len=4294967295&zeroDateTimeBehavior=convertToNull" # Specifies database type. # The inbuilt options are "mysql" and "h2" # Change jdbc parameters accordingly db.type=mysql #JDBC parameters for mysql database db.driver_name=com.mysql.cj.jdbc.Driver db.jdbc_url=jdbc:mysql://localhost/sahireports?allowMultiQueries=true&sessionVariables=sql_mode=NO_BACKSLASH_ESCAPES,group_concat_max_len=4294967295&zeroDateTimeBehavior=convertToNull db.user_name=root db.password= ``` - Change the user\_name, password and database name as required. - Use mysql java connector version 8.X.X. **For version 5.X.X onwards, use:** - Add the following to `userdata.properties` in `sahi/userdata/config` folder ```properties "mysql" "com.mysql.jdbc.Driver" "jdbc:mysql://localhost/sahireports?allowMultiQueries=true&sessionVariables=sql_mode=NO_BACKSLASH_ESCAPES,group_concat_max_len=4294967295&zeroDateTimeBehavior=convertToNull" # Specifies database type. # The inbuilt options are "mysql" and "h2" # Change jdbc parameters accordingly db.type=mysql #JDBC parameters for mysql database db.driver_name=com.mysql.jdbc.Driver db.jdbc_url=jdbc:mysql://localhost/sahireports?allowMultiQueries=true&sessionVariables=sql_mode=NO_BACKSLASH_ESCAPES,group_concat_max_len=4294967295&zeroDateTimeBehavior=convertToNull db.user_name=root db.password= ``` - Change the user\_name, password and database name as required. - Use mysql java connector version 5.X.X. ## Restart and Run Restart Sahi. This will create the required tables in the database. Run a script and check! ## Trouble-shooting If you see an error like ```js com.mysql.jdbc.PacketTooBigException: Packet for query is too large ``` run the following query once on your database ```js SET GLOBAL max_allowed_packet=16777216 ``` --- # Storing Reports in MSSQL Database By default Sahi stores its reports in a H2 database which is bundled in Sahi. Sahi reports can now also be logged in MSSQL database. To store in a MSSQL database, do the following: ## Create a Database Create a database in MSSQL using any MSSQL client. Let us assume that the name of the database is **sahireports** ## Creating Tables The tables will be created automatically, once Sahi is restarted after performing the following steps. There is no need to run the db script manually. ## Add MSSQL Driver Jars to Sahi Classpath [Download the MSSQL Connector](https://docs.microsoft.com/en-us/sql/connect/jdbc/release-notes-for-the-jdbc-driver?view=sql-server-ver15#64), extract and copy **mssql-jdbc.jar** to `sahi/userdata/extlib` folder (create if needed). :::note MSSQL Connector version 6.4.0 and later are supported. ::: :::note Choose a mssql-jdbc.jar that supports your Java runtime. For example, to use MSSQL Connector version 6.4.0 with Java 8, copy mssql-jdbc-6.4.0.jre8.jar to `sahi/userdata/extlib` folder. ::: ## Point Sahi to use the MSSQL Database Add the following to `userdata.properties` in `sahi/userdata/config` folder ```js "mssql" "com.microsoft.sqlserver.jdbc.SQLServerDriver" "jdbc:sqlserver://localhost:1433;databaseName=sahireports" # Specifies database type. # The inbuilt options are "mysql", "h2" and "mssql" # Change jdbc parameters accordingly db.type=mssql #JDBC parameters for mssql database db.driver_name=com.microsoft.sqlserver.jdbc.SQLServerDriver db.jdbc_url=jdbc:sqlserver://localhost:1433;databaseName=sahireports db.user_name=sa db.password=abcd123 ``` Change the user\_name, password and database name as required. :::note SSL handshake exception may occur for MSSQL Connector version 10.2.0 and later. This occurs when your SQL server does not have a trusted SSL/TLS certificate. To fix this, append `trustServerCertificate=true` to the connection URL as in the example below. ```js "jdbc:sqlserver://localhost:1433;databaseName=sahireports;trustServerCertificate=true" db.jdbc_url=jdbc:sqlserver://localhost:1433;databaseName=sahireports;trustServerCertificate=true ``` ::: ## Restart and Run Restart Sahi. This will create the required tables in the database. Run a script and check! --- # Storing Reports in ORACLE Database By default Sahi stores its reports in a H2 database which is bundled in Sahi. Sahi reports can now also be logged in ORACLE database. To store in an ORACLE database, do the following: ## Create a Database Connection Create a database connection in Oracle using any Oracle client (Oracle SQL Developer). Let us assume that the name of the database connection is **sahireports** To achieve database connection to **sahireports** follow the below steps, Assuming you have installed Oracle Database and Oracle Client (Oracle SQL Developer). Connect to **SYSTEM** and run the below query to create, connect and grant privileges to the user. ```js CREATE USER sahireports IDENTIFIED BY Sahipro1; GRANT CONNECT TO sahireports; GRANT ALL PRIVILEGES TO sahireports IDENTIFIED BY Sahipro1; ``` ![Oracle Connection](https://resources.sahipro.com/docs/assets/images/using-sahi/oracle_connect_db.webp) Now, you can successfully connect to **sahireports** ## Add ORACLE Driver Jars to Sahi Classpath [Download the ORACLE Connector](https://www.oracle.com/database/technologies/appdev/jdbc-downloads.html), extract and copy **ojdbc.jar** file to `sahi/userdata/extlib` folder (create if needed). :::note Choose an ojdbc.jar that supports your Java runtime. For example, to use ORACLE Connector with Java 8, copy ojdbc8.jar to `sahi/userdata/extlib` folder. ::: ## Point Sahi to use the ORACLE Database Add the following to `userdata.properties` in `sahi/userdata/config` folder ```properties "oracle" "oracle.jdbc.driver.OracleDriver" "jdbc:oracle:thin:@localhost:1521:oracle" # Specifies database type. # The inbuilt options are "mysql", "h2", "mssql" and "oracle" # Change jdbc parameters accordingly db.type=oracle #JDBC parameters for oracle database db.driver_name=oracle.jdbc.driver.OracleDriver db.jdbc_url=jdbc:oracle:thin:@localhost:1521:oracle db.user_name=sahireports db.password=Sahipro1 ``` Change the **db.user\_name** and **db.password** as required. ## Restart and Run Restart Sahi. This will create the required tables in the database. Run a script and check! --- # Storing Reports in PostgreSQL Database By default Sahi stores its reports in a H2 database which is bundled in Sahi. Sahi reports can now also be logged in PostgreSQL database. To store in a PostgreSQL database, do the following: ## Create a Database Create a database in PostgreSQL using any PostgreSQL client. Let us assume that the name of the database is **sahireports** ## Creating Tables The tables will be created automatically, once Sahi is restarted after performing the following steps. There is no need to run the db script manually. ## Add PostgreSQL Driver Jars to Sahi Classpath [Download the PostgreSQL Connector](https://jdbc.postgresql.org/download/index.html), extract and copy **postgresql-xxxxxx.jar** to `sahi/userdata/extlib` folder (create if needed). ## Point Sahi to use the PostgreSQL Database Add the following to `userdata.properties` in `sahi/userdata/config` folder ```properties "postgresql" "org.postgresql.Driver" "jdbc:postgresql://localhost:5432/sahireports" # Specifies database type. # The inbuilt options are "mysql", "mssql", "postgresql", "oracle" and "h2" # Change jdbc parameters accordingly db.type=postgresql #JDBC parameters for postgresql database db.driver_name=org.postgresql.Driver db.jdbc_url=jdbc:postgresql://localhost:5432/sahireports db.user_name=postgres db.password= ``` Change the user\_name, password and database name as required. ## Restart and Run Restart Sahi. This will create the required tables in the database. Run a script and check! --- # Sync Reports to Central Database Sahi reports can be synced from one machine to another using Sync functionality. This document describes the various ways in which reports can be synced from Machine A to Machine B. Both machines need to be running Sahi. Sync can be performed manually or it can be set to automatic mode. The source and destination database types can be different. For example, you can sync from h2.db to mysql. ## Sync to a Central Database While sync can be performed from any machine to any other machine, the real power lies in having Machine B as a Central machine and syncing reports from various other machines to Machine B. This is especially useful in a continuous integration setup where one wants to aggregate the reports of each build's run at a central location. ## Manual Sync To sync reports from machine A to machine B (you push the reports from machine A to machine B): 1. On machine A, open [Reports](https://resources.sahipro.com/docs/using-sahi/sahi-reports/#open-reports) and select the suites or scenario files to sync in the [reports list](https://resources.sahipro.com/docs/using-sahi/reports-list/). 2. Click **Sync**. The **Sync to Central Server / Target Machine** dialog opens. 3. Fill in the dialog and click **Sync**:
The Sync to Central Server / Target Machine dialog with the fields Host, Port 9999 and Your Machine Name, ticked boxes for Sync Script Steps, Sync Steps Images and Sync Artifacts, Number of Images at one request 20, Number of Artifacts at one request 20, and the Cancel and Sync buttons
- **Host**: the host name or IP address of machine B. - **Port**: the port Sahi Pro runs on, on machine B. Unless it was changed, it's 9999. - **Your Machine Name**: a name for machine A. Machine B shows it as the **Origin Machine** of the synced reports, so you can see which machine sent them. - **Sync Script Steps**: tick it to sync every step of the scenario files. - **Sync Steps Images**: tick it to sync the screenshots in the reports. - **Number of Images at one request**: how many images to send at a time, 20 by default. Lower it on a slow network. - **Sync Artifacts**: tick it to sync the other files saved with the reports. - **Number of Artifacts at one request**: how many of those files to send at a time, 20 by default. Lower it on a slow network, or when the files are large. 4. When the sync ends, Sahi Pro shows whether it worked. 5. To send an email after the sync, see [Trigger Email After Sync](#trigger-email-after-sync). :::note Sahi Pro must be running on both machines. ::: ## Auto Sync In a typical [continuous integration setup](https://resources.sahipro.com/docs/using-sahi/integrate-with-jenkins/), the Sync needs to be done between the Sahi Master machine (Machine A) and Central database machine(Machine B). You can configure this as follows: ### Sahi Master Machine Configure the following in Sahi Master Machine. 1. Click on `Configure` link from Sahi Dashboard, and open `sync_db.properties`. 2. Uncomment the below statements and enter the appropriate values. ```properties syncdb.autosync.enable=true syncdb.autosync.host=centralDBHostIP syncdb.autosync.port=9999 syncdb.autosync.machineName=UserMachineName syncdb.autosync.syncSteps.enable=true syncdb.autosync.syncSteps.syncImages=true syncdb.autosync.syncSteps.imagesPerBatch=20 syncdb.autosync.syncSteps.artifactsPerBatch=20 ``` :::note Note that these values are indicative. You need to modify these values as appropriate. ::: :::note - syncdb.autosync.host and syncdb.autosync.port refer to the host and port of the Central DB machine. syncdb.autosync.host can be IP address or machine name of the Central DB machine. syncdb.autosync.port is the port at which Sahi is running on the Central DB machine - syncdb.autosync.machineName refers to the source machine from which reports are being synced. Give a unique name that distinguishes this machine from other machines in the Central DB. - syncdb.autosync.syncSteps.enable - Setting this to false will not sync the steps in a script. Leave this as true. - syncdb.autosync.syncSteps.syncImages - Setting this to true means that if a step has images (\_takeScreenShot etc), it will get synced too. If you do not want images, set this to false. - syncdb.autosync.syncSteps.imagesPerBatch - This controls how many images should be zipped and transferred at a time. Leave this as 20. Reduce this, if your network is slow. - syncdb.autosync.syncSteps.artifactsPerBatch - This controls how many artifacts should be zipped and transferred at a time. This may need to be adjusted based on artifact sizes. Reduce this, if your network is slow. ::: 3. If you want to ignore some tests from Auto Sync, you can provide the regular expression using `syncdb.autosync.ignoreTests`. For example, to ignore all individual scripts (.sah files), you can use the following regular expression. This is a Java Regular Expression. ```properties syncdb.autosync.ignoreTests=.*[.]sah$ ``` You can also ignore select suites from getting auto synced. 4. Refer to [Trigger Email After Sync](#trigger-email-after-sync) section for details on how to send emails after sync. :::note Note: Sahi should be running on both the machines for sync to be performed. ::: Whenever a test run completes for a sync unit (as decided by the ignoreTests parameter), Sahi will automatically Sync Reports to your Central Database Machine. ## Trigger Email After Sync To trigger email after manual sync or auto sync, follow the below steps. ### Destination Machine (Central Database Machine) Configure the following on the Destination machine (Central Database Machine) to which reports are synced. :::note NOTE: The configuration spans multiple configuration files. ::: 1. Click on `Configure` link from Sahi Dashboard, and open `sync_db.properties`. Uncomment the statement below. ```properties syncdb.autosync.triggerEmail.enable=true ``` 2. Click on `Configure` link from Sahi Dashboard, and open `sync_db.properties` - To configure email.properties, refer to [Email.properties](https://resources.sahipro.com/docs/using-sahi/email-during-playback/#emailproperties-file-explained) section. - Comment `"mail.to"` property (address of the receiver's) statement from email.properties file. :::note NOTE: Email address of the receivers need to be configured in `userdata/config/sync_email_trigger.txt`. Other properties should get defined in `email.properties`. ::: 3. Click on `Configure` link from Sahi Dashboard, and open `sync_email_trigger.txt`. When using a Central DB to sync all reports, emails can be sent to multiple people based on which machine(s) triggered the sync. Eg. ```properties machine1,machine2,projectx_.*=manager1@example.com,boss2@example.com machine3=email1@example.com, email2@example.com When reports are synced from machine1, machine2 or any machine starting with projectx_, emails will be sent to manager1@example.com and boss2@example.com. When reports are synced from machine3, emails will be sent to email1@example.com and email2@example.com. ``` The left hand side of the expression specifies the source machines (corresponding to `syncdb.autosync.machineName` in `sync_db.properties`) from where the reports were synced. You can specify multiple machine patterns separated by comma. Each machine pattern can be a Java Regular Expression that matches `syncdb.autosync.machineName` of a source machine. 4. The email contains a `View Logs` link that points to the logs. Sometimes the IP address of the link does not come out correct - this can happen in case of a VM. In such cases, you can configure the machine and port details explicitly, by updating the following properties in userdata.properties. ```properties mail.centralDB.host= mail.centralDB.port= ``` By default, these values are not specified, and the machine's IP address and port will be taken. Sahi will now automatically trigger email after Manual or Auto Sync to the Central Database Machine. --- # Record Tests for Mobile Browsers Record tests for a mobile browser from a desktop browser, by giving it a phone's screen size and user agent from the Sahi Pro start page. A test recorded in a desktop browser can fail in a mobile browser. Many applications change their layout on a small screen, or serve a different mobile page, so elements move or get different names. To record steps that match what the phone shows, make the desktop browser look like the phone: give it the phone's screen size and user agent. 1. From the Sahi Pro Dashboard, launch a browser, such as Chrome. It opens on the Sahi Pro start page. 2. Set up the browser as the phone, then open your application:
The Sahi Pro start page with Launch the Sahi Controller (Sahi Mode, Java Mode and Launch Controller) above a Start URL box with https://sahitest.com/demo/training/ and a Go button; Change Resolution and Change User Agent are ticked, with 412 and 915 in the width and height boxes and an Android phone's user agent below; numbered badges mark Change Resolution, Change User Agent, the Start URL box and Go
1. Tick **Change Resolution** and enter the phone's screen width and height in pixels, such as 412 and 915. 2. Tick **Change User Agent** and enter the phone browser's user agent string. 3. Enter the address of your application in **Start URL**. 4. Click **Go**. The browser opens the mobile version of your application. Record your steps from there with the [Controller](https://resources.sahipro.com/docs/using-sahi/sahi-controller/), as you would for a desktop browser. To run the tests on a real phone, see [Run Tests on Mobile Browsers](https://resources.sahipro.com/docs/using-sahi/playback-mobile-browser/). --- # Run Tests on Mobile Browsers Since Sahi uses a proxy and injects Javascript, Sahi scripts can run on most mobile browsers. ## Pre-requisites 1. The Mobile device and System on which Sahi Pro is running should be on the same network. 2. Find the IP of the laptop (using ipconfig on Windows). We will call it the `laptopIP` 3. Configure the proxy settings on the device with proxy host `laptopIP` and Sahi port `9999` :::danger[Caution] USE ONLY ONE OF THE METHODS TO SET PROXY, DO NOT USE BOTH. ::: **a) Run below commands in the command prompt (this will set proxy globaly and takes effect right away):** - To set proxy in Android device/emulator: ```js adb shell settings put global http_proxy : ``` Eg. `adb shell settings put global http_proxy 10.10.2.50:9999` - To check proxy of Android device/emulator: ```js adb shell settings get global http_proxy ``` To disable proxy in Android device/emulator: ```js adb shell settings put global http_proxy :0 ``` **b) Alternetive way to set proxy in Android device/emulator are below:** :::note This method will not work if the device is using any VPN service. ::: For `Android device/emulator` having version 8 and above, - Turn off the mobile data. - Go to Settings > Network & internet > wi-fi > (AndroidWifi) settings > Edit > Advanced options > Proxy > Select the Manual Proxy. - Configure Proxy. - After setting the proxy, please turn off the wi-fi and turn on again to reflect the proxy. For `Android emulator only` having version 7 and below, - Go to Settings > Wireless & networks > Cellular networks > Access Point Names > (create)Sahi\_Proxy. - Configure APN.\ APN: `localhost.sahitest.com`\ proxy host: `laptopIP from previous step`\ proxy port: `9999` ## Run From Mobile Device 1. Start Sahi on a laptop that is on the same network as the mobile device. 2. On the mobile browser, navigate to `http://laptopIP:9999/`. eg. `http://10.10.2.50:9999/` 3. The Sahi Pro start page opens, with **Run a Script** at the top:
The Sahi Pro start page on a phone: Run a Script, with Script Directory C:/SahiPro/userdata/scripts/, File (Choose a script), Start URL (https://) and a Run button
4. For automating HTTPS websites in mobile browsers, Sahi's root certificate must be installed. Below are the steps to install Sahi's root certificate: :::note For iOS device, please use Safari browser. ::: - In **Install SSL Root Certificate** on the start page, tap **crt** or **der** to download Sahi's root certificate. The tabs below the buttons repeat the steps for **iOS**, **Android 11+** and **Below Android 11**:
Install SSL Root Certificate on the phone start page: the crt, der and pem buttons, the tabs iOS, Android 11+ and Below Android 11, and the iOS steps: tap crt or der to download the certificate; open the Settings app, tap Profile Downloaded and install it; go to Settings › General › About › Certificate Trust Settings and turn on full trust for the Sahi certificate; use Safari on iOS
**For Android 11 and above version** - Open Settings. - Go to Biometrics/Security > Other security settings/Credential Storage (depend on devices) > Install certificates from storage > CA Certificate. - Accept the warning alert. - Browse to the downloaded certificate and select it. - Confirm the certificate installation. **For below Android 11 version** - Open the downloaded file (if not open automatically) and proceed to the certificate installation process. **For iOS device** - Open the Settings app on your iOS device. - You should see a notification that a `Profile Downloaded` option is available. ![](https://resources.sahipro.com/docs/assets/images/using-sahi/mobile/ios/profile-downloaded.webp) - Tap on the `Profile Downloaded` and proceed to the certificate installation process. - In order to open SSL websites in iOS device, turn on SSL trust for Sahi root certificate. Go to `Settings` → `General` → `About` → `Certificate Trust Settings`. Under `Enable full trust for root certificates`, enable trust for the certificate. 5. Ensure that cookies are allowed in the mobile browser settings. 6. In **Run a Script**, choose the **File** to run, enter the **Start URL**, and tap **Run**. ## Run Android Browser Script From Sahi Pro Editor :::caution[Important] Please ignore the `step 1` to `step 5` for Android Device which is not tethered with the system or for Android Emulator and ensure that USB debugging is enabled in the android device/emulator and ADB is available on the system. Refer [here](https://resources.sahipro.com/docs/using-sahi/android-getting-started/#pre-requisites) for more details. ::: 1. Install [Sahi Pro Mobile Web Runner](https://resources.sahipro.com/webrunner/android/Sahi_Pro_Mobile_Web_Runner.apk) on the device. 2. Launch the application on the device. ![](https://resources.sahipro.com/docs/assets/images/using-sahi/mobile/android/web-runner-screen.webp) 3. Configure the proxy host and port in the application and Click on `Connect`. ![](https://resources.sahipro.com/docs/assets/images/using-sahi/mobile/android/web-runner-config-host-port.webp) 4. You will prompt to allow `Screen Cast`. Click on `Start Now`. ![](https://resources.sahipro.com/docs/assets/images/using-sahi/mobile/android/web-runner-screen-cast.webp) 5. Once the application is connected to Sahi Pro, `connection established` message will be shown on the application. ![](https://resources.sahipro.com/docs/assets/images/using-sahi/mobile/android/web-runner-connection-successfull.webp) 6. In the Editor, open the test to run in the Android browser, then: 1. Click **Run** to open the Run Configuration, and choose **Android Browser** in **Start Mode**. 2. Choose the device in **Android Device**. Click the refresh icon next to it if the device isn't listed. 3. Enter the **Start URL**. 4. Click **Start Run**.
The Run Configuration with Start Mode Android Browser, Browser chrome, the Android Device and iOS Device boxes with refresh icons, Start URL https://sahitest.com/demo/training/, Scenario File books.s.csv, Filter, Run Type, Export Run Config and Start Run; numbered badges mark Start Mode, Android Device, Start URL and Start Run
:::note Note: For SSL websites, open Sahi pro launcher page by clicking on `Open Sahi Pro Launcher` from the application. Then click on the crt or der links to download and install the Sahi root certificate. ::: ## Run iOS Browser Script From Sahi Pro Editor 1. Follow the `step 1` to `step 5` from [Run From Mobile Device](https://resources.sahipro.com/docs/using-sahi/playback-mobile-browser/#run-from-mobile-device). 2. In the Editor, open the test to run in the iOS browser, then: 1. Click **Run** to open the Run Configuration, and choose **iOS Browser** in **Start Mode**. 2. In **iOS Device**, choose the device that has `Remote` in its name. 3. Enter the **Start URL**. 4. Click **Start Run**.
The Run Configuration with Start Mode iOS Browser, Browser chrome, the Android Device and iOS Device boxes with refresh icons, Start URL https://sahitest.com/demo/training/, Scenario File books.s.csv, Filter, Run Type, Export Run Config and Start Run; numbered badges mark Start Mode, iOS Device, Start URL and Start Run
:::note If a test run fails on Safari after 90 seconds, see [Test Runs Fail on Safari Browser](https://resources.sahipro.com/docs/troubleshooting/safari-issues/#test-runs-fail-on-safari-browser) ::: --- # Run Sahi Script on iPad Sahi can be used for testing the fluid nature of web apps and its functionality on different devices. In this post, we will be looking into running Sahi scripts on iPad. Before I go ahead and mention how to do this, there are few important notes about this kind of execution: 1. You can not install Sahi on iPad. Sahi must be installed and running on a different computer in the same network. 2. The scripts which will be executed on iPad will not be recorded on the iPad. These scripts will be recorded on the computer itself, by resizing the browser and changing the user agent to iPad. 3. Only the test run happens on the iPad, to check if the web app renders correctly on iPad or not. With these points in mind, let us move ahead and configure our iPad for the run. While following these steps, use the IP address of the machine on which Sahi is running 1. To start configuring the iPad, click on the settings icon on the home screen. ![iPad Settings](https://resources.sahipro.com/docs/assets/images/using-sahi/mobile/ipad-settings.webp) 2. This will open the general settings option panel. Click on the network tab: ![iPad Settings](https://resources.sahipro.com/docs/assets/images/using-sahi/mobile/ipad-settings-network.webp) 3. This will show all the network options that are present for connection. In the wi-fi settings click on the network that is being used by both the iPad and the machine running Sahi. I am using Tyto\_24 so I will click on the arrow button next to it. :::note For android, just long press on the network that is being used then press 'Modify network', a new window will appear, then check 'Advanced options'. ::: ![iPad Settings](https://resources.sahipro.com/docs/assets/images/using-sahi/mobile/ipad-settings-3.webp) 4. This will open the settings for that particular network and show a bunch of details about the network. What we are interested is the proxy for the network. In case you are within another proxy, such as your corporate proxy, you need to make changes in the Sahi installed in your machine. Let us click on the manual button of proxy. ![iPad Settings](https://resources.sahipro.com/docs/assets/images/using-sahi/mobile/ipad-settings-4.webp) 5. This opens up the settings panel for the proxy. The two fields which we are interested in are the proxy and port. We need to set these ports to our computer running Sahi on port 9999 so that the iPad can use the Sahi on the machine to run the scripts. ![iPad Settings](https://resources.sahipro.com/docs/assets/images/using-sahi/mobile/ipad-settings-5.webp) 6. Set the proxy to the IP address of your machine. Look here for instructions on how to get the IP address of your system. ![iPad Settings](https://resources.sahipro.com/docs/assets/images/using-sahi/mobile/ipad-settings-6.webp) 7. Also set the port to 9999. This will ensure that it is going to route through Sahi installed and running on the machine. ![iPad Settings](https://resources.sahipro.com/docs/assets/images/using-sahi/mobile/ipad-settings-7.webp) 8. Configure Safari to accept cookies always: - In Safari 5.1 or later: Safari -> Preferences -> Privacy -> Select "Never" under "Block Cookies" - In Safari 5.0 or earlier: Safari -> Preferences -> Security -> Select "Always" under "Accept Cookies" :::note DO NOT MISS THIS STEP. This is very important ::: 9. Open Safari and go to `http://:9999`, such as `http://192.168.1.70:9999`. The Sahi Pro start page opens. 10. In **Run a Script**, choose the **File** to run [1], enter the **Start URL** [2] and tap **Run** [3]:
Run a Script on the Sahi Pro start page at iPad size, with Script Directory C:/SahiPro/userdata/scripts/, File sahitests/codecoverage_test.sah, Start URL https://sahitest.com/ and the Run button; numbered badges mark File, Start URL and Run
11. Safari opens the start URL and the test runs. The test's report is in [Reports](https://resources.sahipro.com/docs/using-sahi/sahi-reports/) on the machine that runs Sahi Pro. --- # Sahi Pro Desktop Engine Getting started with Sahi Pro Desktop Engine Automation. ## Prerequisites 1. Java 1.8 or above is needed for running Sahi. 2. Microsoft .NET framework v4.5+ required for Windows Desktop Automation. - To check version of installed Microsoft .NET framework - On the Start menu, choose Run. - In the Open box, enter `regedit.exe` - In the Registry Editor, open the following subkey: `HKEY_LOCAL_MACHINE\SOFTWARE\Microsoft\NET Framework Setup\NDP\v4\Full` ![](https://resources.sahipro.com/docs/assets/images/using-sahi/win-desktop/netframework.webp) ### Download Sahi Pro Desktop Engine Download Sahi Pro and Sahi Pro Desktop Engine from the [Download Center](https://resources.sahipro.com/docs/introduction/installers/).\ [Install Sahi Pro](https://resources.sahipro.com/docs/using-sahi/quick-tutorial/#install-sahi) into a folder without spaces in its path. Then install Sahi Pro Desktop Engine into the same folder as Sahi Pro. Sahi Pro Desktop Engine needs a separate license from Sahi Pro. You will need a valid license to run Sahi Pro Desktop Engine. If you do not have a valid license yet, [book a demo](https://sahipro.com/get-started/) to get a 14 day trial license. ### Upgrade Sahi Pro Desktop Engine If you wish to upgrade from an older version of Sahi Pro Desktop Engine, refer to [Upgrade](https://resources.sahipro.com/docs/using-sahi/upgrade/) for details. ### Install Sahi Pro Desktop Engine #### Installing using Configure page 1. Click **All Settings** on the Dashboard. The All Settings window opens. 2. Click **Sahi Pro Settings**. The Sahi Pro Settings page opens.
The Sahi Pro Dashboard with the All Settings window open, Sahi Pro Settings and the All Settings button highlighted
3. In the menu on the left, open **Configuration** and click **Product Updates**. Sahi Pro Settings with Product Updates highlighted in the menu, showing the Sahi Pro card with version 12.6.0.0 available and a Download button, and the Engines section with the Desktop, Mobile, SAP and Visual Assist Engines - Under **Engines**, click **Install** next to **Desktop Engine**. ![Sahi Pro Desktop Engine Installer](https://resources.sahipro.com/docs/assets/images/using-sahi/desktop_install_config_page.webp) :::note Sahi will automatically restart to make sure the changes are reflected. ::: #### Installing using Jar 1. Double click on install\_sahi\_pro\_desktop\_xxx.jar to start the installer. If Java is configured properly, it will launch the installer. ![Sahi Pro Desktop Engine Installer](https://resources.sahipro.com/docs/assets/images/using-sahi/desktop-installer.webp) :::note If the installer does not launch, or if the jar file is opened as if it is a zip file, cancel the unzip dialog, open a command prompt, cd to where the file is downloaded, and run ```sh java -jar install_sahi_pro_desktop_xxx.jar ``` ::: :::note Sahi Pro Desktop Engine must be installed in the same folder as Sahi Pro is installed. For example, if Sahi Pro is installed at `C://tools/Sahi_Pro`, then install Sahi Pro Desktop Engine also at `C://tools/Sahi_Pro`. ::: 2. Add `Product Key` directly to Sahi product key popup window. Sahi Desktop Engine needs valid `Product Key` to be available inside `userdata\config\productkey.txt` (create if needed). ![](https://resources.sahipro.com/docs/assets/images/using-sahi/sahidesktoplicense.webp) If the `Product Key` is valid, Sahi will startup fine and you will be able to access Sahi. :::note Sahi Pro Browser capability can be disabled by unchecking the `Browser` checkbox. One needs to add `Product Key` based on Sahi Pro capabilities enabled. ::: ### Start Sahi Dashboard ![Sahi Pro Dashboard](https://resources.sahipro.com/docs/assets/images/using-sahi/dashboard.webp) Start Sahi Dashboard by any of the following methods 1. Double click on the desktop shortcut or 2. Start from the command line. Windows: - Go to `\userdata\bin` and run `start_dashboard.bat` Linux - Go to `/userdata/bin` and run `./start_dashboard.sh` :::caution[Important] Browser Icons will not be present on Sahi dashboard, if Sahi Pro Browser Capability is disabled. ::: :::note if Sahi Pro Desktop Engine is installed at correct location, `Desktop Icon`will automatically appear on launcher tab of Sahi dashboard. ::: ## Automating Windows and Java applications Sahi Pro Desktop Engine provides support for Windows and Java applications. Overall usage of Sahi Pro remains the same.\ The `_setMode` function allows [switching between different modes](https://resources.sahipro.com/docs/sahi-script/multiple-modes/) like Browser, Desktop, Mobile etc. in a single script. If you are not familiar with Sahi Pro, go through the [Sahi Pro Quick Tutorial](https://resources.sahipro.com/docs/using-sahi/quick-tutorial/). **Click on below links for detailed use of Sahi Pro with different technologies:** - [Windows Automation](https://resources.sahipro.com/docs/using-sahi/windows-desktop/) - [Java GUI Applications Automation](https://resources.sahipro.com/docs/using-sahi/java-application/) - [Java Web Start Applications Automation](https://resources.sahipro.com/docs/using-sahi/javaws/) - [Java Applets Automation](https://resources.sahipro.com/docs/using-sahi/applet-new/) --- # Windows Desktop Automation This section details how to test Windows Desktop Applications. If you are not familiar with Sahi Pro, see Quick Tutorial on Sahi Pro To automate windows desktop applications using Sahi Pro Flowcharts, refer Windows Desktop Automation. ## Start Windows Desktop Automation - Start Sahi Dashboard - Click `Processes` link on Sahi Pro Dashbord. Ensure that `Windows Automation` is turned on. ![](https://resources.sahipro.com/docs/assets/images/using-sahi/win-desktop/start_win_process.webp) - "Sahi windows agent started!" message appears on Sahi Pro console. ![](https://resources.sahipro.com/docs/assets/images/using-sahi/win-desktop/start_win.webp) ## Using the Controller - To Launch Sahi Controller, click the Desktop icon on the Sahi Dashboard. ![](https://resources.sahipro.com/docs/assets/images/using-sahi/win-desktop/desktop-icon-dashboard.webp) :::note Make sure popup blockers are turned off. ::: - On the Controller, go to the Record tab and check "enable recording/identification for Windows" checkbox. ![](https://resources.sahipro.com/docs/assets/images/using-sahi/win-desktop/controller-check.webp) The Controller can be used to interact with the desktop application. You can Identify, Click, Set, Assert, choose Other Actions. You can even Test an expression from Evaluate Expression to perform an action on the Windows Desktop application. :::note Refer [Sahi Controller](https://resources.sahipro.com/docs/using-sahi/sahi-controller/) and [Java Controller](https://resources.sahipro.com/docs/using-sahi/java-controller/) for a better understanding. ::: ## Element Identification - Launch the Controller and check "enable recording/identification for Windows" checkbox. ![](https://resources.sahipro.com/docs/assets/images/using-sahi/win-desktop/controller-check.webp) - To identify an element, press the CTRL key, hover over any element and **release the CTRL key**. :::note The accessors will not be populated till CTRL key is released. This is an optimization to stop Sahi from unwanted processing ::: . ![](https://resources.sahipro.com/docs/assets/images/using-sahi/win-desktop/identification.webp) - `Accessor:` shows the Sahi accessor for that element - `Alternatives:` shows all alternative accessors for that element - `Value:` shows the value of the current element. Mostly this is the input text or the visible text. - `Prefix:`window name. :::note Blank `Prefix` means element is present on the taskbar. ::: - `Mode:`shows the Automation mode :::note 1. `Start SahiWin exe` must be clicked from Sahi Dashboard and ' Windows ' checkbox at right side top most corner in controller must be checked during identification or recording. 2. If during identification, Sahi is identifing background elements, then goto display setting of PC and change `Change the size of text, apps and other items` to 100% (Recommended). 3. For SilverLight, XBAP (i.e browser based desktop application) during identification, if Sahi is not identifing some boundary elements, then maximize the browser. 4. Refer [Identify Elements](https://resources.sahipro.com/docs/using-sahi/sahi-controller/#identify-elements) for a better understanding. ::: ## Evaluate Expression Evaluating Windows Desktop Application expression through Controller. It helps while identifying elements or while debugging. ![](https://resources.sahipro.com/docs/assets/images/using-sahi/win-desktop/eval-expression.webp) - Put a valid Sahi expression in the Evaluate Expression box - Select mode as 'Sahi-Windows' - Click on `→`. The result will be seen in the bottom box. :::note Note: Selecting some text and pressing '→' will only evaluate the selected text. ::: - `Append` While recording, selecting and clicking on `Append` will append the steps to the currently recording script. This is mainly used for manually append any step from Evaluate Expression to the currently recording script. - `Highlight` Can be used on selected text to highlight the element (shows a red 1 pixel border briefly). Invokes the `_highlight` function. - `Drop down` Lists some actions like Click, Get Value, Get Text etc. :::note Note: `Start SahiWin exe` must be clicked on Sahi Dashboard and 'Sahi-Windows' must be selected as the 'Select mode for evaluate' during evaluating ::: :::note Refer [Evaluate Expression](https://resources.sahipro.com/docs/using-sahi/sahi-controller/#evaluate-expression) for a better understanding. ::: ## Recording a script This is similar to recording a Sahi script for normal browser testing. - To record a script, launch the Controller, check 'Windows' checkbox at right side top most corner in controller, give a script name and click 'Record'. Actions done on the Windows Desktop are recorded automatically. - Steps can also be recorded from the Controller. - A. You can use Click, Set, Assert, choose 'Other Actions' to perform an action on the Windows Desktop Application. B. You will need to record these steps explicitly by clicking on 'Append'. ![](https://resources.sahipro.com/docs/assets/images/using-sahi/win-desktop/controller.webp) :::note 1. `Start SahiWin exe` must be clicked from Sahi Dashboard and 'Windows' checkbox must be checked in Sahi Controller during identification or recording. 2. Cursor Feedback: ![](https://resources.sahipro.com/docs/assets/images/using-sahi/win-desktop/cursor_feedback.webp) During recording, mouse cursor turns to Arrow with Red dot until the step is recorded. 3. Refer [Record a script](https://resources.sahipro.com/docs/using-sahi/sahi-controller/#record-a-script) for a better understanding. ::: ## Run Tests ### From Controller Once a script is recorded, you can run it from the Controller itself, with **Run**. - ![](https://resources.sahipro.com/docs/assets/images/using-sahi/win-desktop/controller-play.webp) - Choose the script. - Select Start Mode as `Windows`. - You can leave the Start url blank. This is not used for Windows Desktop Application. - Click on Play to run the script. - Click on Logs to view the logs of the played back script. :::note Note: A script cannot be played back if `Start SahiWin exe` is not clicked on Sahi Dashboard. ::: :::note Refer [Run Tests via Controller](https://resources.sahipro.com/docs/using-sahi/run-tests-via-controller/) for a better understanding. ::: ### From the Editor You can run the script from the Editor as well. - Choose the script/suite/scenario from the Editor and click **Run**. - Choose the Start Mode as Windows. - Choose either of the two options - 'Run in single machine' or 'distributed (multiple machines)'. - Press Run to run the test. Refer [Run Tests from the Editor](https://resources.sahipro.com/docs/using-sahi/run-tests-via-editor/) for a better understanding. :::note Note: A script cannot be run if `Start SahiWin exe` is not clicked on Sahi Dashboard. ::: ### Scripting Notes - To start a Windows application from script, use ```js _execute("correct/path/your_application.exe"); // or _execute("correct/path/your_application.bat"); ``` - All code interactions with Windows will need to be preceded by \_setMode("WINDOWS") #### Auto Scrolling - In some cases, the element can be found only on vertical scroll. In such a case, you must specify a scrollable parent element using `_startLookInside` function. Windows Automation will gradually scroll vertically inside this scrollable parent element and try to find the element. - It is possible, that the element exists but is visible only on scrolling horizontally. In such a case, Windows Automation will automatically scroll horizontally starting from left to right and make the element visible. ![](https://resources.sahipro.com/docs/assets/images/using-sahi/win-desktop/auto_scroll.webp) ```js // For example element for folder '823' can be found only on vertical scroll. So if we try to perform any action on this element, it will fail. // In such case we use _startLookInside api and thus the element will be found on vertical scroll. _startLookInside(_list("Items View")); // Specify a scrollable parent element // Now if _listitem("823") is not found, //Windows automation will scroll vertically from top to bottom inside _list("Items View") and try to find the element. _click(_listitem("823")); _stopLookInside(); ``` ## Additional Configurations - **Execute Faster by Ignoring Hidden and Disabled Elements** - While searching for an element during the test run, Sahi internally iterates through all the elements on the application screen. At times, this iteration may be slower for few screens in your application. This iteration can be made faster by adding below properties to the **userdata.properties** file as applicable. ```properties // Add below property to ignore hidden elements in your application sahi.desktop_automation.windows_automation.ignore_hidden_elements=true // Add below property to ignore disabled elements in your application sahi.desktop_automation.windows_automation.ignore_disabled_elements=true ``` - **Enable Identifying Inner Elements** - In some applications, inner elements may not be identified from the Sahi Controller. Lets say a pane element contains child elements like textbox, button, etc and the child elements are not getting identified from Sahi Controller. To fix this, find the entry for the parent element type in `\config\accessor_metadata\mswindows.json` file. Add a new key **"deepSearchAlgo"** with value as **"child"** in this entry for the parent element type. For example, the key "deepSearchAlgo" can be added for a pane element as shown below. ```json {"type": "pane", "name":"_pane", "id":"50033", "deepSearchAlgo":"child", "attributes": ["name", "automationId", "helpText", "className", "index"], "action": "setValue", "value" : "transform", "assertType":"TEXT", "since": ["NA", "NA", "NA", "7.0.0"]} ``` --- # Java Web Start Automation This section details how to test Java Web Start Automation. If you are not familiar with Sahi Pro, see Quick Tutorial on Sahi Pro To automate java applications using Sahi Pro Flowcharts, refer Java Web Start Automation. ## Introduction Sahi Pro Desktop Engine provides support for automation of Java Web Start Application. ## Identifying and Recording Java Web Start ### Open Java Web Start from Sahi browser 1. :::note To open Java Web Start Application from Sahi browser, Sahi Browser capability should be enabled. ::: 2. Bring up the browser of your choice by clicking on any of the browser icons present on Sahi Dashbord. 3. Enter jnlp application path in the space provided for "start URL" and click "GO" , to start the application (Download and save the JNLP application on local file system before hand.) ![](https://resources.sahipro.com/docs/assets/images/using-sahi/javaws-browser-path.webp) 4. Launch the Controller by clicking on `Sahi Controller` link present on the Sahi start page. You can now start identifying/recording.\ Like normal Sahi Pro for web pages, you can use Ctrl-hover (⌘-hover on Mac) to identify various elements on the Java Web Start application. ### Open Java Web Start from command-line 1. Open a command prompt and cd to sahi/userdata/bin (or click on the "Bin" link on the Sahi Dashboard) 2. For Windows: Invoke java\_app.bat with the jnlp application path to start the application (Download and save the JNLP application on local file system before hand.) ```text D:\Sahi_Pro\userdata\bin>java_app.bat ``` 3. For Linux: Invoke java\_app.sh with the jnlp application path to start the application (Download and save the JNLP application on local file system before hand.) ```text ~/sahi_pro/userdata/bin>./java_app.sh ``` 4. To Launch Sahi Controller, click the Desktop icon on the Sahi Dashboard. ![](https://resources.sahipro.com/docs/assets/images/using-sahi/win-desktop/desktop-icon-dashboard.webp) You can now start recording. Like normal Sahi, you can use Ctrl-hover (⌘-hover on Mac) to identify various elements on the Java Application. ### Use of Java Mode 1. To use "Evaluate expression" on Java Web Start applications, choose `"Sahi-Java"`. ![](https://resources.sahipro.com/docs/assets/images/using-sahi/java/mode-evaluate-type-java.webp) 2. To run the script from the Controller, set its mode to Java, then click **Run**. ![](https://resources.sahipro.com/docs/assets/images/using-sahi/java/controller-play-java.webp) ## Scripting Notes - To start a JNLP file, use [\_launchJavaApplication($jnlpFile)](https://resources.sahipro.com/docs/sahi-script/functions/java/#_launchjavaapplication) API. - If you need to download the JNLP everytime, navigate to the page with JNLP, and once Sahi downloads it, use \_saveLastDownloadedAs() function to save it to desired location and then call \_launchJavaApplication - All code interactions with Java Web Start application will need to be preceded by [\_setMode("JAVA")](https://resources.sahipro.com/docs/sahi-script/functions/script-execution-control/#_setmode) --- # Java GUI Application Automation This section details how to test Java Application. If you are not familiar with Sahi Pro, see Quick Tutorial on Sahi Pro To automate java applications using Sahi Pro Flowcharts, refer Java GUI Application Automation. ## Introduction Sahi Pro Desktop Engine provides support for automation of Java Application. ## Recording Java Application ### Launch Java Application from browser. :::note 1. To open Java Application from Sahi browser, Sahi Browser capability should be enabled. 2. To pass arguments to a Java Application at runtime, create a batch file and launch the Java Application from command-line. ::: - Bring up the browser of your choice by clicking on any of the browser icons present on Sahi Dashbord. - Enter Java application jar file path in the space provided for "start URL" and click "GO" , to start the application (Download and save the Java aplication on local file system before hand). ![](https://resources.sahipro.com/docs/assets/images/using-sahi/java-jar-browser-path.webp) ### Launch Java Application from command-line 1. Open a command prompt and cd to sahi/userdata/bin (or click on the "Bin" link on the Sahi Dashboard). 2. For Windows: Invoke java\_app.bat with the Java application jar file path to start the application\ (Download and save the Java aplication on local file system before hand). ```text D:\Sahi_Pro\userdata\bin>java_app.bat ``` 3. For Linux: Invoke java\_app.sh with the Java application jar file path to start the application\ (Download and save the Java application on local file system before hand). ```text ~/sahi_pro/userdata/bin>./java_app.sh ``` 4. To Launch Sahi Controller, click the Desktop icon on the Sahi Dashboard. ![](https://resources.sahipro.com/docs/assets/images/using-sahi/win-desktop/desktop-icon-dashboard.webp) You can now start recording. Like normal Sahi, you can use Ctrl-hover (⌘-hover on Mac) to identify various elements on the Java Application. ## Use of Java Mode 1. To use "Evaluate expression" on Java GUI applications, choose `"Sahi-Java"`. ![](https://resources.sahipro.com/docs/assets/images/using-sahi/java/mode-evaluate-type-java.webp) 2. To run the script from the Controller, set its mode to Java, then click **Run**. ![](https://resources.sahipro.com/docs/assets/images/using-sahi/java/controller-play-java.webp) ## Scripting Notes - To start a Java application from script, use ```js _execute("correct/path/your_application.bat"); ``` - To start a Java application [\_launchJavaApplication($javaApplicationPath)](https://resources.sahipro.com/docs/sahi-script/functions/java/#_launchjavaapplication) API. :::note To pass arguments to a Java Application at runtime, create a batch file and use ```js _execute("correct/path/your_application.bat"); ``` ::: - All code interactions with Java application will need to be preceded by [\_setMode("JAVA")](https://resources.sahipro.com/docs/sahi-script/functions/script-execution-control/#_setmode) --- # Applet Automation This section details how to test Java Applets. If you are not familiar with Sahi Pro, refer Quick Tutorial on Sahi Pro ## Approaches Java Applets can be automated using the following approaches. 1. [Applet Automation Using Only Desktop Automation](https://resources.sahipro.com/docs/using-sahi/applet-automation-using-desktop-automation/) - This is available since Sahi Pro v10.0.0. - This approach needs ONLY Sahi Pro Desktop Engine license. - Applet elements are automated using JAVA mode, while elements on browser are automated using WINDOWS mode. 2. [Applet Automation Using Browser and Desktop Automation](https://resources.sahipro.com/docs/using-sahi/applet-automation-using-browser-and-desktop-automation/) - This is available since Sahi Pro v7.0.0. - This approach needs both Sahi Pro and Sahi Pro Desktop Engine licenses. - Applet elements are automated using JAVA\_APPLET mode, while elements on browser are automated using BROWSER mode. ## Applet Functions Applets functions are different from normal JavaScript APIs. Most components are identified by its class name prefixed by `"_jv"`. Example: ```js _jvJButton("Test Button") ``` or ```js _jvJComboBox("ComboBox") ``` Applet also supports `_near`, `_in` and `_under` functions. Example: ```js _jvJComboBox("ComboBox", _near(_jvJLabel("Mouth"))); _highlight(_jvJComboBox("ComboBox", _under(_jvJLabel("Mouth")))); _setSelected(_jvJComboBox("ComboBox", _near(_jvJLabel("Mouth"))), "Larry"); _click(_jvJButton("sun_small.gif")); ``` ## Trouble Shooting ### Page hangs or Sahi does not recognize any element 1. While automating applets using Sahi make sure that java uses browser's proxy setting. This can be configured in Java Control Panel as shown in below images. ![](https://resources.sahipro.com/docs/assets/images/using-sahi/applet/java_control_panel.webp) ![](https://resources.sahipro.com/docs/assets/images/using-sahi/applet/java_network_settings.webp) 2. Clear Java cache by deleting Temporary Files through the Java Control Panel. Click on the "Settings" button. ![](https://resources.sahipro.com/docs/assets/images/using-sahi/applet/java_control_panel2.webp) Uncheck the checkbox adjacent to "Keep temporary files on my computer" and click "Delete Files.." then click "Ok" button. ![](https://resources.sahipro.com/docs/assets/images/using-sahi/applet/temporary-file-settings-applet.webp) 3. Click on the "Configure" link on the Sahi Dashboard and click "download\_contenttypes.txt". ![](https://resources.sahipro.com/docs/assets/images/using-sahi/applet/configure-ui-navigation.webp) Comment "application/octet-stream", save and restart Sahi. ![](https://resources.sahipro.com/docs/assets/images/using-sahi/applet/download-content-type.webp) ## Sample applet A sample applet is available at [http://sahi.co.in/demo/applet/simple.htm](https://sahitest.com/demo/applet/simple.htm) --- # Sahi Pro Mobile Engine Getting started with Sahi Pro Mobile Engine Automation. ## Download Sahi Pro Mobile Engine Download Sahi Pro and Sahi Pro Mobile Engine from the [Download Center](https://resources.sahipro.com/docs/introduction/installers/).\ [Install Sahi Pro](https://resources.sahipro.com/docs/using-sahi/quick-tutorial/#install-sahi) into a folder without spaces in its path. Then install Sahi Pro Mobile Engine into the same folder as Sahi Pro. Sahi Pro Mobile Engine needs a separate license from Sahi Pro. You will need a valid license to run Sahi Pro Mobile Engine. If you do not have a valid license yet, [book a demo](https://sahipro.com/get-started/) to get a 14 day trial license. ### Install Sahi Pro Mobile Engine #### Installing using Configure page 1. Click **All Settings** on the Dashboard. The All Settings window opens. 2. Click **Sahi Pro Settings**. The Sahi Pro Settings page opens.
The Sahi Pro Dashboard with the All Settings window open, Sahi Pro Settings and the All Settings button highlighted
3. In the menu on the left, open **Configuration** and click **Product Updates**. Sahi Pro Settings with Product Updates highlighted in the menu, showing the Sahi Pro card with version 12.6.0.0 available and a Download button, and the Engines section with the Desktop, Mobile, SAP and Visual Assist Engines - Under **Engines**, click **Install** next to **Mobile Engine**. ![Sahi Pro Mobile Engine Installer](https://resources.sahipro.com/docs/assets/images/using-sahi/mobile_install_config_page.webp) :::note Sahi will automatically restart to make sure the changes are reflected. ::: #### Installing using Jar 1. Double click on install\_sahi\_pro\_mobile\_xxx.jar to start the installer. If Java is configured properly, it will launch the installer. ![Sahi Pro Mobile Engine Installer](https://resources.sahipro.com/docs/assets/images/using-sahi/mobile/mobile-installer.webp) :::note If the installer does not launch, or if the jar file is opened as if it is a zip file, cancel the unzip dialog, open a command prompt, cd to where the file is downloaded, and run ```sh java -jar install_sahi_pro_mobile_xxx.jar ``` ::: :::note Sahi Pro Mobile Engine must be installed in the same folder as Sahi Pro is installed. For example, if Sahi Pro is installed at `C://tools/Sahi_Pro`, then install Sahi Pro Mobile Engine also at `C://tools/Sahi_Pro`. ::: 2. Add `Product Key` directly to Sahi product key popup window. Sahi Pro Mobile Engine needs `Product Key` to be available inside `sahi/userdata/config` (create if needed). ![](https://resources.sahipro.com/docs/assets/images/using-sahi/sahimobilelicense.webp) If the `Product Key` is valid, Sahi will startup fine and you will be able to access Sahi. :::note Sahi Pro Browser capability can be disabled by unchecking the `Browser` checkbox. One needs to add licenses based on Sahi Pro capabilities enabled. ::: ### Start Sahi Dashboard ![Sahi Pro Dashboard](https://resources.sahipro.com/docs/assets/images/using-sahi/mobile/dashboard.webp) Start Sahi Dashboard by any of the following methods 1. Double click on the desktop shortcut or 2. Start from the command line. Windows: - Go to `\userdata\bin` and run `start_dashboard.bat` Linux - Go to `/userdata/bin` and run `./start_dashboard.sh` :::caution[Important] Browser Icons will not be present on Sahi dashboard, if Sahi Pro Browser Capability is disabled. ::: :::note If Sahi Pro Mobile Engine is installed at correct location, `Android Icon`and`iOS Icon`will automatically appear on Sahi dashboard. ::: ## Automating Android and iOS applications Sahi Pro Mobile Engine provides support for Android and iOS applications. Overall usage of Sahi Pro remains the same. If you are not familiar with Sahi Pro, go through the [Sahi Pro Quick Tutorial](https://resources.sahipro.com/docs/using-sahi/quick-tutorial/) - [Get started with Android Automation](https://resources.sahipro.com/docs/using-sahi/android-getting-started/) - [Get started with iOS Automation](https://resources.sahipro.com/docs/using-sahi/ios-getting-started/) --- # Android Automation - Getting Started This section helps you quickly get started with Android Automation. To automate an Android Devices/Simulators using Sahi Pro Flowcharts, refer Android Automation - Getting Started. ## Pre-requisites - Desktop - The machine needs to have Android Platform Tools installed so that ADB is available in the system. Having a full blown Android SDK is even better. - Make sure the path to the Android Platform Tools folder is added to the PATH environment variable. To test this, open a command prompt and type adb (or adb.exe). ADB should start up if the Android Platform Tools folder is in the PATH. - Device - Connect the device. Enable USB debugging from Settings -> Developer options. - To enable Developer options, go to Setting -> About phone -> scroll to Build number and tap it 7 times. - If you already have the driver for the device installed, you should now be connected through adb. If not, install the USB driver for the device. - The device has to be connected through USB cable throughout the duration of the test. Alternatively, you can setup adb over Wi-Fi as well if you do not wish to tether the device. - Screen lock should be removed and display options should be set such that the device does not sleep throughout the execution of the script. - When the device is connected for the first time, you may get an alert asking for permission to connect. Set it to always accept the connection. - To know the device ID which is connected to the machine, type `adb devices` in command prompt. ## Play Protect Warning On the Android device, `Google Play Protect` scans for apps that are not known to `Play Protect` and warns the user during installation. When running a script on the Android device or connecting to it through the Android Viewer for the first time, Sahi first installs 2 apps on the device to facilitate Android testing. Since these apps are for testing purpose and are not from the Play Store, `Google Play Protect` can display the following warning. ### Warning: Send app for a security check? ![](https://resources.sahipro.com/docs/assets/images/using-sahi/mobile/android/play-protect-send-app-warning.webp) - Click on `Don't send` to dismiss the warning. - You will see a similar warning for the 2nd app - `in.co.sahi.android.test`. - Click on `Don't send` again to dismiss the 2nd warning. The connection will proceed successfully. To prevent the warning message from appearing again, do the following steps. 1. Open the `Play Store` app on the device. 2. At the top right, tap the `Profile` icon. 3. Tap `Play Protect` from the list. 4. `Play Protect` screen opens. At the top right, tap the `Settings` icon. 5. The following screen opens. ![](https://resources.sahipro.com/docs/assets/images/using-sahi/mobile/android/play-protect-settings-before.webp) 6. Tap the second option, `Improve harmful app detection` to switch it `OFF`. The screen now looks like this. ![](https://resources.sahipro.com/docs/assets/images/using-sahi/mobile/android/play-protect-settings-after.webp) 7. Connecting the Android Viewer again or running the script will not show the `Play Protect` warning again. ## Download and Install Sahi Pro Mobile Engine You need to install [Sahi Pro Mobile Engine](https://resources.sahipro.com/docs/using-sahi/mobile-engine/) before you can proceed with the [Quick Tutorial](#quick-tutorial) ## Quick Tutorial 1. Connect the Android Device to the system. 2. Install the Sample Application `/userdata/android/testapps/AndroidApp.apk` on the device. - Open a Command Prompt(Windows) or Terminal Shell(Mac, Linux etc.) - Type `cd /userdata/android/testapps` and press enter. - Type `adb install AndroidApp.apk` and press enter to install the app. 3. Start Sahi Dashboard and click on the `Android` button. ![](https://resources.sahipro.com/docs/assets/images/using-sahi/mobile/android/android_button.webp) 4. This brings up Android Viewer in system's default browser. ![](https://resources.sahipro.com/docs/assets/images/using-sahi/mobile/android/android_viewer.webp) 5. Now select the device from the `Device Info` dropdown\ Specify `Application Package Name:`com.sahipro.SahiTestApp 6. Now click on `Connect Session` button. 7. This will start `com.sahipro.SahiTestApp` application in Android device. The device screen is also visible on the Android Viewer. ![](https://resources.sahipro.com/docs/assets/images/using-sahi/mobile/android/quick_guide_android.webp) 8. Launch the Controller by press ALT key and then double click on the Android Viewer window. 9. Specify a script name (test\_sample\_app.sah) in Controller and click on `Record` button. 10. Now on the Android Viewer click the `Sample Application` button. ![](https://resources.sahipro.com/docs/assets/images/using-sahi/mobile/android/quick_guide_android_1.webp) 11. This will bring up the Login screen. ![](https://resources.sahipro.com/docs/assets/images/using-sahi/mobile/android/quick_guide_android_2.webp) 12. Click on the textbox below User Name. This makes the element editable in the Viewer.\ Type "test" in textbox and press enter. ![](https://resources.sahipro.com/docs/assets/images/using-sahi/mobile/android/quick_guide_android_3.webp) 13. Click on the textbox below Password. This brings up the textbox on the screenshot where you can specify the Password.\ Type "secret" in textbox and press enter. ![](https://resources.sahipro.com/docs/assets/images/using-sahi/mobile/android/quick_guide_android_5.webp) 14. Click on the `Login` button. This will brings up the Add Books screen. ![](https://resources.sahipro.com/docs/assets/images/using-sahi/mobile/android/quick_guide_android_6.webp) 15. Click on the textbox right side of `Ruby`. This brings the textbox on the screenshot where you can specify the number of books. ![](https://resources.sahipro.com/docs/assets/images/using-sahi/mobile/android/quick_guide_android_7.webp) 16. Click on the textbox right side of `Java`. This brings the textbox on the screenshot where you can specify the number of books. ![](https://resources.sahipro.com/docs/assets/images/using-sahi/mobile/android/quick_guide_android_8.webp) 17. Click on the textbox right side of `Python`. This brings the textbox on the screenshot where you can specify the number of books. ![](https://resources.sahipro.com/docs/assets/images/using-sahi/mobile/android/quick_guide_android_9.webp) 18. Click on the `Add Total` button. This will sums up the cost of all three books. ![](https://resources.sahipro.com/docs/assets/images/using-sahi/mobile/android/quick_guide_android_10.webp) 19. Press the Ctrl (⌘ on Mac) key and hover the mouse over the textbox below `Total`.\ Click on the `Assert` button which will generate the valid assertions for that textbox. ![](https://resources.sahipro.com/docs/assets/images/using-sahi/mobile/android/quick_guide_android_12.webp) 20. Click on the `Append` button which will append the assertions in the script. ![](https://resources.sahipro.com/docs/assets/images/using-sahi/mobile/android/quick_guide_android_13.webp) 21. Stop the recording of the script by clicking on the `Stop` button from Controller. 22. Check the recorded script by clicking on `Editor` from controller. The script looks like this. ```js _setMode("ANDROID"); _mActivateApplication("com.sahipro.SahiTestApp", true); _click(_button("Sample Application")); _setValue(_textbox("com.sahipro.SahiTestApp:id/username"), "test"); _setPassword(_textbox("com.sahipro.SahiTestApp:id/pwd"), "MgkKEQBU"); _click(_button("Login")); _setValue(_textbox("com.sahipro.SahiTestApp:id/RubyQuantity"), "1"); _setValue(_textbox("com.sahipro.SahiTestApp:id/JavaQuantity"), "2"); _setValue(_textbox("com.sahipro.SahiTestApp:id/PythonQuantity"), "3"); _click(_button("Add Total")); _assertExists(_textbox("com.sahipro.SahiTestApp:id/Price")); _assertVisible(_textbox("com.sahipro.SahiTestApp:id/Price")); _assertEqual("1750", _getValue(_textbox("com.sahipro.SahiTestApp:id/Price"))); ``` 23. Now come back to Sahi controller and click on `Playback` tab. Select the recorded script and select the `Start Mode:`Android ![](https://resources.sahipro.com/docs/assets/images/using-sahi/mobile/android/quick_guide_android_14.webp) 24. Now click on the `Play` button. This will start the script execution. You can see the steps being executed on the actual device/simulator. :::note When the script is being run from the Controller, you CANNOT see the test run happening on the Android Viewer. The Android Viewer does not get refreshed during the test run. ::: ![](https://resources.sahipro.com/docs/assets/images/using-sahi/mobile/android/quick_guide_android_15.webp) You can see the result of the executed script in the Controller itself. 25. For checking the logs of the executed script, click on the `Logs` link from Controller. This will open a script report of that script. ![](https://resources.sahipro.com/docs/assets/images/using-sahi/mobile/android/quick_guide_android_16.webp) ## Further Reading [Android Automation in Detail](https://resources.sahipro.com/docs/using-sahi/android-details/)\ [Android Accessor functions](https://resources.sahipro.com/docs/sahi-script/functions/android-accessors/)\ [Mobile functions](https://resources.sahipro.com/docs/sahi-script/functions/mobile/)\ [Working with Multiple Modes in a Single Script](https://resources.sahipro.com/docs/sahi-script/multiple-modes/) --- # Automating Android Apps - Details This page describes Android Automation in detail. If you wish to get a quick start, read Android Automation - Getting Started. ## Features - Supports running scripts against a connected Android device or emulator using SDK 18 and above. - [Android Viewer](#android-viewer) and [Controller](https://resources.sahipro.com/docs/using-sahi/sahi-controller/) allow easy interaction with the connected device. - Scripts can be recorded from the Android Viewer and Object spy features are also available. - Android function syntax is similar to Sahi Pro functions for browser testing. - Single script can interact with different modes like Browser, Desktop, Mobile etc. :::caution[Important] Note: From Sahi Pro v9.0.1, `_connectDevice` and `_selectDevice` executes implicitly if the start mode is Android. No need to write these functions in the script.\ To execute these functions explicitly from the script, pass `connectDeviceInternal=false` as extra parameter in the Run Configuration. Refer [here](https://resources.sahipro.com/docs/using-sahi/run-tests-via-editor/) for more details. ::: ## Limitations - Does not support testing Android device or emulator below SDK 18. (Run `adb shell getprop ro.build.version.sdk` to verify) - Does not support run in parallel from the editor, if only one device is connected. ## Android Viewer Android Viewer allows an end user to view the Android device/emulator screen on a Desktop browser. The user can launch the Controller and then identify Android elements by pressing the Ctrl (⌘ on Mac) key and hovering the mouse over the element. This section details how to use the Android Viewer. 1. A User can launch Android Viewer directly from Sahi Dashboard by clicking `Android` button. ![](https://resources.sahipro.com/docs/assets/images/using-sahi/mobile/android/android_button.webp) This brings up Android Viewer in system's default browser. If the user wants to launch Android Viewer in a specific browser then, open that Sahi browser and then click on the `Android Viewer` link from the start page, this brings up Android Viewer in that browser. ![](https://resources.sahipro.com/docs/assets/images/using-sahi/mobile/android/android_viewer.webp) 2. `Device Info:` shows the list of the connected device to the system\ `Application Package Name:` allows an end user to start an application by it's package name which is already installed in that device. Leave it blank if you wants to start the device session in its current state of the screen. :::note Note: if device list doesn't contains the connected device, then click on the refresh button next to devices dropdown. ::: 3. Make sure that the device is connected through a USB cable or over Wi-Fi. Click on `Connect Session`. If the connection is successful, you will see the device screenshot in a short while. ![](https://resources.sahipro.com/docs/assets/images/using-sahi/mobile/android/android_viewer2.webp) 4. When some action is performed from the [Android Viewer](#android-viewer) or from the [Controller](https://resources.sahipro.com/docs/using-sahi/sahi-controller/), the screenshot will be refreshed a few times, to display the latest device state. However, if actions are performed on the device manually, the screenshot will not get refreshed. Click on the `Refresh` button manually to refresh the screenshot. 5. One can interact with the device from the Android Viewer itself without launching the Controller. 6. Launch the Controller by clicking on the `Controller` button. 7. You can now start identifying elements by pressing the Ctrl (⌘ on Mac) key and hovering the mouse over elements on the Desktop screenshot. You will notice the Accessor textbox on the Controller, showing the accessor for the element. The Alternatives dropdown displays the alternatives for the accessor. ![](https://resources.sahipro.com/docs/assets/images/using-sahi/mobile/android/android_viewer_and_controller.webp) :::note Note: While evaluating any line of code from `Evaluate expression`, make sure Sahi-Android is selected on Controller. ::: ### Android Viewer Actions: ![](https://resources.sahipro.com/docs/assets/images/using-sahi/mobile/android/android_viewer2.webp) These buttons perform various actions on the Android device and these actions are recorded while [recording a script](#recording-a-script). These will give quick access to Android assist functions during debugging/script recording. - ![](https://resources.sahipro.com/docs/assets/images/using-sahi/mobile/swipe_up.webp) is used to swipe up on the screen. - ![](https://resources.sahipro.com/docs/assets/images/using-sahi/mobile/swipe_down.webp) is used to swipe down on the screen. - ![](https://resources.sahipro.com/docs/assets/images/using-sahi/mobile/swipe_left.webp) is used to swipe left on the screen. - ![](https://resources.sahipro.com/docs/assets/images/using-sahi/mobile/swipe_right.webp) is used to swipe right on the screen. - ![](https://resources.sahipro.com/docs/assets/images/using-sahi/mobile/open_menu.webp) is used to call up the menu of the app on the display. - ![](https://resources.sahipro.com/docs/assets/images/using-sahi/mobile/enter.webp) will press enter in the text field. - ![](https://resources.sahipro.com/docs/assets/images/using-sahi/mobile/search.webp) is used to open search field (if present) within an application. - ![](https://resources.sahipro.com/docs/assets/images/using-sahi/mobile/recent_apps.webp) will show all recent open apps. - ![](https://resources.sahipro.com/docs/assets/images/using-sahi/mobile/home.webp) is used for navigating to the home screen. - ![](https://resources.sahipro.com/docs/assets/images/using-sahi/mobile/back.webp) simulates the back action. ### Screenshot Outline View Security restrictions may prohibit Android Viewer from capturing the screen shot to be displayed. In such a case, you can use the **Screenshot Outline View** feature to toggle the outline view.\ For example, lets assume that for the below screen, Android Viewer is unable to take the screenshot. To enable the outline view, check the highlighted checkbox in Android Viewer. ![](https://resources.sahipro.com/docs/assets/images/using-sahi/mobile/android/android-screen-without-outline.webp) After checking it, the Android Viewer will display the outline view like this. ![](https://resources.sahipro.com/docs/assets/images/using-sahi/mobile/android/android-screen-with-outline.webp) Now you will be able to identify the elements in controller. :::note A few things to note... - If the app orientation changes from portrait to landscape or vice versa, do a manual refresh by clicking on the Refresh button, to view the screenshot correctly. - If you resize the Android Viewer page, do a manual refresh by clicking on the Refresh button, to view the screenshot correctly. - Do not disconnect (physically or via wifi) the device before disconnecting the session. In case you do so and on reconnecting you find that `Connect Session` does not seem to connect the device, please have a look at the Sahi console. If the Sahi console indicates that you should reconnect the device, please do so. - Closing the Android Viewer browser does NOT disconnect the session. So always disconnect the session before closing the browser. If you fail to do so and open the Android Viewer again, it will show the session to be in a connected state. - As of now, Android Viewer supports only one device at a time. The device has to be connected to the machine that runs Sahi. ::: ## Configure Android Devices/Emulators For configuring the Android devices/emulators, do the following: 1. Click **All Settings** on the Dashboard. The All Settings window opens. 2. Click **Sahi Pro Settings**. The Sahi Pro Settings page opens.
The Sahi Pro Dashboard with the All Settings window open, Sahi Pro Settings and the All Settings button highlighted
In the menu on the left, open **Browsers And Devices** and click **Android Device Definitions** (`android_devices.xml`). ![](https://resources.sahipro.com/docs/assets/images/using-sahi/mobile/android/configure-android-devices.webp) ### androidDevice Node ```xml Moto Moto G5 XXXX YYYY ```
ElementValue
nameKey by which this androidDevice will be referred. This can be any value without spaces.
displayNameBetter name displayed in Android Viewer.
deviceIdId of the device, multiple Id can be added under same name.
you can get the Device Id by executing this command
adb devices
:::note For example, Two devices are configured under `Moto`. For parallel suite runs of data driven suite on this two devices, select `Moto` as Android Device from editor (or specify `Moto` as Android Device in ANT target). Scripts will be distributed in two devices. ::: ## Recording a Script This is similar to recording a Sahi script for normal browser testing. 1. To record a script, launch the Controller from the Android Viewer page, choose a script to record and press Record. 2. Actions done from the Android Viewer page are recorded automatically. - Hovering the mouse over an editable element will overlay a textbox where you can type text. After entering the text, press Enter or click outside the textbox. This will cause the text content to be sent to the device. The relevant step (\_setValue, \_setPassword etc.) will get recorded automatically. - The user can click on any non-editable element on the Viewer. This will click the element on the device. The \_click step will get recorded automatically. 3. Steps can also be recorded from the Controller. You can use Click, Set, Assert, choose Other Actions, Test an expression from Evaluate Expression to perform an action on the Device. But you will need to record these steps explicitly by clicking on `Append`. 4. Since the device screenshot gets refreshed after a Controller action is performed, the user can continue to interact with the changing screen from the Android Viewer itself. If the device screenshot is not refreshed correctly, click on the Refresh button manually to reflect the current screenshot. :::note For better understanding refer [Sahi Controller](https://resources.sahipro.com/docs/using-sahi/sahi-controller/) and [Java Controller](https://resources.sahipro.com/docs/using-sahi/java-controller/). ::: ## Recording Hybrid App ### Pre-requisites - Android Device must be connected on the same network in which Sahi Pro is running. - Configure the proxy in Android Device. For recording Android application which contains Webview (Hybrid contents), open the application in [Android Viewer](#android-viewer) and go to the screen which contains webview.\ If the screen is displaying hybrid contents then there will be one checkbox visible below `Refresh` button. 1. Check the checkbox to identify/record hybrid elements as Web. 2. Press the Ctrl (⌘ on Mac) key and mouse over the hybrid element. 3. Element's accessor will be displayed in Sahi Controller. ![](https://resources.sahipro.com/docs/assets/images/using-sahi/mobile/android/android_webview.webp) 4. To record the hybrid app, perform the actions directly from Android Device. 5. Sample script will look like this ```js _setMode("ANDROID"); _mActivateApplication("com.sahipro.SahiTestApp", true); _setAccessorIgnoreCase(true); _click(_button("Test Web View")); _setValue(_textbox("com.sahipro.SahiTestApp:id/editText"), "https://sahitest.com/demo/training"); _click(_button("GO")); // _aStartWebContext will change the mode to ANDROID_WEBVIEW _aStartWebContext("com.sahipro.SahiTestApp"); _setValue(_textbox("user"), "test"); _setValue(_password("password"), "secret"); _click(_submit("Login")); // _aStopWebContext will revert back the mode to ANDROID _aStopWebContext(); ``` :::note NOTE: To identify/record the hybrid element as native, uncheck the checkbox in Android Viewer. ::: ## Run Tests ### From the Controller Once a script is recorded, you can run it from the Controller itself, with **Run**. 1. Choose the script. 2. Select the `Start Mode:`Android. 3. You can leave the Start URL blank. This is not used. 4. Click on Play to execute the script. 5. Click on Logs to view the logs of the executed script. :::note Note: When the script is being run from the Controller, you cannot see the test run happening on the Android Viewer. The AndroidViewer does not get refreshed during the test run. ::: ### From the Editor User can run the script/suite/scenario from the Editor as well. 1. Choose the script/suite/scenario from the Editor and click **Run**. 2. Select the `Start Mode:`Android. 3. No need to choose any browser. 4. Choose a device to execute a script from `Android Device` dropdown. 5. You can leave the Start URL blank. This is not used. 6. Press `Run` to run the script. :::note For better understanding refer [Run Tests from the Editor](https://resources.sahipro.com/docs/using-sahi/run-tests-via-editor/). ::: ### Via ANT target User can generate an ANT target from the Editor for a script/suite/scenario and run using ANT. 1. Choose the script/suite/scenario from the Editor and click **Run**. 2. Select the `Start Mode:`Android. 3. You do not need to choose any browser. 4. Choose a device to execute a script from `Android Device:` dropdown. 5. You can leave the Start URL blank. This is not used. 6. Press `Create ANT Target` to generate the ANT target. :::note For better understanding refer to [Run Tests via ANT](https://resources.sahipro.com/docs/using-sahi/playback-via-ant/). ::: ## More Info [Android Accessor functions](https://resources.sahipro.com/docs/sahi-script/functions/android-accessors/)\ [Mobile functions](https://resources.sahipro.com/docs/sahi-script/functions/mobile/) --- # iOS Automation - Getting Started This section helps you quickly get started with iOS Automation. To automate an IOS Devices/Simulators using Sahi Pro Flowcharts, refer iOS Automation - Getting Started. ## Introduction Sahi iOS testing is available as part of the [`Sahi Pro Mobile Engine`](https://resources.sahipro.com/docs/using-sahi/mobile-engine/) module. It allows automation of both iOS devices and simulators having iOS version 9.3 and above. It provides the familiar Sahi features and API paradigm available for browser testing. This includes the ability to record and run scripts, edit scripts using the Editor, run suites etc. ## Pre-requisites - Desktop - iOS testing requires a Mac machine running macOS 10.12.6 or later. It is not supported on Windows and Linux. - The machine needs to have Xcode 9.2 or above installed. (Run `xcodebuild -version` to verify.) - The path to the active Xcode developer directory needs to be set. To check if it is set, do the following. - Open a Terminal shell, and run the following command `xcode-select --print-path` - You should see something similar to `/Applications/Xcode.app/Contents/Developer` if the active directory has been set. If you have Xcode installed as `/Applications/Xcode.app`, this would already be set. - If the active directory is not set, you will see an output similar to the following.\ `xcode-select: error: unable to get active developer directory, use sudo xcode-select --switch path/to/Xcode.app to set one (or see man xcode-select)` - Run the following command to set the active directory.\ `sudo xcode-select --switch /Applications/Xcode.app`\ The above command assumes that Xcode is available as `/Applications/Xcode.app`. If you have named your Xcode app as Xcode9.2.app, the above command would be\ `sudo xcode-select --switch /Applications/Xcode9.2.app` - Verify that the active directory is set by running `xcode-select --print-path` again. - Simulator - Xcode will automatically install simulators with version iOS 11 or above. If you wish to test on iOS 9.3 or iOS 10.3, install the simulators through Xcode. - There are no specific prerequisites required to test on a simulator. - Device - Testing on a device involves a few steps. Refer to [Testing on a Device](https://resources.sahipro.com/docs/using-sahi/ios-details/#testing-on-a-device) for pre-requisites and details, after going through this quick tutorial. ## Download and Install Sahi Pro Mobile Engine You need to install [Sahi Pro Mobile Engine](https://resources.sahipro.com/docs/using-sahi/mobile-engine/) before you can proceed with the [Quick Tutorial](#quick-tutorial) ## Quick Tutorial This tutorial involves automating a sample app on an iOS simulator. `Sahi Pro Mobile Engine` ships with a few iOS Test Apps. We will use `SahiTestApp` in this tutorial. We will be running the tutorial on `iOS 16.4 - iPhone 14 Pro Max` Simulator. But this can be run on any Simulator having version iOS 9.3 or above. 1. **Start the Simulator**\ Start a simulator explicitly using the Simulator app. We can also start it with start\_simulator.sh detailed in [Testing on a Simulator](https://resources.sahipro.com/docs/using-sahi/ios-details/#testing-on-a-simulator). But we will just use the Simulator app for now. - Start the Simulator app from the Xcode menu - `Xcode -> Open Developer Tool -> Simulator`. - Start the specific simulator from the Simulator app menu - `Hardware->Device->iOS 16.4->iPhone 14 Pro Max` - Note down the Simulator UUID. This is needed to install SahiTestApp, in the next step. - To get the Simulator UUID, open a Terminal shell, and run `xcrun simctl list devices` - You should see output similar to the following. ![\](https://resources.sahipro.com/docs/assets/images/using-sahi/mobile/ios/getting-started/xcrun-output.webp) NOTE that the output will have simulators for different iOS versions, and also different OS types like tvOS, watchOS etc.\ NOTE that your Simulator UUIDs will be different. - From the output, locate the `iOS 16.4 - iPhone 14 Pro Max` simulator entry. It looks like this. As you can see, this shows up as Booted. ![Booted Simulator](https://resources.sahipro.com/docs/assets/images/using-sahi/mobile/ios/getting-started/booted-simulator.webp) 2. **Install the Test App**\ SahiTestApp needs to be installed on the booted Simulator, before we can automate it. - Sahi provides a shell script, `install_testapps_on_simulator.sh`, to install all Sahi iOS test apps in one go. - Open a Terminal shell and navigate to `/userdata/bin/iOS/testapps` folder. - Type `./install_testapps_on_simulator.sh ` where `` is the Simulator UUID you noted above.\ Based on the specific xcrun output above, this will look like `./install_testapps_on_simulator.sh 26E1E4C9-70D9-42A2-918E-AD5B21DE5D74` NOTE again that your Simulator UUID will be different. - All the test apps should now get installed on your booted simulator. 3. Now that we have installed SahiTestApp on the Simulator, start up the `Sahi Dashboard`, and click on the `iOS` button ![](https://resources.sahipro.com/docs/assets/images/using-sahi/mobile/ios/getting-started/ios-dashboard-button.webp) 4. This will bring up the iOS Viewer in the default browser. ![](https://resources.sahipro.com/docs/assets/images/using-sahi/mobile/ios/getting-started/quick-guide-ios1.webp) 5. The `Device Info:` dropdown lists all the Simulators installed on the Mac machine. The booted Simulator will have a (Booted) suffix.\ If `Device Info` is not populated automatically, choose the booted Simulator from the dropdown. 6. Type `com.sahipro.ios.test.SahiTestApp` in the `Application BundleId` textbox.\ You will notice that a bunch of suggested apps comes up, but Sahi test apps are not part of the suggestions. So, we need to manually type it the first time. Sahi will remember it from the next time onwards. ![](https://resources.sahipro.com/docs/assets/images/using-sahi/mobile/ios/getting-started/quick-guide-ios2.webp) 7. Click on `Connect Session` button. 8. This will start the SahiTestApp application on the Simulator, and the iOS Viewer will display the screenshot of the application. ![](https://resources.sahipro.com/docs/assets/images/using-sahi/mobile/ios/getting-started/quick-guide-ios3.webp) 9. Launch the Controller by press ALT key and then double click on the iOS Viewer window. 10. Specify a script name (test\_ios\_sample\_app.sah) in the Controller and click on `Record` button. ![](https://resources.sahipro.com/docs/assets/images/using-sahi/mobile/ios/getting-started/quick-guide-ios4.webp) :::note NOTE: Throughout this tutorial, we will perform actions on the Viewer which will get recorded in the script. ::: :::note NOTE: The Viewer has to be in focus for performing any actions. ::: 11. Click on `TEST SAMPLE APPLICATION` in the iOS Viewer. The `TEST SAMPLE APPLICATION` element will be clicked on the device, and the Viewer screenshot will be refreshed. The Login screen is now visible. ![](https://resources.sahipro.com/docs/assets/images/using-sahi/mobile/ios/getting-started/quick-guide-ios5.webp) 12. Click on `Recorded steps` tab in the Controller. You can see a bunch of recorded steps. ![](https://resources.sahipro.com/docs/assets/images/using-sahi/mobile/ios/getting-started/quick-guide-ios6.webp) A few steps have been recorded implicitly. Finally the click on `TEST SAMPLE APPLICATION` has also been recorded. 13. We are in the Login screen, and we need to automate the User Name and Password text fields.\ IMPORTANT: Automation of text fields needs the Hardware keyboard to be setup correctly. The iOS Simulator sometimes has problems showing the keyboard. To make sure that the keyboard works, click on the User Name textbox in the Simulator (NOT on the Viewer). Check if the keyboard appears. ![](https://resources.sahipro.com/docs/assets/images/using-sahi/mobile/ios/getting-started/keyboard-username.webp) As you can see, the keyboard appears. :::note - If you see the keyboard appearing, toggle the keyboard **twice** by clicking on \[Hardware->Keyboard->Toggle Software Keyboard\] from the Simulator app menu **twice**. This will first hide the keyboard and show it again. - If you do NOT see the keyboard appearing, toggle the keyboard **once** by clicking on \[Hardware->Keyboard->Toggle Software Keyboard\] from the Simulator app menu **once**. This will simply show the keyboard once. ::: 14. Proceed with the automation. In the Viewer, click the textbox near the User Name label. You can now see an editable textbox overlaid on the User Name textbox. ![](https://resources.sahipro.com/docs/assets/images/using-sahi/mobile/ios/getting-started/quick-guide-ios7.webp) 15. Type "test" in the textbox and press the Enter key on your Mac. ![](https://resources.sahipro.com/docs/assets/images/using-sahi/mobile/ios/getting-started/quick-guide-ios8.webp) 16. The "test" string is sent to the device and the Username textbox is populated with "test". This can be seen from the Viewer screenshot. ![](https://resources.sahipro.com/docs/assets/images/using-sahi/mobile/ios/getting-started/quick-guide-ios9.webp) Also, you can see that a \_setValue step has been recorded for the Username textbox. 17. Click on the Password textbox now. You can see an editable textbox overlaid on the Password textbox. ![](https://resources.sahipro.com/docs/assets/images/using-sahi/mobile/ios/getting-started/quick-guide-ios10.webp) 18. Type "secret" in the textbox and press the Enter key on your Mac. ![](https://resources.sahipro.com/docs/assets/images/using-sahi/mobile/ios/getting-started/quick-guide-ios11.webp) 19. The "secret" string is sent to the device and the Password textbox is populated with masked characters. ![](https://resources.sahipro.com/docs/assets/images/using-sahi/mobile/ios/getting-started/quick-guide-ios12.webp) Also, you can see that a \_setPassword step has been recorded for the Password textbox. 20. Click the "Login" button. You are now in the Available Books screen. ![](https://resources.sahipro.com/docs/assets/images/using-sahi/mobile/ios/getting-started/quick-guide-ios13.webp) 21. Click on the "Quantity" textbox for "Ruby for Rails". An editable textbox shows up with 0 in it. Remove it and enter 3 in the textbox. Press Enter key on your Mac. On the device, the "Quantity" textbox for "Ruby for Rails" is filled with a value 3, as can be seen from the Viewer screenshot. ![](https://resources.sahipro.com/docs/assets/images/using-sahi/mobile/ios/getting-started/quick-guide-ios14.webp) 22. Repeat the steps for the "Quantity" textbox for "Core Java". - Click on the "Quantity" textbox for "Core Java". An editable textbox shows up with 0 in it. Remove it and enter 5 in the textbox. Press Enter key on your Mac. - On the device, the "Quantity" textbox for "Core Java" is filled with a value 5. The Viewer shows the filled value. - At the end of the above step, the Viewer will look like this. You can see the \_setValue step recorded for "Core Java". ![](https://resources.sahipro.com/docs/assets/images/using-sahi/mobile/ios/getting-started/quick-guide-ios15.webp) 23. Repeat the steps for the "Quantity" textbox for "Python Cookbook". - Click on the "Quantity" textbox for "Python Cookbook". An editable textbox shows up with 0 in it. Remove it and enter 4 in the textbox. Press Enter key on your Mac. - On the device, the "Quantity" textbox for "Python Cookbook" is filled with a value 4. The Viewer shows the filled value. - At the end of the above step, the Viewer will look like this. You can see the \_setValue step recorded for "Python Cookbook". ![](https://resources.sahipro.com/docs/assets/images/using-sahi/mobile/ios/getting-started/quick-guide-ios16.webp) 24. Click on the "ADD TOTAL" button. The Viewer shows the calculated total. ![](https://resources.sahipro.com/docs/assets/images/using-sahi/mobile/ios/getting-started/quick-guide-ios17.webp) 25. It is time to add assertions on the total. Press the Ctrl (⌘ on Mac) key and hover your mouse over the calculated total (3300). You will see the appropriate accessor in the Controller - `_label("TotalCost")` ![](https://resources.sahipro.com/docs/assets/images/using-sahi/mobile/ios/getting-started/quick-guide-ios18.webp) 26. Click on `Assert` button in the Controller. The Controller adds a few assertions for `_label("TotalCost")`. ![](https://resources.sahipro.com/docs/assets/images/using-sahi/mobile/ios/getting-started/quick-guide-ios19.webp) 27. Click on `Append` button in the Controller. The assertions are appended to the script. ![](https://resources.sahipro.com/docs/assets/images/using-sahi/mobile/ios/getting-started/quick-guide-ios20.webp) ![](https://resources.sahipro.com/docs/assets/images/using-sahi/mobile/ios/getting-started/quick-guide-ios21.webp) 28. Stop the recording of the script by clicking on the `Stop` button from Controller. 29. Check the recorded script by clicking on `Editor` from controller. The script looks like this. ```js _setMode("IOS"); _mActivateApplication("com.sahipro.ios.test.SahiTestApp", true); _click(_label("TEST SAMPLE APPLICATION")); _setValue(_textbox("usernameID"), "test"); _setPassword(_password("passwordID"), "MgkKEQBU"); _click(_button("Login")); _setValue(_textbox("RubyID"), "3"); _setValue(_textbox("JavaID"), "5"); _setValue(_textbox("PythonID"), "4"); _click(_button("ADD TOTAL")); _assertExists(_label("TotalCost")); _assertVisible(_label("TotalCost")); _assertEqual("3300", _getText(_label("TotalCost"))); ``` 30. It is time to run the script. In the Controller, set the mode to iOS and click **Run** ![](https://resources.sahipro.com/docs/assets/images/using-sahi/mobile/ios/getting-started/quick-guide-ios22.webp) 31. Click on the `Play` button. This will start the script execution. :::note When the script is being run from the Controller, you CANNOT see the test run happening on the iOS Viewer. The iOS Viewer does not get refreshed during the test run. ::: You can see the result of the executed script in the Controller itself. ![](https://resources.sahipro.com/docs/assets/images/using-sahi/mobile/ios/getting-started/quick-guide-ios23.webp) 32. Click **Reports** in the Controller's bottom bar. This shows the report for the test run. ![](https://resources.sahipro.com/docs/assets/images/using-sahi/mobile/ios/getting-started/quick-guide-ios24.webp) 33. Close the Controller. 34. Click on `Disconnect Session` button in the Viewer to disconnect the session. ## Further Reading [iOS Automation in Detail](https://resources.sahipro.com/docs/using-sahi/ios-details/)\ [iOS Accessor functions](https://resources.sahipro.com/docs/sahi-script/functions/ios-accessors/)\ [Mobile functions](https://resources.sahipro.com/docs/sahi-script/functions/mobile/)\ [Working with Multiple Modes in a Single Script](https://resources.sahipro.com/docs/sahi-script/multiple-modes/) --- # Automating iOS Apps - Details This page describes iOS Automation in detail. If you wish to get a quick start, read iOS Automation - Getting Started. ## Features - Supports running scripts against a connected iOS device or simulator having version iOS 9.3 and above. - [iOS Viewer](#ios-viewer) and [Controller](https://resources.sahipro.com/docs/using-sahi/sahi-controller/) allow easy interaction with the connected device. - Scripts can be recorded from the iOS Viewer and Object spy features are also available. - Scripts can be played back from the Controller, Editor, ANT etc. - iOS function syntax is similar to Sahi Pro functions used for browser testing. - Single script can interact with different modes like Browser, Desktop, Mobile etc. :::caution[Important] Note: From Sahi Pro v9.0.1, `_connectDevice` and `_selectDevice` executes implicitly if the start mode is iOS. No need to write these functions in the script.\ To execute these functions explicitly from the script, pass `connectDeviceInternal=false` as extra parameter in the Run Configuration. Refer [here](https://resources.sahipro.com/docs/using-sahi/run-tests-via-editor/) for more details. ::: ## Limitations - Does not support testing iOS device or simulator below iOS 9.3 - Does not support distributed run on multiple machines yet. - Does not support testing on a remote iOS device yet. The iOS device needs to be connected to the Mac machine. ## Testing on a Simulator The iOS simulator can be started in 3 different ways. It is not necessary that the simulator be started up prior to starting an [iOS Viewer](#ios-viewer) session or running a script. But it is advisable to explicitly start it beforehand. More details below. 1. Explicitly start the simulator before running the test.\ This can be done in either of the following ways. - Using Simulator app - Start the Simulator app from the Xcode menu - `Xcode -> Open Developer Tool -> Simulator`. - Start a specific simulator from the Simulator app menu - `Hardware->Device->iOS 16.4->iPhone 14 Pro Max` - Using start\_simulator.sh - This is a shell script that one can use to launch a Simulator from the command line. - Open a Terminal shell and navigate to `/userdata/bin/iOS` folder. - Run `./start_simulator.sh ` where `` refers to the UUID of the specific simulator. - Simulator UUIDs can be obtained by running `xcrun simctl list devices` on a Terminal shell.When the simulator is started explicitly first, a test will simply run the script in the launched simulator. At the end of the script run, the simulator will remain open. 2. The Simulator app is open, but the specific simulator is not running (the process is running, but the desired simulator is not running).\ In this case, the test will launch the simulator, run the script and close the simulator. 3. Simulator app is shut down and no Simulator process is in memory.\ In this case, the script will launch the simulator in the background, run the script and close the simulator. The simulator will remain invisible through the duration of the script since it runs in the background. :::note NOTE: The script run can be quite slow if the simulator was not launched explicitly before the start of the test, since the simulator startup is part of the script run time. ::: ## Testing on a Device Testing on a device involves a few steps first. - Device Pre-requisites :::caution[Important] You will need an Apple developer license to test an app on the device. This is needed since the device testing binary needs to be signed, for it to work on the device. ::: - Devices with iOS versions above iOS 9.3 are supported - The device has to be connected to the Mac machine through USB cable throughout the duration of the test. - The device needs to be on the same Wi-Fi network as the Mac machine. - Screen lock should be removed and display options should be set such that the device does not sleep during the execution of the script. - Additionally, follow the below steps for iOS devices with iOS 14 and above: - Add property `ios.use.sahi.common_domain=true` in `/userdata/config/userdata.properties` - Find the IP of the Mac machine. - Configure proxy settings of the mobile device with proxy host as the Mac machine's IP and port as 9999. - Connecting iOS Device in iOS Viewer - Start up the [iOS Viewer](#ios-viewer). - Choose the iOS Device from Device Info dropdown. Type the application bundle identifier in the `Application BundleId` textbox. - Click on `Connect Session` button. - If the device binary does not exist then It will ask to build the device binary in iOS Viewer. ![](https://resources.sahipro.com/docs/assets/images/using-sahi/mobile/ios/device-binary-not-exist.webp) :::note IMPORTANT NOTE: The device binary needs to be built once per Xcode version. This is not per device. Once built, you can test with multiple devices. If Xcode version changes, then iOS Viewer will shows to build the device binary for that Xcode version. ::: - Type the `Team ID` in the textbox to build the device binary. :::note NOTE: The `Team ID`can be obtained from your Apple Developer Account page. ::: :::note NOTE: User have to add his/her `Apple ID` to the `Accounts` section of Xcode on his/her machine. This is available from the Xcode menu - `Xcode -> Preferences -> Accounts`. ::: - Click on `Build` button. iOS Viewer will create a device binary and shows the appropriate result. ![](https://resources.sahipro.com/docs/assets/images/using-sahi/mobile/ios/build-device-binary.webp) - After the device binary built successfully, click on `Connect Session` button. This will start the SahiTestApp application on the iOS Device, and the iOS Viewer will display the screenshot of the application. :::note This process does not required for testing iOS Simulator. ::: - When the device is connected to the Mac for the first time, the user will get an alert on the device asking to `Trust this computer`. Choose the `Trust` option. ![Trust this computer](https://resources.sahipro.com/docs/assets/images/using-sahi/mobile/ios/trust-this-computer.webp) ## iOS Viewer `iOS Viewer` allows an end user to view the iOS device/simulator screen on a Mac browser. The user can launch the Controller and then identify iOS elements by pressing the Ctrl (⌘ on Mac) key and hovering the mouse over the elements in the Viewer. This section details how to use the iOS Viewer. 1. The user can launch `iOS Viewer` directly from Sahi Dashboard by clicking `iOS` button. This brings up the `iOS Viewer` in the system's default browser. If the user wants to launch `iOS Viewer` in a different browser, one can open that Sahi browser from the Dashboard and click on the `iOS Viewer` link to bring up the `iOS Viewer` in that browser. ![iOS Viewer](https://resources.sahipro.com/docs/assets/images/using-sahi/mobile/ios/ios-viewer1.webp) 2. `Device Info:` shows the list of devices connected to the Mac machine and simulators installed on the machine. If you are connecting to a Simulator, you may want to start the simulator first. Refer to [Testing on a Simulator](#testing-on-a-simulator) for details. `Application BundleId:` The user needs to choose an application to start the Viewer session with. This application needs to be available on the device/simulator. One can choose an application from the dropdown or enter a new application bundle id, ex: `com.mycompany.myapp`. When entering the app bundle id, one can give a name to it as well, like this, in brackets - `com.mycompany.myapp (MyApp)`. :::note NOTE: If the viewer session is connected successfully, the application bundle id will be stored in app history so that the next time the user can simply choose it from the dropdown list. Typing `MyApp` will bring up the `com.mycompany.myapp (MyApp)` option. ::: :::note Note: if device list doesn't contains the connected device, then click on the refresh button next to devices dropdown. ::: 3. If you are connecting to a device, ensure that it is connected to the Mac machine through a USB cable.\ Ensure that the device and the Mac machine are connected to the same Wi-Fi network. 4. Click on `Connect Session`. If the connection is successful, you will see three buttons `Disconnect Session`, `Controller` and `Refresh`. You will see also the device screenshot. If you encounter connection errors, refer to the [connection troubleshooting](#troubleshooting-connection-issues) section. ![iOS Viewer](https://resources.sahipro.com/docs/assets/images/using-sahi/mobile/ios/ios-viewer2.webp) 5. When some action is performed from the [iOS Viewer](#ios-viewer) or from the [Controller](https://resources.sahipro.com/docs/using-sahi/sahi-controller/), the screenshot will be refreshed automatically. However, any actions performed through the `Evaluate Expression` box in the Controller will not cause a screenshot refresh. Click on the `Refresh` button manually to refresh the screenshot. :::note At times, the screenshot will not show the latest device state, particularly when the app is fetching some data from the network. In such cases, press the `Refresh` button to refresh the screenshot. ::: 6. One can interact with the device from the `iOS Viewer` itself without launching the Controller. 7. Launch the Controller by clicking on the `Controller` button. This will bring up the Controller. This is exactly the same as a normal browser Controller, except that it is configured to interact with an iOS session. 8. One can now start identifying elements by pressing the Ctrl (⌘ on Mac) key and hovering the mouse over elements on the Viewer screenshot. One will notice the Accessor textbox on the Controller, showing the accessor for the element. The Alternatives dropdown displays the alternatives for the accessor.\ The image shows the Accessor and Alternatives for the "Privacy & Security" label element. The Viewer shows the highlighted element. ![iOS Viewer and Controller](https://resources.sahipro.com/docs/assets/images/using-sahi/mobile/ios/viewer-and-controller.webp) :::caution[Important] Note: While evaluating any line of code from the `Evaluate expression` box, make sure `Sahi-IOS` is selected in the Controller. ::: :::note A few things to note... - If the app orientation changes from portrait to landscape or vice versa, do a manual refresh by clicking on the Refresh button, to view the screenshot correctly. - If you resize the iOS Viewer page, do a manual refresh by clicking on the Refresh button, to view the screenshot correctly. - Disconnect the session by clicking on `Disconnect Session` before you disconnect the device from the Mac machine. - Closing the iOS Viewer browser does NOT disconnect the session. So always disconnect the session before closing the browser. If you fail to do so and open the iOS Viewer again, it will show the session to be in a connected state. ::: ## Configure iOS Devices/Simulators For connfiguring the iOS devices/simulators, do the following: 1. Click **All Settings** on the Dashboard. The All Settings window opens. 2. Click **Sahi Pro Settings**. The Sahi Pro Settings page opens.
The Sahi Pro Dashboard with the All Settings window open, Sahi Pro Settings and the All Settings button highlighted
In the menu on the left, open **Browsers And Devices** and click **iOS Device Definitions** (`ios_devices.xml`). ![](https://resources.sahipro.com/docs/assets/images/using-sahi/mobile/ios/configure-ios-devices.webp) ### iOSDevice Node ```xml iPhone iPhone X XXXX YYYY simulator ```
ElementValue
nameKey by which this iOSDevice will be referred. This can be any value without spaces.
displayNameBetter name displayed in iOS Viewer.
deviceIdId of the device, multiple Id can be added under same name.
you can get the Device Id by executing below command

For MacOS 12 onwards, use this command:
xcrun xctrace list devices
For MacOS 11 and earlier, use this command:
instruments -s devices
typeType should be either simulator or device
:::note For example, Two devices are configured under `iPhone`. For parallel suite runs of data driven suite on this two devices, select `iPhone` as iOS Device from editor (or specify `iPhone` as iOSDevice in ANT target). Scripts will be distributed in two devices. ::: ### Troubleshooting connection issues There are a few reasons for connection issues that one may face, especially with a device. The error alerts will have useful information about what went wrong. - If you connect to a device and the device binary does not exist, you will get an error indicating the same in iOS Viewer. Refer to [Testing on a Device](#testing-on-a-device) for building the device binary. - The connection can also fail if the device is on a different network than the desktop, or is not able to connect to the desktop. ## Recording a Script This is similar to recording a Sahi script for normal browser testing. 1. To record a script, launch the Controller from the iOS Viewer page, choose a script to record and press Record. 2. Actions done from the iOS Viewer page are recorded automatically. - Hovering the mouse over a textbox will overlay a textbox where one can type text in. After typing the text, press Enter or click outside the textbox. This will send the text content to the device. The `_setValue/_setPassword` step will get recorded automatically. - The user can click on any other element. This will click the element on the device. The `_click` step will get recorded automatically. 3. Steps can also be recorded from the Controller. One can use Click, Set, Assert, choose Other Actions, Test an expression from Evaluate Expression to perform an action on the Device. But one will need to record these steps explicitly by clicking on `Append`. 4. The device screenshot will get refreshed after a Controller action is performed, except when it is from the `Evaluate Expression` box, in which case an explicit refresh is required. The user can continue to interact with the changing screen from the Viewer itself. If the device screenshot is not refreshed correctly, click on the Refresh button manually to reflect the current screenshot. :::note For more details on Controller, refer to [Sahi Controller](https://resources.sahipro.com/docs/using-sahi/sahi-controller/) and [Java Controller](https://resources.sahipro.com/docs/using-sahi/java-controller/). ::: ## Recording Hybrid App ### Pre-requisites - iOS Device must be connected on the same network in which Sahi Pro is running. - Configure the proxy in iOS Device. For recording iOS application which contains Webview (Hybrid contents), open the application in [iOS Viewer](#ios-viewer) and go to the screen which contains webview.\ If the screen is displaying hybrid contents then there will be one checkbox visible below `Refresh` button. 1. Check the checkbox to identify/record hybrid elements as Web. 2. Press the Ctrl (⌘ on Mac) key and mouse over the hybrid element. 3. Element's accessor will be displayed in Sahi Controller. ![](https://resources.sahipro.com/docs/assets/images/using-sahi/mobile/ios/ios_webview.webp) 4. To record the hybrid app, perform the actions directly from iOS Device. 5. Sample script will look like this ```js _setMode("IOS"); _mActivateApplication("com.sahipro.ios.test.SahiTestApp", true); _setAccessorIgnoreCase(true); _click(_button("Test Web View")); _setValue(_textbox("webViewTextFieldID"), "https://sahitest.com/demo/responsiveTestPage.htm"); _click(_button("GO")); // _mStartWebContext will change the mode to IOS_WEBVIEW _mStartWebContext(); _click(_heading4("Sales")); // _mStopWebContext will revert back the mode to IOS _mStopWebContext(); ``` :::note NOTE: To identify/record the hybrid element as native, uncheck the checkbox in iOS Viewer. ::: ## Run Tests ### From the Controller Once a script is recorded, you can run it from the Controller itself, with **Run**. - 1. Choose the script. 2. Select the `Start Mode:`iOS. 3. You can leave the Start URL blank. This is not used. 4. Click on Play to execute the script. 5. Click on Logs to view the logs of the executed script. :::note Note: When the script is being run from the Controller, you cannot see the test run happening on the iOS Viewer. The iOS Viewer does not get refreshed during the test run. ::: ### From the Editor User can run a script/suite/scenario from the Editor as well. 1. Choose the script/suite/scenario from the Editor and click **Run**. 2. Select the `Start Mode:`iOS. 3. You do not need to choose any browser. 4. Choose a device to execute a script from `IOS Device:` dropdown. 5. You can leave the Start URL blank. This is not used. 6. Press `Run` to run the script. :::note Refer to [Run Tests from the Editor](https://resources.sahipro.com/docs/using-sahi/run-tests-via-editor/) for more details on running tests from the Editor. ::: ### Via ANT Target User can generate an ANT target from the Editor for a script/suite/scenario and run using ANT. 1. Choose the script/suite/scenario from the Editor and click **Run**. 2. Select the `Start Mode:`iOS. 3. You do not need to choose any browser. 4. Choose a device to execute a script from `IOS Device:` dropdown. 5. You can leave the Start URL blank. This is not used. 6. Press `Create ANT Target` to generate the ANT target. :::note Refer to [Run Tests via ANT](https://resources.sahipro.com/docs/using-sahi/playback-via-ant/) for more details on running tests via ANT ::: ## Automating System Dialogs System dialogs in iOS are not visible to the automation APIs, so they cannot be automated by normal Sahi functions. For example, one cannot induce a click on an Allow button in the system dialog. They are automated through a special flow. 1. Before one expects a system dialog, one needs to setup the expectation by using [`_iExpectSystemDialog`](https://resources.sahipro.com/docs/sahi-script/functions/ios/#_iexpectsystemdialog) API. Pass the expected message and the accessor of the button to click. 2. Perform actions that bring up the system dialog. 3. In order to trigger the system dialog automation flow, one needs to interact with the app. Use [`_iInteractWithApp()`](https://resources.sahipro.com/docs/sahi-script/functions/ios/#_iinteractwithapp) for the same. If the expected message and the actual message match, and the button accessor is available, it will be clicked, and the dialog will be dismissed. 4. One can check the message of the last dialog shown, by using [`_iLastSystemDialog()`](https://resources.sahipro.com/docs/sahi-script/functions/ios/#_ilastsystemdialog) 5. Finally, the last system dialog message can be cleared using [`_iClearLastSystemDialog()`](https://resources.sahipro.com/docs/sahi-script/functions/ios/#_iclearlastsystemdialog) ## Known Issues - Issues with automating text fields This issue occurs on some iOS simulators. If there are multiple text fields in an app, automation of setting values may fail after a certain number of fields. The keyboard will not come up after the first few successful steps. To solve this, first ensure that the Hardware keyboard is setup correctly. The iOS Simulator sometimes has problems showing the keyboard. To make sure that the keyboard works, click on on any text field in the Simulator. Check if the keyboard appears. :::note - If you see the keyboard appearing, toggle the keyboard "twice" by clicking on \[`Hardware->Keyboard->Toggle Software Keyboard`\] from the Simulator app menu "twice". This will first hide the keyboard and show it again. - If you do NOT see the keyboard appearing, toggle the keyboard "once" by clicking on \[`Hardware->Keyboard->Toggle Software Keyboard`\] from the Simulator app menu "once". This will simply show the keyboard once. ::: After this, the text fields automation will succeed. Do the same if there are other keyboard problems. - In the `iOS Viewer,` keyboard dimensions come up in Portrait orientation in Landscape mode. To record any keys, record in Portrait mode. - In a webview, a textbox or password field may need an extra `_click` before the `_setValue` step. - Issues With System Dialogs - If an app requires the Location permission, and Location is not turned ON in Settings, the system dialog will show a button to launch `Settings`. Unfortunately clicking on `Settings` button will launch the Settings app and cause the current app to be deactivated. This eventually causes `_iInteractWithApp()` to fail. So such a dialog cannot be automated. Or in other words, any dialog button that causes invocation of a different app cannot be automated. :::caution[Important] To workaround this, either turn Location ON from `Settings` manually or automate this step before the system dialog automation code kicks in. In such a case, the dialog will show the "Allow" and "Don't Allow" buttons, neither of which will launch a new app. ::: - If one wishes to automate clicking the "Don't Allow" button, note that the character between n and t is NOT a single quote. Either use a regular expression /Don.\*Allow/ or use the exact specific character, as shown in `userdata/scripts/sahitests/ios/systemdialogs/systemDialog1.sah - testCalendarSystemDialogSpecialCharacters method.` - System dialogs may not get automated on iOS 9 ## Demo Scripts Refer to demo scripts in `/userdata/scripts/sahitests/ios` folder. ## Test Apps A few iOS Test Apps have been bundled with the Sahi Pro Mobile Engine. The demo scripts make use of these test apps. To install these tests apps on your simulator, do the following. - Start the specific simulator explicitly using the Simulator app or start\_simulator.sh, as explained in [Testing on a Simulator.](#testing-on-a-simulator) - Open a Terminal shell and navigate to `/userdata/bin/iOS/testapps` - Type `./install_testapps_on_simulator.sh ` and press Enter. `` refers to the UUID of the specific simulator. Simulator UUIDs can be obtained by running `xcrun simctl list devices` on a Terminal shell. This will install all the test apps on the specific simulator. ### Test App Bundle Ids Since they are test apps, their bundle ids have not been added to the apps history out of the box. Hence one will need to explicitly type in the testapp bundle id while connecting the Viewer session. Here is the list of the Test App bundle ids. - SahiTestApp - com.sahipro.ios.test.SahiTestApp - SahiTestApp2 - com.sahipro.ios.test.SahiTestApp2 - LoginApp - com.sahipro.ios.test.LoginApp - NearApp - com.sahipro.ios.test.NearApp - GroceryApp - com.sahipro.ios.test.GroceryApp - SpecialCharactersApp - com.sahipro.ios.test.SpecialCharactersApp - FirstApp - com.sahipro.ios.test.FirstApp - SecondApp - com.sahipro.ios.test.SecondApp ## Appendix This section contains information on miscellaneous topics. ### Element Identification - Suggestions - Prefer using a direct text accessor for best performance. For example: \_button("Login"). - Prefer using a direct text accessor that does not change. For example, value is not a good choice for \_textbox, since it can change. So \_textbox("johndoe") is not a good accessor. - If a direct text accessor is not available, use an index accessor provided it does not change. Otherwise, prefer a relational (\_in, \_near) or positional (\_rightOf, \_leftOf...) accessor. - \_rightOf may be faster than \_near in many cases. - \_parentNode() may be useful too. ### Element Identification - Notes on Alternate Candidates In iOS testing, an element is considered visible (`_isVisible($el)` will return true) if it is hittable. Clicking on an element that is not hittable causes internal test failures. :::note Hence we only display visible elements in the Controller Accessor and Alternatives. ::: However, there are times when one wants to check the text of a non hittable element or whether it is selected, etc. In order to do so, the user will need the identifier for the element. To facilitate this, we show the identifiers of all possible alternate candidates, in the Controller result section. :::note The Accessor shows the smallest possible visible element at a point, while the alternate candidates contain those elements that are smaller than or equal in size to the Accessor. ::: ![Accessor with alternate candidates](https://resources.sahipro.com/docs/assets/images/using-sahi/mobile/ios/accessor-with-alternate-candidates.webp) ### Viewer - Starting or activating a new app In iOS testing, interacting with any element requires the app which contains the element, to be in the foreground and activated.\ There are two scenarios when one would want to activate a new app. 1. When the app itself launches a new app on some interaction 2. One wishes to explicitly launch a new app since the testcase requires interacting with more than one app. In either case, before one can interact with the new app, it has to be activated. - App launches new app internally - Automatic activation - if the new app is part of the app history that Sahi stores, it will be activated automatically. - If Sahi is not yet aware of the new app, the user will receive an alert indicating the app needs to be activated by specifying the application bundle id. Enter the app bundle id and click on `Start/Activate app` in the Viewer. - Explicit launch of app\ Enter the app bundle id and click on `Start/Activate app` in the Viewer. If the app is in the background, it will just be activated. Else it will be launched newly. ### helperFunctions.sah `/userdata/scripts/sahitests/iOS/helperFunctions.sah` lists a few helper functions that are useful in a Sahi script. ## More Info [iOS Accessor functions](https://resources.sahipro.com/docs/sahi-script/functions/ios-accessors/)\ [Mobile functions](https://resources.sahipro.com/docs/sahi-script/functions/mobile/) --- # Sahi Pro SAP Engine Getting started for automation with Sahi Pro SAP Engine Automation. ## Prerequisites 1. Java 1.8 or above is needed for running Sahi Pro. 2. Microsoft Visual C++ Redistributable 2008 x86 or Microsoft Visual C++ Redistributable 2010 x86. - Verify the installed version of Microsoft Visual C++ Redistributable as follows: - Open Add and Remove Programs and look for Microsoft Visual C++ Redistributable. - The installed versions will be listed there. ![](https://resources.sahipro.com/docs/assets/images/using-sahi/sap-gui/apps&features.webp) 3. Microsoft .NET framework v4.5+. - Verify the installed version of Microsoft .NET framework as follows : - On the Start menu, choose Run. - In the Open box, enter `regedit.exe` - In the Registry Editor, open the following subkey: `HKEY_LOCAL_MACHINE\SOFTWARE\Microsoft\NET Framework Setup\NDP\v4\Full` ![](https://resources.sahipro.com/docs/assets/images/using-sahi/win-desktop/netframework.webp) 4. SAP GUI scripting interface must be installed. ![](https://resources.sahipro.com/docs/assets/images/using-sahi/sap-gui/prerequisite_sapguiscripting.webp) ### Download Sahi Pro SAP Engine Download Sahi Pro and Sahi Pro SAP Engine from the [Download Center](https://resources.sahipro.com/docs/introduction/installers/).\ [Install Sahi Pro](https://resources.sahipro.com/docs/using-sahi/quick-tutorial/#install-sahi) into a folder without spaces in its path. Then install Sahi Pro SAP Engine into the same folder as Sahi Pro. Sahi Pro SAP Engine needs a separate license from Sahi Pro. You will need a valid license to run Sahi Pro SAP Engine. If you do not have a valid license yet, [book a demo](https://sahipro.com/get-started/) to get a 14 day trial license. ### Install Sahi Pro SAP Engine #### Installing using Configure page 1. Click **All Settings** on the Dashboard. The All Settings window opens. 2. Click **Sahi Pro Settings**. The Sahi Pro Settings page opens.
The Sahi Pro Dashboard with the All Settings window open, Sahi Pro Settings and the All Settings button highlighted
3. In the menu on the left, open **Configuration** and click **Product Updates**. Sahi Pro Settings with Product Updates highlighted in the menu, showing the Sahi Pro card with version 12.6.0.0 available and a Download button, and the Engines section with the Desktop, Mobile, SAP and Visual Assist Engines - Under **Engines**, click **Install** next to **SAP Engine**. ![Sahi Pro SAP Engine Installer](https://resources.sahipro.com/docs/assets/images/using-sahi/sap_install_config_page.webp) :::note Sahi will automatically restart to make sure the changes are reflected. ::: #### Installing using Jar 1. Double click on install\_sahi\_pro\_sap\_xxx.jar to start the installer. If Java is configured properly, it will launch the installer. ![Sahi Pro SAP Engine Installer](https://resources.sahipro.com/docs/assets/images/using-sahi/sap-gui/sap-installer.webp) :::note If the installer does not launch, or if the jar file is opened as if it is a zip file, cancel the unzip dialog, open a command prompt, cd to where the file is downloaded, and run ```sh java -jar install_sahi_pro_sap_xxx.jar ``` ::: :::note Sahi Pro SAP Engine must be installed in the same folder as Sahi Pro is installed. For example, if Sahi Pro is installed at `C://tools/Sahi_Pro`, then install Sahi Pro SAP Engine also at `C://tools/Sahi_Pro`. ::: 2. Add `Product Key` in Sahi Pro's product key popup window. Sahi SAP Engine needs a valid `Product Key` to be available inside `userdata\config\productkey.txt` (create if needed). ![](https://resources.sahipro.com/docs/assets/images/using-sahi/sahisaplicense.webp) If the `Product Key` is valid, Sahi will startup fine and you will be able to access Sahi. :::note Sahi Pro Browser capability can be disabled by unchecking the `Browser` checkbox. One needs to add `Product Key` based on Sahi Pro capabilities enabled. ::: ### Start Sahi Dashboard ![Sahi Pro Dashboard](https://resources.sahipro.com/docs/assets/images/using-sahi/sap-gui/dashboard.webp) Start Sahi Dashboard by any of the following methods 1. Double click on the desktop shortcut or 2. Start from the command line. \- Go to `\userdata\bin` and run `start_dashboard.bat` :::caution[Important] Browser Icons will not be present on Sahi dashboard, if Sahi Pro Browser Capability is disabled. ::: :::note If Sahi Pro SAP Engine is installed at correct location, `SAP Icon`will automatically appear on Sahi dashboard. ::: ## Automating SAP GUI applications Sahi Pro SAP Engine provides support for SAP GUI applications. Overall usage of Sahi Pro remains the same.\ If you are not familiar with Sahi Pro, go through the [Sahi Pro Quick Tutorial](https://resources.sahipro.com/docs/using-sahi/quick-tutorial/). - [Get started with SAP GUI Automation](https://resources.sahipro.com/docs/using-sahi/sap-gui-getting-started/) --- # SAP GUI Automation - Getting Started This section details how to test SAP GUI Applications. If you are not familiar with Sahi Pro, see Quick Tutorial on Sahi Pro To automate SAP GUI applications using Sahi Pro Flowcharts, refer SAP GUI Automation - Getting Started . ## Start SAP GUI Automation 1. Scripting must be enabled in SAP GUI client. 1. Open SAP GUI options from top right corner of SAP Logon pad. ![](https://resources.sahipro.com/docs/assets/images/using-sahi/sap-gui/sap_logon_screen.webp) 2. Go to **Accessiblity & Scripting** **→** Select **Scripting**. 3. Check the **Enable scripting** checkbox under **User Settings**. ![](https://resources.sahipro.com/docs/assets/images/using-sahi/sap-gui/enable_scripting.webp) 4. Ensure that scripting is not disabled in the Registry for SAP GUI client as follows : 1. On the Start menu, choose Run. 2. In the Open box, enter `regedit.exe`. 3. In the Registry Editor, check the value for following subkeys. If the value is set as `0`, modify it as `1` to enable scripting. Ignore this if the subkeys are not present.\ `HKEY_LOCAL_MACHINE\SOFTWARE\SAP\SAPGUI Front\SAP Frontend Server\Security\UserScripting`\ `HKEY_LOCAL_MACHINE\software\Wow6432Node\sap\SAPGUI Front\SAP Frontend Server\Scripting` 2. Scripting must be enabled in SAP GUI server. Start RZ11 transaction and set the following profile parameters as applicable :- 1. Parameter `sapgui/user_scripting` must be set as TRUE. 2. Parameter `sapgui/user_scripting_disable_recording` must be set as FALSE. If TRUE, recording will be prohibited. 3. Parameter `sapgui/user_scripting_force_notification` must be set as FALSE. If TRUE, SAP GUI server would notify for every scripting activity. 4. Your SAP administrator may have set parameter `sapgui/user_scripting_per_user` as TRUE to enable scripting only for specific users. If this parameter is set as TRUE, ensure that your SAP administrator has enabled scripting for you. 5. Up to patch level 16 of SAP GUI for Windows 7.40 and patch level 3 of SAP GUI for Windows 7.50, parameter `sapgui/user_scripting_set_readonly` must be set as FALSE. If TRUE, a READ ONLY version of SAP GUI Scripting is activated. :::note If you do not have privileges to enable scripting in SAP GUI server, contact your SAP administrator. ::: 3. Start Sahi Dashboard 4. Ensure `SAP Automation is enabled`. `Disable SAP Automation` link must be visible on Sahi dashbord from the Processes settings. **"Sahi SAP agent started!"** message appears on Sahi Pro console. ```text Feb 19, 2020 2:48:30 PM net.sf.sahi.test.ProcessHelper execute INFO: cmd /C D:\Sahi_Pro\sap\bin\SahiSAP.exe -port=9999 > D:\Sahi_Pro\sap\SAP_log.txt >>>> Sahi SAP agent started! Feb 19, 2020 2:48:40 PM net.sf.sahi.test.ProcessHelper$PIDGatherer run INFO: PIDs: [8668]; 10491 ms ``` 5. Ensure that in userdata.properties, `sahi.sap.saplogon.execpath` specifies the correct path for SAP logon pad. ## Using the Controller and Element Identification - To Launch Sahi Controller, click the SAP icon on the Sahi Dashboard. ![](https://resources.sahipro.com/docs/assets/images/using-sahi/sap-gui/sap-icon-dashboard.webp) :::note Make sure popup blockers are turned off. ::: - On the Controller, go to the Record tab. The Controller can be used to interact with the SAP GUI application. User can Identify, Click, Set, Assert, choose Other Actions, or user can even Test an expression from Evaluate Expression to perform an action on the SAP GUI application. - To identify an element, press the CTRL key, hover over any element. ![](https://resources.sahipro.com/docs/assets/images/using-sahi/sap-gui/identification.webp) - `Accessor:` shows the Sahi accessor for that element - `Alternatives:` shows all alternative accessors for that element - `Value:` shows the value of the current element. Mostly this is the input text or the visible text. - `Prefix:`window name. - `Mode:`shows the Automation mode :::note 1. If SAP automation is not enabled,`Enable SAP Automation` link must be clicked from Sahi Dashboard before starting identification or recording. 2. Refer [Identify Elements](https://resources.sahipro.com/docs/using-sahi/sahi-controller/#identify-elements) for a better understanding. ::: ## Evaluate Expression Evaluating SAP GUI Application expression through Controller. It helps while identifying elements or while debugging. ![](https://resources.sahipro.com/docs/assets/images/using-sahi/sap-gui/eval-expression.webp) - Put a valid Sahi expression in the Evaluate Expression box - Select mode as 'Sahi-SAP' - Click on **→** The result will be seen in the bottom box. :::note Note: Selecting some text and pressing '**→**' will only evaluate the selected text. ::: - `Append` While recording, selecting and clicking on `Append` will append the steps to the currently recording script. This is mainly used for manually append any step from Evaluate Expression to the currently recording script. - `Highlight` Can be used on selected text to highlight the element (shows a red 1 pixel border briefly). Invokes the `_highlight` function. - `Drop down` Lists some actions like Click, Get Value, Get Text etc. :::note Note: If SAP automation is not enabled, `Enable SAP Automation` link must be clicked from Sahi Dashboard and **'Sahi-SAP'** must be selected as the **'Select mode for evaluate'** during evaluating. ::: :::note Refer [Evaluate Expression](https://resources.sahipro.com/docs/using-sahi/sahi-controller/#evaluate-expression) for a better understanding. ::: ## Recording a script This is similar to recording a Sahi script for normal browser testing. - To record a script, launch the Controller, provide a script name and click 'Record'. Actions done on the SAP GUI client application are recorded automatically. - Steps can also be recorded from the Controller. - A. You can use Click, Set, Assert, choose 'Other Actions' to perform an action on the SAP GUI client application. B. You will need to record these steps explicitly by clicking on 'Append'. ![](https://resources.sahipro.com/docs/assets/images/using-sahi/sap-gui/controller.webp) :::note 1. If SAP automation is not enabled, `Enable SAP Automation` link must be clicked from Sahi Dashboard before starting identification or recording. 2. Note : A user's interaction with SAP GUI involves communication with SAP server. A communication with SAP server is initiated by SAP GUI at multiple occasions. The most common actions by user that initiate SAP server communication are as follows: - Enter key pressed from keyboard - Click on Enter button in the toolbar - Click on Save button in the toolbar While recording with Sahi Pro SAP Engine, the actions performed in SAP GUI are captured for every such SAP GUI to SAP server communication. Thus the steps get recorded after every **Enter key press**, **Click on Enter button in the toolbar**, **Click on Save button in the toolbar**, etc. **For example :** When recording login operation, we would enter user name, enter password and press enter key from keyboard. In this case, all these three actions will be recorded after enter key is pressed. 3. Refer [Record a script](https://resources.sahipro.com/docs/using-sahi/sahi-controller/#record-a-script) for a better understanding. ::: ## Run Tests ### From Controller Once a script is recorded, you can run it from the Controller itself, with **Run**. - ![](https://resources.sahipro.com/docs/assets/images/using-sahi/sap-gui/controller-play.webp) - Choose the script. - Select Start Mode as `SAP`. - You can leave the Start url blank. This is not used for SAP GUI client application. - Click on Play to run the script. - Click on Logs to view the logs of the played back script. :::note Note: A script cannot be played back if SAP automation is not enabled. `Enable SAP Automation` link must be clicked from Sahi Dashboard. ::: :::note Refer [Run Tests via Controller](https://resources.sahipro.com/docs/using-sahi/run-tests-via-controller/) for a better understanding. ::: ### From the Editor You can run the script from the Editor as well. - Choose the script/suite/scenario from the Editor and click **Run**. - Choose the Start Mode as SAP. - Choose either of the two options - 'Run in single machine' or 'distributed (multiple machines)'. - Press Run to run the test. Refer [Run Tests from the Editor](https://resources.sahipro.com/docs/using-sahi/run-tests-via-editor/) for a better understanding. :::note Note: A script cannot be played back if SAP automation is not enabled. `Enable SAP Automation` link must be clicked from Sahi Dashboard. ::: --- # Sahi Pro Visual Assist Engine Getting started for automation with Sahi Pro Visual Assist Engine Automation. ## Prerequisites - Java 8 Update 361 or above is required. ### Download Sahi Pro Visual Assist Engine Download Sahi Pro and Sahi Pro Visual Assist Engine from the [Download Center](https://resources.sahipro.com/docs/introduction/installers/).\ [Install Sahi Pro](https://resources.sahipro.com/docs/using-sahi/quick-tutorial/#install-sahi) into a folder without spaces in its path. Then install Sahi Pro Visual Assist Engine into the same folder as Sahi Pro. Sahi Pro Visual Assist Engine needs a separate license from Sahi Pro. You will need a valid license to run Sahi Pro Visual Assist Engine. If you do not have a valid license yet, [book a demo](https://sahipro.com/get-started/) to get a 14 day trial license. ### Install Sahi Pro Visual Assist Engine #### Installing using Configure page 1. Click **All Settings** on the Dashboard. The All Settings window opens. 2. Click **Sahi Pro Settings**. The Sahi Pro Settings page opens.
The Sahi Pro Dashboard with the All Settings window open, Sahi Pro Settings and the All Settings button highlighted
3. In the menu on the left, open **Configuration** and click **Product Updates**. Sahi Pro Settings with Product Updates highlighted in the menu, showing the Sahi Pro card with version 12.6.0.0 available and a Download button, and the Engines section with the Desktop, Mobile, SAP and Visual Assist Engines - Under **Engines**, click **Install** next to **Visual Assist Engine**. ![Sahi Pro Visual Assist Engine Installer](https://resources.sahipro.com/docs/assets/images/using-sahi/ai_assist/ai_assist_install_config_page.webp) :::note Sahi will automatically restart to make sure the changes are reflected. ::: #### Installing using Jar 1. Double click on install\_sahi\_pro\_visual\_assist\_xxx.jar to start the installer. If Java is configured properly, it will launch the installer. ![Sahi Pro Visual Assist Engine Installer](https://resources.sahipro.com/docs/assets/images/using-sahi/ai_assist/ai_assist_installer.webp) :::note If the installer does not launch, or if the jar file is opened as if it is a zip file, cancel the unzip dialog, open a command prompt, cd to where the file is downloaded, and run ```sh java -jar install_sahi_pro_visual_assist_xxx.jar ``` ::: :::note Sahi Pro Visual Assist Engine must be installed in the same folder as Sahi Pro is installed. For example, if Sahi Pro is installed at `C://tools/Sahi_Pro`, then install Sahi Pro Visual Assist Engine also at `C://tools/Sahi_Pro`. ::: 2. Add `Product Key` in Sahi Pro's product key popup window. Sahi Visual Assist Engine needs a valid `Product Key` to be available inside `userdata\config\productkey.txt` (create if needed). ![](https://resources.sahipro.com/docs/assets/images/using-sahi/ai_assist/sahiailicense.webp) If the `Product Key` is valid, Sahi will startup fine and you will be able to access Sahi. :::note One needs to add `Product Key` based on Sahi Pro capabilities enabled. ::: ### Start Sahi Dashboard ![Sahi Pro Dashboard](https://resources.sahipro.com/docs/assets/images/using-sahi/dashboard.webp) Start Sahi Dashboard by any of the following methods 1. Double click on the desktop shortcut or 2. Start from the command line. \- Go to `\userdata\bin` and run `start_dashboard.bat` ## Automating applications using Artificial Intelligence Sahi Pro Visual Assist Engine provides capabilities to automate applications using computer vision and machine learning algorithms. Overall usage of Sahi Pro remains the same. If you are not familiar with Sahi Pro, go through the [Sahi Pro Quick Tutorial](https://resources.sahipro.com/docs/using-sahi/quick-tutorial/). - [Get started with Visual Assist Automation](https://resources.sahipro.com/docs/using-sahi/visual-assist-getting-started/) --- # Visual Assist Automation - Getting Started Find and act on elements by how they look on screen, using image recognition and OCR with the Visual Assist Engine. Some elements can't be found from the application's code: a button that's only an image, a chart drawn on a canvas, or text inside a picture. Sahi Pro's usual accessors read the code, so they can't see these. Visual Assist finds them by how they look on screen instead, either by a picture you capture (image recognition) or by their text (optical character recognition, OCR). Visual Assist works with web applications and, with the matching engine, with desktop and mobile applications. ## Before You Start Install the Visual Assist Engine. See [Install Engines](https://resources.sahipro.com/docs/using-sahi/check-for-updates/#install-engines). ## Open the Controller 1. In the No-Code Test Editor, select the keyword and click **Automate**. 2. In the **Automate with Controller** dialog, choose the **Controller Mode** for your application, such as Browser, Desktop, Java, SAP, Android or iOS, and fill in where it starts. 3. Click **Launch Controller**. For more ways to open it, see [Open the Controller](https://resources.sahipro.com/docs/using-sahi/sahi-controller/#open-the-controller). ## Turn On Visual Assist 1. In the Controller, open the **Advanced Editor** tab. 2. Click **Visual Assist**, the first of the four icons at the top right. The **Visual Assist** panel appears. 3. Choose **Image Recognition** to find an element by its picture, or **Optical Character Recognition** to find it by its text.
The Advanced Editor with Visual Assist turned on and its list open, showing None, Image Recognition and Optical Character Recognition, with the Visual Assist button and the list highlighted
## Capture an Image To use an element that has no code behind it, such as a logo or an icon in a desktop application, capture a picture of it first. Sahi Pro then looks for that picture on the screen. 1. Choose **Image Recognition**. 2. If the element only shows after you do something, such as opening a menu, set a delay in seconds in the box next to the list. It gives you time to bring the right window to the front. 3. Click **Capture an image to identify**, and select the area of the screen with the element. The Visual Assist panel with Image Recognition chosen, the capture delay 0, and the Capture an image to identify button highlighted 4. Name the image. To keep it in a folder, choose one under **Image Directory**, or type a new folder in front of the name, such as `Logos/CompanyLogo`. 5. **Element Accessor** shows the accessor for the image, which uses [\_visualImage](https://resources.sahipro.com/docs/sahi-script/functions/visual-assist-accessors/#_visualimage). To see the images you've captured, click **Open the images directory**, next to the capture button. ## Read Text with OCR Text inside an image or a canvas isn't in the code either, so Sahi Pro can't read it the usual way. OCR reads it from the screen. 1. Choose **Optical Character Recognition**. 2. Set a delay if you need one, as for an image. 3. Click **Capture an image to identify**, and select the area with the text. 4. **Element Accessor** shows the accessor for the text, which uses [\_visualText](https://resources.sahipro.com/docs/sahi-script/functions/visual-assist-accessors/#_visualtext). The browser above the Controller. In the browser, the area around the book title Python Cookbook is selected. In the Controller, Visual Assist is set to Optical Character Recognition and Element Accessor shows _visualText("Python Cookbook"), highlighted. ## Identify an Image or Text on the Screen Once an image is captured, or for text on the screen, you can identify it the usual way: 1. Choose **Image Recognition** or **Optical Character Recognition**. 2. Hold Ctrl (⌘ on Mac) and hover over the image or the text. **Element Accessor** shows its accessor. The browser above the Controller. In the browser, the pointer is over the Add button, highlighted. In the Controller, Visual Assist is set to Image Recognition and Element Accessor shows _visualImage("training/add_button.png"), highlighted. ## Add the Step Add a step for the element as for any other: choose a **Quick Action**, try it with **Evaluate Step**, then click **Add as Step** and **Save**. See [Identify an Element and Add a Step](https://resources.sahipro.com/docs/using-sahi/sahi-controller/#identify-an-element-and-add-a-step). Sahi Pro acts on a Visual Assist element the way a user would, with real mouse and keyboard events. See [Native Events](https://resources.sahipro.com/docs/sahi-script/functions/actions/#native-events). To try a Visual Assist accessor on its own, use the [Evaluator](https://resources.sahipro.com/docs/using-sahi/sahi-controller/#evaluate-code-in-the-evaluator). ## View a Captured Image A Visual Assist step names its image only by a file path, such as `training/add_button.png`. When a test has several such steps, the path alone doesn't tell you which button or icon each one clicks. Open the image from the step to see it: 1. In the No-Code Test Editor, open the scenario file and select the keyword. Its steps show on the right, and a Visual Assist step reads like **Click on training/add_button.png visualImage**. The No-Code Test Editor with the Buy Books Using Button Images test case open and the Add Books To Cart keyword selected; its steps list on the right, with the step Click on training/add_button.png visualImage highlighted 2. Double-click the step to edit it, then click **View Image** (the eye icon) in the **Element** box.
The Edit Step panel for the step, with Action Click and Element _visualImage("training/add_button.png"), and the View Image eye icon in the Element box highlighted
3. The **Visual Assist Image Viewer** shows the image, its path and its width and height. **Open Parent Folder** opens the directory it's saved in, the `snips` directory of your project.
The Visual Assist Image Viewer showing the captured Add button, with Image Path training/add_button.png, Width 47px, Height 29px and an Open Parent Folder link
Close the viewer and click **Cancel** to leave the step unchanged. ## Run the Test Run it from the Controller, as described in [Run Tests via Controller](https://resources.sahipro.com/docs/using-sahi/run-tests-via-controller/), or from the Editor, as described in [Run Tests from the Editor](https://resources.sahipro.com/docs/using-sahi/run-tests-via-editor/). ## Visual Assist Functions For every Visual Assist function, see [Visual Assist Accessor Functions](https://resources.sahipro.com/docs/sahi-script/functions/visual-assist-accessors/) and [Visual Assist Functions](https://resources.sahipro.com/docs/sahi-script/functions/visual-assist/). --- # Sahi Flex Support ## Introduction Sahi Pro provides support for automation of flex applications via the Sahi Flex Library (SFL). To enable automation, the flex application needs to be compiled with Sahi's swc file. :::note Different swc files are available for different versions of Flex. Compile your application with the relevant swc file. If your application is compiled with Flex 4.0, use sfl4.swc Sahi's swc files are located in `sahi_pro/sfl/` folder ::: ## Compile with sfl.swc using command line You can compile your flex application with sfl using the following command (Change sfl version as needed) ```js "-include-libraries+=sfl4.swc" mxmlc yourapp.mxml -include-libraries+=sfl4.swc --output=yourapp.swf ``` :::caution[Important] After compilation refresh the browser cache, to make sure that the modified app is available. ::: ## Compile using Ant When compiling using Ant, we need to specify the compiler.include-libraries option ```xml ... normal options ``` :::caution[Important] After compilation refresh the browser cache, to make sure that the modified app is available. ::: ## Compile using Adobe Flash Builder (Add SWC files to Flex Builder projects) 1. In Flex Builder, select your Flex project in the Navigator. 2. Select Project > Properties. The Properties dialog box appears. 3. Select Flex Compiler in the tree to the left. The Flex Compiler properties panel appears. 4. In the "Additional compiler arguments" field, enter the following command: ```js -include-libraries "sfl4.swc" ``` :::note In Flex Builder, the entries in the include-libraries compiler option are relative to the Flex Builder installation directory. The default location of this directory on Windows 32 bit is `C:\Program Files\Adobe\Flex Builder`\ and on Windows 64 bit is `C:\Program Files(x86)\Adobe\Flex Builder` ::: :::caution[Important] After compilation refresh the browser cache, to make sure that the modified app is available. ::: ## Recording a flex application ![](https://resources.sahipro.com/docs/assets/images/using-sahi/flex.webp) From the dashboard, open any browser and navigate to your flex application. Press ALT and double click on the document window of the page which you want to record. Sahi's Controller window will popup. You can now start recording your Flex application. :::caution[Important] Ctrl-hover (⌘-hover on Mac) (to get a flex element's accessor) will work only if the Flex application is in focus. To do this, you will have to first click on the Flex application. ::: Flex functions are slightly different from the normal JavaScript APIs. Example ```js _f("flex_app_id").textinput("username2") ``` The code above identifies a `mx.controls::TextInput` field inside a flex application identified by `_f("flex_app_id")` ## Identification of Flex Components Sahi identifies flex components based on the type (class name) of element and one of its visible/significant attributes. The attributes may be one of `label, text, name, automationName, toolTip, id, autoGeneratedName, index` or some other attribute which is relevant to that element.\ mx components are identified as lower case of their class names. Eg. `mx.controls::TextInput` corresponds to function `_f("id").textinput("id2")` Spark components are identified with an `s_` prefix. Eg. `spark.components::TextArea` corresponds to function `_f("id").s_textarea("id2")` ## Recognizing Custom Components Sahi, by default, adds support for most mx and spark components. If your component is not recognized, do the following: 1. Ctrl-hover (⌘-hover on Mac) on the element which is a parent of the element you want to recognize. You can use up/down arrows near the Accessor field on the Controller. 2. Once a parent element is identified, click on the "List Properties" button on the Controller. It will list down all components inside the parent and also all attributes. 3. In the fully qualified classnames visible, make an intelligent guess to narrow down your element of interest. Suppose your class name of interest is `my.package::MyClass` To enable Sahi to recognize custom components in your application, edit `sahi_pro/userdata/config/user_extensions.js` and add, ```js SflWrapper.prototype.addCustomMetaData = function(){ this.addMetaData({qn: "my.package::MyClass", attributes: ["label", "text", "name", "automationName", "toolTip", "id", "autoGeneratedName", "index"], action: "click", value: "label", apiName: "myotherclass"}); } ``` In the above, 1. change `my.package::MyClass` to your relevant class 2. For clickable elements, keep `action:"click"`. For text input elements, use `action:"setValue"` 3. Set `value` to the attribute which conveys the value of that field. For example, a dateField will have selectedDate as its value attribute. This will be visible in the "Value" field on the Controller, and is used in assertions. 4. The name of the function is by default the lowercase of the classname. If apiName attribute is specified, that is used instead. Eg. in the above case, the function becomes `_flex("id").myotherclass("id2")`. If apiName was omitted, the function would have been `_flex("id").myclass("id2")`. ## Performing actions on Flex elements Sahi's Action functions also work with Flex elements. Examples: ```js _click(_f("mxComponents").button("ColumnChart")); _setValue(_f("mxComponents").textinput("txt1"), "English"); _setValue(_f("sparkComponents").s_richeditabletext("richEdTxt"),"Hi there!"); _setSelected(_f("sparkComponents").s_combobox(0),"Cucumber"); ``` ## Relational operators in SFL SFL supports near, inside, leftOf, rightOf and under APIs. The usage of these functions is a little different from the Sahi relation functions. 1. The relation functions are called as member functions. ```js ".near(" ")" ".rightOf(" _f("fid").textinput("u").near(_f("fid").label("User")) _f("mxC").datagriditemrenderer("/@fictitious.com/").rightOf(_f("mxComponents").datagriditemrenderer("Mary Jones")) ``` 2. They can be chained to use multiple relations. ```js ".near(" ").inside(" ")" _f("fid").textinput("u").near(_f("fid").label("User")).inside(_f("fid").vgroup("SettingsPanelView")) ``` ## Known Issues 1. For the Ctrl-hover (⌘-hover on Mac) to work, one needs to click on the Flex app and bring it in focus. 2. File upload/download are not currently supported. 3. NumericStepper recording does not work. However it can identified from the Controller and scripted. 4. Parallel run of scripts using testrunner causes scripts to fail. Keep value of threads to 1 in testrunner.bat ## Tips on usage The flex recorder in Sahi is not as sophisticated as the web recorder. To introspect and identify elements, one can use the Evaluate Expression box. Ctrl-hover (⌘-hover on Mac) on any Flex element. It will populate something like ```js _f("sampleId1").textinput("username") ``` 1. One can see all attributes of the textinput field by one of the following 1. Ctrl-hover (⌘-hover on Mac) on element and Click on List Properties 2. Copy the accessor into Evaluate Expression box and click "Test->" 3. Explicity put component.listProperties() into Evaluate Expression box and click "Test->" ```js _f("sampleId1").textinput("username").listProperties() ``` 2. To fetch the value of an element, use \_getValue() function. Depending on the type of element, Sahi will correctly return its "value" attribute. ```js _assertEqual("abcd", _getValue(_f("mxComponents").textarea("textarea"))); ``` 3. To fetch the text of an element, use \_getText() function. On flex it fetches the textual content of the component (behaves like innerText in HTML). ```js _assertEqual("abcd", _getText(_f("mxComponents").textarea("textarea"))); ``` 4. To fetch any property of an element, use .get Example ```js _f("sampleId1").textinput("username").get("text") ``` or ```js _f("sampleId1").textinput("username").get("label") ``` 5. To execute any member function of an element, use `.executeFn(arg1, arg2 ...)`\ Example ```js _call(_f("sampleId1").popupbutton("menu").executeFn("open")); ``` or ```js var $fontSize = _fetch(_f("sampleId1").textinput("username").executeFn("getStyle", "fontSize")); ``` 6. To see which Flex components make up a particular component, use introspect() Example ```js _f("flexId").textinput("tId").introspect() ``` This will show a list of all elements inside the textinput field. The output may look something like: ```js textinput0>Panel4>username>HaloBorder17:mx.skins.halo::HaloBorder textinput0>Panel4>username>UITextField8:mx.core::UITextField #abcd ``` 7. To see all elements in a flex component, (especially when an element is not identified) use ```js _f("sampleId1").introspect() ``` 8. To check if an element exists, use \_exists or .exists() ```js _assert(_exists(_f("mymovie").datagrid(0))); //or _assert(_f("mymovie").datagrid(0).exists()); ``` 9. To check if an element is visible, use \_isVisible or .isVisible() ```js _assert(_isVisible(_f("mymovie").datagrid(0))); //or _assert(_f("mymovie").datagrid(0).isVisible()); ``` 10. To get data from a grid, use .getGridData() ```js _assertEqual([["a", "a1"],["b", "b1"]], _f("mymovie").datagrid(0).getGridData()); ``` 11. If getGridData does not work or if we are dealing with a graph, it is easier to get the dataprovider of the element and verify that the data is correct. To get the dataprovider, do ```js _f("mymovie").datagrid(0).get("dataProvider") ``` This will return a JSON string. To get an object out of it, use ```js var obj = eval("(" + _f("mymovie").datagrid(0).get("dataProvider") + ")"); ``` obj will now be an array of objects, which looks something like this: ```js [{"balance":"1000","category":"Personel Care","date":"15/12/2010","description":"ATM Fee", "price":"1000","quantity":"1000","payee":"ABC","amount":"1000","datePaid":"15/12/2010", "status":"success","action":"buy"}] ``` 12. Sometimes similar elements may be created in a flex app, but only the top most active container may be of relevance while automation. For example a tab pane may have multiple tabs and each tab screen may have a "Save" button. The sequence of navigation of tabs may give different indexes to these different Save buttons. To fix this, Sahi can be told to strictly work only with visible elements using \_setStrictVisibilityCheck ```js // Force Sahi to only find visible elements _setStrictVisibilityCheck(true, _f("myapp")); // Perform actions on visible elements only _click(_f("myapp").button("Save")); // Remove strict visibility check _setStrictVisibilityCheck(false, _f("myapp")); ``` 13. SFL supports indexes and regular expressions just like normal Sahi functions. ![](https://resources.sahipro.com/docs/assets/images/flex/datagrid.webp) For example, to look for maurice@fictitious.com we could do ```js ".rightOf(" ")" // returns maurice@fictitious.com _getText(_f("mxComponents").datagriditemrenderer("/@fictitious.com/[2]")); //using relation and regular expression //returns maurice@fictitious.com _getText(_f("mxComponents").datagriditemrenderer("/@fictitious.com/") .rightOf(_f("mxComponents").datagriditemrenderer("Maurice Smith"))) ``` 14. In some flex apps with lots of dynamically loading parts, it may be customary to show a rotating icon with "Loading..." or some such message. Sahi can be told to wait till this message disappears using [\_setFlexReadyCondition](https://resources.sahipro.com/docs/sahi-script/functions/flex/#_setflexreadycondition). At the start of your script add this: ```xml _setFlexReadyCondition(function(fl){ return !_isVisible(fl.uitextfield("Loading...")); }); ``` ## Flex app and Sahi Pro version Your Flex app needs to be compiled with the appropriate swc file based on the Flex SDK used. It does not have a dependence on the Sahi Pro version itself. The swc files available for compilation can be found inside the `sahi_pro/sfl` folder. --- # Salesforce Test Automation Salesforce offers a suite of cloud based applications across domains such as sales, customer service, marketing, analytics, and more. Salesforce test automation involves automating applications like Sales Cloud, Service Cloud, Marketing Cloud, Field Service, etc. Sahi Pro simplifies Salesforce test automation by offering following capabilities: ## Automatic Handling of Complex DOMs The user interfaces in Salesforce applications consist of iframes and Shadow DOMs. Sahi Pro automatically traverses across frames, iframes, and Shadow DOMs, requiring no extra effort to handle such HTML DOM structures. ## Lightning Web Components Support Lightning Web Components in Salesforce like lightning-button, lightning-input-field, etc. are available by default in Sahi Pro. They can be automated like standard HTML elements in web automation. [Salesforce Accessor functions](https://resources.sahipro.com/docs/sahi-script/functions/salesforce-accessors/) lists all such salesforce web components. ## Built-in Automatic Waits Salesforce test automation commonly requires waits to manage the timing of processes and ensure that actions occur in the correct sequence. Sahi Pro addresses this with its in-built automatic waits for page loads and AJAX activity. ## Cross-Technology Automation Salesforce workflows often span multiple platforms and integrated systems. Sahi Pro supports comprehensive, end-to-end test automation across: - Web applications - REST APIs - Mobile (iOS, Android) - Desktop (Windows, Java) - SAP GUI This enables seamless test automation of interconnected systems within the Salesforce ecosystem. --- # Load Testing with Sahi Pro Sahi Pro lets you run load tests on your application. There are 2 Sahi scripts involved in this. One is used to generate the load. This script is called the noise and is run on a headless browser. The steps in the noise file are generally in an infinite loop so that they never terminate. The other script is called the subject. The subject is the script whose steps you would like to measure periodically at different loads. ## Setting up 1. Get the headless browser, Google Chrome headless. Read [this article, Sahi headless execution with Google Chrome](https://resources.sahipro.com/docs/using-sahi/sahi-headless-execution-with-chrome/). 2. Start Sahi Pro. Google Chrome headless should be visible on the Dashboard as one of the browsers. 3. On the dashboard, click on the 'Bin' link. This will open up a command prompt at userdata/bin. 4. On the command prompt, run ```sh dload.bat sahitests/load/noise.sah sahitests/load/subject.sah https://sahitest.com/demo/training/ firefox ``` This will do the following: 1. Run 1 (min) thread(s) of noise.sah on Google Chrome headless (This will not be visible) 2. Run subject.sah on firefox browser and store the time of steps. Subject will be run 3 (subjectRepeatCount) times for averaging. 3. Wait for 5 seconds (interval). 4. Run 2 (incrementBy) more threads of noise.sah on Google Chrome headless. 5. Run subject.sah 3 times on firefox and store results. 6. Keep incrementing the noise threads at periodic intervals, run the subject 3 times, and store results, till it reaches max noise threads. Once done, click on 'Logs' link on the Dashboard to view results. ## Load Testing Using a Different Master :::note From Sahi Pro v9.0.0 onwards, it is possible to do load testing using a different master. ::: This should be used when the `Master` is different from the `Initiator`. A typical case where you would use this or the ANT equivalent, is when you have a continuous integration build server that is not capable of launching any UI. The build server will contain all the scripts but since it cannot launch any UI, it cannot run Sahi tests. In such a case, Sahi can be run on other machines and `dload_different_master` can be used on the integration build server to trigger the Sahi tests on these machines. `dload_different_master` does the following. - It first syncs the contents of scripts folder from the `Initiator` to a staging folder on the `Master`. - It then distributes the scripts from the staging folder of the `Master` to various nodes and runs the tests. - If offline logs are requested, the logs are copied over from the `Master` to the `Initiator` after the run is over. Let us look at `dload_different_master` in more detail. 1. Sahi (running on the `Master`) distributes the scripts to different machines based on their capacity and availability of browsers. Note that Sahi should be running on each of the nodes. Also, on each machine, the browser paths must be correctly specified. :::note Sahi does not need to be installed on the `Initiator` machine. ::: 2. The following directory structure is assumed on the `Initiator` machine. The requisite files like ant-sahi.jar should be copied over from a Sahi Pro installation. The directory structure of the files is the same in the SahiPro installation. ```xml lib ant-sahi.jar logs userdata bin dload_different_master.bat setjava.bat config email.properties scripts ``` 3. Open `/userdata/bin/dload_different_master.bat` (dload\_different\_master.sh on linux) using any Editor. 4. MASTER\_HOST should point to the Master machine. For Windows: ```js SET MASTER_HOST=machine1 ``` For Linux: ```sh export MASTER_HOST=machine1 ``` :::danger[Caution] Make sure you change "machine1" to the actual machine name or IP ::: 5. INITIATOR\_ORIGIN\_FOLDER is the path to the base folder containing the various scripts. With the above assumed directory structure, it would point to `/userdata/scripts`. :::note The default value need not be changed. ::: 6. MASTER\_STAGING\_PATH refers to the Staging folder on the Master machine to which the contents of INITIATOR\_ORIGIN\_FOLDER will be first synced to. Distribution of scripts will happen from MASTER\_STAGING\_PATH. :::note The default value need not be changed. ::: 7. Sahi can send a mail summarizing the test run. The variable SEND\_EMAIL\_REPORT can be set as true or false. If true, Sahi sends the mail. For Windows: ```js SET SEND_EMAIL_REPORT=true ``` For Linux: ```sh export SEND_EMAIL_REPORT=true ``` Email specific parameters like username, password etc. are defined in `sahi/userdata/bin/[email.properties](https://resources.sahipro.com/docs/using-sahi/email-during-playback/#emailproperties-file-explained)` file. 8. Sahi can send a mail based on success or failure or in both the cases. This condition can be set using the EMAIL\_TRIGGER variable. For Windows: ```js SET EMAIL_TRIGGER=success,failure,user_aborted ``` For Linux: ```sh export EMAIL_TRIGGER=success,failure,user_aborted ``` 9. For a long running suite, Sahi can send periodic emails indicating progress. To enable periodic emails, set the following property. For Windows: ```js SET SEND_EMAIL_REPORT_PERIODICALLY=true ``` For Linux: ```sh export SEND_EMAIL_REPORT_PERIODICALLY=true ``` To set time interval (in minutes), use SET SEND\_EMAIL\_REPORT\_PERIODICALLY\_TIME variable. For Windows: ```js SET SEND_EMAIL_REPORT_PERIODICALLY_TIME=30 ``` For Linux: ```sh export SEND_EMAIL_REPORT_PERIODICALLY_TIME=30 ``` 10. The relative path to the properties file containing information about the mail such as sender, recipient, host, port etc. can be set using the EMAIL\_PROPERTIES variable. 11. Passwords can be hidden or shown from the console and logs by toggling the EMAIL\_PASSWORD\_HIDDEN variable. It can be set as true or false. If true, Sahi hides the password from Sahi console and logs. 12. Sahi can set offline logs to be generated in `xml`, `html`, `junit`, `tm6` and `excel` types. The default type is `html`. These logs will be generated on the `Master` and pulled back to the `Initiator`, since the user would want to see the logs on the `Initiator`. The following set of commands illustrate how HTML and XML logs can be generated. For Windows: ```js SET UNIQUE_ID=%DATE%__%TIME% SET UNIQUE_ID=%UNIQUE_ID: =_% SET UNIQUE_ID=%UNIQUE_ID::=_% SET UNIQUE_ID=%UNIQUE_ID:/=_% SET MASTER_HTMLLOGS_DIR=logs/temp/html/%UNIQUE_ID% SET MASTER_XMLLOGS_DIR=logs/temp/xml/%UNIQUE_ID% SET LOGS_INFO=html:%MASTER_HTMLLOGS_DIR%,xml::%MASTER_XMLLOGS_DIR% SET INITIATOR_OUTPUT_HTMLLOGS_DIR=%TOP_LEVEL_FOLDER%/logs/html/%UNIQUE_ID% SET INITIATOR_OUTPUT_XMLLOGS_DIR=%TOP_LEVEL_FOLDER%/logs/xml/%UNIQUE_ID% ``` For Linux: ```sh export UNIQUE_ID=$(date +"%m_%d_%Y")__$(date +"%I_%M_%S") export MASTER_HTMLLOGS_DIR=logs/temp/html/$UNIQUE_ID export MASTER_XMLLOGS_DIR=logs/temp/xml/$UNIQUE_ID export LOGS_INFO=html:$MASTER_HTMLLOGS_DIR,xml:$MASTER_XMLLOGS_DIR export INITIATOR_OUTPUT_HTMLLOGS_DIR=$TOP_LEVEL_FOLDER/logs/html/$UNIQUE_ID export INITIATOR_OUTPUT_XMLLOGS_DIR=$TOP_LEVEL_FOLDER/logs/xml/$UNIQUE_ID ``` :::note The default values can be left as is. ::: 13. Configure the NODES variable to contain all the machines on which the tests should run. The command to set the nodes in Windows and Linux respectively are: For Windows: ```js SET NODES=machine2:9999,machine3:9999,machine4:9999 ``` For Linux: ```sh export NODES=machine2:9999,machine3:9999,machine4:9999 ``` :::note The nodes may or may not include the `Master` machine. If the `Master` machine is not included, scripts will not be run on the `Master`. ::: :::danger[Caution] Do not include localhost (the `Initiator`) here since Sahi may not be installed on the `Initiator`. If you want localhost as one of the nodes, run dload instead. ::: :::caution[Important] "machine2", "machine3" and "machine4" are placeholders to illustrate usage. Replace them with actual machine names. The nodes can contain 1 or more machines. ::: 14. SUBJECT\_HOST should point to the machine, where subject browser has to run. For Windows: ```js SET SUBJECT_HOST=machine1 ``` For Linux: ```sh export SUBJECT_HOST=machine1 ``` 15. To execute the scripts using dload\_different\_master.bat, open a command window and go to the `/userdata/bin` directory. This can also be done easily by clicking the bin link on the dashboard. 16. Run dload\_different\_master.bat to see the syntax. ```text D:\sahi\userdata\bin>dload_different_master.bat -- Usage: dload_different_master.bat File path is relative to userdata/scripts tags are used only if the input suite is a csv file -- Example: dload_different_master.bat sahitests/load/noise.sah sahitests/load/subject.sah https://sahitest.com/demo/training/ firefox -- D:\dev\sahi\sahi_pro_g\userdata\bin> ``` :::danger[Caution] NOTE:  Refer to the notes below for actual details. ::: In the usage above, - The first argument is the noise script path. This path can be relative to the path set in INITIATOR\_ORIGIN\_FOLDER, or it can be an absolute path contained in INITIATOR\_ORIGIN\_FOLDER. - The second argument is the subject script path. This path can be relative to the path set in INITIATOR\_ORIGIN\_FOLDER, or it can be an absolute path contained in INITIATOR\_ORIGIN\_FOLDER. - The third argument is the start URL Type. - The forth argument is the Subject Browser Type. ## Reporting Reports show the most expensive steps and URLs in the load test. Clicking on the circles in the graphs takes you to the step/URL which was expensive. Most Expensive Steps Across Different Loads: ![](https://resources.sahipro.com/docs/assets/images/using-sahi/loadtesting/load_steps_graph.webp) Most Expensive URLs Across Different Loads: ![](https://resources.sahipro.com/docs/assets/images/using-sahi/loadtesting/load_urls_graph.webp) Steps: ![](https://resources.sahipro.com/docs/assets/images/using-sahi/loadtesting/load-test-steps.webp) :::note Note: The table contents are truncated in this image. You should see entries for `Load: 9` as well, in the actual log. ::: To test your application, go to userdata/scripts/sahitests/load folder. 1. Open `noise.sah` and add your sequence of steps. These steps should be representative of a normal user interaction. Note that your steps should be in a `while(true){}` loop so that the threads don't die out. (Refer to existing noise.sah) 2. Open `subject.sah` and specify the sequence of steps whose reaction times you would like to measure at different loads. 3. The parameters `min`, `max`, `incrementby`, `interval`, `subjectRepeatCount` etc. can be edited in `dload.bat` file. 4. It is also possible to involve multiple machines in creating the load by modifying the `NODES` variable (Look in `dload.bat`) 5. To get HAR logs and URL timing information, use `_startHarLogging()` in your script to start logging HAR logs. To stop the logs, use `_stopHarLogging()`. ## Running load tests through ANT Sahi supports load testing through an ANT target. ### Load Testing Copy the following content to an empty file and save the file as an xml, say `dload.xml` in your ``. You can now run the default ANT target in the xml file as ```sh ant -f dload.xml ``` ```xml ``` ### Load Testing with Different Master Copy the following content to an empty file and save the file as an xml, say `dload_different_master.xml` in your ``. You can now run the default ANT target in the xml file as ```sh ant -f dload_different_master.xml ``` ```xml ``` ### Attributes and their description :::note taskdef classpath is relative to where ant is run from. ::: | Attribute | Description | | --- | --- | | scriptDir | Specifies the path to the scripts folder. Can be the absolute path or a path relative to the userdata folder | | host | Hostname of the server where Sahi is running (Can be IP as well). Leave this as localhost | | port | Port on which Sahi is running | | subject | Path to the subject script. | | noise | Path to the noise script. | | browser | The browser on which the subject script is run (can be IE, Firefox etc.) | | baseurl | Specifies URL which is the starting URL for the subject and noise scripts | | noiseBrowserType | The browser on which the noise script is run (default ChromeHL) | | minThread | The minimum number of noise browsers to run initially | | maxThread | The maximum number of noise browsers to run finally | | increment | The number of noise browsers to be run incrementally after the specified interval | | interval | The interval after which to increment the noise browsers by | | repearCount | Number of times the subject script should be run at every noise level. It is good to run it more than 1 time to average out any random behaviour. | | node | Each node attribute specifies a machine on which the noise browsers should run. Add as many node entries as there are machines to run. The nodes may or may not include the `Master` machine (localhost). If the `Master` machine is not included, the noise browsers will not be run on the `Master`. There can be 1 or more nodes. | | report | This attribute is used to store offline report. `type` parameter specify the format in which the offline logs should be downloaded and `logdir` is the file location of the offline logs. | ### Command to execute the above ANT target ```sh ant -f dload.xml ``` --- # Other Language Drivers Apart from Sahi Script, Sahi has functions available in Java to drive the browser. Sahi has drivers in Java also to automate browsers. However these drivers are not as powerful as Sahi Script. A list of features that are supported in Sahi Script but NOT in the Java drivers are: 1. Automatic creation of logs: One needs to use the language/framework's logging mechanism to explicit generate logs. 2. Management of scripts via suites, data driven suites, tagging etc. Needs custom implementation to do this in Java 3. Distributed suite runs: Needs custom implementation to do this in Java 4. Web based execution: Not available in Java 5. Controller capabilities: Java driver Controllers allow recording of code snippets, but it cannot run, evaluate code etc. These features are only available for Sahi Script since it is Javascript. :::caution[Important] We recommend using the JS (Sahi) scripting language. Read [our recommendations](https://resources.sahipro.com/docs/using-sahi/best-practices/#language-recommendation) before deciding on a driver. ::: --- # Sahi Java Driver The Sahi Java Driver can be used to write Java unit tests and functional tests for web applications. :::caution[Important] We recommend using the JS (Sahi) scripting language. Read [our recommendations](https://resources.sahipro.com/docs/using-sahi/best-practices/#language-recommendation) before deciding on the Java driver. ::: A brief example on the usage is provided below: ```java public class SahiDriverDemo { public static void main(String[] args) { String browserType = "firefox"; // You can specify the browser you want to run the tests on. // browserType can take any value defined in // sahi/userdata/config/browser_types.xml // Create a browser and open it Browser browser = new Browser(browserType); browser.open(); browser.navigateTo("http://www.google.com"); browser.textbox("q").setValue("sahi forums"); browser.submit("Google Search").click(); browser.waitFor(1000); browser.link("Forums ? Sahi ? Web Automation and Test Tool").click(); browser.link("Login").click(); System.out.println(":: browser.textbox(\"req_username\").exists() = " + browser.textbox("req_username").exists()); // close the browser browser.close(); } } ``` There is a sample Eclipse project available in `sahi/sample_java_project`. One needs to add `sahi_java_driver.jar` and `js.jar` to the project classpath. Both of the jars are located at `sahi/sample_java_project/lib` More detailed examples are available in DriverClientTestNew.java which is in sahi/sample\_java\_project Full documentation is available as [Javadocs](http://sahipro.com/java/javadocs/) Make sure that the proxy settings are properly configured on the browser (not needed for firefox) and that the Sahi proxy is running. Have a look at [Using Sahi](https://resources.sahipro.com/docs/using-sahi/) for details on configuring the browser and starting the proxy. ## Recording Java code 1. Open sahi/config/sahi.properties and set controller.mode=java 2. Restart Sahi 3. Open a fresh browser with the proxy configured and navigate to any website. 4. Press Ctrl-Alt (⌘-Alt on Mac) and DblClick on the page to bring up the Sahi Java Controller. 5. Click on the record button and start performing actions on the browser. Steps will be visible in the "Recorded Steps" section. 6. Copy the code from the Sahi controller and paste it into your class. --- # TypeScript Support Sahi allows scripts to be written in TypeScript. TypeScript .ts files need to be first compiled to JS and then executed via Sahi. :::caution[Important] This is an advanced customization and should be used only when you absolutely need to use TypeScript. Sahi's editor etc. do not have native support for TypeScript. ::: ## Pre-requisites 1. [Node.js](https://nodejs.org/en/download/) must be installed in the system. 2. [TypeScript](https://www.npmjs.com/package/typescript) must be installed in the system. ## Building TypeScript 1. Copy `/userdata/scripts/sahitests/typescript/sahi_apis.ts` file in your TypeScript workspace. 2. Create `tsconfig.json` in your workspace, if not exist and put the following contents ```json { "compileOnSave": true, "compilerOptions": { "target": "es3", "outDir": "/userdata/scripts/sahitests/typescript/out" } } ``` :::note NOTE: Replace `` with the Sahi Pro installation directory. Target should be `es3` ::: 3. Open the TypeScript workspace in MS Code and build the project. ```js Go to: Tasks -> Run Build Task -> tsc:build ``` Or, Open a command prompt/bash, cd to TypeScript workspace and run `tsc`. 4. It will build the TypeScript workspace and create JavaScript files in `/userdata/scripts/sahitests/typescript/out` directory. 5. Open the JavaScript files in Sahi Pro Editor and run the script. --- # Complex Use Cases Even though Sahi Pro looks simple, it is very powerful and can handle a lot of complex use cases. Navigate the left panel to explore. --- # Record and Run Tests on CEF-Based Browsers (Experimental Feature) Chromium Embedded Framework allows embedding of Chromium browser in desktop applications. Sahi Pro can be used to automate these embedded browsers by following these steps: - Start Sahi and open a browser. Go to [http://localhost:9999/_s_/dyn/ControllerUI_showActiveSessions](http://localhost:9999/_s_/dyn/ControllerUI_showActiveSessions). This page shows the currently active sessions. ![](https://resources.sahipro.com/docs/assets/images/using-sahi/cef/recently_active_sessions.webp) - Click on `All Settings` button on the dashboard and then Turn on system proxy from settings dialog. ![](https://resources.sahipro.com/docs/assets/images/using-sahi/cef/system_proxy.webp) - Now launch the application which has CEF browser. The CEF browser will respect the system proxy(which is right now set to Sahi proxy) and will show up in the active sessions page mentioned in the above step. ![](https://resources.sahipro.com/docs/assets/images/using-sahi/cef/cef_application.webp) - Refresh the page to check if CEF browser is listed. In this example, the second item in the list shows up after opening the CEF based application and has the same URL and title. ![](https://resources.sahipro.com/docs/assets/images/using-sahi/cef/active_sessions_with_cef.webp) - Once the browser from CEF is listed(use the window Title and URL to determine the right browser), click on launch link on Active Sessions page to launch a controller for CEF browser. This controller will allow record and run on the CEF browser. ![](https://resources.sahipro.com/docs/assets/images/using-sahi/cef/recroding_in_cef.webp) --- # Automate Browser Extensions This section describes how to automate browser extensions using Sahi Pro in BROWSER mode. :::caution[Important] - Steps mentioned [below](#automate-an-extension-in-google-chrome) are experimental in nature. They may not work for every browser extension. - Thus, it is recommended to use [Sahi Pro Desktop Engine](https://resources.sahipro.com/docs/introduction/sahi-pro-desktop-engine/) to automate browser extensions. - Add below property in the **userdata.properties** file to identify the elements of the browser extension using Sahi Pro Desktop Engine. ```properties windows.allow_identification_for_browsers=chrome,msedge ``` ::: ## Automate an extension in Google Chrome 1. Download the extension's source in a directory. One way to download the source is using the [Chrome extension source viewer extension](https://chrome.google.com/webstore/detail/chrome-extension-source-v/jifpbeccnghkjeaalbbjmodiffmgedin). After downloading the zip file, extract it to a new folder. 2. Add the below lines to all HTML files present in the extension's source content. Below script files inject Sahi's JavaScript and thus facilitate automating HTML pages. ```xml ``` 3. Open the `manifest.json` file of the extension. Add the following lines to the end before the closing curly braces '}'. ```js ,"content_security_policy": { "extension_pages": "script-src 'self'; object-src 'self'" } ``` 4. Start Sahi. Launch Chrome from Sahi Dashboard. Navigate to chrome://extensions/. 5. Enable Developer mode. Click on the `Load unpacked` button and select the extension source directory (downloaded and modified). 6. Click on details for the newly added extension. Allow in incognito. 7. Navigate to chrome://extensions/shortcuts. Set a shortcut to activate the extension e.g 'Ctrl + Q'. This shortcut key can be triggered on the HTML body using [\_keyPress](https://resources.sahipro.com/docs/sahi-script/functions/actions/#_keypress) function in Sahi script. ```js _keyPress(document.body, 'Q', "CTRL"); ``` 8. Exit from Chrome and close Sahi. 9. We have now added this extension to one Chrome profile folder in Sahi at `sahi_pro\userdata\browser\chrome\profiles\sahi0`. We need to add these changes to other profile folders. 1. Open `sahi_pro\userdata\browser\chrome\profiles` directory. 2. Except `sahi0` directory, delete all the other directories like `sahi1`, `sahi2`, and so on. 3. Then recreate Chrome profile folders like `sahi1`, `sahi2`, and so on by duplicating the contents of the `sahi0` folder. --- # Create Virtual Machines with AWS Cloud Formation AWS Cloud Formation helps creating virtual machines (EC2 Instances - Windows) with minimal effort. Sahi provides custom Cloud Formation template inorder to launch the EC2 Instances fully loaded with Sahi Pro Runner installed and running. Follow the below Steps to launch Cloud Formation stack with desired EC2 Instances. ## Prerequisites A valid AWS account ## Steps 1. Login to the account and navigate to 'CloudFormation' page under 'Management & Governance' in 'Services' drop down 2. Click 'Create Stack'(With new resources) button 3. Select 'Template is ready' option in 'Prerequisite - Prepare template' box 4. Select 'Upload a template file' option in 'Specify template' box 5. Click [here](https://resources.sahipro.com/docs/assets/cloudformationtemplate.txt) to download Cloud formation template 6. Upload the downloaded CloudFormation template and click 'Next' 7. Provide a valid Stack name and fill the below 'Parameters' - **AMIId**: Provide the Amazon Machine Image Id with which all instance will be launched. Default AMIId is of 'Microsoft Windows Server 2019 Base' - **CidrIp**: Provide IP Address as CIDR notation to which 9999 and RDP ports should open. Default is open to everyone - **KeyName**: Select a valid Key Pair from the drop down to get access to the instance - **MasterInstanceType**: EC2 Instance type for Master machine. Default is 't3.large' - **MasterName**: Specified name will come under 'Name' tag for master machine. Default is Sahi Master - **Password**: Password for user 'Administrator' for all the machines - **SahiLicenseKey**: Product key for accessing Sahi license from License Server - **NodeInstanceCount**: Count of Node EC2 instances to be created(must be between 1 and 5) - **NodeInstanceType**: EC2 Instance type for Node machine. Default is 't3.medium' - **NodeName**: Specified name will come under 'Name' tag for node machines. Default is Sahi Node - **Password**: Specify valid windows Password to set for all machines. You have to provide this password if you are connecting to any machines through RDP - **SahiDownloadURL**: Specify valid download url of Sahi Pro Runner. Eg: https://resources.sahipro.com/installers/install_sahi_pro_runner_v900_xxxxxx.jar - **SahiLicenseKey**: Specify valid Sahi Runner license key to run Sahi instances (Don't change any value for UserDataScripts, UserDataScripts1, UserDataScripts2, UserDataScripts3) - **SubnetId**: Id of the subnet where the instance to be launched - **VPCId**: Id of the VPC to which the Security Group is to be created 8. Click Next. Add more Tags if required 9. Click Next. Click Create Stack 10. Check the 'Events' tab to verfiy the stack creation is successful. After successful creation, wait for 10-15 mins for instance to be ready for use ![](https://resources.sahipro.com/docs/assets/images/using-sahi/aws-cft-events.webp) 11. Navigate to 'Resources' tab. Click on Physical ID for EC2InstanceMaster and it will take you to EC2 instances page with Master machine details ![](https://resources.sahipro.com/docs/assets/images/using-sahi/aws-cft-resources.webp) 12. Copy the 'Public DNS (IPv4)' from the 'Description' tab and paste it on 'Configure Nodes' in Sahi's Run Configuration ![](https://resources.sahipro.com/docs/assets/images/using-sahi/aws-cft-ip.webp) 13. Go back to 'Resources' tab in Cloud Formation page and click on Physical ID for EC2InstanceNode and repeat the above step to copy Public DNS to Sahi's Run Configuration 14. Repeat the above step if you have more nodes :::note If you connecting to any of the machines through RDP, please double click on 'Close.bat' present in desktop to close the RDP connection ::: --- # Mobile Automation integration with AWS Device Farm This section helps you for integration Sahi with AWS Device Farm. ## Pre-requisites 1. Sahi Pro Mobile Engine and AWS Command Line Interface (CLI) version 2 should be installed with in the AWS system. - Please refer [here](https://docs.aws.amazon.com/cli/latest/userguide/cli-configure-quickstart.html) to quickly setup AWS CLI. - Please make sure that `Default region name` is `us-west-2`. - Please make sure that `Default output format` is `json`. 2. cURL should be installed on the system. - To verify, run `curl` in the command line. ## Android Integration 1. Goto: [AWS Device Farm](https://console.aws.amazon.com/devicefarm/) 2. Create a new project under `Mobile device testing projects`. ![](https://resources.sahipro.com/docs/assets/images/using-sahi/mobile/devicefarm/android/create-project.webp) 3. Click on `Project settings`. ![](https://resources.sahipro.com/docs/assets/images/using-sahi/mobile/devicefarm/android/project-settings.webp) 4. **OPTIONAL:** Set the maximum `Execution Timeout` according to the script execution timeout. 5. Click on `Device Pools`. ![](https://resources.sahipro.com/docs/assets/images/using-sahi/mobile/devicefarm/android/device-pool-setting.webp) 6. Click on `Create a new device pool`. Give a name to device pool and add one device in it. Click on `Save device pool` → `Done`. ![](https://resources.sahipro.com/docs/assets/images/using-sahi/mobile/devicefarm/android/create-device-pool.webp) :::note **Note:** Add only ONE device in each device pool. Each device pool is considered as a Single Device for Sahi Pro Mobile Engine. ::: 7. Click on `Uploads`. ![](https://resources.sahipro.com/docs/assets/images/using-sahi/mobile/devicefarm/android/uploads-setting.webp) 8. Click on `Upload a file` and upload 3 APKs. 1. **Test Application:** Select Type as `Android App`. ![](https://resources.sahipro.com/docs/assets/images/using-sahi/mobile/devicefarm/android/upload-test-app.webp) :::note Uploading Sahi test app from `/userdata/android/testapps/AndroidApp.apk` ::: 2. **Sahi Instrumentation App:** Select Type as `Android App` and upload APK from `/android/lib/app-debug.apk`. ![](https://resources.sahipro.com/docs/assets/images/using-sahi/mobile/devicefarm/android/upload-sahi-app.webp) 3. **Sahi Instrumentation App:** Select Type as `Instrumentation Test Package` and upload APK from `/android/lib/app-debug-androidTest.apk`. ![](https://resources.sahipro.com/docs/assets/images/using-sahi/mobile/devicefarm/android/upload-sahi-instrumentation-app.webp) 9. Configure `/userdata/config/aws_devicefarm.properties` file. 1. Open Sahi Pro's Settings, from either place: - **From the Dashboard:** click **All Settings**, then **Sahi Pro Settings**.
The Sahi Pro Dashboard with the All Settings window open, Sahi Pro Settings and the All Settings button highlighted
- **From the No-Code Test Editor:** click **Settings** (the gear icon) in the left bar. 2. Open **Browsers And Devices** and click **AWS Device Farm**. The **Configure AWS DeviceFarm** page opens. Sahi Pro Settings with Browsers And Devices open and AWS Device Farm highlighted, showing the Configure AWS DeviceFarm page - **Using Device Farm Configuration UI** 1. In **Configure Device Farm Properties**, set **Select Type** to **Android** and click **Fetch Device Farm Projects** to fetch your Device Farm projects. Configure Device Farm Properties for Android, with project Sahi Pro - Android, AndroidApp.apk, app-debug.apk and app-debug-androidTest.apk selected, and Fetch Device Farm Projects and Update aws_devicefarm.properties highlighted 2. **Select Device Farm Project:** `Sahi Pro - Android`\ **Select Test Application:** `AndroidApp.apk`\ **Select Sahi App:** `app-debug.apk`\ **Select Sahi App Test:** `app-debug-androidTest.apk` Click **Update aws_devicefarm.properties**. This updates the `aws_devicefarm.properties` file. 3. Configure [android\_devices.xml](https://resources.sahipro.com/docs/using-sahi/android-details/#configure-android-devicesemulators) **Select Device Pool:** `Google Pixel 8 Pro`\ **Set Device Capacity:** 5 (default is 1).\ Click on `Generate` button to generate the device xml. Configure Device Pool for Android, with the Google Pixel 8 Pro pool, device capacity 5 and the generated androidDevice XML, and Generate highlighted Rename the `name` tag value to `AWS-Google-Pixel` and click **Update in android_devices.xml**. This updates the `android_devices.xml` file. :::note Repeat this step, if you wish to configure multiple device pools. ::: :::note You can also select more than one device pool at a time to generate android device xml. Configure Device Pool for Android, with two pools selected, Google Pixel 8 Pro and Samsung Galaxy S24 Ultra, highlighted, and the generated androidDevice XML with a deviceId for each ::: - **Using Command Line** 1. At the top of the **Configure AWS DeviceFarm** page, click **Raw Text View**.
The top of the Configure AWS DeviceFarm page, with Raw Text View highlighted next to Settings UI View
2. Set `android.aws.devicefarm.project.arn` property.\ To get the **ARN** of the project, execute `aws devicefarm list-projects` in Command Prompt/Terminal. ```json { "projects": [ { "arn": "arn:aws:devicefarm:us-west-2:332167198415:project:f8fa4d62-dec9-4be3-8bbf-f37be0249897", "name": "Sahi Pro - Android", "created": "2020-04-17T02:53:39.857000+00:00" } ] } ``` 3. Set `android.aws.devicefarm.main_app.arn` property.\ To get the **ARN** of the main test app, execute `aws devicefarm list-uploads --arn <>` in Command Prompt/Terminal. :::note Replace `<>` with the above project ARN ::: ```json { "uploads": [ .... { "arn": "arn:aws:devicefarm:us-west-2:332167198415:upload:f8fa4d62-dec9-4be3-8bbf-f37be0249897/7fc96cdc-6ccc-404a-8ba7-ac35957ae751", "name": "AndroidApp.apk", "created": "2020-04-17T03:36:52.807000+00:00", "type": "ANDROID_APP", "status": "SUCCEEDED", "url": "https://prod-us-west-2-uploads.s3-us-west-2.amazonaws.com/arn%3Aaws%3Adevicefarm%3Aus-west-2%3A332167198415%3Aproject%3Af8fa4d62-dec9-4be3-8bbf-f37be0249897/uploads/arn%3Aaws%3Adevicefarm%3Aus-west-2%3A332167198415%3Aupload%3Af8fa4d62-dec9-4be3-8bbf-f37be0249897/7fc96cdc-6ccc-404a-8ba7-ac35957ae751/AndroidApp.apk?X-Amz-Algorithm=AWS4-HMAC-SHA256&X-Amz-Date=20200417T050507Z&X-Amz-SignedHeaders=content-type%3Bhost&X-Amz-Expires=86400&X-Amz-Credential=AKIAJSORV74ENYFBITRQ%2F20200417%2Fus-west-2%2Fs3%2Faws4_request&X-Amz-Signature=dfd1f87ddc29c4c68e56d7d7ddd636cba2810b8d9472e1682760209ee7e4774b", "metadata": "{\"device_admin\":false,\"activity_name\":\"com.sahipro.SahiTestApp.MainActivity\",\"version_name\":\"1.0\",\"screens\":[\"small\",\"normal\",\"large\",\"xlarge\"],\"error_type\":null,\"sdk_version\":\"18\",\"package_name\":\"com.sahipro.SahiTestApp\",\"version_code\":\"1\",\"native_code\":[],\"target_sdk_version\":\"26\"}", "contentType": "application/octet-stream", "category": "PRIVATE" } ] } ``` 4. Set `android.aws.devicefarm.sahi_app.arn` property.\ To get the **ARN** of the sahi instrumentation app, execute `aws devicefarm list-uploads --arn <>` in Command Prompt/Terminal. :::note Replace `<>` with the above project ARN ::: ```json { "uploads": [ .... { "arn": "arn:aws:devicefarm:us-west-2:332167198415:upload:f8fa4d62-dec9-4be3-8bbf-f37be0249897/348c5af7-f13d-417d-aa16-805f4dc6c7e5", "name": "app-debug.apk", "created": "2020-04-17T03:53:49.858000+00:00", "type": "ANDROID_APP", "status": "SUCCEEDED", "url": "https://prod-us-west-2-uploads.s3-us-west-2.amazonaws.com/arn%3Aaws%3Adevicefarm%3Aus-west-2%3A332167198415%3Aproject%3Af8fa4d62-dec9-4be3-8bbf-f37be0249897/uploads/arn%3Aaws%3Adevicefarm%3Aus-west-2%3A332167198415%3Aupload%3Af8fa4d62-dec9-4be3-8bbf-f37be0249897/348c5af7-f13d-417d-aa16-805f4dc6c7e5/app-debug.apk?X-Amz-Algorithm=AWS4-HMAC-SHA256&X-Amz-Date=20200417T050507Z&X-Amz-SignedHeaders=content-type%3Bhost&X-Amz-Expires=86400&X-Amz-Credential=AKIAJSORV74ENYFBITRQ%2F20200417%2Fus-west-2%2Fs3%2Faws4_request&X-Amz-Signature=0ccd167ea46837fb74fe54320825fc523a4a4f5243775d87ede5d8744286c24a", "metadata": "{\"device_admin\":false,\"activity_name\":\"\",\"version_name\":\"9.0.0\",\"screens\":[\"small\",\"normal\",\"large\",\"xlarge\"],\"error_type\":null,\"sdk_version\":\"18\",\"package_name\":\"in.co.sahi.android\",\"version_code\":\"900\",\"native_code\":[],\"target_sdk_version\":\"24\"}", "contentType": "application/octet-stream", "category": "PRIVATE" } ] } ``` 5. Set `android.aws.devicefarm.sahi_app_test.arn` property.\ To get the **ARN** of the sahi instrumentaion test app, execute `aws devicefarm list-uploads --arn <>` in Command Prompt/Terminal. :::note Replace `<>` with the above project ARN ::: ```json { "uploads": [ .... { "arn": "arn:aws:devicefarm:us-west-2:332167198415:upload:f8fa4d62-dec9-4be3-8bbf-f37be0249897/6142cb93-671a-437e-abd3-6f2a4e5c6948", "name": "app-debug-androidTest.apk", "created": "2020-04-17T03:57:51.722000+00:00", "type": "INSTRUMENTATION_TEST_PACKAGE", "status": "SUCCEEDED", "url": "https://prod-us-west-2-uploads.s3-us-west-2.amazonaws.com/arn%3Aaws%3Adevicefarm%3Aus-west-2%3A332167198415%3Aproject%3Af8fa4d62-dec9-4be3-8bbf-f37be0249897/uploads/arn%3Aaws%3Adevicefarm%3Aus-west-2%3A332167198415%3Aupload%3Af8fa4d62-dec9-4be3-8bbf-f37be0249897/6142cb93-671a-437e-abd3-6f2a4e5c6948/app-debug-androidTest.apk?X-Amz-Algorithm=AWS4-HMAC-SHA256&X-Amz-Date=20200417T050507Z&X-Amz-SignedHeaders=content-type%3Bhost&X-Amz-Expires=86400&X-Amz-Credential=AKIAJSORV74ENYFBITRQ%2F20200417%2Fus-west-2%2Fs3%2Faws4_request&X-Amz-Signature=805d11d2d673996750ed3aaa9156e0559cb8320765afde97268435ed3663187a", "metadata": "{\"test_package_name\":null,\"instrumentation_runner\":\"android.support.test.runner.AndroidJUnitRunner\",\"error_type\":null,\"package_name\":\"in.co.sahi.android.test\"}", "contentType": "application/octet-stream", "category": "PRIVATE" } ] } ``` 6. Configure [android\_devices.xml](https://resources.sahipro.com/docs/using-sahi/android-details/#configure-android-devicesemulators) - Get AWS Device Pool ARN by executing `aws devicefarm list-device-pools --arn <>` in Command Prompt/Terminal. :::note Replace `<>` with the above project ARN ::: ```json { "devicePools": [ .... { "arn": "arn:aws:devicefarm:us-west-2:332167198415:devicepool:f8fa4d62-dec9-4be3-8bbf-f37be0249897/9c614bb4-b950-48b4-b85e-2d54a4b677e0", "name": "Google Pixel 2", "type": "PRIVATE", "rules": [ { "attribute": "ARN", "operator": "IN", "value": "[\"arn:aws:devicefarm:us-west-2::device:5F20BBED05F74D6288D51236B0FB9895\"]" } ] } ] } ``` - Configure device pool arn in `android_devices.xml`. ```xml AWS-Google-Pixel Google Pixel 2 arn:aws:devicefarm:us-west-2:332167198415:devicepool:f8fa4d62-dec9-4be3-8bbf-f37be0249897/9c614bb4-b950-48b4-b85e-2d54a4b677e0 ``` 10. Open Sahi Pro Editor and execute `sahitests/android/testSampleApp.sah` script. - Click on `Playback`. - Select `Android` as `Start Mode`. - Select `AWS-Google-Pixel` as `Android Device`. ![](https://resources.sahipro.com/docs/assets/images/using-sahi/mobile/devicefarm/android/playback-settings.webp) 11. Open Sahi Pro Script Report for the above executed script. ![](https://resources.sahipro.com/docs/assets/images/using-sahi/mobile/devicefarm/android/script-execution-logs.webp) ## iOS Integration 1. Goto: [AWS Device Farm](https://console.aws.amazon.com/devicefarm/) 2. Create a new project under `Mobile device testing projects`. ![](https://resources.sahipro.com/docs/assets/images/using-sahi/mobile/devicefarm/ios/create-project.webp) 3. Click on `Project settings`. ![](https://resources.sahipro.com/docs/assets/images/using-sahi/mobile/devicefarm/ios/project-settings.webp) 4. **OPTIONAL:** Set the maximum `Execution Timeout` according to the script execution timeout. 5. Click on `Device Pools`. ![](https://resources.sahipro.com/docs/assets/images/using-sahi/mobile/devicefarm/android/device-pool-setting.webp) 6. Click on `Create a new device pool`. Give a name to device pool and add one device in it. Click on `Save device pool` → `Done`. ![](https://resources.sahipro.com/docs/assets/images/using-sahi/mobile/devicefarm/ios/create-device-pool.webp) :::note **Note:** Add only ONE device in each device pool. Each device pool is considered as a Single Device for Sahi Pro Mobile Engine. ::: 7. Create `IPA` files for `Uploads` in next step. 1. Generate `IPA` file for your application which needs to test. - Open `Finder` → `Desktop`, create a new folder and name it **Payload**. :::caution[Important] Folder name should be **Payload** must required and no other files should be present in the **Payload** folder. ::: - Copy the **test-appication.app** file, and paste it in the **Payload** folder. - Compress the **Payload** folder into `.zip` file. - Change the file name and extension of **Payload.zip** to **test-application.ipa**. 2. Generate `IPA` file for `SahiUITestAutomator-Runner.app`. - Open `Finder` → `Desktop`, create a new folder and name it **Payload**. :::caution[Important] Folder name should be **Payload** must required and no other files should be present in the **Payload** folder. ::: - Copy the **SahiUITestAutomator-Runner.app** file from `/iOS/build_output/DebugLocation/Device//Debug-iphoneos` location, and paste it in the **Payload** folder. :::note If `SahiUITestAutomator-Runner.app` is not present then follow steps mentioned in [Testing on a Device](https://resources.sahipro.com/docs/using-sahi/ios-details/#testing-on-a-device) document.\ The iOS Version of device should be same as iOS version of device which we selected at the time of Device pool creation. ::: - Compress the **Payload** folder into `.zip` file. - Change the file name and extension of **Payload.zip** to **SahiUITestAutomator-Runner.ipa**. 8. Click on `Uploads`. ![](https://resources.sahipro.com/docs/assets/images/using-sahi/mobile/devicefarm/android/uploads-setting.webp) 9. Click on `Upload a file` and upload 2 IPAs. 1. **Test Application:** Select Type as `iOS App`. ![](https://resources.sahipro.com/docs/assets/images/using-sahi/mobile/devicefarm/ios/upload-test-app.webp) :::note Uploading test app `test-appication.app` which is generated in `Step - 7a` ::: 2. **Sahi SahiUITestAutomator-Runner App:** Select Type as `XCTest UI Test Package` and upload `SahiUITestAutomator-Runner.app` which is generated in `Step - 7b`. ![](https://resources.sahipro.com/docs/assets/images/using-sahi/mobile/devicefarm/ios/upload-sahi-app.webp) 10. Configure `/userdata/config/aws_devicefarm.properties` file. 1. Open Sahi Pro's Settings, from either place: - **From the Dashboard:** click **All Settings**, then **Sahi Pro Settings**.
The Sahi Pro Dashboard with the All Settings window open, Sahi Pro Settings and the All Settings button highlighted
- **From the No-Code Test Editor:** click **Settings** (the gear icon) in the left bar. 2. Open **Browsers And Devices** and click **AWS Device Farm**. The **Configure AWS DeviceFarm** page opens. Sahi Pro Settings with Browsers And Devices open and AWS Device Farm highlighted, showing the Configure AWS DeviceFarm page - **Using Device Farm Configuration UI** 1. In **Configure Device Farm Properties**, set **Select Type** to **iOS** and click **Fetch Device Farm Projects** to fetch your Device Farm projects. Configure Device Farm Properties for iOS, with project Sahi Pro - iOS, SahiTestApp.ipa and SahiUITestAutomator-Runner.ipa selected, and Fetch Device Farm Projects and Update aws_devicefarm.properties highlighted 2. **Select Device Farm Project:** `Sahi Pro - iOS`\ **Select Test Application:** `SahiTestApp.ipa`\ **Select Sahi App Test:** `SahiUITestAutomator-Runner.ipa` Click **Update aws_devicefarm.properties**. This updates the `aws_devicefarm.properties` file. 3. Configure [ios\_devices.xml](https://resources.sahipro.com/docs/using-sahi/ios-details/#configure-ios-devicessimulators) **Select Device Pool:** `Apple iPhone 14`\ **Set Device Capacity:** 5 (default is 1).\ Click on `Generate` button to generate the device xml. Configure Device Pool for iOS, with the Apple iPhone 14 pool, device capacity 5 and the generated iOSDevice XML, and Generate highlighted Rename the `name` tag value to `AWS-iPhone` and click **Update ios_devices.xml**. This updates the `ios_devices.xml` file. :::note Repeat this step, if you wish to configure multiple device pools. ::: :::note You can also select more than one device pool at a time to generate iOS device xml. Configure Device Pool for iOS, with two pools selected, Apple iPhone 14 and Apple iPhone 15 Pro, highlighted, and the generated iOSDevice XML with a deviceId for each ::: - **Using Command Line** 1. At the top of the **Configure AWS DeviceFarm** page, click **Raw Text View**.
The top of the Configure AWS DeviceFarm page, with Raw Text View highlighted next to Settings UI View
2. Set `ios.aws.devicefarm.project.arn` property.\ To get the **ARN** of the project, execute `aws devicefarm list-projects` in Command Prompt/Terminal. ```json { "projects": [ { "arn": "arn:aws:devicefarm:us-west-2:3325467198415:project:16csd039-a132-4683-v3d7-cswsdadf7c093", "name": "Sahi Pro - iOS", "defaultJobTimeoutMinutes": 10, "created": "2019-06-18T11:46:52.589000+00:00" } ] } ``` 3. Set `ios.aws.devicefarm.main_app.arn` property.\ To get the **ARN** of the main test app, execute `aws devicefarm list-uploads --arn <>` in Command Prompt/Terminal. :::note Replace `<>` with the above project ARN ::: ```json { "uploads": [ .... { "arn": "arn:aws:devicefarm:us-west-2:332167198415:upload:16csd039-a132-4683-v3d7-cswsdadf7c093/c1bcddb2-be82-49fd-d632-eac5c31e4f77", "name": "SahiTestApp.ipa", "created": "2020-03-03T15:08:56.950000+00:00", "type": "IOS_APP", "status": "SUCCEEDED", "url": "https://prod-us-west-2-uploads.s3-us-west-2.amazonaws.com/arn%3Aaws%3Adevicefarm%3Aus-west-2%3A332167198415%3Aproject%3Aupload:16csd039-a132-4683-v3d7-cswsdadf7c093/uploads/arn%3Aaws%3Adevicefarm%3Aus-west-2%3A332167198415%3Aupload%3A16ccd039-a132-4683-a3d7-caedadf7c093/c1bcddb2-be82-49fd-d632-eac5c31e4f77/your-app.ipa?X-Amz-Algorithm=AWS4-HMAC-SHA256&X-Amz-Date=20200303T151908Z&X-Amz-SignedHeaders=content-type%3Bhost&X-Amz-Expires=86400&X-Amz-Credential=AKIAJSORV74ENYHBBSFBITRQ%2F20200303%2Fus-west-2%2Fs3%2Faws4_request&X-Amz-Signature=f9a3c56126c60c3f5ad2e7f5fc70fb85153a2f31cf530d3e4c71d858eea42cd9", "metadata": "{\"activity_name\":\"\",\"minimum_arm\":7,\"error_type\":null,\"package_name\":\"com.sahipro.ios.test.SahiTestApp\",\"sdk_version\":930,\"files\":{},\"warning_type\":null,\"supported_os\":\"9.3\",\"executable\":\"SahiTestApp\",\"platform\":[\"iPhoneOS\"],\"form_factor\":[1,2]}", "contentType": "application/octet-stream", "category": "PRIVATE" } ] } ``` 4. Set `ios.aws.devicefarm.sahi_app_test.arn` property.\ To get the **ARN** of the sahi instrumentation app, execute `aws devicefarm list-uploads --arn <>` in Command Prompt/Terminal. :::note Replace `<>` with the above project ARN ::: ```json { "uploads": [ .... { "arn": "arn:aws:devicefarm:us-west-2:332167198415:upload:upload:16csd039-a132-4683-v3d7-cswsdadf7c093/0d63fefc-2cc5-4acd-8fe4-88395512e2cd", "name": "SahiUITestAutomator-Runner.ipa", "created": "2020-03-03T15:16:47.256000+00:00", "type": "XCTEST_UI_TEST_PACKAGE", "status": "SUCCEEDED", "url": "https://prod-us-west-2-uploads.s3-us-west-2.amazonaws.com/arn%3Aaws%3Adevicefarm%3Aus-west-2%3A332167198415%3Aproject%3Aupload:16csd039-a132-4683-v3d7-cswsdadf7c093/uploads/arn%3Aaws%3Adevicefarm%3Aus-west-2%3A332167198415%3Aupload%3Ac1bcddb2-be82-49fd-d632-eac5c31e4f77/0d63fefc-2cc5-4acd-8fe4-88395512e2cd/SahiUITestAutomator-Runner.ipa?X-Amz-Algorithm=AWS4-HMAC-SHA256&X-Amz-Date=20200303T151908Z&X-Amz-SignedHeaders=content-type%3Bhost&X-Amz-Expires=86400&X-Amz-Credential=AKIAJSORV74EKMNSNYFBITRQ%2F20200303%2Fus-west-2%2Fs3%2Faws4_request&X-Amz-Signature=c3d4e877361d5f76e11adacdbec188e30c5bef311661aadc28c7937111d91eb3", "metadata": "{\"test_package_name\":\"com.sahipro.ios.UITestAutomator_ff5e470f0e28c043d20b48006a0f14e90ca3\",\"activity_name\":\"\",\"warning_type\":null,\"supported_os\":\"8.0\",\"executable\":\"SahiUITestAutomator-Runner\",\"platform\":[\"iPhoneOS\"],\"minimum_arm\":7,\"error_type\":null,\"package_name\":\"com.sahipro.ios.UITestAutomator_ff5e470f0e28c043d20b48006a0f14e90ca3.xctrunner\",\"sdk_version\":800,\"files\":{},\"test_executable\":\"SahiUITestAutomator\",\"form_factor\":[1,2]}", "contentType": "application/octet-stream", "category": "PRIVATE" } ] } ``` 5. Restart Sahi. 6. Configure [ios\_devices.xml](https://resources.sahipro.com/docs/using-sahi/ios-details/#configure-ios-devicessimulators) - Get AWS Device Pool ARN by executing `aws devicefarm list-device-pools --arn <>` in Command Prompt/Terminal. :::note Replace `<>` with the above project ARN ::: ```json { "devicePools": [ .... { { "arn": "arn:aws:devicefarm:us-west-2:332167558415:devicepool:b83ss0c-84a8-4a4d-b9de-5fddsw3f64/9789465c-c2e2-4064-a043-83b977293c98", "name": "iPhone 11", "type": "PRIVATE", "rules": [ { "attribute": "ARN", "operator": "IN", "value": "[\"arn:aws:devicefarm:us-west-2::device:A9AD8EC023394AC2BFC5148593BD6883\"]" } ] } } ] } ``` - Configure device pool arn in `ios_devices.xml`. ```xml AWS-iPhone iPhone 11 arn:aws:devicefarm:us-west-2:332167558415:devicepool:b83ss0c-84a8-4a4d-b9de-5fddsw3f64/9789465c-c2e2-4064-a043-83b977293c98 device ``` 11. Open Sahi Pro Editor and execute `testSampleApp.sah` script. - Click on `Playback`. - Select `iOS` as `Start Mode`. - Select `AWS-iPhone` as `iOS Device`. ![](https://resources.sahipro.com/docs/assets/images/using-sahi/mobile/devicefarm/ios/playback-settings.webp) 12. Open Sahi Pro Script Report for the above executed script. ![](https://resources.sahipro.com/docs/assets/images/using-sahi/mobile/devicefarm/ios/script-execution-logs.webp) --- # Sahi Robot Bridge :::caution[Important] This is an experimental feature. We do not provide support for this. ::: ## Installation Robot bridge comes bundled with Sahi. Following must be completed before you can invoke test cases using the bridge: - Python must be installed on the machine (This version was tested with v2.7 of Python). If you don't have Python already installed, you can get it from [Python Website](https://www.python.org/downloads/) - Robot framework must be installed and available in systems PATH variable. Generally you need to add the scripts folder of Python to your PATH variable. This will insure that we have pybot available for script execution. - Add `your_sahi_home/plugins/robot` to your PYTHONPATH. A batch file called `runRobotTest.bat` is present within the `plugins/robot` folder which can be used to test the correct working of the bridge using a ready made script in Sahi. :::caution[Important] You need to change the path of scripts folder in your resource.txt file to match your scripts folder path. ::: ## Keywords - Sahi Open Browser Opens a browser with given browser name and start URL. The browser names are defined in `sahi_pro/userdata/config/browser_types.xml`. - Sahi Close Browser This will close the open browser. - Sahi Load Script Loads a script and executes the steps in it. The functions of the script are then available for individual execution. It takes the full script path as the parameter. eg. ```js load script D:/sahi/sahi_pro_g/userdata/scripts/sahitests/robot_sample.sah ``` - Sahi Execute Function Executes a function from loaded script. Takes two parameters(second parameter is optional): 1. Function name 2. All the parameters separated by comma as the second parameter. If the function doesn't takes any arguments, leave blank. ```js execute function login "test","secret" execute function addBooks "3", "2", "1" execute function verifyTotal "1400" ``` - Sahi Execute Step Executes a valid Sahi statement. Takes only one parameter as the complete Sahi statement. e.g ```js execute sahi step _navigateTo("http://sahi.co.in/"); ``` --- # Sahi MTM Bridge ## Installation To use Sahi MTM Bridge, copy `Sahi.cs` and `Utils.cs` in your test solution. Correct the namespace in both the files to match your own namespace(the present namespace is `SahiLibraryMtm`). Now you will have access to the Sahi MTM Bridge in your test cases. ## MTM Bridge MTM lets you associate a test case with a test scenario. For each test case in MTM, you need to have a Sahi script which will be called in the unit test for the scenario. eg. if we have a test called "test" for which we have a Sahi script `test_demo.sah` (You can find this script in `sahi/userdata/scripts/sahitests/plugins` folder). We will be using Nunit to run the unit test for our case. The test case will look like this: ```java using System; using System.Collections.Generic; using System.Linq; using System.Text; using NUnit.Framework; //remove this as you will not be using Nunit //change namespace to your own solution namespace SahiLibraryMtm { [TestFixture] public class SahiTest { private static String sahiHost = "localhost"; private static String sahiPort = "9999"; private static String browserType = "chrome+ie+firefox"; private static String userDataScriptsFolder = "D:/sahi/sahi_pro_g/userdata/scripts/sahitests/plugins/"; [Test] public void test() { String scriptPath = userDataScriptsFolder + "test_demo.sah"; Sahi sahiHelper = new Sahi(sahiHost, sahiPort); Boolean s = sahiHelper.executeInParallel("http://sahi.co.in/demo", browserType, scriptPath); Console.WriteLine(s); } } ``` Above code can be found in `SahiTest.cs`. All we need to do is call executeInParallel method of `Sahi.cs` as shown above. browserType can take one or multiple browser and will execute them in parallel for multiple browsers. In case of any errors, it will be thrown as exception and will be available to MTM. --- # Integration with Git This section helps you to integrate Sahi Pro with Git using Sahi Editor. ## Git Configuration Click on the `Git Configuration` link in Sahi Editor to launch the Git Configuration dialog. ![](https://resources.sahipro.com/docs/assets/images/using-sahi/editor/git_launch.webp) ### Understanding the Git Configuration dialog ![](https://resources.sahipro.com/docs/assets/images/using-sahi/editor/git_config.webp) Specify the following Git configuration values as applicable: - Remote Path: URL for the remote Git repository. - Branch: Remote branch name. - Author Name: Name of the Git user. - Author Email: Email of the Git user. - Authentication Type: Authentication types like HTTPS, SSH, Netrc can be employed. See the [Authentication Type](#authentication-type) section for details. - Git Directory: Directory path to clone the branch in the system. - Git Log Integration: Tick this check-box to integrate Git with Sahi logs and view the specific file version after clicking on the line in logs. :::note Note: 1. Before saving the Git Configuration in Sahi, ensure that the remote Git repository is initialized. 2. Values for `Remote Path`, `Authentication Type` and `Git Directory` can be specified only once. Once Git Configuration is saved successfully, these values will not be editable. 3. Clicking on the `Save` button clones the remote Git repository at the specified Git Directory path. To avoid merging errors, ensure the following. 1. A Git repository should not exist already at this `Git Directory` path. So a directory with name `.git` should not be present at the `Git Directory` path. Note that `.git` directory if present will be hidden. 2. Files that will get cloned from the remote Git repository should not already exist in the `Git Directory`. 4. For the remote Git repository, it is recommended to have the same directory structure as in the `/userdata` directory. ::: ### Authentication Type **HTTPS Authentication** Enter the User Name and Password after selecting HTTPS Authentication from the dropdown. ![](https://resources.sahipro.com/docs/assets/images/using-sahi/editor/git_auth_https.webp) :::note Note: 1. HTTPS Authentication works only with an HTTPS URL. For example, `https://github.com/gituser/git_integration.git`. 2. To modify the saved Git configuration, the user must edit the `/userdata/config/git.properties` file. ::: **SSH Authentication** Choose SSH Authentication from the Authentication Type dropdown. Specify the file path of the private key file. Also, enter the Passphrase for the private key if applicable. ![](https://resources.sahipro.com/docs/assets/images/using-sahi/editor/git_auth_ssh.webp) :::note Note: 1. ssh key should be pem format. 1. Use following command to generate ssh key in PEM format: ```js sh-keygen -t ecdsa -b 521 -m PEM -C "your_email@example.com" ``` where: "-m PEM" creates public key to an OpenSSL compatible format 2. Following command can be used to convert existing public key to an OpenSSL compatible PEM format: ```js ssh-keygen -f id_rsa -e -m pem ``` 2. SSH Authentication works only with an SSH URL which starts with `git`. For example, `git@github.com:gituser/git_integration.git`. 3. To modify the saved Git configuration, the user must edit the `/userdata/config/git.properties` file. ::: **Netrc Authentication** Choose Netrc Authentication from the Authentication Type dropdown. Netrc Authentication works with both HTTPS and SSH URLs. ![](https://resources.sahipro.com/docs/assets/images/using-sahi/editor/git_auth_netrc.webp) :::note Note: The tokens `machine`, `login` and `password` should be present in `_netrc` (on Windows) or `.netrc` (on Linux or Mac) file. ::: ## Git Commit Click on the `Git Commit` link in Sahi Editor to launch Git Commit. `Git Commit` link will appear only after successfully saving the Git Configuration. ![](https://resources.sahipro.com/docs/assets/images/using-sahi/editor/git_commit_launch.webp) Git Commit can also be launched from the Navigator of Sahi Editor by right-clicking on a file or directory name. Clicking on the context menu item `Git Commit` will add the selected file or directory to Staged Changes. ![](https://resources.sahipro.com/docs/assets/images/using-sahi/editor/git_commit_rc_launch.webp) ### Understanding the Git Commit tab ![](https://resources.sahipro.com/docs/assets/images/using-sahi/editor/git_commit.webp) 1. Project Info: It specifies the Repository name and Branch Name. 2. Staged Changes: It contains the list of modified files staged for a commit. 3. Unstaged Changes: It contains the list of modified files. 4. Commit Message: Message to describe changes in the commit. 5. Author: This is the name and email of the author who is checking-in commit. It will be auto-filled using the author details saved in the [Git Configuration](#git-configuration). 6. Check-in: This button will check-in staged changes with a commit message. 7. Check-out: This button will check-out the latest changes from the remote repository. Click on a file to move it to and fro between Staged Changes and Unstaged Changes. Also, right-clicking on a file will show the following context menu. ![](https://resources.sahipro.com/docs/assets/images/using-sahi/editor/git_commit_right_click.webp) **Compare with HEAD Revision**: Compares the current file with HEAD Revision. **Replace with HEAD Revision**: Replaces the current file with HEAD Revision. **Add to index**: Adds the current file to index (Staged Changes). ## Git History Click on the `Git History` link in Sahi Editor to launch Git History. `Git History` link will appear only after successfully saving the Git Configuration. ![](https://resources.sahipro.com/docs/assets/images/using-sahi/editor/git_history_launch.webp) Git History can also be launched from the Navigator of Sahi Editor by right-clicking on a file or directory name. Clicking on the context menu item `Git History` will show all commits checked in for the selected file or directory. ![](https://resources.sahipro.com/docs/assets/images/using-sahi/editor/git_history_rc_launch.webp) ### Understanding the Git History tab ![](https://resources.sahipro.com/docs/assets/images/using-sahi/editor/git_history.webp) 1. List of all commits made in the remote repository. 2. Information of the selected commit like commit id, author, date and message. 3. Files that were changed by the selected commit. 4. Line differences that were made in the selected file by the selected commit. 5. Search box to search for commits using commit id, message, or author details. Click on a commit to select and display its information. The list of files changed by the selected commit is shown at the right bottom. Select a file from this list to show the changes made in that file. Also, right-clicking on a file from this list will show a context menu shown in the image below. Clicking on `Compare with Current Version` will compare the commit version of the file with its current version. ![](https://resources.sahipro.com/docs/assets/images/using-sahi/editor/git_history_file_right_click.webp) If two commits are selected using `Ctrl + click` (`⌘ + click` on Mac), then right-clicking on them will show a context menu shown in the image below. Clicking on `Compare with Each Other` will compare the selected commits. ![](https://resources.sahipro.com/docs/assets/images/using-sahi/editor/git_history_commit_right_click.webp) ## Git Compare The Git Compare tab will compare and show the differences between two versions of a file. It can show the following comparisons. **Comparison between local version and Head version of a file**\ Right-click on a file in the Git Commit tab and select `Compare with HEAD Revision`. This will open a comparison between the local version and the Head version of the selected file. ![](https://resources.sahipro.com/docs/assets/images/using-sahi/editor/git_compare_current_head.webp) **Comparison between local version and Current version of a file**\ In the Git History tab, the list of files changed by the selected commit is shown at the right bottom. Right-click on a file from this list and select `Compare with Current Version`. This will open comparison between the local version of the file and the version of the file in the selected commit. **Comparison between two commits**\ In the Git History tab, select two commits using `Ctrl + click` (`⌘ + click` on Mac). Right-click on them and select `Compare with Each Other`. This will open comparison between the two selected commits. This comparison displays all the modified files in a tree structure. Select any file and view the differences. ![](https://resources.sahipro.com/docs/assets/images/using-sahi/editor/git_compare_each_other.webp) --- # How Atlas Works How Sahi Pro Atlas turns the application behaviour you describe into Sahi Pro tests, and where AI is used along the way. Sahi Pro Atlas turns the application behaviour you describe into Sahi Pro tests. This page walks through each stage, from your description to the files Sahi Pro runs. :::caution[Beta Preview] Atlas is a beta preview in Sahi Pro v12.0.0.10. It works with web applications for now, and features may change before general release. ::: ## From Behaviour to Tests 1. **Describe the application behaviour.** Type it in, upload a document, or describe it in a chat message. You can also use your own editor's AI: it gathers the context and sends it to Atlas through the Atlas MCP server. 2. **Atlas builds a spec.** AI structures the application behaviour into a `mapp.yaml` spec of states, roles, conditions and outcomes. It suggests where in the UI each behaviour lives, and turns fields and preconditions into typed forms. The spec is a simple format that people can read and edit. 3. **You review and approve.** Every proposed change is shown as a diff. You can edit the proposed values directly, not just accept or reject them, and nothing is written to the spec until you approve it. 4. **Atlas plans the tests.** Fixed rules generate one scenario for each path, error and access rule, plus every real combination of choices that affect each other. The same spec always produces the same tests. 5. **Atlas writes each test case.** Each test case is structured, with its setup, teardown and seed data worked out by convention. 6. **Atlas creates the Sahi Pro files.** Test case steps are mapped by rule to Sahi Pro's own formats: scenario files (`.s.csv`), `.sah` files and data files (`.csv`). Existing keywords are reused, and new keywords are created as stubs, without steps. 7. **You implement new keywords in Sahi Pro.** Record the interaction once by walking through the application, or let **AI Suggest** author the keyword for you. Sahi Pro saves the keyword file. ## Same Behaviour, Same Tests Ask an AI the same question twice and you can get two different answers. For tests, that's a real problem: a test suite that changes on its own can't be trusted. Atlas uses AI only to understand the application behaviour and build the spec. The tests come from that spec through fixed rules, so the same spec gives the same tests, every time. When a test changes, it's because the spec changed, and you approved that change. ## Where AI Is Used | Stage | How it works | | --- | --- | | Describe the application behaviour, build the spec | AI | | Review and approve | You decide | | Plan the tests, write the test cases, create the Sahi Pro files | Fixed rules: the same spec gives the same tests every time | | Implement new keywords | Your choice: record it in Sahi Pro, or use AI Suggest | --- # Running and Maintaining Atlas Tests How tests generated by Sahi Pro Atlas run on the Sahi Pro engine, stay up to date, and build up your keyword library. Atlas hands over standard Sahi Pro files. This page covers what happens after that: running the tests, keeping them up to date, and how your keyword library grows. :::caution[Beta Preview] Atlas is a beta preview in Sahi Pro v12.0.0.10. It works with web applications for now, and features may change before general release. ::: ## Running the Tests The generated tests run on the Sahi Pro engine, the same proven engine that runs every other Sahi Pro test, using your keyword library and your real application. Atlas never runs tests itself: it hands over standard Sahi Pro files. ## Keeping Tests Up to Date When the application behaviour changes, Atlas updates the spec and shows you the changes as diffs to approve. Once you approve them: - **New behaviour:** Atlas writes new tests for it. It chains keywords that already exist in other tests to build the business flow, and creates only the keywords that are missing. - **Changed behaviour:** Atlas updates the existing tests that cover it, instead of rewriting them. Your tests stay in step with the application, and the keywords your team has already built keep working in them. ## Keywords Build Up Over Time Every keyword, whether authored by AI Suggest or recorded by hand, is reused by the next test Atlas generates and by your team's own hand-written Sahi Pro tests. The more you use Atlas, the less there is left to implement. --- # AI and Your Data The ways to run Sahi Pro Atlas so your application data stays under your control: your own AI keys, your own infrastructure, or local models. Atlas reads descriptions of your application, so you choose where that data goes. :::caution[Beta Preview] Atlas is a beta preview in Sahi Pro v12.0.0.10. It works with web applications for now, and features may change before general release. ::: - **Bring Your Own Key:** connect Atlas to your own AI provider with your own keys. - **Your own infrastructure:** deploy Atlas inside your network, so your application data stays there. - **Local models:** use self-hosted or local models. --- # Sahi Script Overview Sahi Script is the scripting language of Sahi Pro. Its built-in functions, formerly called Sahi APIs, find elements with accessors, act on them, check results with assertions, and work with data, files, logs and screenshots. A Sahi script is a `.sah` file of steps. Each step calls one of Sahi's built-in functions, which cover: - **Accessors**, which find elements on the screen, such as `_link("Login")` or `_textbox("user")`. - **Actions**, which act on those elements, such as `_click` or `_setValue`. - **Assertions**, which check results, such as `_assertExists` or `_assertEqual`. - **Everything else a test needs**: reading data from Excel, CSV files and databases, working with files, logging, taking screenshots, calling REST APIs and controlling how a script runs. Most tests do not need code. Build them in the No-Code Test Editor, described in [Using Sahi](https://resources.sahipro.com/docs/using-sahi/). Use Sahi Script when you want to: - Keep working with scripts you already have, for example from Sahi Pro Classic. - Write a test faster in code, or have an AI assistant write it for you. - Do something the Editor does not cover, such as calling Java, reading a PDF or connecting over SSH. :::note Sahi's built-in functions used to be called **Sahi APIs**. They are now the [Function Reference](https://resources.sahipro.com/docs/sahi-script/functions/), so they are not confused with REST APIs. ::: ## A short script ```js _setValue(_textbox("user"), "test"); _setValue(_password("password"), "secret"); _click(_submit("Login")); _assertExists(_link("Logout")); ``` Each line finds an element with an accessor function (`_textbox`, `_password`, `_submit`, `_link`) and acts on it or checks it with an action or assertion function (`_setValue`, `_click`, `_assertExists`). ## Where to start | If you want to | Read | | --- | --- | | Have an AI assistant write or fix scripts | [Write Scripts with AI](https://resources.sahipro.com/docs/sahi-script/write-scripts-with-ai/) | | Write scripts that are reliable and easy to maintain | [Best Practices](https://resources.sahipro.com/docs/sahi-script/best-practices/) | | Learn the language | [Sahi Scripting Basics](https://resources.sahipro.com/docs/sahi-script/sahi-scripting-basics/) | | Look up a function | [Function Reference](https://resources.sahipro.com/docs/sahi-script/functions/) | --- # Write Keywords in Sahi Script Write and refactor keyword code in the Test Scenario Editor's script view: the toolbar, the Context panel, Create Function, Find and Replace, Find Usage and Create AR. Most keywords are built without code in the [No-Code Test Editor](https://resources.sahipro.com/docs/using-sahi/sahi-script-editor/#build-tests-in-the-no-code-test-editor). Some need logic that no-code can't express, such as a loop, a calculation or a call to Java. Behind every keyword is a Sahi Script function in a keyword file (`.sah`), and you can write that code yourself in the Test Scenario Editor's script view. To open the script view, click a keyword file (`.sah`) in the Navigator, or Ctrl-click (⌘-click on Mac) a keyword in a scenario file. ## The Script View Toolbar The visual_books.sah keyword file in the script view, with numbered badges on the toolbar buttons Auto Format, Create Function, Show Context, Find and Replace, Rest Client and Create AR 1. **Auto Format:** fixes the indentation of the whole file. See [Auto Format](#auto-format). 2. **Create Function:** turns selected lines into a function. See [Create a Function](#create-a-function). 3. **Show Context:** opens the [Context panel](#context-panel). 4. **Find and Replace:** finds text in the file. See [Find and Replace](#find-and-replace). 5. **Rest Client:** opens the [Rest API Editor](https://resources.sahipro.com/docs/using-sahi/rest-api/getting-started/). 6. **Create AR:** creates an Accessor Repository from the file. See [Create an Accessor Repository](#create-an-accessor-repository). ## Context Panel A call to a keyword or an accessor kept in an Accessor Repository doesn't show where it's defined. The Context panel does. Click **Show Context**, or Ctrl-click (⌘-click on Mac) the call. - **Function:** the file that defines the function, its parameters and their values. **Open** opens that file, and **Include** adds it to the current file if it isn't included yet. **Insert** adds the call, and **Update** changes the values in the line. - **Accessor:** the AR key and value of the element in the line. You can change the value, or the key in every file or only this one.
The Context panel with its Function and Accessor tabs, Function File Name with Open and Include, Function Name, a Parameter and Value table, and Insert, Insert and Go to Next Line and Update
:::caution Write Accessor Repository keys in capitals with underscores, such as `$_LOGIN_BUTTON`. Tests still run with other keys, but their values don't show properly in the Context panel. ::: Ctrl-click (⌘-click on Mac) also moves between files: on a keyword in a scenario file, on a function or AR key, or on a file path in an `_include` or `loadSahi` line. **Previous Location** and **Next Location**, the arrows at the right of the tabs, take you back. ## Create a Function Recorded steps often repeat with different values. Turn them into one function with parameters: 1. Select the lines and click **Create Function**. 2. Enter a **Function Name**. You can choose from names listed in `userdata/config/function_names.txt`. 3. Check the values to turn into parameters under **Function Parameters**, and name them. **(more)** shows more of them. 4. Choose the options: **Remove Duplicates** merges parameters with the same value, **Add Function Call** replaces the lines with a call to the new function, and **Create JS Doc** adds the documentation comment. 5. Click **Create**.
The Create Function dialog with Function Name, the options Remove Duplicates, Add Function Call and Create JS Doc, and three values 2, 3 and 1 as parameters $Q, $Q1 and $Q2, with Cancel and Create
## Find and Replace **Find and Replace** searches the open file, with **Exact match** and **Match Case**. Enter text in **Replace with** and click **Replace** or **ReplaceAll**. To search only, press Ctrl + F (⌘ + F on Mac).
The Find and Replace panel with Find, Exact match, Match Case, Replace with, and the Replace and ReplaceAll buttons
## Find Usage Across Files When you rename a keyword or a variable, every file that uses it has to change too. **Tools** > **Find Usage** searches all the files in the project. Filter the results by **Exact match**, **Keyword**, **Variable** or **Pattern match** (for example `*.sah` to search only keyword files). To replace, enter the new name in **Replace With**, select the files and click **Replace**. The Find Usage - Keywords and Variables panel at the bottom of the Editor, with Find, Replace With, and the filters Exact match, Keyword, Variable and Pattern match ## Auto Format **Auto Format** fixes the indentation of the whole file and makes it easier to read. It treats a semicolon as the end of a line. ## Create an Accessor Repository **Create AR** moves the accessors of the selected files into an Accessor Repository. With no file selected, it works on the open file. To undo it, copy the files from `userdata/scripts_backup` back into the project. :::note Sahi Pro needs read and write permission for the `userdata` folder, set in `userdata/config/userdata_hidden.properties`. ::: ## Editor Shortcuts | **Shortcut** | **Explanation** | | --- | --- | | Ctrl + S (⌘ + S on Mac) | Save the current file | | Alt + Up Arrow | Move current line up | | Alt + Down Arrow | Move current line down | | Ctrl + D (⌘ + D on Mac) | Delete the current line | | Ctrl + F (⌘ + F on Mac) | Search in the file | | Ctrl + / (⌘ + / on Mac) | Comment selected lines | | Ctrl + Alt + Up Arrow (⌘ + Alt + Up Arrow on Mac) | Copy current line above | | Ctrl + Alt + Down Arrow (⌘ + Alt + Down Arrow on Mac) | Copy current line below | | Ctrl + L (⌘ + L on Mac) | Go to a line number | To run or debug the keywords you write, see [Run Tests](https://resources.sahipro.com/docs/using-sahi/run-tests-via-editor/) and [Debug a Test](https://resources.sahipro.com/docs/using-sahi/run-tests-via-editor/#debug-a-test). --- # Write Scripts with AI Give an AI assistant such as Claude, ChatGPT or Copilot the Sahi Script reference so it can write, explain and fix Sahi scripts. AI assistants write better Sahi scripts when they can read Sahi's own documentation instead of guessing. These docs are published in plain text for that purpose. :::note This page is being written. It will add sample prompts and a walkthrough for popular assistants. ::: ## Give the assistant the reference
| File | What it contains | Use it when | | --- | --- | --- | | [llms-sahi-script.txt](https://resources.sahipro.com/docs/llms-sahi-script.txt) | Best practices, the language basics and every Sahi function in one file | You want the assistant to write or review scripts. The file is large (about 1.8 MB), so attach it to an assistant that accepts large files, or give it only the pages you need. | | [llms.txt](https://resources.sahipro.com/docs/llms.txt) | An index of all the documentation, with a link to each page | The assistant can browse the web and should find pages on its own. | | [llms-full.txt](https://resources.sahipro.com/docs/llms-full.txt) | The full text of all the documentation | You also have questions about the Editor, settings or release notes. |
Any page can also be read as plain text by adding `.md` to its address, for example [https://resources.sahipro.com/docs/sahi-script/functions/actions.md](/docs/sahi-script/functions/actions.md). ## Ask for a script Tell the assistant what the test should do, step by step, and which application it runs against. For example: ```text Using the attached Sahi Script reference, write a Sahi script that logs in to the demo shop with user "test", adds two copies of "Java" to the cart and checks that the total is 1150. Follow the best practices in the reference. ``` ## Check what it writes - Run the script in Sahi Pro before you rely on it. The assistant cannot see your application, so element names may need correcting. - Use the Controller to find the right accessor for an element, and give it to the assistant. - Ask the assistant to explain any function you do not recognise, then look it up in the [Function Reference](https://resources.sahipro.com/docs/sahi-script/functions/). --- # Sahi Script Best Practices Rules for writing Sahi scripts that are reliable and easy to maintain, whether you write them yourself or an AI assistant writes them. These rules make scripts reliable and easy to maintain. They are written so that people and AI assistants can both follow them. For organising whole suites and teams, see [Best Practices](https://resources.sahipro.com/docs/using-sahi/best-practices/) in Using Sahi. :::note This page is being written. Each rule will get examples of what to do and what to avoid. ::: ## Finding elements - Identify elements by the text or label users see, for example `_link("Logout")`, not by position or generated ids. - When the same text appears more than once, use a relation such as `_near` or `_in` instead of an index like `[2]`. See [Accessor Basics](https://resources.sahipro.com/docs/sahi-script/functions/accessor-basics/). - Use the Controller to pick accessors instead of writing them by hand. ## Waiting - Do not add fixed pauses. Sahi already waits for pages and AJAX requests to finish. - When you must wait for something specific, use [`_wait`](https://resources.sahipro.com/docs/sahi-script/functions/script-execution-control/#_wait) with a condition and a time limit. ## Checking results - End every test with assertions that prove it passed, such as `_assertExists` or `_assertEqual`. See [Assertion Functions](https://resources.sahipro.com/docs/sahi-script/functions/assertions/). - Check one thing per assertion, so a failure tells you exactly what went wrong. ## Structure - Put repeated steps in functions in a library file, and load it with [`_include`](https://resources.sahipro.com/docs/sahi-script/functions/include/). - Keep test data out of the script. Read it from a file with the [Data Drive Functions](https://resources.sahipro.com/docs/sahi-script/functions/data-drive/). - Give functions and variables names that say what they do. Remember that variables start with `$`. ## Handling failures - Handle errors you expect and recover from them. See [Exception Handling](https://resources.sahipro.com/docs/sahi-script/exception-handling/). - Use the [Logging Functions](https://resources.sahipro.com/docs/sahi-script/functions/logging/) to add messages that explain what the script was doing when it failed. --- # Sahi Scripting Basics Sahi script is based on javascript. Sahi script is parsed by Sahi and the parsed script is fully valid javascript which is executed by the rhino javascript engine. Below are the normal constructs used in Sahi script. They are the same as javascript except for the mandatory $ used in variables. ## Statements Statements are normal lines of code. They end with a semi-colon. Eg. ```js _click(_link("Login")); ``` ### Variable declaration ```js var $variableName = value; ``` or ```js var $variableName; // declaration $variableName = value; // assignment ``` All variables start with a $. The keyword var is used for local variables. Eg. ```js var $username = "SahiTestUser"; var $password; // declaration; $password = $username + "_password"; // "SahiTestUser_password" ``` ### Comments ```js // This is a single line comment /* This is a multiline comment. This has two lines */ ``` ### if statements ```js if (condition) { // statements } ``` Eg. ```js // Comparing normal values if ($username == "PartnerUser"){ _click(_link("Partner Login")); } // Comparing with browser attributes exposed by Sahi if (_getText(_div("page_type")) == "Partner Page"){ _click(_link("Partner Login")); } // Comparing with browser attributes NOT exposed by Sahi's built-in fetch apis // using _fetch if (_fetch(_link(0).href) == "http://sahi.co.in/"){ _click(_link("Partner Login")); } // Comparing with browser attributes NOT exposed by Sahi's built-in fetch apis // using _condition if (_condition(_link(0).href="=" "http://sahi.co.in/")){ _click(_link("Partner Login")); } ``` ### for loops ```js for (var $i=0; $i<$max; $i++){ // statements } ``` Eg. ```js // This loop will login with user1, password1, user2, password2 etc. // login and logout are custom functions. for (var $i=0; $i<10; $i++){ login("user"+$i, "password"+$i); logout(); } ``` ### while loops ```js while (condition) { // statements } ``` Eg. ```js $i = 0; while ($i++ < 10) { login("user"+$i, "password"+$i); logout(); } ``` ## Structuring Sahi Code :::note While recording gives us the low level steps to be performed on the browser, code needs to be restructured for better readability and maintainability. This section explains how to structure your code for effective but simple use of Sahi. ::: ### Functions Functions are the basic building blocks in your automation. Functions are used to club together multiple steps into one logical action. Functions reduce code duplication and allow easier maintenance of scripts. ```js function functionName($parameter1, $parameter2) { // statements } ``` For example a login function may look like this ```js // function declaration function login($usr, $pwd){ _click(_link("Login")); _setValue(_textbox("username"), $usr); _setValue(_password("password"), $pwd); _click(_submit("Login")); } // function call login("test", "secret"); ``` ### Including another Sahi script file To reuse a function from one script in another, we include the relevant script using [\_include](https://resources.sahipro.com/docs/sahi-script/functions/include/#_include). Functions and variables declared in the included script are available in the including script. Eg. **common.sah** ```js // File: common.sah // declare $DEFAULT_USER variable var $DEFAULT_USER = "test"; // login function declaration function login($usr, $pwd){ _click(_link("Login")); _setValue(_textbox("username"), $usr); _setValue(_password("password"), $pwd); _click(_submit("Login")); } ``` **testcase1.sah** ```js // File: testcase1.sah // include common.sah shown above. _include("common.sah"); // Note how login and $DEFAULT_USER are actually declared // in common.sah but available here in testcase1.sah. login($DEFAULT_USER, "secret"); ``` --- # Some Basic Data Types and Data Structures ## Data Types Most interactions with browsers require us to validate either string or integer data. Both these can be stored in regular javascript variables. ## Data Structures Since we work with web UIs, Sahi's need for data structures is fairly minimal. The few that are used are: ### Single dimensional array ```js var $ar = ["Ram", "Sam", "Jam"]; var $firstUser = $ar[0]; // returns "Ram" ``` ### Two dimensional array ```js var $ar2d = [["Ram",18], ["Sam",20], ["Jam",25]]; var $firstRow = $ar2d[0]; // returns ["Ram",18] var $firstUser = $firstRow[0] // returns "Ram" // or var $firstUser = $ar2d[0][0] // returns "Ram" ``` ### Associative Array ```js var $userInfo = {"name":"Ram", "age":"18"}; var $userName = $userInfo["name"]; var $userAge = $userInfo["age"]; ``` --- # Exception Handling and Recovery ## Try Catch For anticipated exceptions, one may use try catch blocks. **Syntax** ```js try{ // sahi statements }catch($e){ // Corrective action // Can print exact source of error in log // Can throw the same or another exception } ``` ### Corrective Action ```js try{ _click(_link("does not exist")); }catch($e){ _log("Exception occured"); // simple logging. no failure _click(_link("linkByHtml")); // Corrective action } ``` ### Corrective Action and Log the Exception Message ```js try{ _disableDefaultErrorLogging(); // This will ignore and not log the failures which occur in try block _click(_link("does not exist")); }catch($e){ _click(_link("linkByHtml")); // Corrective action _logException($e); // Logs the exception, but does not fail } ``` ### Corrective Action, Log and then Fail ```js try{ _disableDefaultErrorLogging(); // This will ignore and not log the failures which occur in try block _click(_link("does not exist")); }catch($e){ _click(_link("linkByHtml")); // Corrective action _logExceptionAsFailure($e); // Logs the exception, and fails, // and in the logs, points to the original line as source of failure. } ``` ## Script Callback Functions For unanticipated exceptions, override Sahi's callback functions to recover. Example: ```js function onScriptEnd(){ _click(_button("Logout")); } function onScriptError(){ _log(">> In onScriptError"); } function onScriptFailure(){ _log(">> In onScriptFailure"); } _navigateTo("http://sahi.co.in/demo/training/"); _setValue(_textbox("user"), "test"); _setValue(_password("password"), "secret"); _click(_submit("Login")); _assertExists(_submit("Login")); // cause SCRIPT ASSERTION FAILURE - triggers onScriptFailure _setValue(_textbox("q11"), "2"); // causes SCRIPT ERROR - triggers onScriptError // Script aborts here, but executes onScriptEnd() to logout _setValue(_textbox("q[1]"), "1"); _setValue(_textbox("q[2]"), "1"); _click(_button("Add")); _assertEqual("1150", _textbox("total").value); // cause SCRIPT FAILURE // If not aborted earlier, automatically calls onScriptEnd() to logout. ``` ### Taking screenshots Use \_focusWindow() and \_takeScreenShot() (available since Sahi Pro V4.3) ```js function onScriptError($e){ _focusWindow(); _takeScreenShot(); } onScriptFailure = onScriptError; _navigateTo("http://sahi.co.in/demo/training/"); _setValue(_textbox("user"), "test"); _setValue(_password("password"), "secret"); _click(_submit("Login")); ``` ### Force Sahi to continue on error after screenshots and logging. ```js function onScriptError($e){ _logExceptionAsFailure($e); _focusWindow(); _takeScreenShot(); return true; // Forces Sahi to continue execution and not stop at error. Since Sahi Pro V4.3 } _navigateTo("http://sahi.co.in/demo/training/"); _setValue(_textbox("user"), "test"); _setValue(_password("password"), "secret"); _click(_submit("Login")); ``` ## \_setRecovery :::caution[Important] \_setRecovery is no longer recommended and may be deprecated soon. Use the callback functions instead ::: The relevant functions are: \_setRecovery(fn) \_removeRecovery() Any function can be assigned to a script as a recovery function. Once set, if there is an error during execution, the recovery function will be called before the script stops. ```js _navigateTo("http://sahi.co.in/demo/"); function myRecoveryFn(){ _alert("In myRecoveryFn."); // This statement will be alerted in case of script error. } _setRecovery(myRecoveryFn); // Set the myRecoveryFn as recovery function. _click(_link("Link Test")); // Works normally _click(_link("Bad Link")); // This statement fails and causes myRecoveryFn to be called. _alert("done"); // This statement will not be called, because script failed in the last statement. ``` The recovery function can be removed via \_removeRecovery(); :::caution[Important] \_setRecovery is no longer recommended and may be deprecated soon. Use the callback functions instead ::: --- # Including Sahi Script Globally Sahi automatically includes `userdata/scripts/global_include.sah` file into every script/scenario that is run. Default implementation of [callback functions](https://resources.sahipro.com/docs/sahi-script/functions/script-execution-control/#callback-functions) are available in this file. `global_include.sah` must always be present at the root of scripts folder. If you have manually configured more than one scripts folder, the `global_include.sah` from the respective root folders will be considered. In case a script root folder doesn't have `global_include.sah` file, user will see an error on console reporting the same. --- # Multiple Modes in a Single Script From Sahi Pro v7.0.0, it is possible to interact with multiple applications from the same script. With the [Sahi Pro Desktop Engine](https://resources.sahipro.com/docs/introduction/sahi-pro-desktop-engine/), we can interact with Window Desktop applications and Java applications The [\_setMode](https://resources.sahipro.com/docs/sahi-script/functions/script-execution-control/#_setmode) function is used to switch modes within a script. ```js // by default start with browser interaction _navigateTo("/demo/training/"); _setValue(_textbox("user"), "test"); ... // Switch to Windows automation _setMode("WINDOWS"); _selectWindow("/Notepad/"); _mouseOver(_toolBar("")); _click(_button("Replace...")); _click(_tabItem("Find")); ... // Switch back to browser _setMode("BROWSER"); _click(_button("Logout")); ``` ## Available Modes | Mode | Description | Available in | | --- | --- | --- | | GENERIC | No specific technology. | All | | BROWSER | Desktop browsers like Chrome, Firefox, Internet Explorer etc. as defined in browser\_types.xml. Eg. `chrome` | Sahi Pro | | ANDROID\_BROWSER | Android web applications | Sahi Pro | | IOS\_BROWSER | iOS web applications | Sahi Pro | | WINDOWS | Native Windows applications (WPF, WinForms, .NET, SilverLight, XBAP) | Sahi Pro Desktop Engine | | JAVA | Java desktop and Web Start/JNLP applications | Sahi Pro Desktop Engine | | JAVA\_APPLET | Java Applets | Sahi Pro Desktop Engine | | ANDROID | Android applications (native and hybrid) | Sahi Pro Mobile Engine | | IOS | iOS applications (native, hybrid and web) | Sahi Pro Mobile Engine | | SAP | SAP GUI Application | Sahi Pro SAP Engine | ## Start Mode The Start Mode, specified before a script or suite is executed, is the mode with which scripts will start playing. The mode can be later changed using \_setMode. If Sahi Browser capability is enabled, Sahi Pro by default starts all scripts in BROWSER mode and automatically launches a browser at the start. If a script needs to start by interacting with JAVA applications, the start mode can be set as JAVA. In this case no browser is opened at start. ## Notes on Default and Start With options - When "Browser" is chosen as the Start Mode option, a browser of the Default Desktop Browser type is started automatically at the start of the script. This browser session is automatically selected, so that the first step in the script is addressed to this browser instance. - When "Generic" or "Windows" or "Java" is chosen as the Start Mode option, no browser launch is made. If you want to interact with the browser, the script has to explicitly do ```js _setMode("BROWSER"); var $instanceId = _launchNewBrowser(); _selectBrowser($instanceId); ``` before steps on browser can be executed. If browserType is not specified in \_launchNewBrowser, a new browser of the default browser type (as specified at run time from editor or batch file or ant) is launched. :::caution[Important] The ant target uses `startWith` parameter to specify start mode. The values of startWith are: | Visible Text | startWith value | | --- | --- | | Browser | BROWSER | | Generic | GENERIC | | Windows | WINDOWS | | Java | JAVA | | Android | ANDROID | | Android Browser | ANDROID\_BROWSER | | iOS | IOS | | iOS Browser | IOS\_BROWSER | | SAP | SAP | ::: --- # Log javascript dialog messages in reports Javascript dialog messages can be logged in reports. This document describes the procedure to log javascript dialog messages in reports. ## Log javascript popup with expectation in reports To log javascript popup messages with expectation in reports 1. Click on `Configure` link from Sahi Dashboard, and open `userdata.properties`. 2. Copy and paste the below statements and enter the appropriate values. ```properties log.js.alert.popups.color.with.expectation=CUSTOM3 log.js.confirmation.popups.color.with.expectation=CUSTOM3 log.js.prompt.popups.color.with.expectation=CUSTOM3 log.js.print.popups.color.with.expectation=CUSTOM3 ``` :::note Note that these values are indicative. You need to modify these values as appropriate. ::: :::note - These properties can take CUSTOM, CUSTOM1, CUSTOM2, CUSTOM3, CUSTOM4 or CUSTOM5, ERROR or FAILURE as values. Default is blank(no background color) - This controls the background color of popup message in reports when expectation is set. - If value is not provided for the above properties javascript popup messages will not be logged in reports ::: ## Log javascript popup without expectation in reports To log javascript popup messages without expectation in reports 1. Click on `Configure` link from Sahi Dashboard, and open `userdata.properties`. 2. Copy and paste the below statements and enter the appropriate values. ```properties log.js.alert.popups.color.without.expectation=FAILURE log.js.confirmation.popups.color.without.expectation=FAILURE log.js.prompt.popups.color.without.expectation=FAILURE log.js.print.popups.color.without.expectation=FAILURE ``` :::note Note that these values are indicative. You need to modify these values as appropriate. ::: :::note - These properties can take CUSTOM, CUSTOM1, CUSTOM2, CUSTOM3, CUSTOM4 or CUSTOM5, ERROR or FAILURE as values. Default is blank(no background color) - This controls the background color of popup message in reports when expectation is not set. - If value is not provided for the above properties javascript popup messages will not be logged in reports ::: ## Color of javascript dialog messages in reports 1. Javascript dialog messages can be logged with various background color as described below: ```properties CUSTOM = yellow CUSTOM1 = orange CUSTOM2 = grey CUSTOM3 = green CUSTOM4 = violet CUSTOM5 = indigo ERROR = red FAILURE = red ``` :::note For ERROR and FAILURE the script will be marked failed. ::: --- # 401 Authentication This section describes how to handle 401 authentication with Sahi Pro. A 401 dialog may be used in authentication of websites. On Internet Explorer, it looks like this: ![](https://resources.sahipro.com/docs/assets/images/using-sahi/401/401-ie.webp) On Chrome, it looks like this: ![](https://resources.sahipro.com/docs/assets/images/using-sahi/401/401-chrome.webp) On Firefox, it looks like this: ![](https://resources.sahipro.com/docs/assets/images/using-sahi/401/401-ff.webp) However, when navigated to the same site, Sahi Pro automatically transforms this modal dialog into a simple web page. ![](https://resources.sahipro.com/docs/assets/images/using-sahi/401/basic_authentication_page.webp) Since it is now just another HTML page, you can easily write scripts to enter username and password into the dialog. :::note Sometimes the AuthKey may have something dynamic like a timestamp in it. In such cases, a regular expression can be used. Eg. You can use `/Secure/` instead of `Secure Gateway` in the AuthKey field above. To accept for any AuthKey one can use `/.*/`. **Try setting AuthKey to `/.*/` before troubleshooting further.** ::: :::caution[Important] Ensure you have installed Java 1.8 or above. To change the version of Java that Sahi Pro uses, edit `sahi/userdata/bin/setjava.bat` (or `setjava.sh`) and modify ```sh set SAHI_JAVA_HOME=C:\path\to\java1.8 ``` ::: ## 401 authentication page for NTLM scheme loops or does not login even if the credentials are provided ![](https://resources.sahipro.com/docs/assets/images/using-sahi/401/ntlm_auth_page.webp) Sahi Pro automatically tries to authenticate the WINDOWS logged in user for the applications which support NTLM scheme. However if Sahi Pro is unable to authenticate the user automatically, the 401 page for NTLM authentication is displayed. The solution would differ based on your environment. Thus to address this, employ below approaches one by one: 1. First approach : 1. Sahi Pro automatically populates the username for the currently logged in user. However if you use different credentials for authentication, kindly enter them. 2. Ensure that the username is in domain\\user format where both the domain name and user name are correct. 3. Provide your password for authentication in the password field and click on the Authenticate button. 2. Second approach : 1. If the first approach did not work, then ensure that following property is enabled in the **userdata.properties** file : ```properties apacheclient.enabled=true ``` 2. Add the following property in the **userdata.properties** file: ```properties apacheclient.ntlm_authentication.enabled=true ``` 3. Restart Sahi Pro and then launch your application in the browser. 4. Now enter valid credentials for authentication as done in the first approach. ## Sahi Pro authenticates automatically but the username is improper Sahi Pro automatically tries to authenticate the WINDOWS logged in user for the applications which support NTLM scheme. If successfully authenticated, Sahi Pro's 401 authentication page will not be displayed. However you may wish to use different credentials i.e credentials of a user other than the currently logged in user. To address this, follow below steps : 1. Add the following property in the **userdata.properties** file: ```properties java.ntlm.transparent_authentication.enabled=false ``` 2. Restart Sahi Pro and launch your application. 3. Now enter valid credentials for authentication. Ensure that the username is in domain\\user format where both the domain name and user name are correct. 4. Provide your password for authentication in the password field and click on the Authenticate button. 5. If it did not authenticate successfully, then ensure that following property is enabled in the **userdata.properties** file : ```properties apacheclient.enabled=true ``` 6. Then add the following property in the **userdata.properties** file: ```properties apacheclient.ntlm_authentication.enabled=true ``` 7. Restart Sahi Pro and try again. ## Handling 401 authentication page for NEGOTIATE or KERBEROS scheme ![](https://resources.sahipro.com/docs/assets/images/using-sahi/401/negotiate_authentication_page.webp) Sahi Pro automatically tries to authenticate the user for applications which support only NEGOTIATE or KERBEROS scheme. However if Sahi Pro is unable to authenticate the user automatically, the 401 page for authentication is displayed. To address this, follow below steps : 1. Verify if `apacheclient.enabled` property is set as true in the **userdata.properties** file. If this property is set as false, set it as true. Restart Sahi Pro and try again. 2. If Sahi Pro was unable to authenticate automatically even after enabling `apacheclient.enabled` property, disable this property by setting it as false. Restart Sahi Pro and try again. 3. Now Sahi Pro's 401 page for authentication is displayed. Enter credentials in this web page. 1. Set User Principal Name as username in this web page. You can find your User Principal Name by running the command `whoami /upn` on the command prompt. 2. Provide your system login password in the password field and click on Authenticate button. Restart Sahi Pro and try again. 4. If the authentication did not succeed, ensure `apacheclient.enabled` property is set as false. Then, set below properties in the **userdata.properties** file. 1. Run the command 'whoami /upn' on the command prompt. This command prints your User Principal Name. Set your User Principal Name as value for `java.kinit.principal_name` property. 2. Encode your system login password using [Password Encoder](https://resources.sahipro.com/docs/using-sahi/sahi-script-editor/#password-encoder). Set this encoded password as value for `java.kinit.encrypted_password` property. 5. Restart Sahi Pro and try again. On start, Sahi Pro will now generate a Kerberos ticket at `USER_HOME\krb5cc_USER_NAME`. For example, if the Windows system's login user name is `userXYZ[icode], then the Kerberos ticket will be generated at [icode]C:\Windows\Users\userXYZ\krb5cc_userXYZ`. :::note Henceforth, the generated Kerberos ticket will be used for authentication. However, this ticket will expire after a period after which it needs to be renewed or regenerated. Sahi Pro will automatically regenerate the ticket on every start. To regenerate the ticket periodically without restarting Sahi Pro, add the following property in the **userdata.properties** file. ```properties # Below example can be used to regenerate the ticket after every 500 minutes. java.kinit.delay_between_regeneration=500 ``` ::: ## 401 dialog or page does not appear with Sahi Pro Sahi Pro automatically tries to authenticate the WINDOWS logged in user for the applications. In this case, the 401 authentication page is not shown. If Sahi Pro is unable to authenticate the user automatically, the 401 authentication page should appear. If it does not appear, the application will not get authenticated access. Thus, the application will not behave as expected. In such a case, where the application expects authentication but the authentication page does not appear, follow below steps. 1. Ensure that `apacheclient.enabled` property is set as true in the **userdata.properties** file. Also, verify if `java.ntlm.transparent_authentication.enabled` is set as true. After enabling these properties, restart Sahi Pro and try again. 2. If Sahi Pro's 401 page for authentication is displayed, enter credentials in this web page. 3. If Sahi Pro's 401 page for authentication is still not displayed, use function [\_setAuthentication](https://resources.sahipro.com/docs/sahi-script/functions/actions/#_setauthentication) to add credentials for authentication. Reload the application page. ## Unable to authenticate different users in separate browser windows simultaneously When you provide credentials for authentication on the 401 page, the user is authenticated in that browser session. Subsequently, Sahi Pro reuses the same credentials to automatically authenticate when other browser sessions are launched. This prevents you from using multiple user accounts at the same time. Follow the steps below to use different credentials, that is, credentials of a user other than the one currently logged in. 1. Ensure that following property is enabled in the **userdata.properties** file : ```properties apacheclient.enabled=true ``` 2. 1. For NTLM scheme, add the following property in the **userdata.properties** file: ```properties apacheclient.ntlm_authentication.enabled=true ``` 2. For Basic scheme, add the following property in the **userdata.properties** file: ```properties apacheclient.basic_authentication.enabled=true ``` 3. Restart Sahi Pro and try again. --- # Client Certificate Authentication This section describes how to handle client certificate authentication in Sahi. Some applications seek a client certificate from the user for authentication. User will be able to connect to such applications only when a valid certificate is provided. When user tries to open such an application, the web browser may prompt to select a certificate as shown in the image below. ![](https://resources.sahipro.com/docs/assets/images/using-sahi/client-cert-auth/client-certificate-dialog.webp) There are two ways to handle client certificate authentication in Sahi: 1. **Using \_setClientCertificate function** - - Add [\_setClientCertificate](https://resources.sahipro.com/docs/sahi-script/functions/actions/#_setclientcertificate) function to your script and specify the certificate details. ```js // Add the application domain to the current script session. _addToSession("https://protectedapplication.test.com"); // Specify details of the certificate to be used for authentication _setClientCertificate("c:/myownpath/testuser1.pfx","Mg0BChVBGh1XOB0K", "PKCS12"); // Navigate to the application that seeks a client certificate _navigateTo("https://protectedapplication.test.com"); ``` - This function supports different types of certificates. For example, PKCS12 (.p12, .pfx), JKS (.jks), JCEKS (.jceks, .jcs) etc. - Since this function sets a certificate in the current script session, different certificates can be used simultaneously in different browser instances. 2. **Using certificate present in the system** - - If the client certificate file is not available but the certificate is installed in the system, follow below steps. - Add the following property in the **userdata.properties** file. Restart Sahi. ```properties ssl.client.system_keystore.enabled=true ``` - If this does not work, add the following properties in the **userdata.properties** file. Restart Sahi. ```properties ssl.client.system_keystore.enabled=true ssl.client.system_keystore.name=WINDOWS-ROOT ``` :::note By default, the userdata property **ssl.client.system\_keystore.name** is set as **WINDOWS-MY** to use certificates available in the keystore for the current Windows user. When this property is set as **WINDOWS-ROOT**, all the certificates trusted by the current machine can be used. ::: --- # Parsing XML in Sahi Scripts Sahi uses Rhino as its javascript engine and Rhino has excellent support for handling XML. Below is a script which reads and asserts XML nodes and attributes. The example has been picked from [http://www.ibm.com/developerworks/webservices/library/ws-ajax1/](http://www.ibm.com/developerworks/webservices/library/ws-ajax1/) so that it is easy to experiment with the ibm examples in this script. ```js var xmlStr = '' + '' + ' ' + ' Ant' + ' Shaggy' + ' Blue' + ' 176' + ' ' + ' ' + ' Paul' + ' Spiky' + ' Grey' + ' 178' + ' ' + ''; xmlStr = xmlStr.replace(/<\?xml[^>]*\?>/, ""); // needed in some cases var $x = new XML(xmlStr); _assertEqual("Ant", $x.person[0].name.toString()); _assertEqual("Grey", $x.person[1].eyes.toString()); for each (var $p in $x.person){ var $measure = $p.height.@measure.toString(); _assert($measure == "metric"); _assert($p.height > 170); } ``` :::note 1. All nodes that you access are of type xml. You will need to use toString() on them before you assert them. 2. If your XML string starts with ``, it may throw an error To fix it, do the following ```js var xmlStr = xmlStr.replace(/<\?xml[^>]*\?>/, ""); var $x = new XML(xmlStr); ``` ::: ## Parsing XML containing namespaces ```js "idns::Id" var $xmlStr = '' + '' + ' 123' + ' ' + ' Welcome1 to MyApp' + ' Thank1 you for using MyApp' + ' ' + '' ; var $x = new XML($xmlStr); // Set the default namespace. All elements will be in this namespace default xml namespace = "http://sahi.co.in"; var $welcome0 = $x..Welcome[0].toString(); _assertEqual("Welcome1 to MyApp", $welcome0); // Specific namespace for id var idns = new Namespace("http://www.tytosoftware.com"); // Access element using namespace::localName var $id = $x.idns::Id.toString(); _assertEqual("123", $id); ``` For more details on e4x usage have a look at [https://developer.mozilla.org/en-US/docs/E4X/Processing_XML_with_E4X](https://developer.mozilla.org/en-US/docs/E4X/Processing_XML_with_E4X). There is a lot more that can be done with the XML object. Have a look at these links:\ [http://www.ibm.com/developerworks/webservices/library/ws-ajax1/](http://www.ibm.com/developerworks/webservices/library/ws-ajax1/)\ [http://www.xml.com/pub/a/2007/11/28/introducing-e4x.html](http://www.xml.com/pub/a/2007/11/28/introducing-e4x.html) --- # Calling Java Sahi scripts run on the Rhino javascript engine. This allows Sahi to call any Java code in the classpath of Sahi. ## Calling inbuilt Java classes Inbuilt Java classes can be directly called using their fully qualified name. Eg. ```js function printThroughJava(s){ java.lang.System.out.println("Through Java: " + s); } printThroughJava("Hi there"); // Should print "Through Java: Hi there" on the console. ``` ## Working with Java object directly in Sahi Script Since Javascript does not have variable types, variables are declared with just **var**. Below is an example of reading property files via Java and Sahi Script. In Java: ```java public Properties loadProperties(String path, boolean isXML) { Properties props = new Properties(); try { FileInputStream inStream = new FileInputStream(path); if (isXML) { props.loadFromXML(inStream); } else { props.load(inStream); } inStream.close(); } catch (Exception e) { // do nothing } return props; } // Usage Properties props = loadProperties("a.properties", false); System.out.println(props.getProperty("name")); ``` The same in Sahi Script: ```js function loadProperties($path, $isXML) { var $props = new java.util.Properties(); try { var $inStream = new java.io.FileInputStream($path); if ($isXML) { $props.loadFromXML($inStream); } else { $props.load($inStream); } $inStream.close(); } catch (e) { // do nothing } return $props; } // Usage var $props = loadProperties("a.properties", false); _alert($props.getProperty("name")); ``` ## Calling Java classes in Custom Packages Custom packages need to be prefixed with 'Packages' keyword. This is how \_readFile is implemented in Sahi: ```js // Part of lib.js Sahi.prototype._readFile = function (filePath) { return "" + Packages.net.sf.sahi.util.Utils.readFileAsString(filePath); }; ``` ## Accessing Your Own Custom Classes from Sahi ### Sample Custom Class Suppose you have built a custom class called LanguageUtils.java which has a function to read property files. ```java package com.example.utils; public class LanguageUtils { public static Properties loadProperties(String path, boolean isXML) { Properties props = new Properties(); try { FileInputStream inStream = new FileInputStream(path); if (isXML) { props.loadFromXML(inStream); } else { props.load(inStream); } inStream.close(); } catch (Exception e) { e.printStackTrace(); } return props; } } ``` Let us assume that this class has been compiled and added to languageutils.jar file. ## Add to Classpath Copy languageutils.jar to sahi/userdata/extlib/ folder (create extlib folder if not present). Restart Sahi. Have a look at [adding-jars-to-sahis-classpath](https://resources.sahipro.com/docs/sahi-script/adding-jars-to-sahis-classpath/) for more details. ## Call loadProperties Method from Sahi Script ```js var $LangUtils = Packages.com.example.utils.LanguageUtils; var $props = $LangUtils.loadProperties("a.properties", false); _alert($props.getProperty("name")); ``` Have a look at Rhino's documentation for a detailed discussion on [Scripting Java through Rhino](https://developer.mozilla.org/en-US/docs/Scripting_Java) Refer here for [troubleshooting](https://resources.sahipro.com/docs/troubleshooting/calling-custom-java-code/) --- # Adding Jars to Sahi's Classpath While interacting with databases or while calling custom java code from Sahi scripts, the necessary jars need to be added to Sahi's classpath. :::note From Sahi Pro V5.1.0.0 onwards, we need to only add the jars to `sahi_pro/userdata/extlib` directory. All jars in `sahi_pro/userdata/extlib` are automatically added to Sahi Pro's classpath. ::: ## From command-line If Sahi is started from the desktop shortcut or via commandline using start\_sahi.bat or start\_dashboard.bat, just copy the needed jars to `sahi_pro/userdata/extlib`. :::caution[Important] DO NOT use subfolders. Jars should be copied directly into `sahi_pro/userdata/extlib` folder. ::: ## From ant If you are using ant, jars need to be copied in `sahi_pro/userdata/extlib` and additionally, we need to add `sahi_pro/userdata/extlib` as a path element to the classpath: ```xml .. and other Sahi jars ... ``` :::caution[Important] DO NOT use subfolders. Jars should be copied directly into `sahi_pro/userdata/extlib` folder. ::: Make sure to change the pathelement locations properly. (Relative to where you are running the target from.) --- # Working with SSH from Sahi Consider this scenario 1. You create a loan from your banking web application 2. An xml is created and stored on your web server 3. The xml is then consumed by another third party service which you do not have control over (or you are not testing it right now) In your test case you need to verify if the xml was created properly. Normally you would have created an ssh session via shell or putty and checked the contents of the XML file. This section explains how you can accomplish this via Sahi. ## Prerequisites Download the following jars and copy them to sahi/userdata/extlib folder (create extlib if not already present) 1. enchanter-core-0.6.jar (Download from [http://code.google.com/p/enchanter/](http://code.google.com/p/enchanter/)) 1. ganymed-ssh2-build210.jar (Download [http://www.ganymed.ethz.ch/ssh2/ganymed-ssh2-build210.zip](http://www.ganymed.ethz.ch/ssh2/ganymed-ssh2-build210.zip), unzip it and copy only ganymed-ssh2-build210.jar) ## The Sahi Script ```js // Access enchanter var ssh = new Packages.org.twdata.enchanter.impl.DefaultStreamConnection(); // Connect to your server. change the host, port, username and password ssh.connect( "myserver.example.com", 7822, "username", "password"); // Wait for the prompt as seen when you connect via putty. // Here we have used "~$", it may be different for your server var $prompt = "~$"; ssh.waitFor($prompt); // Send the command to be executed ssh.sendLine("ls -al"); java.lang.System.out.println("Done sending"); // Collect the out put till it shows the prompt again var $i=0; var $outputAr = []; while (true) { var $line = ssh.getLine(); if ($line == null || $prompt == _sahi.trim($line) || $i++ > 100) break; $outputAr.push($line); } var $output = $outputAr.join("\r\n"); // disconnect from the ssh session ssh.disconnect(); // Use $output _alert($output); ``` ## NOTES We are just utilizing a java class here to make the ssh connection. Sahi itself does not do much here, except calling the correct APIs. If you run into any trouble, have a look at the documentation for [enchanter](http://code.google.com/p/enchanter/). To connect using a private key, use something like this: ```js ssh.connect( "myserver.example.com", 7822, "username", "password", "C:/mykey.pem"); ``` Note that you need to use a .pem key and not .ppk keys as used with putty. If there is no password, try with null or `""`. ```js ssh.connect( "myserver.example.com", 7822, "username", null, "C:/mykey.pem"); ``` or ```js ssh.connect( "myserver.example.com", 7822, "username", "", "C:/mykey.pem"); ``` --- # Working with Telnet from Sahi This section describes how to interact with Telnet server from Sahi. ## Prerequisites Download the following jar and copy it to sahi/userdata/extlib folder (create extlib folder if not already present). 1. commons-net-3.8.0.jar (Download from [Apache Commons Net](https://commons.apache.org/proper/commons-net/), unzip it and copy only commons-net-3.8.0.jar) ## The Sahi Script Refer the functions below. Functions `connect`, `receive`, and `send` are wrapper functions written to interact with the telnet server. Add these functions to your Sahi script. Also, refer the sample script below. ```js // Wrapper functions /* * Call this function for connecting to the telnet server. */ function connect($host, $port) { var $telnet = new org.apache.commons.net.telnet.TelnetClient(); // Access telnet client $telnet.connect($host, $port); if( ! $telnet.isConnected() ) { _log("Unable to connect to telnet server."); } return $telnet; } /* * Call this function to receive data from the telnet server. * In other words, whenever you expect the telnet server would send data, this function must be called. */ function receive($telnet) { try { var $sb = new java.lang.StringBuffer(); var $buffer = java.lang.reflect.Array.newInstance(java.lang.Byte.TYPE, 4096); var $length = 0; java.lang.Thread.sleep(800); // Alternatively, we can use _wait(800) while ( ($length = $telnet.getInputStream().read($buffer)) > 0 ) { $sb.append(new java.lang.String($buffer, 0, $length)); java.lang.Thread.sleep(800); // Alternatively use _wait(800) if ( $telnet.getInputStream().available() == 0 ) { break; } } return $sb.toString() ; } catch ($e) { _log("Error while receiving data from the telnet server."); _logExceptionAsFailure($e); // Logs the exception, and fails. } return ""; } /* * Call this function for sending data to the telnet server. */ function send($telnet, $data) { try { $telnet.getOutputStream().write(new java.lang.String($data).getBytes()); $telnet.getOutputStream().flush(); } catch ($e) { _log("Error while sending data to the telnet server."); _logExceptionAsFailure($e); // Logs the exception, and fails. } } // Below is a sample script that employs above wrapper functions to interact with the telnet server. var $telnet = connect("myserver.example.com", 8023); // Connect to the telnet server. receive($telnet); send($telnet, "0"); receive($telnet); send($telnet, "1"); receive($telnet); send($telnet, "username\r\n"); // Send User Name and enter key receive($telnet); send($telnet, "password\r\n"); // Send Password and enter key var $str = receive($telnet); _log($str); $telnet.disconnect(); ``` ## NOTES - These wrapper functions employ a java class 'org.apache.commons.net.telnet.TelnetClient' to communicate with the telnet server. Sahi itself does not do much here, except calling the correct APIs. If you run into any trouble, have a look at the documentation for [Apache Commons Net](https://commons.apache.org/proper/commons-net/). - Telnet protocol provides bidirectional communication. Whenever you expect the telnet server would send data, the function `receive` must be called. It will wait and collect all the data sent by the server. Function `send` must be called only at a time when the server is not sending any data. --- # Reading PDF Files in Sahi During automation we sometimes need to verify contents of static PDF files and editable PDF files. A good open source library for reading PDF content is [Apache PDFbox](http://pdfbox.apache.org/). Below sample codes uses Apache PDFbox version **3.0.xx**. ## Prerequisites - Download pdfbox-app-x.x.x.jar file from [http://pdfbox.apache.org/download.cgi](https://pdfbox.apache.org/download.cgi) - Copy it to `SahiPro/userdata/extlib` folder (create if required). :::note Note: The jar file has to be copied into `SahiPro/userdata/extlib` folder, not in `SahiPro/extlib` folder. ::: ## Reading static pdf file For reading static PDF files, extracting the data, and validating it, Sahi Pro utilizes Apache PDFBox. This tool streamlines the process of extracting text content from PDF files via the command line. To run the below code: - Copy the code below to `SahiPro/userdata/scripts/pdf_pdfboxapp.sah` file. - Copy [Gandhiji.pdf](https://resources.sahipro.com/docs/assets/images/using-sahi/pdfreader/gandhiji.pdf) and save it in `SahiPro/userdata/scripts` folder. **Code** We are using pdfbox-app-x.x.x.jar to convert pdf to text using below code.\ The `showPDFText` function reads pdf file and shows the text in the current web page, by replacing the html body.\ The `getPDFText` function reads pdf file and returns the contents of the pdf as a string. ```js /** Reads PDF file and shows the text in the current web page. Useful for adding assertions @param $pdf- PDF file path relative to the current script directory */ function showPDFText($pdf) { var $pdfboxAppJarPath = _userDataPath("extlib\\pdfbox-app-3.x.x.jar"); var $pdf = _resolvePath($pdf); var $txt = _resolvePath("PDFAstext.txt"); var $data = _execute("java -jar " + $pdfboxAppJarPath + " export:text -html -i=" + $pdf + " -o=" +$txt, true); var $text = _readFile($txt); _call(document.body.innerHTML = $text); } /** Reads PDF file and returns the contents as a string @param $pdf- PDF file path relative to the current script directory @returns string text contents of the PDF file */ function getPDFText($pdf,$txt) { var $pdfboxAppJarPath = _userDataPath("extlib\\pdfbox-app-3.x.x.jar"); var $pdf = _resolvePath($pdf); var $txt = _resolvePath("PDFAstext.txt"); var $data = _execute("java -jar " + $pdfboxAppJarPath + " export:text -i=" + $pdf + " -o=" +$txt, true); var $text = _readFile($txt); return $text; } var $pdf = "Gandhiji.pdf"; // Gandhiji.pdf needs to be present in the current script directory showPDFText($pdf); _assertContainsText("2 October 1869", _paragraph("/Born/")); _assertContainsText("30 January 1948", _paragraph("/Died/")); var $data = getPDFText($pdf); _assertTrue($data.includes("2 October 1869")); ``` ## Reading values of editable fields from pdf file To read editable PDF files, extract the data entered by users, validate the data entered into editable PDF files, Sahi Pro typically utilize libraries from Apache PDFbox that support the manipulation of editable PDFs. To run the below code: - Copy the code below to `SahiPro/userdata/scripts/read_pdf_fields.sah` file. - Copy [editablePDF.pdf](https://resources.sahipro.com/docs/assets/images/using-sahi/pdfreader/editablepdf.pdf) and save it in `SahiPro/userdata/scripts` folder. - Copy [pdf\_fields\_lib.sah](https://resources.sahipro.com/docs/assets/images/using-sahi/pdfreader/pdf_fields_lib.sah) and save it in `SahiPro/userdata/scripts` folder. **Code** The below code uses library functions like load(), printAll(), getValue(), isChecked(), which are defined in `pdf_fields_lib.sah` file. ```js _include("pdf_fields_lib.sah") var $pdf = new SahiFrameWork_PDFFields(); var $file = _resolvePath("editablePDF.pdf"); $pdf.load($file); $pdf.printAll(); _assertEqual("Sahi Pro", $pdf.getValue("Name")); _assertTrue($pdf.isChecked("Option 1")); ``` --- # Sending Emails Sahi can send emails at the end of a suite, or from anywhere inside a script. To email test run reports at the end of a suite run, refer to Run Tests via Editor. This section explains how to send out emails from within a script. There is a small program to send emails which is bundled with Sahi. It is just a thin wrapper over JavaMail. 1. **NOTE:** Java 1.8 or above is required. 2. Call the below function for sending emails, and make changes accordingly. ```js function sendEmail($emailSubject, $emailBody) { var $host = "smtp.gmail.com"; var $port = 587; var $username = "from@gmail.com"; var $password = "password"; var $isSSL = true; // set to true if you use SSL var $mailer = new Packages.net.sf.sahi.util.Mailer($host, $port, $username, $password, $isSSL); $mailer.setMailProperty("mail.smtp.starttls.enable", "true"); $mailer.setMailProperty("mail.smtp.auth", "true"); $mailer.setMailProperty("mail.smtp.ssl.protocols", "TLSv1.2") $mailer.setFrom("from@gmail.com"); $mailer.setTo("to@example.com"); $mailer.setSubject($emailSubject); $mailer.setBody($emailBody); $mailer.addAttachment("Attachment.zip", "d:/Attachment.zip"); $mailer.send(); } ``` Call the below function for sending emails with inline attachments after making appropriate changes. ```js function sendEmailWithInlineAttachment($emailSubject, $emailBody, $contentId1, $contentId2) { var $host = "smtp.gmail.com"; var $port = 587; var $username = "from@gmail.com"; var $password = "password"; var $isSSL = true; // set to true if you use SSL var $mailer = new Packages.net.sf.sahi.util.Mailer($host, $port, $username, $password, $isSSL); $mailer.setMailProperty("mail.smtp.starttls.enable", "true"); $mailer.setMailProperty("mail.smtp.auth", "true"); $mailer.setMailProperty("mail.smtp.ssl.protocols", "TLSv1.2") $mailer.setFrom("from@gmail.com"); $mailer.setTo("to@example.com"); $mailer.setSubject($emailSubject); $mailer.setBody($emailBody); $mailer.addAttachment("Attachment.zip", "d:/Attachment.zip"); $mailer.addAttachmentInline($contentId1, "d:/image1.png"); $mailer.addAttachmentInline($contentId2, "d:/image2.png"); $mailer.send(); } ``` Call following function to use `sahi/userdata/config/email.properties` file for sending email. :::note For details about email.properties, refer [Email.properties file explained](https://resources.sahipro.com/docs/using-sahi/email-during-playback/#emailproperties-file-explained). ::: ```js function sendEmailWithProps($emailSubject, $emailBody) { var $props = loadProperties(_userDataPath("config/email.properties"), false); var $mailer = new Packages.net.sf.sahi.util.Mailer($props); $mailer.addTo("additional@gmail.com"); //This will append to the already present receipent address from properties file $mailer.setBody($emailBody); $mailer.setSubject($emailSubject); $mailer.addAttachment("Attachment.zip", "d:/Attachment.zip"); $mailer.send(); } function loadProperties($path, $isXML) { var $props = new java.util.Properties(); try { var $inStream = new java.io.FileInputStream($path); if ($isXML) { $props.loadFromXML($inStream); } else { $props.load($inStream); } $inStream.close(); } catch (e) { // do nothing } return $props; } ``` :::note NOTE: Refer to the functions listed below for more details. ::: Refer to [Working with Java object directly in Sahi Script](https://resources.sahipro.com/docs/sahi-script/calling-java/#working-with-java-object-directly-in-sahi-script) to see an example of reading property files via Java and Sahi Script Refer to [Email.properties file explained](https://resources.sahipro.com/docs/using-sahi/email-during-playback/#emailproperties-file-explained) for detailed explanation about email.properties. 3. Call it directly as ```js sendEmail("Mail from Sahi", "All izz well"); or //contentId's must be unique var $contentId1 = "inlineImage1"; var $contentId2 = "inlineImage2"; var $inlineImg1 = ""; var $inlineImg2 = ""; sendEmail("Mail from Sahi", "All izz well"+$inlineImg1 + "2nd phrase" +$inlineImg2, $contentId1, $contentId2); or sendEmailWithProps("Mail from Sahi", "All izz well"); ``` 4. To trigger an email at the end of script, add an onScriptEnd function to your script: ```js function onScriptEnd(){ var $status = _scriptStatus(); // "FAILURE" or "SUCCESS" var $scriptName = _scriptName(); var $scriptPath = _scriptPath(); // Script name with full file path sendEmail($status + ": " + $scriptName, "Script: " + $scriptPath + "\nStatus: " + $status); } ``` The Mailer class mentioned above exposes the following public methods that can be used while sending email: | Method | Documentation | | --- | --- | | setTo($toList) | Sets recipient address to $toList. eg. $mailer.setTo("awesome@gmail.com"); or $mailer.setTo("pro@gmail.com, else@gmail.com"); | | addTo($toList) | Adds $toList to existing recipient To address list eg. $mailer.addTo("awesome@gmail.com"); or $mailer.addTo("pro@gmail.com, else@gmail.com"); | | setCC($ccList) | Sets CC to $ccList. eg. $mailer.setCC("awesome@gmail.com"); or $mailer.setCC("pro@gmail.com, else@gmail.com"); | | addCC($ccList) | Adds $ccList to existing list for CC eg. $mailer.addCC("awesome@gmail.com"); or $mailer.addCC("pro@gmail.com, else@gmail.com"); | | setBCC($bccList) | Sets BCC to $bccList. eg. $mailer.setBCC("awesome@gmail.com"); or $mailer.setBCC("pro@gmail.com, else@gmail.com"); | | addBCC($bccList) | Adds $bccList to existing list for BCC eg. $mailer.addBCC("awesome@gmail.com"); or $mailer.addBCC("pro@gmail.com, else@gmail.com"); | | setSubject($subject) | Sets the subject of email to $subject. | | addSubject($subject) | Sets the subject of email to $subject. This is now deprecated. Use setSubject instead. | | setBody($body) | Sets the body of email to $body | | addBody($body) | Sets the body of email to $body. This is now deprecated. Use setBody instead. | | addAttachment($name, $path); | Adds attachment with name as $name and path as $path. Can be called multiple times for multiple attachments. | | setMailProperty($property, $value); | Sets additional email properties. eg. $mailer.setMailProperty("mail.smtp.starttls.enable", "true"); | Refer to [Sahi call back functions](https://resources.sahipro.com/docs/sahi-script/functions/script-execution-control/#callback-functions) for more details on onScriptEnd --- # Working with Polymer [Google Polymer](https://www.polymer-project.org/) is a project which provides custom components for ready consumption by web developers. Polymer leverages newer HTML5 features like custom tags and shadowDOM where available. Due to the growing popularity of Polymer and as a proof of concept, Sahi Pro 6.1.0 ships with customizations to work with Polymer elements out of the box. ## Recommendations - Turn on `_setStrictVisibilityCheck` to true to make the script ignore elements that are created but hidden on the page - Some waits may be needed before `_paperFab` buttons ## Sample Script ```js _navigateTo("http://polymer-topeka.appspot.com/"); _setStrictVisibilityCheck(true); _click(_paperInput("first")); _setValue(_textbox("First Name"), "test"); _setValue(_textbox("Last Initial"), "secret"); _click(_coreIcon("avatar-12")); _wait(1000); _click(_paperFab("check")); _click(_coreIcon("play-arrow")); _wait(1000); _click(_paperFab("av:play-arrow")); _click(_paperButton("Ricotta")); _wait(1000); _click(_paperFab("check")); _click(_paperButton("False")); _wait(1000); _click(_paperFab("check")); _click(_paperCheckbox("Honey")); _click(_paperCheckbox("Water")); _click(_paperCheckbox("Brown Sugar")); _wait(1000); _click(_paperFab("check")); _click(_paperButton("Corn")); _click(_paperButton("Wheat")); _wait(1000); _click(_paperFab("check")); _assertEqual("8", _getText(_div("pts"))); _wait(2000); _click(_paperIconButton("arrow-back")); _assertEqual("test s", _getText(_div("user-name"))); _click(_coreIcon("arrow-forward[1]")); _wait(1000); _click(_paperButton("Sign Out")); ``` --- # Tweaking Sahi Functions ## Accessor metadata explained Sahi's Accessors are defined via json files. Sahi uses `userdata/config/accessor_metadata/metadata.properties` file to determine which jsons to use. For example, to determine what accessors to use for html components, you will see: ```properties html=custom_html.json,polymer.json,html.json ``` Here, custom\_html.json is in `userdata/config/accessor_metadata` and the others are in `config/accessor_metadata` Default json files are in `config/accessor_metadata` Custom json files can be added in `userdata/config/accessor_metadata`. If the file names are same in both folders, the userdata one is used. When an accessor is defined in multiple json files, the first definition is used. If you want to override any existing html accessor, redefine them in custom\_html.json and use ```properties html=custom_html.json,polymer.json,html.json ``` ### accessor\_metadata JSON explained The json files contain an array of objects. A typical entry may look like ```json {"tag": "A", "type": null, "event":"click", "name": "_link", "attributes": ["sahiText", "title|alt", "id", "index", "href", "className"], "action": "_click", "value": "sahiText"} ``` This defines an `_link` function which helps identify an "A" html tag by one of the "attributes". During recording, the "event" (click) will be recorded by default. If it was a form input element, the "type" and "value" attributes will also be specified. ```json {"tag": "INPUT", "type": "text", "event":"change", "name": "_textbox", "attributes": ["aria-label", "name", "id", "_sahi.getAssociatedLabel", "index", "className"], "action": "_setValue", "value": "value"} ``` Note also that the action has been specified as "\_setValue", so \_setValue will be recorded. ## Adding a custom element To add a custom element, add relevent properties to one of the json files. Example: To identify a polymer `CORE-ICON-BUTTON`, add ```json {"tag": "CORE-ICON-BUTTON", "type": null, "event":"click", "name": "_coreIconButton", "attributes": ["aria-label", "sahiText", "id", "className", "index"], "action": "_click", "value": "sahiText"}, ``` You can add it in custom\_html.json file. (Note: this element is already defined in polymer.json.) ## Identifying elements by an attribute not available with Sahi It is possible that Sahi does not use your desired element attribute while identifying elements. For example one of our users wished to use the "title" attribute of a button ```xml ``` To add title as one of the attributes, do the following: 1. Open `sahi/config/accessors_metadata/html.json` 2. Search for ```js {tag: "INPUT", type: "button", event:"click", name: "_button", attributes: ["value", "name", "id", "index", "className"], action: "_click", value: "value"}; ``` 3. Copy this into `userdata/config/accessors_metadata/custom_html.json` Add "title" to the list of attributes so that ```js attributes: ["value", "name", "id", "index", "className"] ``` becomes ```js attributes: ["value", "name", "id", "index", "title", "className"] ``` The full line looks like this after the change: ```js {tag: "INPUT", type: "button", event:"click", name: "_button", attributes: ["value", "name", "id", "index", "title", "className"], action: "_click", value: "value"}; ``` 4. Save the file, restart Sahi and clear browser cache. From now on Sahi will identify buttons by their title also. NOTES: 1. Any attribute of the HTML element can be used for identification. So if you are using a framework which introduces something like widgetID="myId", you can add "widgetID" in the above attributes list. 2. The order of the attributes is significant. So if you wish to move "title" to be the default attribute, make it ```js attributes: ["title", "value", "name", "id", "index", "className"] ``` 3. When an attribute is added, regular expression matching, adding of index for duplicates etc. are handled automatically by Sahi. :::note NOTE: title is now added by default to Sahi ::: --- # Function Reference All the functions built into Sahi Script, which used to be called Sahi APIs. Use them to find elements, act on them, check results, and work with files, data and logs. Sahi's built-in functions are what a Sahi script calls to test an application. They used to be called **Sahi APIs**. Each function lists the Sahi Pro versions it is available in, the modes it supports, its arguments and its return value. Sahi's functions can broadly be classified into three categories. ## Accessor functions Accessor functions find elements in the application, for example `_link("Login")` or `_textbox("user")`. For the browser, Sahi injects these functions into the page via the proxy. Start with [Accessor Basics](https://resources.sahipro.com/docs/sahi-script/functions/accessor-basics/). ## Action functions Action functions act on elements and check them, such as clicking, typing keys and asserting the state of elements. See [Action Functions](https://resources.sahipro.com/docs/sahi-script/functions/actions/) and [Assertion Functions](https://resources.sahipro.com/docs/sahi-script/functions/assertions/). ## Other functions Other functions handle exceptions, files, Excel sheets, databases, logging, screenshots and more. --- # Accessor Basics ## Overview Browser Accessor functions help access elements on the browser. They need to be executed on the browser and not in the proxy. They should be used as parameters to Browser Action functions. All accessor functions take an _identifier_ and an optional _domRelation_. - Identifiers can either be a numerical index or a property as specified in each case. - Identifiers which are not numerical, can either be a string or a javascript regular expression. - Identifiers which are strings can also have an index along with them in square brackets as part of the string. ## Identifying unique element For example, ```xml Link to Sahi website ``` can be represented in the following ways: | Accessor | Description | | --- | --- | | `_link(12)` | Using index in the page; assuming it is the 13th link on the page. | | `_link("sahi_link")` | Using id as string | | `_link(/.*_link/)` | Using id as regular expression | | `_link("Link to Sahi website")` | Using visible text as string | | `_link(/Link to .* website/)` | Using visible text as regular expression | | `_link("/Link to .* website/")` | Using visible text as regular expression | | `_link({id:"sahi_link"})` | Using an associative array with id | | `_link({sahiText:"/Link to .*/"})` | Using an associative array with visible text as regular expression | | `_link({className:"low",sahiText:"/Link.*/"})` | Using an associative array with multiple attributes like className and sahiText | ## Identifying element among similar elements For example, ```xml
User One delete
User Two delete
``` There are two delete links in this table and there may be more. | Accessor | Description | | --- | --- | | `_link("delete")` | points to the first delete link. This is the same as `_link("delete[0]")` | | `_link("delete[1]")` | points to the second delete link; Note that indexing starts at 0 | | `_link("/del/[1]")` | points to the second delete link; Note that indexing starts at 0 | :::danger[Caution] Using indexes works fine as long as the page is static, but it is not recommended for dynamic applications, as it makes scripts fail when changes are made to the web pages. ::: ## Use of DOM Relation Functions When elements are not uniquely identifiable by themselves, we should try to identify them in relation to either some element near them or by the element in which they are contained. `_near` is a DOM relation marker which specifies that the element should be searched **near** another element. `_in` is a DOM relation marker which specifies that the element should be searched **within** another element. For example, in the above case, the second delete link is near User Two. | Accessor | Description | | --- | --- | | `_link(0, _near(_cell("User Two")))` | points to the 0th link near cell with text "User Two".
Note that the index is 0 here since it is the nearest link. | | `_link("delete", _near(_cell("User Two")))` | points to the nearest link with text "delete" near cell with text "User Two".
Note that we do not need to specify "delete\[1\]" since it is the delete.
link
nearest to User Two. | | `_link(/del/, _near(_cell("User Two")))` | points to the nearest link with text which matches
regular expression /del/ near cell with text "User Two". | | `_link("delete[2]", _near(_cell("User Two")))` | points to the 3rd nearest link with text "delete" near cell with text "User Two". | | `_link("/del/[2]", _near(_cell("User Two")))` | points to the 3rd nearest link with text matching /del/ near cell with text "User Two".
Note how the regular expression is appended with the index in square brackets
and quoted to make it a string | A similar DOM relation is \_in | Accessor | Description | | --- | --- | | `_link(0, _in(_cell("del2")))` | points to the 0th link in cell with id "del2" | | `_link("delete", _in(_cell("del2")))` | points to the link with text "delete" within cell with id "del2" | ## Use of Positional Relation Functions Position relations like under, rightOf, leftOf etc. relate one element to another via their position. One important frequent requirement in web applications is the assertion of elements in a column of a grid. For example ```xml
Name Delete Status
User One delete Active
User Two delete Inactive
``` | Name | Delete | Status | | --- | --- | --- | | User One | delete | Active | | User Two | delete | Inactive | In the above table: | Accessor | Description | | --- | --- | | `_cell(0, _near(_cell("User One")), _under(_cell("Status")))` | Finds first cell near `User One` and under `Status` | | `_cell(0, _rightOf(_cell("User One")), _under(_cell("Status")))` | Finds first cell to the right of `User One` and under `Status` | | `_cell("Inactive", _under(_cell("Status")))` | Finds first `Inactive` cell under `Status` | ## \_near vs \_rightOf or\_leftOf Using \_near where the element to be found may or may not exist can give you unexpected results. For example, in the table below | Name | Delete | Status | | --- | --- | --- | | User One | delete | Active | | User Two | ? | Inactive | Let us say we are looking to check if a delete link exists against all users. `_assertExists(_link("delete", _near(_cell("User Two"))))` may be expected to fail, but it passes.\ `_link("delete", _near(_cell("User Two")))` actually points to the above highlighted link. This is because, \_near is a DOM relation function and finds an element within 7 ancestors (parent nodes) of the given anchor. In our case this link was found within 2 ancestors of the cell in the next row. The correct way of asserting this would be `_assertExists(_link("delete", _rightOf(_cell("User Two"))))`. \_rightOf forces location only along the same line ## Forcing Sahi Pro to ignore case when identifying elements ### _setAccessorIgnoreCase Since: Sahi Pro 5.1.0, Desktop Engine 7.5.0, Mobile Engine 7.5.0 Modes: Browser, Windows, Java, Android, iOS ```js _setAccessorIgnoreCase($isIgnore) ``` | Argument | Type | Description | | --- | --- | --- | | `$isIgnore` | boolean | true or false | Returns: `null` If `_setAccessorIgnoreCase` is used with `isIgnore` parameter as true, on further steps, case differences will be ignored in identifiers of Accessors. For example, given a link with text "Home", `_link("Home")` will identify the element, but not `_link("HOME")` or `_link("home")`. If `_setAccessorIgnoreCase` is added with `isIgnore` parameter as true, then the same element can be identified using `_link("Home")`, `_link("HOME")` or `_link("home")` ```js "FAILURE" "_setAccessorIgnoreCase(true);" "SUCCESS" "_setAccessorIgnoreCase(false);" _assertExists(_link("Home")); // SUCCESS _assertExists(_link("HOME")); // FAILURE _assertExists(_link("/home/")); // FAILURE _setAccessorIgnoreCase(true); _assertExists(_link("Home")); // SUCCESS _assertExists(_link("HOME")); // SUCCESS _assertExists(_link("/home/")); // SUCCESS _setAccessorIgnoreCase(false); _assertExists(_link("Home")); // SUCCESS _assertExists(_link("HOME")); // FAILURE _assertExists(_link("/home/")); // FAILURE ``` :::note The default value of \_setAccessorIgnoreCase is **false**. It can be forced to be true by default by adding ```properties sahi.accessor.ignore_case=true ``` to `sahi/userdata/config/userdata.properties` ::: --- # Browser Accessor Functions ## Form Input Elements ### _password Since: Sahi Pro 3.5 **API:** _password(identifier [, relation1 [, relation2 ...]]) **Tag:** Tag: INPUT of type: password **HTML:** ```html ``` **Identifiers:** name, id, sahiLabel, css class, data-testid, index Valid Accessors and alternatives: (Assume this is the 6th password in the UI and 2nd password with class "shaded bigfont") ```js //name _password("password_name") //id _password("password_id") //index _password(5) //css class with index _password("shaded bigfont[1]") //css class with regular expression and index _password("/bigfont/[1]") //multiple attributes as JSON _password({className: "shaded bigfont", sahiIndex: 1}) //multiple attributes as JSON including regular expression _password({className: "/shaded .*font/", sahiIndex: 1}) // Use sahiIndex for index, className for class and sahiText for visible text attributes. ``` **Relations:** Relational functions _in, _near, _leftOf, _rightOf, _under, _above can be used. ```js // with _in _password("password_name", _in(_div("Container"))) // index with 2 relational APIs, _rightOf and _under _password(0, _rightOf(_span("Name")), _under(_cell("Action"))) // with regular expression and relations _password("/bigfont/", _rightOf(_span("Name")), _under(_cell("Action"))) ``` **Value:** value (this is the default attribute used in assertions etc.) **Actions:** Default event recorded is _setValue Example usage: ```js _setValue(_password("password_name"), "apple"); _setValue(_password("/bigfont/[1]", _rightOf(_span("Name"))), "apple"); ``` **Assertions:** Example assertions: ```js // Check if element exists _assertExists(_password("password_id")); // Check if element is visible _assert(_isVisible(_password("password_id"))); _assertEqual("apple", _getValue(_password("password_id"))); ``` ### _radioGroup Since: Sahi Pro 11.0.0 **API:** _radioGroup(identifier [, relation1 [, relation2 ...]]) **Tag:** Tag: INPUT of type: radio **HTML:** ```html ``` **Identifiers:** id, name, value, sahiLabel, css class, data-testid, index Valid Accessors and alternatives: (Assume this is the 6th radioGroup in the UI and 2nd radioGroup with class "shaded bigfont") ```js //id _radioGroup("radioGroup_id") //name _radioGroup("radioGroup_name") //value _radioGroup("apple") //index _radioGroup(5) //css class with index _radioGroup("shaded bigfont[1]") //css class with regular expression and index _radioGroup("/bigfont/[1]") //multiple attributes as JSON _radioGroup({className: "shaded bigfont", sahiIndex: 1}) //multiple attributes as JSON including regular expression _radioGroup({className: "/shaded .*font/", sahiIndex: 1}) // Use sahiIndex for index, className for class and sahiText for visible text attributes. ``` **Relations:** Relational functions _in, _near, _leftOf, _rightOf, _under, _above can be used. ```js // with _in _radioGroup("radioGroup_id", _in(_div("Container"))) // index with 2 relational APIs, _rightOf and _under _radioGroup(0, _rightOf(_span("Name")), _under(_cell("Action"))) // with regular expression and relations _radioGroup("/bigfont/", _rightOf(_span("Name")), _under(_cell("Action"))) ``` **Value:** _sahi.getSelectValueFn (this is the default attribute used in assertions etc.) **Actions:** Default event recorded is _setSelected Example usage: ```js _setSelected(_radioGroup("radioGroup_id"), null); _setSelected(_radioGroup("/bigfont/[1]", _rightOf(_span("Name"))), null); ``` **Assertions:** Example assertions: ```js // Check if element exists _assertExists(_radioGroup("radioGroup_id")); // Check if element is visible _assert(_isVisible(_radioGroup("radioGroup_id"))); ``` ### _textbox Since: Sahi Pro 3.5 **API:** _textbox(identifier [, relation1 [, relation2 ...]]) **Tag:** Tag: INPUT of type: text **HTML:** ```html ``` **Identifiers:** aria-label, name, id, sahiLabel, css class, data-testid, index Valid Accessors and alternatives: (Assume this is the 6th textbox in the UI and 2nd textbox with class "shaded bigfont") ```js //aria-label _textbox("descriptive label") //name _textbox("textbox_name") //id _textbox("textbox_id") //index _textbox(5) //css class with index _textbox("shaded bigfont[1]") //css class with regular expression and index _textbox("/bigfont/[1]") //multiple attributes as JSON _textbox({className: "shaded bigfont", sahiIndex: 1}) //multiple attributes as JSON including regular expression _textbox({className: "/shaded .*font/", sahiIndex: 1}) // Use sahiIndex for index, className for class and sahiText for visible text attributes. ``` **Relations:** Relational functions _in, _near, _leftOf, _rightOf, _under, _above can be used. ```js // with _in _textbox("descriptive label", _in(_div("Container"))) // index with 2 relational APIs, _rightOf and _under _textbox(0, _rightOf(_span("Name")), _under(_cell("Action"))) // with regular expression and relations _textbox("/bigfont/", _rightOf(_span("Name")), _under(_cell("Action"))) ``` **Value:** value (this is the default attribute used in assertions etc.) **Actions:** Default event recorded is _setValue Example usage: ```js _setValue(_textbox("descriptive label"), "apple"); _setValue(_textbox("/bigfont/[1]", _rightOf(_span("Name"))), "apple"); ``` **Assertions:** Example assertions: ```js // Check if element exists _assertExists(_textbox("textbox_id")); // Check if element is visible _assert(_isVisible(_textbox("textbox_id"))); _assertEqual("apple", _getValue(_textbox("textbox_id"))); ``` ### _hidden Since: Sahi Pro 3.5 **API:** _hidden(identifier [, relation1 [, relation2 ...]]) **Tag:** Tag: INPUT of type: hidden **HTML:** ```html ``` **Identifiers:** name, id, css class, sahiLabel, data-testid, index Valid Accessors and alternatives: (Assume this is the 6th hidden in the UI and 2nd hidden with class "shaded bigfont") ```js //name _hidden("hidden_name") //id _hidden("hidden_id") //index _hidden(5) //css class with index _hidden("shaded bigfont[1]") //css class with regular expression and index _hidden("/bigfont/[1]") //multiple attributes as JSON _hidden({className: "shaded bigfont", sahiIndex: 1}) //multiple attributes as JSON including regular expression _hidden({className: "/shaded .*font/", sahiIndex: 1}) // Use sahiIndex for index, className for class and sahiText for visible text attributes. ``` **Relations:** Relational functions _in, _near, _leftOf, _rightOf, _under, _above can be used. ```js // with _in _hidden("hidden_name", _in(_div("Container"))) // index with 2 relational APIs, _rightOf and _under _hidden(0, _rightOf(_span("Name")), _under(_cell("Action"))) // with regular expression and relations _hidden("/bigfont/", _rightOf(_span("Name")), _under(_cell("Action"))) ``` **Value:** value (this is the default attribute used in assertions etc.) **Actions:** Default event recorded is _setValue Example usage: ```js _setValue(_hidden("hidden_name"), "apple"); _setValue(_hidden("/bigfont/[1]", _rightOf(_span("Name"))), "apple"); ``` **Assertions:** Example assertions: ```js // Check if element exists _assertExists(_hidden("hidden_id")); // Check if element is visible _assert(_isVisible(_hidden("hidden_id"))); _assertEqual("apple", _getValue(_hidden("hidden_id"))); ``` ### _datebox Since: Sahi Pro 3.5 **API:** _datebox(identifier [, relation1 [, relation2 ...]]) **Tag:** Tag: INPUT of type: date **HTML:** ```html ``` **Identifiers:** name, id, sahiLabel, index, css class, data-testid Valid Accessors and alternatives: (Assume this is the 6th datebox in the UI and 2nd datebox with class "shaded bigfont") ```js //name _datebox("datebox_name") //id _datebox("datebox_id") //index _datebox(5) //css class with index _datebox("shaded bigfont[1]") //css class with regular expression and index _datebox("/bigfont/[1]") //multiple attributes as JSON _datebox({className: "shaded bigfont", sahiIndex: 1}) //multiple attributes as JSON including regular expression _datebox({className: "/shaded .*font/", sahiIndex: 1}) // Use sahiIndex for index, className for class and sahiText for visible text attributes. ``` **Relations:** Relational functions _in, _near, _leftOf, _rightOf, _under, _above can be used. ```js // with _in _datebox("datebox_name", _in(_div("Container"))) // index with 2 relational APIs, _rightOf and _under _datebox(0, _rightOf(_span("Name")), _under(_cell("Action"))) // with regular expression and relations _datebox("/bigfont/", _rightOf(_span("Name")), _under(_cell("Action"))) ``` **Value:** value (this is the default attribute used in assertions etc.) **Actions:** Default event recorded is _setValue Example usage: ```js _setValue(_datebox("datebox_name"), "2012-12-18"); _setValue(_datebox("/bigfont/[1]", _rightOf(_span("Name"))), "2012-12-18"); ``` **Assertions:** Example assertions: ```js // Check if element exists _assertExists(_datebox("datebox_id")); // Check if element is visible _assert(_isVisible(_datebox("datebox_id"))); _assertEqual("2012-12-18", _getValue(_datebox("datebox_id"))); ``` ### _datetimebox Since: Sahi Pro 3.5 **API:** _datetimebox(identifier [, relation1 [, relation2 ...]]) **Tag:** Tag: INPUT of type: datetime **HTML:** ```html ``` **Identifiers:** name, id, sahiLabel, index, css class, data-testid Valid Accessors and alternatives: (Assume this is the 6th datetimebox in the UI and 2nd datetimebox with class "shaded bigfont") ```js //name _datetimebox("datetimebox_name") //id _datetimebox("datetimebox_id") //index _datetimebox(5) //css class with index _datetimebox("shaded bigfont[1]") //css class with regular expression and index _datetimebox("/bigfont/[1]") //multiple attributes as JSON _datetimebox({className: "shaded bigfont", sahiIndex: 1}) //multiple attributes as JSON including regular expression _datetimebox({className: "/shaded .*font/", sahiIndex: 1}) // Use sahiIndex for index, className for class and sahiText for visible text attributes. ``` **Relations:** Relational functions _in, _near, _leftOf, _rightOf, _under, _above can be used. ```js // with _in _datetimebox("datetimebox_name", _in(_div("Container"))) // index with 2 relational APIs, _rightOf and _under _datetimebox(0, _rightOf(_span("Name")), _under(_cell("Action"))) // with regular expression and relations _datetimebox("/bigfont/", _rightOf(_span("Name")), _under(_cell("Action"))) ``` **Value:** value (this is the default attribute used in assertions etc.) **Actions:** Default event recorded is _setValue Example usage: ```js _setValue(_datetimebox("datetimebox_name"), "9/6/2011 14:06:48"); _setValue(_datetimebox("/bigfont/[1]", _rightOf(_span("Name"))), "9/6/2011 14:06:48"); ``` **Assertions:** Example assertions: ```js // Check if element exists _assertExists(_datetimebox("datetimebox_id")); // Check if element is visible _assert(_isVisible(_datetimebox("datetimebox_id"))); _assertEqual("9/6/2011 14:06:48", _getValue(_datetimebox("datetimebox_id"))); ``` ### _datetimelocalbox Since: Sahi Pro 3.5 **API:** _datetimelocalbox(identifier [, relation1 [, relation2 ...]]) **Tag:** Tag: INPUT of type: datetime-local **HTML:** ```html ``` **Identifiers:** name, id, sahiLabel, index, css class, data-testid Valid Accessors and alternatives: (Assume this is the 6th datetimelocalbox in the UI and 2nd datetimelocalbox with class "shaded bigfont") ```js //name _datetimelocalbox("datetimelocalbox_name") //id _datetimelocalbox("datetimelocalbox_id") //index _datetimelocalbox(5) //css class with index _datetimelocalbox("shaded bigfont[1]") //css class with regular expression and index _datetimelocalbox("/bigfont/[1]") //multiple attributes as JSON _datetimelocalbox({className: "shaded bigfont", sahiIndex: 1}) //multiple attributes as JSON including regular expression _datetimelocalbox({className: "/shaded .*font/", sahiIndex: 1}) // Use sahiIndex for index, className for class and sahiText for visible text attributes. ``` **Relations:** Relational functions _in, _near, _leftOf, _rightOf, _under, _above can be used. ```js // with _in _datetimelocalbox("datetimelocalbox_name", _in(_div("Container"))) // index with 2 relational APIs, _rightOf and _under _datetimelocalbox(0, _rightOf(_span("Name")), _under(_cell("Action"))) // with regular expression and relations _datetimelocalbox("/bigfont/", _rightOf(_span("Name")), _under(_cell("Action"))) ``` **Value:** value (this is the default attribute used in assertions etc.) **Actions:** Default event recorded is _setValue Example usage: ```js _setValue(_datetimelocalbox("datetimelocalbox_name"), "1985-04-12T23:20:50.52"); _setValue(_datetimelocalbox("/bigfont/[1]", _rightOf(_span("Name"))), "1985-04-12T23:20:50.52"); ``` **Assertions:** Example assertions: ```js // Check if element exists _assertExists(_datetimelocalbox("datetimelocalbox_id")); // Check if element is visible _assert(_isVisible(_datetimelocalbox("datetimelocalbox_id"))); _assertEqual("1985-04-12T23:20:50.52", _getValue(_datetimelocalbox("datetimelocalbox_id"))); ``` ### _emailbox Since: Sahi Pro 3.5 **API:** _emailbox(identifier [, relation1 [, relation2 ...]]) **Tag:** Tag: INPUT of type: email **HTML:** ```html ``` **Identifiers:** name, id, sahiLabel, index, css class, data-testid Valid Accessors and alternatives: (Assume this is the 6th emailbox in the UI and 2nd emailbox with class "shaded bigfont") ```js //name _emailbox("emailbox_name") //id _emailbox("emailbox_id") //index _emailbox(5) //css class with index _emailbox("shaded bigfont[1]") //css class with regular expression and index _emailbox("/bigfont/[1]") //multiple attributes as JSON _emailbox({className: "shaded bigfont", sahiIndex: 1}) //multiple attributes as JSON including regular expression _emailbox({className: "/shaded .*font/", sahiIndex: 1}) // Use sahiIndex for index, className for class and sahiText for visible text attributes. ``` **Relations:** Relational functions _in, _near, _leftOf, _rightOf, _under, _above can be used. ```js // with _in _emailbox("emailbox_name", _in(_div("Container"))) // index with 2 relational APIs, _rightOf and _under _emailbox(0, _rightOf(_span("Name")), _under(_cell("Action"))) // with regular expression and relations _emailbox("/bigfont/", _rightOf(_span("Name")), _under(_cell("Action"))) ``` **Value:** value (this is the default attribute used in assertions etc.) **Actions:** Default event recorded is _setValue Example usage: ```js _setValue(_emailbox("emailbox_name"), "my_email@sahipro.com"); _setValue(_emailbox("/bigfont/[1]", _rightOf(_span("Name"))), "my_email@sahipro.com"); ``` **Assertions:** Example assertions: ```js // Check if element exists _assertExists(_emailbox("emailbox_id")); // Check if element is visible _assert(_isVisible(_emailbox("emailbox_id"))); _assertEqual("my_email@sahipro.com", _getValue(_emailbox("emailbox_id"))); ``` ### _monthbox Since: Sahi Pro 3.5 **API:** _monthbox(identifier [, relation1 [, relation2 ...]]) **Tag:** Tag: INPUT of type: month **HTML:** ```html ``` **Identifiers:** name, id, sahiLabel, index, css class, data-testid Valid Accessors and alternatives: (Assume this is the 6th monthbox in the UI and 2nd monthbox with class "shaded bigfont") ```js //name _monthbox("monthbox_name") //id _monthbox("monthbox_id") //index _monthbox(5) //css class with index _monthbox("shaded bigfont[1]") //css class with regular expression and index _monthbox("/bigfont/[1]") //multiple attributes as JSON _monthbox({className: "shaded bigfont", sahiIndex: 1}) //multiple attributes as JSON including regular expression _monthbox({className: "/shaded .*font/", sahiIndex: 1}) // Use sahiIndex for index, className for class and sahiText for visible text attributes. ``` **Relations:** Relational functions _in, _near, _leftOf, _rightOf, _under, _above can be used. ```js // with _in _monthbox("monthbox_name", _in(_div("Container"))) // index with 2 relational APIs, _rightOf and _under _monthbox(0, _rightOf(_span("Name")), _under(_cell("Action"))) // with regular expression and relations _monthbox("/bigfont/", _rightOf(_span("Name")), _under(_cell("Action"))) ``` **Value:** value (this is the default attribute used in assertions etc.) **Actions:** Default event recorded is _setValue Example usage: ```js _setValue(_monthbox("monthbox_name"), "1996-12"); _setValue(_monthbox("/bigfont/[1]", _rightOf(_span("Name"))), "1996-12"); ``` **Assertions:** Example assertions: ```js // Check if element exists _assertExists(_monthbox("monthbox_id")); // Check if element is visible _assert(_isVisible(_monthbox("monthbox_id"))); _assertEqual("1996-12", _getValue(_monthbox("monthbox_id"))); ``` ### _numberbox Since: Sahi Pro 3.5 **API:** _numberbox(identifier [, relation1 [, relation2 ...]]) **Tag:** Tag: INPUT of type: number **HTML:** ```html ``` **Identifiers:** name, id, sahiLabel, index, css class, data-testid Valid Accessors and alternatives: (Assume this is the 6th numberbox in the UI and 2nd numberbox with class "shaded bigfont") ```js //name _numberbox("numberbox_name") //id _numberbox("numberbox_id") //index _numberbox(5) //css class with index _numberbox("shaded bigfont[1]") //css class with regular expression and index _numberbox("/bigfont/[1]") //multiple attributes as JSON _numberbox({className: "shaded bigfont", sahiIndex: 1}) //multiple attributes as JSON including regular expression _numberbox({className: "/shaded .*font/", sahiIndex: 1}) // Use sahiIndex for index, className for class and sahiText for visible text attributes. ``` **Relations:** Relational functions _in, _near, _leftOf, _rightOf, _under, _above can be used. ```js // with _in _numberbox("numberbox_name", _in(_div("Container"))) // index with 2 relational APIs, _rightOf and _under _numberbox(0, _rightOf(_span("Name")), _under(_cell("Action"))) // with regular expression and relations _numberbox("/bigfont/", _rightOf(_span("Name")), _under(_cell("Action"))) ``` **Value:** value (this is the default attribute used in assertions etc.) **Actions:** Default event recorded is _setValue Example usage: ```js _setValue(_numberbox("numberbox_name"), "13579"); _setValue(_numberbox("/bigfont/[1]", _rightOf(_span("Name"))), "13579"); ``` **Assertions:** Example assertions: ```js // Check if element exists _assertExists(_numberbox("numberbox_id")); // Check if element is visible _assert(_isVisible(_numberbox("numberbox_id"))); _assertEqual("13579", _getValue(_numberbox("numberbox_id"))); ``` ### _rangebox Since: Sahi Pro 3.5 **API:** _rangebox(identifier [, relation1 [, relation2 ...]]) **Tag:** Tag: INPUT of type: range **HTML:** ```html ``` **Identifiers:** name, id, sahiLabel, index, css class, data-testid Valid Accessors and alternatives: (Assume this is the 6th rangebox in the UI and 2nd rangebox with class "shaded bigfont") ```js //name _rangebox("rangebox_name") //id _rangebox("rangebox_id") //index _rangebox(5) //css class with index _rangebox("shaded bigfont[1]") //css class with regular expression and index _rangebox("/bigfont/[1]") //multiple attributes as JSON _rangebox({className: "shaded bigfont", sahiIndex: 1}) //multiple attributes as JSON including regular expression _rangebox({className: "/shaded .*font/", sahiIndex: 1}) // Use sahiIndex for index, className for class and sahiText for visible text attributes. ``` **Relations:** Relational functions _in, _near, _leftOf, _rightOf, _under, _above can be used. ```js // with _in _rangebox("rangebox_name", _in(_div("Container"))) // index with 2 relational APIs, _rightOf and _under _rangebox(0, _rightOf(_span("Name")), _under(_cell("Action"))) // with regular expression and relations _rangebox("/bigfont/", _rightOf(_span("Name")), _under(_cell("Action"))) ``` **Value:** value (this is the default attribute used in assertions etc.) **Actions:** Default event recorded is _setValue Example usage: ```js _setValue(_rangebox("rangebox_name"), "5"); _setValue(_rangebox("/bigfont/[1]", _rightOf(_span("Name"))), "5"); ``` **Assertions:** Example assertions: ```js // Check if element exists _assertExists(_rangebox("rangebox_id")); // Check if element is visible _assert(_isVisible(_rangebox("rangebox_id"))); _assertEqual("5", _getValue(_rangebox("rangebox_id"))); ``` ### _searchbox Since: Sahi Pro 3.5.2 **API:** _searchbox(identifier [, relation1 [, relation2 ...]]) **Tag:** Tag: INPUT of type: search **HTML:** ```html ``` **Identifiers:** name, id, sahiLabel, index, css class, data-testid Valid Accessors and alternatives: (Assume this is the 6th searchbox in the UI and 2nd searchbox with class "shaded bigfont") ```js //name _searchbox("searchbox_name") //id _searchbox("searchbox_id") //index _searchbox(5) //css class with index _searchbox("shaded bigfont[1]") //css class with regular expression and index _searchbox("/bigfont/[1]") //multiple attributes as JSON _searchbox({className: "shaded bigfont", sahiIndex: 1}) //multiple attributes as JSON including regular expression _searchbox({className: "/shaded .*font/", sahiIndex: 1}) // Use sahiIndex for index, className for class and sahiText for visible text attributes. ``` **Relations:** Relational functions _in, _near, _leftOf, _rightOf, _under, _above can be used. ```js // with _in _searchbox("searchbox_name", _in(_div("Container"))) // index with 2 relational APIs, _rightOf and _under _searchbox(0, _rightOf(_span("Name")), _under(_cell("Action"))) // with regular expression and relations _searchbox("/bigfont/", _rightOf(_span("Name")), _under(_cell("Action"))) ``` **Value:** value (this is the default attribute used in assertions etc.) **Actions:** Default event recorded is _setValue Example usage: ```js _setValue(_searchbox("searchbox_name"), "apple"); _setValue(_searchbox("/bigfont/[1]", _rightOf(_span("Name"))), "apple"); ``` **Assertions:** Example assertions: ```js // Check if element exists _assertExists(_searchbox("searchbox_id")); // Check if element is visible _assert(_isVisible(_searchbox("searchbox_id"))); _assertEqual("apple", _getValue(_searchbox("searchbox_id"))); ``` ### _telephonebox Since: Sahi Pro 4.2 **API:** _telephonebox(identifier [, relation1 [, relation2 ...]]) **Tag:** Tag: INPUT of type: tel **HTML:** ```html ``` **Identifiers:** name, id, sahiLabel, index, css class, data-testid Valid Accessors and alternatives: (Assume this is the 6th telephonebox in the UI and 2nd telephonebox with class "shaded bigfont") ```js //name _telephonebox("telephonebox_name") //id _telephonebox("telephonebox_id") //index _telephonebox(5) //css class with index _telephonebox("shaded bigfont[1]") //css class with regular expression and index _telephonebox("/bigfont/[1]") //multiple attributes as JSON _telephonebox({className: "shaded bigfont", sahiIndex: 1}) //multiple attributes as JSON including regular expression _telephonebox({className: "/shaded .*font/", sahiIndex: 1}) // Use sahiIndex for index, className for class and sahiText for visible text attributes. ``` **Relations:** Relational functions _in, _near, _leftOf, _rightOf, _under, _above can be used. ```js // with _in _telephonebox("telephonebox_name", _in(_div("Container"))) // index with 2 relational APIs, _rightOf and _under _telephonebox(0, _rightOf(_span("Name")), _under(_cell("Action"))) // with regular expression and relations _telephonebox("/bigfont/", _rightOf(_span("Name")), _under(_cell("Action"))) ``` **Value:** value (this is the default attribute used in assertions etc.) **Actions:** Default event recorded is _setValue Example usage: ```js _setValue(_telephonebox("telephonebox_name"), "123-555-2000"); _setValue(_telephonebox("/bigfont/[1]", _rightOf(_span("Name"))), "123-555-2000"); ``` **Assertions:** Example assertions: ```js // Check if element exists _assertExists(_telephonebox("telephonebox_id")); // Check if element is visible _assert(_isVisible(_telephonebox("telephonebox_id"))); _assertEqual("123-555-2000", _getValue(_telephonebox("telephonebox_id"))); ``` ### _timebox Since: Sahi Pro 3.5 **API:** _timebox(identifier [, relation1 [, relation2 ...]]) **Tag:** Tag: INPUT of type: time **HTML:** ```html ``` **Identifiers:** name, id, sahiLabel, index, css class, data-testid Valid Accessors and alternatives: (Assume this is the 6th timebox in the UI and 2nd timebox with class "shaded bigfont") ```js //name _timebox("timebox_name") //id _timebox("timebox_id") //index _timebox(5) //css class with index _timebox("shaded bigfont[1]") //css class with regular expression and index _timebox("/bigfont/[1]") //multiple attributes as JSON _timebox({className: "shaded bigfont", sahiIndex: 1}) //multiple attributes as JSON including regular expression _timebox({className: "/shaded .*font/", sahiIndex: 1}) // Use sahiIndex for index, className for class and sahiText for visible text attributes. ``` **Relations:** Relational functions _in, _near, _leftOf, _rightOf, _under, _above can be used. ```js // with _in _timebox("timebox_name", _in(_div("Container"))) // index with 2 relational APIs, _rightOf and _under _timebox(0, _rightOf(_span("Name")), _under(_cell("Action"))) // with regular expression and relations _timebox("/bigfont/", _rightOf(_span("Name")), _under(_cell("Action"))) ``` **Value:** value (this is the default attribute used in assertions etc.) **Actions:** Default event recorded is _setValue Example usage: ```js _setValue(_timebox("timebox_name"), "17:39:57"); _setValue(_timebox("/bigfont/[1]", _rightOf(_span("Name"))), "17:39:57"); ``` **Assertions:** Example assertions: ```js // Check if element exists _assertExists(_timebox("timebox_id")); // Check if element is visible _assert(_isVisible(_timebox("timebox_id"))); _assertEqual("17:39:57", _getValue(_timebox("timebox_id"))); ``` ### _urlbox Since: Sahi Pro 3.5 **API:** _urlbox(identifier [, relation1 [, relation2 ...]]) **Tag:** Tag: INPUT of type: url **HTML:** ```html ``` **Identifiers:** name, id, sahiLabel, index, css class, data-testid Valid Accessors and alternatives: (Assume this is the 6th urlbox in the UI and 2nd urlbox with class "shaded bigfont") ```js //name _urlbox("urlbox_name") //id _urlbox("urlbox_id") //index _urlbox(5) //css class with index _urlbox("shaded bigfont[1]") //css class with regular expression and index _urlbox("/bigfont/[1]") //multiple attributes as JSON _urlbox({className: "shaded bigfont", sahiIndex: 1}) //multiple attributes as JSON including regular expression _urlbox({className: "/shaded .*font/", sahiIndex: 1}) // Use sahiIndex for index, className for class and sahiText for visible text attributes. ``` **Relations:** Relational functions _in, _near, _leftOf, _rightOf, _under, _above can be used. ```js // with _in _urlbox("urlbox_name", _in(_div("Container"))) // index with 2 relational APIs, _rightOf and _under _urlbox(0, _rightOf(_span("Name")), _under(_cell("Action"))) // with regular expression and relations _urlbox("/bigfont/", _rightOf(_span("Name")), _under(_cell("Action"))) ``` **Value:** value (this is the default attribute used in assertions etc.) **Actions:** Default event recorded is _setValue Example usage: ```js _setValue(_urlbox("urlbox_name"), "http://www.example.com/blah.html"); _setValue(_urlbox("/bigfont/[1]", _rightOf(_span("Name"))), "http://www.example.com/blah.html"); ``` **Assertions:** Example assertions: ```js // Check if element exists _assertExists(_urlbox("urlbox_id")); // Check if element is visible _assert(_isVisible(_urlbox("urlbox_id"))); _assertEqual("http://www.example.com/blah.html", _getValue(_urlbox("urlbox_id"))); ``` ### _weekbox Since: Sahi Pro 3.5 **API:** _weekbox(identifier [, relation1 [, relation2 ...]]) **Tag:** Tag: INPUT of type: week **HTML:** ```html ``` **Identifiers:** name, id, sahiLabel, index, css class, data-testid Valid Accessors and alternatives: (Assume this is the 6th weekbox in the UI and 2nd weekbox with class "shaded bigfont") ```js //name _weekbox("weekbox_name") //id _weekbox("weekbox_id") //index _weekbox(5) //css class with index _weekbox("shaded bigfont[1]") //css class with regular expression and index _weekbox("/bigfont/[1]") //multiple attributes as JSON _weekbox({className: "shaded bigfont", sahiIndex: 1}) //multiple attributes as JSON including regular expression _weekbox({className: "/shaded .*font/", sahiIndex: 1}) // Use sahiIndex for index, className for class and sahiText for visible text attributes. ``` **Relations:** Relational functions _in, _near, _leftOf, _rightOf, _under, _above can be used. ```js // with _in _weekbox("weekbox_name", _in(_div("Container"))) // index with 2 relational APIs, _rightOf and _under _weekbox(0, _rightOf(_span("Name")), _under(_cell("Action"))) // with regular expression and relations _weekbox("/bigfont/", _rightOf(_span("Name")), _under(_cell("Action"))) ``` **Value:** value (this is the default attribute used in assertions etc.) **Actions:** Default event recorded is _setValue Example usage: ```js _setValue(_weekbox("weekbox_name"), "1996-W16"); _setValue(_weekbox("/bigfont/[1]", _rightOf(_span("Name"))), "1996-W16"); ``` **Assertions:** Example assertions: ```js // Check if element exists _assertExists(_weekbox("weekbox_id")); // Check if element is visible _assert(_isVisible(_weekbox("weekbox_id"))); _assertEqual("1996-W16", _getValue(_weekbox("weekbox_id"))); ``` ### _textarea Since: Sahi Pro 3.5 **API:** _textarea(identifier [, relation1 [, relation2 ...]]) **Tag:** Tag: TEXTAREA **HTML:** ```html