

Sync Reports to Central Database
Sahi reports can be synced from one machine to another using Sync functionality.
This document describes the various ways in which reports can be synced from Machine A to Machine B. Both machines need to be running Sahi.
Sync can be performed manually or it can be set to automatic mode.
The source and destination database types can be different. For example, you can sync from h2.db to mysql.
Sync to a Central Database
Section titled “Sync to a Central Database”While sync can be performed from any machine to any other machine, the real power lies in having Machine B as a Central machine and syncing reports from various other machines to Machine B.
This is especially useful in a continuous integration setup where one wants to aggregate the reports of each build’s run at a central location.
Manual Sync
Section titled “Manual Sync”To sync reports from machine A to machine B (you push the reports from machine A to machine B):
-
On machine A, open Reports and select the suites or scenario files to sync in the reports list.
-
Click Sync. The Sync to Central Server / Target Machine dialog opens.
-
Fill in the dialog and click Sync:
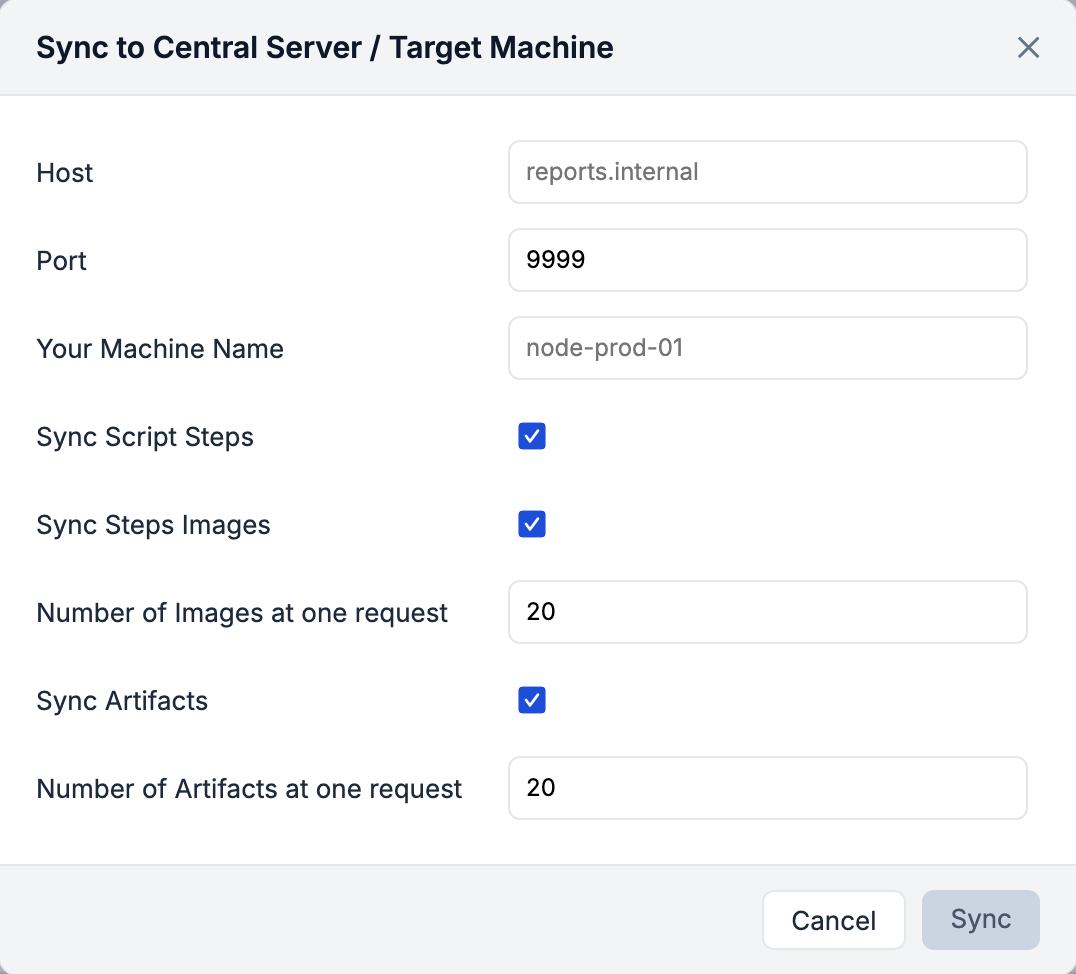
- Host: the host name or IP address of machine B.
- Port: the port Sahi Pro runs on, on machine B. Unless it was changed, it’s 9999.
- Your Machine Name: a name for machine A. Machine B shows it as the Origin Machine of the synced reports, so you can see which machine sent them.
- Sync Script Steps: tick it to sync every step of the scenario files.
- Sync Steps Images: tick it to sync the screenshots in the reports.
- Number of Images at one request: how many images to send at a time, 20 by default. Lower it on a slow network.
- Sync Artifacts: tick it to sync the other files saved with the reports.
- Number of Artifacts at one request: how many of those files to send at a time, 20 by default. Lower it on a slow network, or when the files are large.
-
When the sync ends, Sahi Pro shows whether it worked.
-
To send an email after the sync, see Trigger Email After Sync.
Auto Sync
Section titled “Auto Sync”In a typical continuous integration setup, the Sync needs to be done between the Sahi Master machine (Machine A) and Central database machine(Machine B). You can configure this as follows:
Sahi Master Machine
Section titled “Sahi Master Machine”Configure the following in Sahi Master Machine.
-
Click on
Configurelink from Sahi Dashboard, and opensync_db.properties. -
Uncomment the below statements and enter the appropriate values.
syncdb.autosync.enable=truesyncdb.autosync.host=centralDBHostIPsyncdb.autosync.port=9999syncdb.autosync.machineName=UserMachineNamesyncdb.autosync.syncSteps.enable=truesyncdb.autosync.syncSteps.syncImages=truesyncdb.autosync.syncSteps.imagesPerBatch=20syncdb.autosync.syncSteps.artifactsPerBatch=20 -
If you want to ignore some tests from Auto Sync, you can provide the regular expression using
syncdb.autosync.ignoreTests. For example, to ignore all individual scripts (.sah files), you can use the following regular expression. This is a Java Regular Expression.syncdb.autosync.ignoreTests=.*[.]sah$You can also ignore select suites from getting auto synced.
-
Refer to Trigger Email After Sync section for details on how to send emails after sync.
Whenever a test run completes for a sync unit (as decided by the ignoreTests parameter), Sahi will automatically Sync Reports to your Central Database Machine.
Trigger Email After Sync
Section titled “Trigger Email After Sync”To trigger email after manual sync or auto sync, follow the below steps.
Destination Machine (Central Database Machine)
Section titled “Destination Machine (Central Database Machine)”Configure the following on the Destination machine (Central Database Machine) to which reports are synced.
-
Click on
Configurelink from Sahi Dashboard, and opensync_db.properties. Uncomment the statement below.syncdb.autosync.triggerEmail.enable=true -
Click on
Configurelink from Sahi Dashboard, and opensync_db.properties- To configure email.properties, refer to Email.properties section.
- Comment
"mail.to"property (address of the receiver’s) statement from email.properties file.
-
Click on
Configurelink from Sahi Dashboard, and opensync_email_trigger.txt. When using a Central DB to sync all reports, emails can be sent to multiple people based on which machine(s) triggered the sync. Eg.machine1,machine2,projectx_.*=manager1@example.com,boss2@example.commachine3=email1@example.com, email2@example.comWhen reports are synced from machine1, machine2 or any machine starting with projectx_,emails will be sent to manager1@example.com and boss2@example.com.When reports are synced from machine3, emails will be sent to email1@example.com and email2@example.com.The left hand side of the expression specifies the source machines (corresponding to
syncdb.autosync.machineNameinsync_db.properties) from where the reports were synced. You can specify multiple machine patterns separated by comma. Each machine pattern can be a Java Regular Expression that matchessyncdb.autosync.machineNameof a source machine. -
The email contains a
View Logslink that points to the logs. Sometimes the IP address of the link does not come out correct - this can happen in case of a VM. In such cases, you can configure the machine and port details explicitly, by updating the following properties in userdata.properties.mail.centralDB.host=mail.centralDB.port=By default, these values are not specified, and the machine’s IP address and port will be taken.
Sahi will now automatically trigger email after Manual or Auto Sync to the Central Database Machine.