Run/Execute Flows
Run Settings Dialog
abstract
Run Settings dialog has various settings options which can be used in different scenarios.
General Run Settings
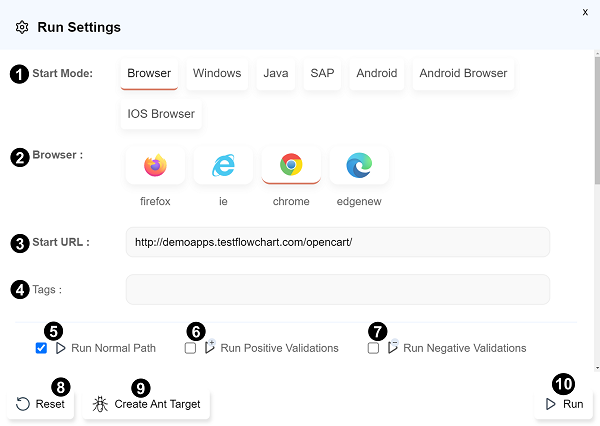
info The basic settings
Start Mode, Browser, Start URL and Run type selections are mandatory whereas others are optional.Start Mode: Select appropriate Start Mode to run the path/flowchart.Browsermode is used to run a path/flowchart on desktop browser only.Windowsmode is used to run a path/flowchart on a windows application.Android Browsermode is used to run a path/flowchart on Android Browser for mobile only.Javamode is used to run a path/flowchart on Java Application only.Androidmode is used to run a path/flowchart on Android device for mobile only.iOS Browsermode is used to run a path/flowchart on iOS Browser for mobile only.iOSmode is used to run a path/flowchart on iOS device for mobile only.SAPmode is used to run a path/flowchart on SAP GUI Application only.
Browser: All the browsers configured on the machine are shown here. Click on any browser icon to select one. In case you are providing multiple nodes for distributed playback, this will list browsers from all nodes.
- In case of Start mode selected as
Android,Android BrowserorIOS Browser, the appropriateDevice informationneeds to be provided.
- In case of Start mode selected as
Start URL: Enter the Start URL. This URL refers to the webpage for which the path/flowchart has to run.Tags: Tags can be set to control which subset of paths or flowcharts to run from flowchart or project level. This topic is discussed in more detail here .Run Normal Path: Run the path without any validations. This is the default selection.Run Positive Validations: Run the path with all Positive validation values provided.Run Negative Validations: Run the path with all Negative validation values provided and check for the appropriate error messages.Reset: Resets the Run settings.Create Ant Target: This will generate the contents of an ANT xml file. Refer here to learn more aboutPlayback Via Ant.Run: Run/execute the path(s)/flowchart(s).
infoFor running positive or negative validations, the
Enable Validations checkbox must be checked from the Path tab present on Automate dialog or from the Table View dialog.Tags
infoTags help control which subset of paths should be run when running from flowchart or project level.
Path Tags
To set tags at the Path level:- Click on a Node -> Automate -> Path tab -> Path Info -> Path Tags -> Add/Edit Path Tag
- Enter a tag or multiple tags separated by commas
Eg.adminadmin,smoketests,version6plus
- click OK.
- Click on Table View button on the top of the flowchart.
- Go to either Truth Table View or Execution Order tab and edit Path Tags against each Path.
Flowchart Tags
To set tags at the Flowchart level:- Go to the Projects page
- Click on the vertical dots on the top right of the relevant flowchart and click Settings.
- In the Artifact Tags field, enter a tag or multiple tags separated by commas
Eg.adminadmin,smoketests,version6plus
- click Save Changes.
Execution with Tag Filters
To Execute only selective tags,- Open the Run dialog
- In Tags field, add a tag or a boolean expression of tags.
Eg.smoketestsversion6plusadmin && smoketests(admin || user) && highpriority
Advanced Run Settings
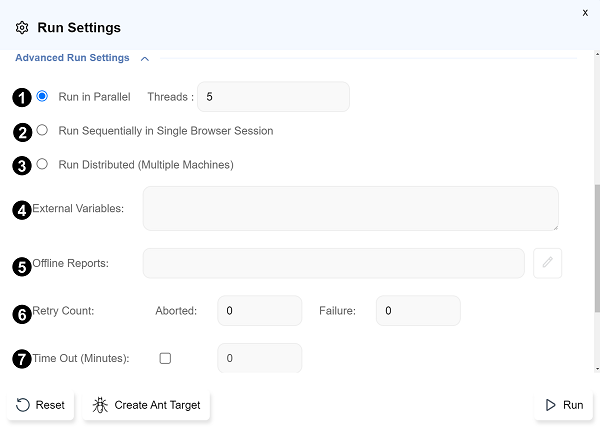
Run in Parallel: The default setup (Run in parallel with Threads as 5) lets you run the paths in parallel with 5 simultaneous instances.
- To run the paths in the flowchart one after another but in different browser sessions, select "Run in parallel" with Threads as 1.
Run Sequentially in Single Browser Session: This option is used to run the paths in the flowchart one after another within the same browser session. This will open a browser window and execute paths one after another on the same browser window. The browser window will only be closed at the end of the flowchart. Use this with caution.Distributed Playback: Playback properties can be configured to distribute path execution across multiple machines. This topic is discussed in more detail here .External Variables: You can pass extra variables before run in form of 'key-value' pairs. These values can then be used within the paths. e.g; key=value- Each line can have only one key-value pair.
- Key of External variables can be used as a variable , $key in steps.
Offline Reports: configure the storage of offline reports by setting the paths for various types of reports.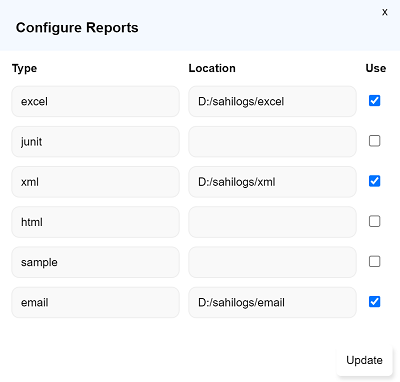
- Provide the location for storing the reports next to the report type.
- Check the
Usecheckbox for the type of reports to be saved. - Click on
Updatebutton to save/apply the Offline Reports settings. - Once updated, you can close the
Configure reportsdialog.
Retry Count: It provides the privilege to retry each of the failed and aborted paths immediately after its execution. User can specify the retry count. Default count is 0.ABORTED: Specify the times for the ABORTED paths should retry.FAILURE: Specify the times for the FAILURE paths should retry.
Time Out: This input allows you to automatically abort an execution if it is taking too long. Once the timeout is reached, Sahi kills the complete flowchart execution and make the status ABORTED_TIMEOUT Enable the check box and provide time in minutes to explore the Time out feature.
-
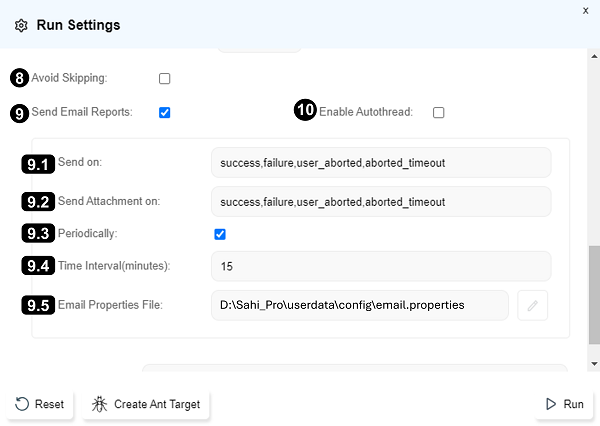
Avoid Skipping: Enabling this prevents skipping of dependent path even if the pre-path has FAILED or ABORTED. This is used whendependsfeature is added. Send Email Report: We can enable sending email reports after path run on Success, Failure or both. Email will be sent after completion of the run process. Check the checkbox to enable sending email reports.- 9.1-
Send on: Select the trigger for sending email with brief reports. It can be either success or failure or both. - 9.2-
Send Attachment on: Select the trigger for sending email with complete reports as attachment. It can be either success or failure or both. - 9.3-
Periodic emails: For a long-running flowchart, users can configure emails to be sent periodically while the flowchart run is in progress. Tick the checkbox for sending out periodic emails. - 9.4-
Time Interval (minutes): Select the time interval at which the periodic emails should be sent. - 9.5-
Email Properties File: Sahi uses the properties file present atuserdata/config/email.propertiesto send the emails. You can click on theeditbutton to edit theemail.propertiesfile. You can change the properties file using other text editors as well.
danger The user needs to edit theemail.propertiesfile and set the various properties. By default, none of the properties are set.- 9.1-
Enable Autothread: This is used to restrict the CPU usage for enhanced performance. Refer here for more details.UserDefinedId: An unique ID can be provided to be used as User Defined Id for the run/execution to differentiate it from other runs. This can be displayed in any type of report by changing
to<xsl:param name="showUserDefinedId" select="'false'" />
in the suites_list.xsl of userdata\config\reports\<xsl:param name="showUserDefinedId" select="'true'" />. can be html, xml
Distributed Playback
Playback properties can be configured to distribute path execution across multiple machines.To distribute the playback across multiple machines, check the
Run distributed radio button.
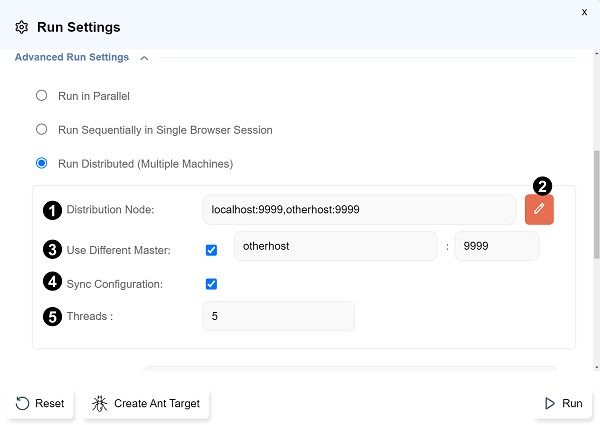
Distribution Node: By default Sahi will consider the localhost as the master node.- Click on the
editbutton to configure nodes for playback.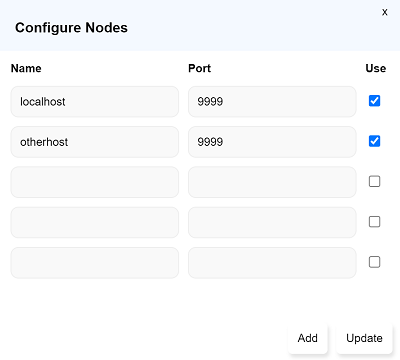
- Provide the machine names and port numbers.
- To use the node for execution, check the "Use" checkbox for the node. (Sometimes you may want to exclude 1 or 2 nodes from the nodes list. You can uncheck that particular node without deleting the entry.)
- Click on Update button. This updates the node information for execution.
- Click on Close button to close the node configuration window.
- This allows you to add more space for additional nodes.
Use Different Master: In case of distributed run, reports will be stored on Master.- To use a different master (i,e; other than the default master node), tick the checkbox for Use Different Master.
- Provide the machine name to be used as the host.
- Provide the port (default 9999).
Sync Configuration: Enabling this will sync and apply the configurations below to all node machines for the particular execution.- download_urls.txt
- donot_download_urls.txt
- response_headers_remove.txt
- streaming_urls.txt
- passthrough_ws_ssh_domains.txt
- block_ssl_domains.txt
- content_detection.txt
- code_coverage_js.txt
- code_coverage_js_exclude.txt
- exclude_inject.txt
- force_inject.txt
- download_contenttypes.txt
- streaming_contenttypes.txt
- ssl_host_port.txt
- substitutions.xml
- user_extension_android.js
- user_extensions.js
- sync_db.properties
- email.properties
- sync_email_trigger.txt
- xhr_ready_states_wait_for_urls.txt
- accessor_metadata/metadata.properties
- accessor_metadata/flex.json
- accessor_metadata/html.json
- accessor_metadata/java.json
- accessor_metadata/mswindows.json,oracle.json
- accessor_metadata/polymer.json
- accessor_metadata/salesforce.json
- accessor_metadata/sap.json
- accessor_metadata/android.json
- accessor_metadata/ios.json
Threads: Set the number of threads to be executed on each Node.
info
After configuring the nodes, you can click on
Run to execute the path or flowchart across machines.
next
Types of Run


