


Automating iOS Apps - Details
abstract
This page describes iOS Automation in detail. If you wish to get a quick start, read iOS Automation - Getting Started.
Features
- Supports running scripts against a connected iOS device or simulator having version iOS 9.3 and above.
- iOS Viewer and Record a steps allow easy interaction with the connected device.
- iOS Inbuilt actions is similar to Sahi Pro Flowcharts Inbuilt Action used for browser testing.
- Single Flowchart can interact with different modes like Browser, Desktop, Mobile etc.
Limitations
- Does not support testing iOS device or simulator below iOS 9.3
- Does not support distributed run on multiple machines yet.
- Does not support testing on a remote iOS device yet. The iOS device needs to be connected to the Mac machine.
Testing on a Simulator
The iOS simulator can be started in 3 different ways. It is not necessary that the simulator be started up prior to starting an iOS Viewer session or running a script. But it is advisable to explicitly start it beforehand. More details below.-
Explicitly start the simulator before running the test.
This can be done in either of the following ways.- Using Simulator app
- Start the Simulator app from the Xcode menu -
Xcode -> Open Developer Tool -> Simulator. - Start a specific simulator from the Simulator app menu -
Hardware->Device->iOS 16.4->iPhone 14 Pro Max
- Start the Simulator app from the Xcode menu -
- Using start_simulator.sh
- This is a shell script that one can use to launch a Simulator from the command line.
- Open a Terminal shell and navigate to
<SAHI_INSTALLATION_FOLDER>/userdata/bin/iOSfolder. - Run
./start_simulator.sh <SIMULATOR_UUID>where<SIMULATOR_UUID>refers to the UUID of the specific simulator. - Simulator UUIDs can be obtained by running
xcrun simctl list deviceson a Terminal shell.
- Using Simulator app
-
The Simulator app is open, but the specific simulator is not running (the process is running, but the desired simulator is not running).
In this case, the test will launch the simulator, run the script and close the simulator. -
Simulator app is shut down and no Simulator process is in memory.
In this case, the script will launch the simulator in the background, run the script and close the simulator. The simulator will remain invisible through the duration of the script since it runs in the background.
info
NOTE: The script run can be quite slow if the simulator was not launched explicitly before the start of the test, since the simulator startup is part of the script run time.
Testing on a Device
Testing on a device involves a few steps first.- Device Pre-requisites
warningYou will need an Apple developer license to test an app on the device. This is needed since the device testing binary needs to be signed, for it to work on the device.
- Devices with iOS versions above iOS 9.3 are supported
- The device has to be connected to the Mac machine through USB cable throughout the duration of the test.
- The device needs to be on the same Wi-Fi network as the Mac machine.
- Screen lock should be removed and display options should be set such that the device does not sleep during the execution of the script.
- Additionally, follow the below steps for iOS devices with iOS 14 and above:
- Add property
ios.use.sahi.common_domain=truein<Sahi_Installation>/userdata/config/userdata.properties - Find the IP of the Mac machine.
- Configure proxy settings of the mobile device with proxy host as the Mac machine's IP and port as 9999.
- Add property
- Connecting iOS Device in iOS Viewer
- Start up the iOS Viewer.
- Choose the iOS Device from Device Info dropdown. Type the application bundle identifier in the
Application BundleIdtextbox. - Click on
Connect Sessionbutton. - If the device binary does not exist then It will ask to build the device binary in iOS Viewer.
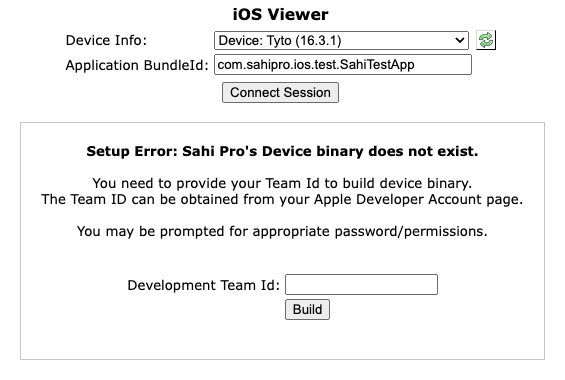 info IMPORTANT NOTE: The device binary needs to be built once per Xcode version. This is not per device. Once built, you can test with multiple devices. If Xcode version changes, then iOS Viewer will shows to build the device binary for that Xcode version.
 - Type the
Team IDin the textbox to build the device binary.info NOTE: TheTeam IDcan be obtained from your Apple Developer Account page.info NOTE: User have to add his/herApple IDto theAccountssection of Xcode on his/her machine. This is available from the Xcode menu -Xcode -> Preferences -> Accounts. - Click on
Buildbutton. iOS Viewer will create a device binary and shows the appropriate result.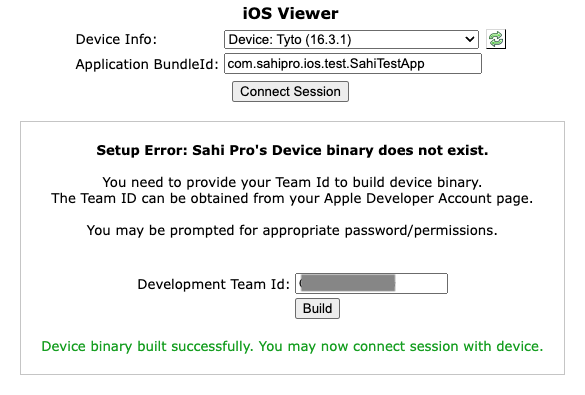
- After the device binary built successfully, click on
Connect Sessionbutton. This will start the SahiTestApp application on the iOS Device, and the iOS Viewer will display the screenshot of the application.
info This process does not required for testing iOS Simulator. - When the device is connected to the Mac for the first time, the user will get an alert on the device asking to
Trust this computer. Choose theTrustoption.
iOS Viewer
iOS Viewer allows an end user to view the iOS device/simulator screen on a Mac browser. The user can launch the Controller and then identify iOS elements by
pressing the CTRL key and hovering the mouse over the elements in the Viewer.
This section details how to use the iOS Viewer.
- On the Flowcharts window, click on the dropdown arrow next to Launch and then select
Launcher Settings.
Launcher Settingsdialog opens.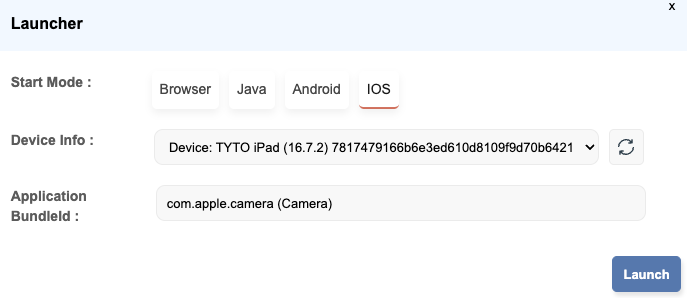
- Select the Mode: Android
- Now select the device from the
Device Infodropdown
SpecifyApplication Package Name:com.sahipro.SahiTestApp - Click on Launch to launch the Application.
- This brings up the
iOS Viewerin the system's default browser. If the user wants to launchiOS Viewerin a different browser, one can open that Sahi browser from the Dashboard and click on theiOS Viewerlink to bring up theiOS Viewerin that browser.
Device Info:shows the list of devices connected to the Mac machine and simulators installed on the machine. If you are connecting to a Simulator, you may want to start the simulator first. Refer to Testing on a Simulator for details.
Application BundleId:The user needs to choose an application to start the Viewer session with. This application needs to be available on the device/simulator. One can choose an application from the dropdown or enter a new application bundle id, ex:com.mycompany.myapp. When entering the app bundle id, one can give a name to it as well, like this, in brackets -com.mycompany.myapp (MyApp).info NOTE: If the viewer session is connected successfully, the application bundle id will be stored in app history so that the next time the user can simply choose it from the dropdown list. TypingMyAppwill bring up thecom.mycompany.myapp (MyApp)option.infoNote: if device list doesn't contains the connected device, then click on the refresh button next to devices dropdown.- If you are connecting to a device, ensure that it is connected to the Mac machine through a USB cable.
Ensure that the device and the Mac machine are connected to the same Wi-Fi network. - Click on
Connect Session. If the connection is successful, you will see three buttonsDisconnect Session,ControllerandRefresh. You will see also the device screenshot. If you encounter connection errors, refer to the connection troubleshooting section.
- When some action is performed from the iOS Viewer the screenshot will be refreshed automatically.
infoAt times, the screenshot will not show the latest device state, particularly when the app is fetching some data from the network. In such cases, press the
Refreshbutton to refresh the screenshot. - One can interact with the device from the
iOS Vieweritself without launching the Controller. - Launch the Controller by ALT and double clicking on the IOS Device. This will bring up the Controller. This is exactly the same as a normal browser Controller, except that it is configured to interact with an iOS session.
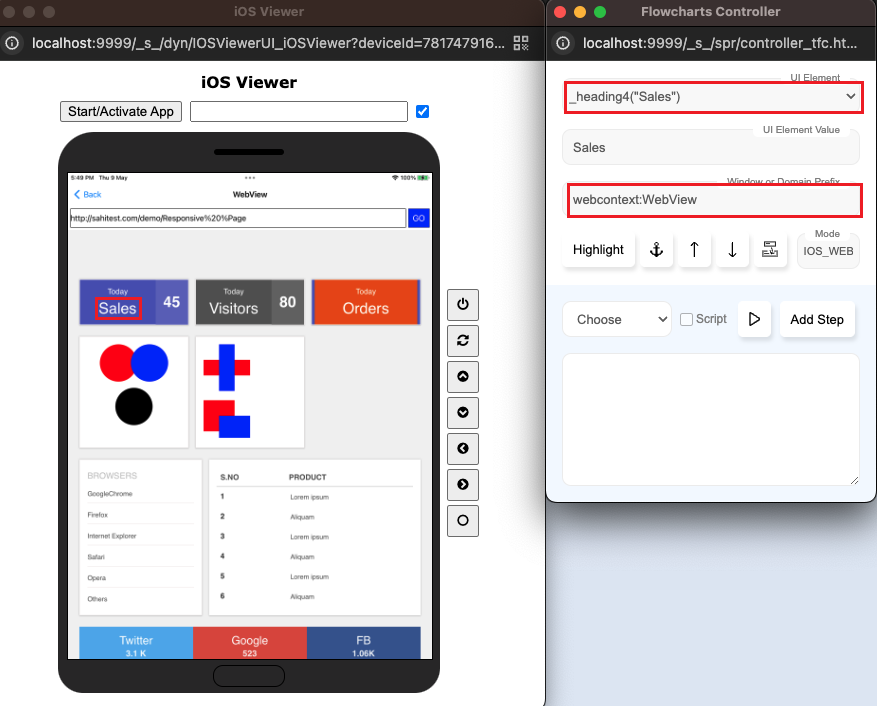
- One can now start identifying elements by pressing the CTRL key and hovering the mouse over elements on the Viewer screenshot. One will notice the Accessor textbox on the Controller,
showing the accessor for the element. The dropdown displays the alternatives for the accessor.
The image shows the Accessor and Alternatives for the "Privacy & Security" label element. The Viewer shows the highlighted element.
Description of the image labeling:
info
A few things to note...
- If the app orientation changes from portrait to landscape or vice versa, do a manual refresh by clicking on the Refresh button, to view the screenshot correctly.
- If you resize the iOS Viewer page, do a manual refresh by clicking on the Refresh button, to view the screenshot correctly.
- Disconnect the session by clicking on
power off iconbefore you disconnect the device from the Mac machine. - Closing the iOS Viewer browser does NOT disconnect the session. So always disconnect the session before closing the browser. If you fail to do so and open the iOS Viewer again, it will show the session to be in a connected state.
Configure iOS Devices/Simulators
For connfiguring the iOS devices/simulators, do the following:- Click on the
All Settingsbutton on the Dashboard. It will open up all Settings dialog. - Click on the
Sahi Pro Settingsbutton. It will open up Configure Sahi Pro page.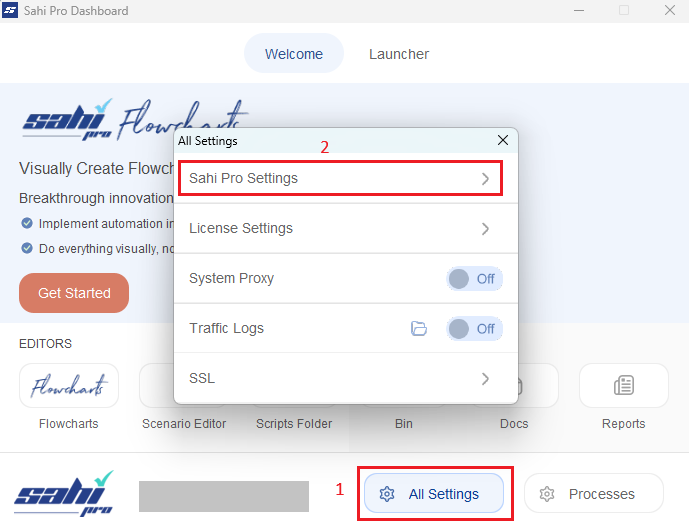
ios_devices.xml on the left. It will open up Configure Sahi Pro page.
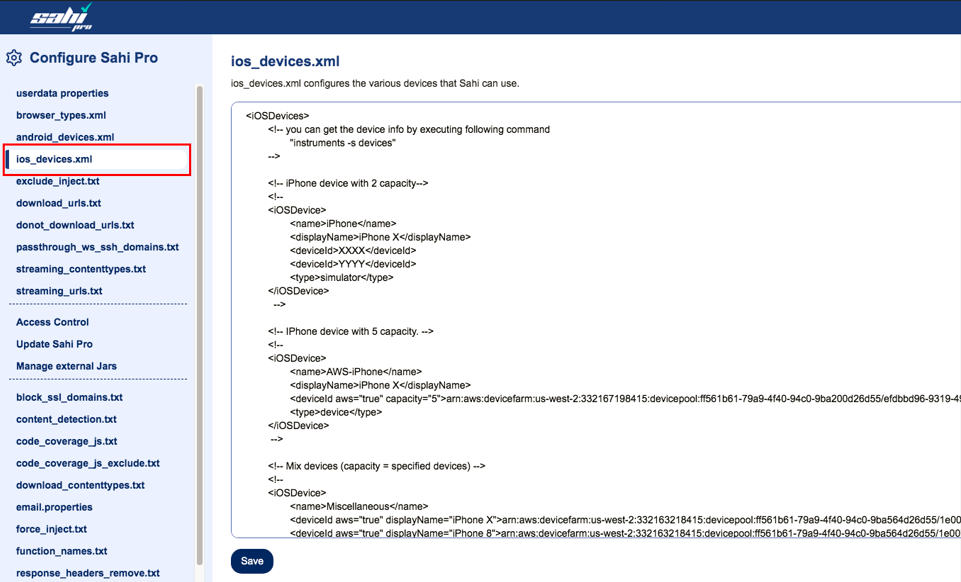
iOSDevice Node
<iOSDevices>
	<!-- iPhone device with 2 capacity-->

	<iOSDevice>
		<name>iPhone</name>
		<displayName>iPhone X</displayName>
		<deviceId>XXXX</deviceId>
		<deviceId>YYYY</deviceId>
		<type>simulator</type>
	</iOSDevice>
</iOSDevices>| Element | Value |
| name | Key by which this iOSDevice will be referred. This can be any value without spaces. |
| displayName | Better name displayed in iOS Viewer. |
| deviceId | Id of the device, multiple Id can be added under same name.
you can get the Device Id by executing below command For MacOS 12 onwards, use this command: |
| type | Type should be either simulator or device |
infoFor example, Two devices are configured under
iPhone. For parallel playback of data driven suite on this two devices, select iPhone as iOS Device from editor (or specify iPhone as iOSDevice in ANT target).
Scripts will be distributed in two devices.
Troubleshooting connection issues
There are a few reasons for connection issues that one may face, especially with a device. The error alerts will have useful information about what went wrong.- If you connect to a device and the device binary does not exist, you will get an error indicating the same in iOS Viewer. Refer to Testing on a Device for building the device binary.
- The connection can also fail if the device is on a different network than the desktop, or is not able to connect to the desktop.
Automating a keyword
This is similar to rautomating a keyword for normal browser testing.-
To automate a Keyword, click on the Keyword from the Sahi Pro Flowcharts page, click on the
Automate, click onStart Recordbutton. - Actions done from the iOS Viewer page are recorded automatically.
- Hovering the mouse over a textbox will overlay a textbox where one can type text in. After typing the text, press Enter or click outside the textbox.
This will send the text content to the device. The
Set Value/Set Passwordstep will get recorded automatically. - The user can click on any other element. This will click the element on the device. The
Clickstep will get recorded automatically.
- Hovering the mouse over a textbox will overlay a textbox where one can type text in. After typing the text, press Enter or click outside the textbox.
This will send the text content to the device. The
- Steps can also be recorded from the Controller. One can use Click, Set, Assert, choose Other Actions, Test an expression from Evaluate Expression to perform an action on the Device.
But one will need to record these steps explicitly by clicking on
Add Step. - The device screenshot will get refreshed after a Controller action is performed. The user can continue to interact with the changing screen from the Viewer itself. If the device screenshot is not refreshed correctly, click on the Refresh icon manually to reflect the current screenshot.
Automating Hybrid App
Pre-requisites
- iOS Device must be connected on the same network in which Sahi Pro is running.
- Configure the proxy in iOS Device.
If the screen is displaying hybrid contents then there will be one checkbox
Enable web view identification.- Check the checkbox to identify/record hybrid elements as Web.
- Press the CTRL key and mouse over the hybrid element.
- Element's accessor will be displayed in Flowcharts Controller.
- To automate the hybrid app, perform the actions directly from iOS Device.
info
NOTE: To identify/record the hybrid element as native, uncheck the checkbox in iOS Viewer.
Playback
- On the
Automatedialog click onRunbutton.
- The
Run Settingsdialog opens. Select the ModeIOS, clickRUN.
infoWhen the flow is being played back, you CANNOT see the playback happening on the IOS Viewer. The IOS Viewer does not get refreshed during playback.
Known Issues
- Issues with automating text fields
This issue occurs on some iOS simulators. If there are multiple text fields in an app, automation of setting values may fail after a certain number of fields. The keyboard will not come up after the first few successful steps.
To solve this, first ensure that the Hardware keyboard is setup correctly. The iOS Simulator sometimes has problems showing the keyboard. To make sure that the keyboard works, click on on any text field in the Simulator. Check if the keyboard appears.infoAfter this, the text fields automation will succeed. Do the same if there are other keyboard problems.-
If you see the keyboard appearing, toggle the keyboard "twice" by clicking on [
Hardware->Keyboard->Toggle Software Keyboard] from the Simulator app menu "twice". This will first hide the keyboard and show it again. -
If you do NOT see the keyboard appearing, toggle the keyboard "once" by clicking on [
Hardware->Keyboard->Toggle Software Keyboard] from the Simulator app menu "once". This will simply show the keyboard once.
-
If you see the keyboard appearing, toggle the keyboard "twice" by clicking on [
- In the
iOS Viewer,keyboard dimensions come up in Portrait orientation in Landscape mode.
To record any keys, record in Portrait mode. - In a webview, a textbox or password field may need an extra
Clickbefore theSet Valuestep. - Issues With System Dialogs
- If an app requires the Location permission, and Location is not turned ON in Settings, the system dialog will show a button to launch
Settings. Unfortunately clicking onSettingsbutton will launch the Settings app and cause the current app to be deactivated. This eventually causes_iInteractWithApp()to fail. So such a dialog cannot be automated. Or in other words, any dialog button that causes invocation of a different app cannot be automated.warningTo workaround this, either turn Location ON fromSettingsmanually or automate this step before the system dialog automation code kicks in. In such a case, the dialog will show the "Allow" and "Don't Allow" buttons, neither of which will launch a new app. - If one wishes to automate clicking the "Don't Allow" button, note that the character between n and t is NOT a single quote. Either use a regular expression /Don.*Allow/ or
use the exact specific character, as shown in
userdata/scripts/sahitests/ios/systemdialogs/systemDialog1.sah - testCalendarSystemDialogSpecialCharacters method. - System dialogs may not get automated on iOS 9
- If an app requires the Location permission, and Location is not turned ON in Settings, the system dialog will show a button to launch
Test Apps
A few iOS Test Apps have been bundled with the Sahi Pro Mobile Add-on. The demo scripts make use of these test apps.To install these tests apps on your simulator, do the following.
- Start the specific simulator explicitly using the Simulator app or start_simulator.sh, as explained in Testing on a Simulator.
- Open a Terminal shell and navigate to
<SAHI_INSTALLATION_FOLDER>/userdata/bin/iOS/testapps - Type
./install_testapps_on_simulator.sh <SIMULATOR_UUID>and press Enter.<SIMULATOR_UUID>refers to the UUID of the specific simulator. Simulator UUIDs can be obtained by runningxcrun simctl list deviceson a Terminal shell.
This will install all the test apps on the specific simulator.
Test App Bundle Ids
Since they are test apps, their bundle ids have not been added to the apps history out of the box. Hence one will need to explicitly type in the testapp bundle id while connecting the Viewer session.Here is the list of the Test App bundle ids.
- SahiTestApp - com.sahipro.ios.test.SahiTestApp
- SahiTestApp2 - com.sahipro.ios.test.SahiTestApp2
- LoginApp - com.sahipro.ios.test.LoginApp
- NearApp - com.sahipro.ios.test.NearApp
- GroceryApp - com.sahipro.ios.test.GroceryApp
- SpecialCharactersApp - com.sahipro.ios.test.SpecialCharactersApp
- FirstApp - com.sahipro.ios.test.FirstApp
- SecondApp - com.sahipro.ios.test.SecondApp
Appendix
This section contains information on miscellaneous topics.Element Identification - Suggestions
- Prefer using a direct text accessor for best performance. For example: _button("Login").
- Prefer using a direct text accessor that does not change. For example, value is not a good choice for _textbox, since it can change. So _textbox("johndoe") is not a good accessor.
- If a direct text accessor is not available, use an index accessor provided it does not change. Otherwise, prefer a relational (_in, _near) or positional (_rightOf, _leftOf...) accessor.
- _rightOf may be faster than _near in many cases.
- _parentNode() may be useful too.
Element Identification - Notes on Alternate Candidates
In iOS testing, an element is considered visible (Is Visible will return true) if it is hittable.
Clicking on an element that is not hittable causes internal test failures.
infoHence we only display visible elements in the Controller Accessor and Alternatives.
However, there are times when one wants to check the text of a non hittable element or whether it is selected, etc. In order to do so, the user will need the identifier for the element.
To facilitate this, we show the identifiers of all possible alternate candidates, in the Controller result section.
infoThe Accessor shows the smallest possible visible element at a point, while the alternate candidates contain those elements that are smaller than or equal in size to the Accessor.

Viewer - Starting or activating a new app
In iOS testing, interacting with any element requires the app which contains the element, to be in the foreground and activated.There are two scenarios when one would want to activate a new app.
- When the app itself launches a new app on some interaction
- One wishes to explicitly launch a new app since the testcase requires interacting with more than one app.
- App launches new app internally
- Automatic activation - if the new app is part of the app history that Sahi stores, it will be activated automatically.
- If Sahi is not yet aware of the new app, the user will receive an alert indicating the app needs to be activated by specifying the application bundle id.
Enter the app bundle id and click on
Start/Activate appin the Viewer. - Explicit launch of app
Enter the app bundle id and click onStart/Activate appin the Viewer. If the app is in the background, it will just be activated. Else it will be launched newly.
More Info
iOS Accessor APIsMobile APIs