


Sahi Pro - Getting Started
abstract
This is a quick tutorial to get started with Sahi Pro Browser Automation.
warningRead this page to get familiar with Sahi Pro before trying the Sahi Pro Desktop, SAP or Mobile Add-ons.
Prerequisites
Java 1.8 or above is needed for running Sahi Pro.Download Sahi Pro
Download Sahi Pro from Sahi's download archives. You will need a valid license to run Sahi Pro. If you do not have a valid license yet, you can register here for a 14 day evaluation license.Upgrade Sahi
If you wish to upgrade from an older version of Sahi, refer to Upgrade for details.Install Sahi
- Double click on install_sahi_pro_xxx.jar to start the installer. If Java is configured properly, it will launch the installer.

info If the installer does not launch, or if the jar file is opened as if it is a zip file, cancel the unzip dialog, open a command prompt, cd to where the file is downloaded, and runjava -jar install_sahi_pro_xxx.jar - Install Sahi Pro in a folder path without spaces. (If there are spaces, Chrome will have trouble launching correctly.)
Start Sahi Dashboard

Start Sahi Dashboard by any of the following methods
- Double click on the desktop shortcut or
- Start from the command line.
Windows: - Go to<sahi_root>\userdata\binand runstart_dashboard.bat
Linux - Go to<sahi_root>/userdata/binand run./start_dashboard.sh
Click on Launcher button to see installed browsers and add-ons.

warning
Sahi looks for browsers in their default install location, and if found, displays it on the Dashboard.
If you do not see your browsers, configure your browser paths correctly.
warning
If you are using Internet Explorer via a VPN or Datacard (like Tata Photon, Reliance etc.),
you may need to explicitly modify the proxy settings for your browser
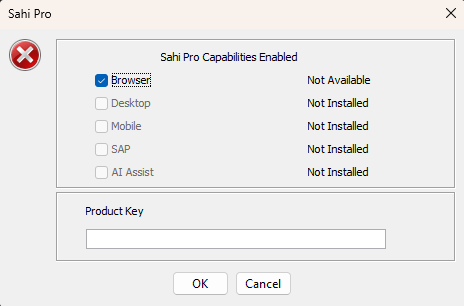
Add License Product Key
- If you have never added your Product Key, you will be presented with Sahi product key popup window.
- Enter the
Product Keyand click 'OK'.
or
- Copy the
Product Keyintouserdata\config\productkey.txt(create the file if needed).
Product Key is valid for selected product, Sahi Pro will start normally.
Recording through Sahi
- Bring up the browser of your choice by clicking on any of the browser icons. You should see a browser window like this:

- To launch controller click on "Sahi Controller" link. Controller can also be launched by ALT and double click on the browser window.
info If that does not work, press CTRL and ALT keys together and then double click. Make sure popup blockers are turned off.
- On the Controller, go the the Record tab (would be selected by default).
- Give
first_script.sahas the name for the script, and click the 'Record' icon.
(Click on the 'Settings'
icon.
(Click on the 'Settings'  icon to show or hide file paths.)
 - Click on the "Sample Application" link on Sahi's start page.
 This will bring up Sahi's sample application.
- Enter username 'test' and password 'secret' and click 'Login'.
 The last recorded step will be visible in the 'Evaluate Expression' box.
- On the next page, which shows a shopping cart, add quantities 2,3,1 and click 'Add'. This will display the added items
at the bottom and its total.


infoThe Controller can be launched using the
Alt + Double Click action on a browser window. By default, Alt + Click and Alt + Double Click actions are not recorded on the browser. To allow recording these actions, enable userdata property recorder.record.controller_hotkey_click.Add assertions
A script normally consists of actions performed on the web page and then verification of functionality. For verifications, we use assertions. Sahi allows adding assertions while recording. To add an assertion on the total field:- Move the mouse over any html element while pressing CTRL key.
warningOn Mac, the application window needs to be in focus to receive mouse events. First bring the application window into focus by clicking on the title bar, or by using Command-Tab.
- The Accessor field will get populated in the Controller. In this case, let us hover over the text field near 'Grand Total'
- Click the "Assert" button to generate assertions for the element.
- They will appear in the "Evaluate expression" box.
- Click → to check that the assertions are true.
- Once satisfied, click on "Append". This will add the assertions to the script.
- Click 'Logout' to logout of the application.
- Click 'Stop' on the Controller to finish recording.

info
You can evaluate any javascript using "Evaluate expression" and →. Actions performed via the Controller
will not be automatically recorded. Only actions performed directly on the page are automatically recorded.
This lets you experiment on the webpage at recording time with out impacting the script.
info
Note that the Controller can be closed and reopened at any time, without disrupting recording.
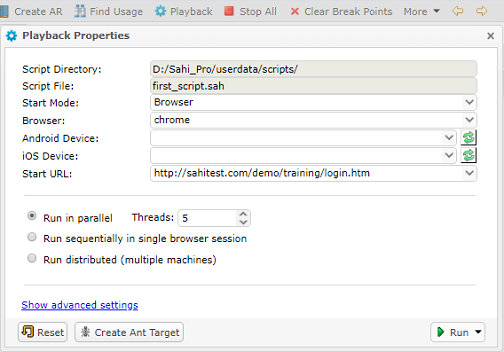
Playing back
 If not already open, open the Sahi Controller (ALT-DblClick on the page).
- Enter the script name for example:
first_script.sahin the 'File:' field (with the help of the autocompletion feature). - Enter the Start URL as 'http://sahitest.com/demo/training/login.htm'. For your own scripts, if you had started recording from http://www.google.co.in, use that URL.
- Click 'Play'.
Note that the Controller can be closed at any time, without disrupting playback.
View Logs
On the Controller, go to Playback tab and click on "Logs" link at the bottom right. It will open a window with the results in HTML. Click on any script to view specific logs.
 Clicking on a line in the logs will drill down to exact line in script.
 You can also view the logs at http://localhost:9999/logs
Edit the recorded script
Recorded scripts need to be refactored into functions for better readability and maintenance.Click on the Editor link on the Recorder to view and edit the currently recorded script.
 Sahi scripts are simple text files which use Javascript syntax.
Notice how there are no waits or complex XPaths in the recorded script.
Sahi scripts are simple text files which use Javascript syntax.
Notice how there are no waits or complex XPaths in the recorded script.
Extract Functions
While the script looks simple, it is still not talking in the language of the business. For example, if one tester were to communicate these action to another, she would describe it as follows:- Login with 'test' and 'secret'
- Add books to cart in quantities 2,3 and 1
- Verify total is 1550
- Logout
On the Script Editor:

- Select the statements pertinent to login.
- Click on 'Create Function'.
- Give a name to the function, in this case 'login'.
- Click on Continue. This will create a function, and then call it with the correct parameters.
/** * login($user, $password) * @param $user - * @param $password - */ function login($user, $password){ _setValue(_textbox("user"), $user); _setPassword(_password("password"), $password); _click(_submit("Login")); } /* --Functions Above-- */ - Keep doing this for the other lines, so that the script looks like this:
/**
* login($user, $password)
* @param $user -
* @param $password -
*/

function login($user, $password){
  _setValue(_textbox("user"), $user);
  _setPassword(_password("password"), $password);
  _click(_submit("Login"));
}

/**
* addBooks($qJava, $qRuby, $qPython)
* @param $qJava -
* @param $qRuby -
* @param $qPython -
*/

function addBooks($qJava, $qRuby, $qPython){
  _setValue(_textbox("q"), $qJava);
  _setValue(_textbox("q[1]"), $qRuby);
  _setValue(_textbox("q[2]"), $qPython);
  _click(_button("Add"));
}

/**
* verifyTotal($total)
* @param $total -
*/

function verifyTotal($total){
  _assertExists(_textbox("total"));
  _assert(_isVisible(_textbox("total")));
  _assertEqual($total, _getValue(_textbox("total")));
}

/**
* logout()
*/

function logout(){
  _click(_button("Logout"));
}

/* --Functions Above-- */

_navigateTo("http://sahitest.com/demo/training/");

login("test", "MgkKEQBU");
addBooks("2", "3", "1");
verifyTotal("1550");
logout();
infoFor more details regarding Scenario Editor, refer hereinfoFor more details regarding Sahi Framework, refer here - Run this script. Click on "Playback" button on Editor. Select browser and enter start URL. Click on "Run" button.
- View the logs. The logs now look nicely folded down at the function level.
 Clicking on 'login' will just open up the steps that were performed under login.
This helps in easy understanding of logs and helps isolate problems easily.
Clicking on 'login' will just open up the steps that were performed under login.
This helps in easy understanding of logs and helps isolate problems easily.
Build a library file
-
This script can further be broken into 2 scripts, one with the function definitions and another with just the calling code.
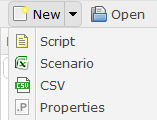
Now hover over the arrow adjacent to the 'New' button and select the 'Script' option.
first_script_lib.sah/** * login($user, $password) * @param $user - * @param $password - */ function login($user, $password){ _setValue(_textbox("user"), $user); _setPassword(_password("password"), $password); _click(_submit("Login")); } /** * addBooks($qJava, $qRuby, $qPython) * @param $qJava - * @param $qRuby - * @param $qPython - */ function addBooks($qJava, $qRuby, $qPython){ _setValue(_textbox("q"), $qJava); _setValue(_textbox("q[1]"), $qRuby); _setValue(_textbox("q[2]"), $qPython); _click(_button("Add")); } /** * verifyTotal($total) * @param $total - */ function verifyTotal($total){ _assertExists(_textbox("total")); _assert(_isVisible(_textbox("total"))); _assertEqual($total, _getValue(_textbox("total"))); } /** * logout() */ function logout(){ _click(_button("Logout")); }
first_script.sah_include("first_script_lib.sah"); _navigateTo("http://sahitest.com/demo/training/"); login("test", "MgkKEQBU"); addBooks("2", "3", "1"); verifyTotal("1550"); logout();
Create a Scenario file
The Sahi Framework allows testers to write their testcases in Spreadsheet Format(Excel like) and run it from Sahi. Often a testing team consists of a mix of subject matter experts, some manual testers and testers with some automation experience. Writing tests in the language of the business allows all stake holders to participate and derive value out of the automation process.- To create a new scenario file, hover over the arrow adjacent to the 'New' button and select the 'Scenario' option.
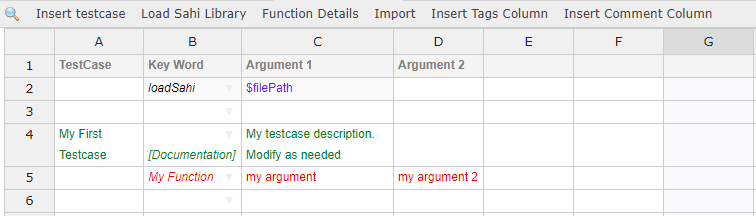
- Default scenario file will look like this:
- Save the file.
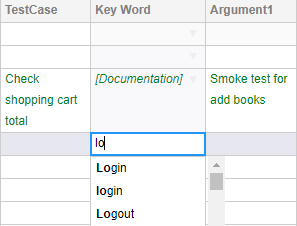
- Start typing the name of function. In this case our function name is "login", so on typing initial letters, for example: "lo", Sahi Editor's autocomplete gives a list of possible options. Select the function from the dropdown.
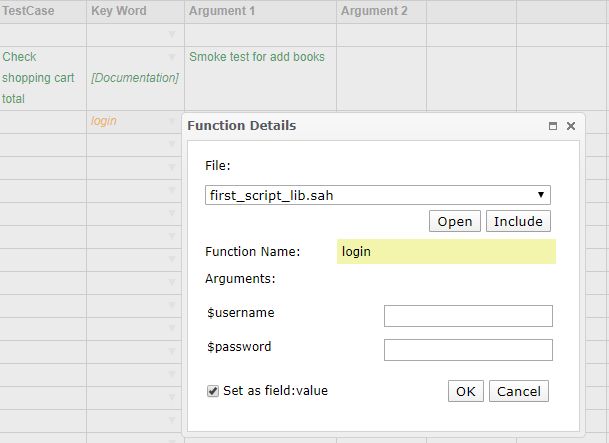
- Now do Ctrl+click on "login" cell. "Function Detail" popup-window gives details of the selected function and its arguments. Click on "Include". This is make "first_script_lib.sah" file available to the scenario file. If other library files contains function with same name, select the required library file.
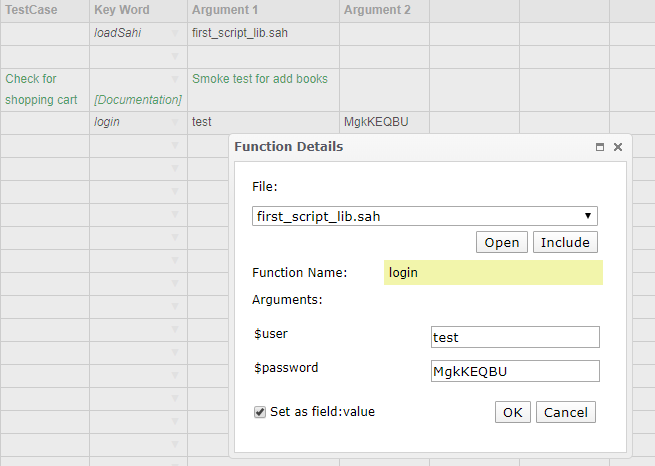
- Enter the function arguments.
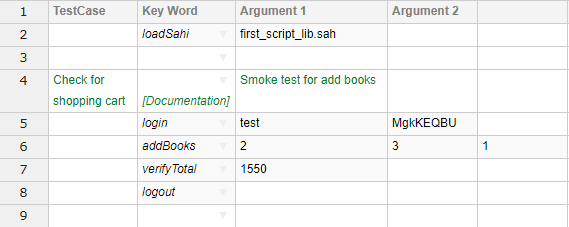
- Enter all the functions and arguments. The scenario file will look like this
- Executing the Scenario File Executing the Scenario sheet is no different from executing a Sahi script. Click on "Playback" button on the Sahi Editor, and then click on "Run" button.
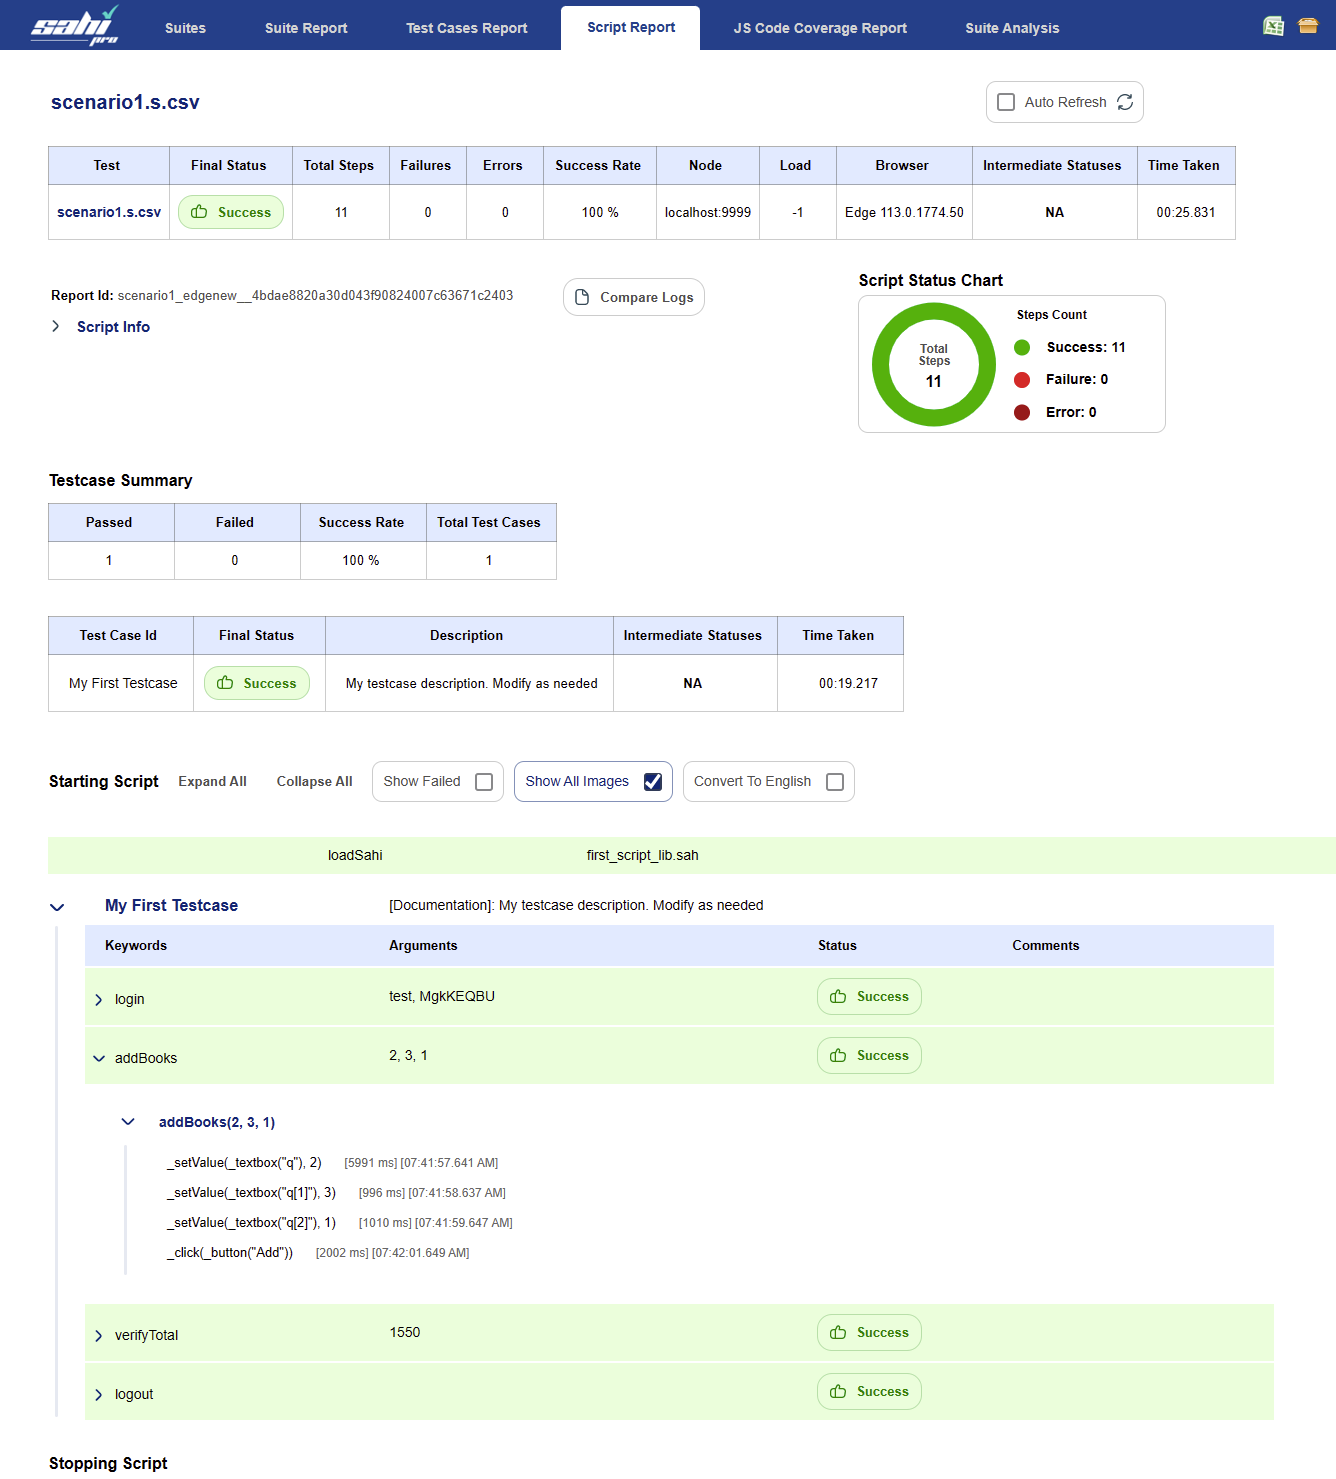
- Play back reports/logs On execution, Sahi generates logs showing success or failure. Logs are visible from the "Logs" link in Editor.
 Right click on cell, and select "Remove Row" from the context menu, for the rows with data in blue color.
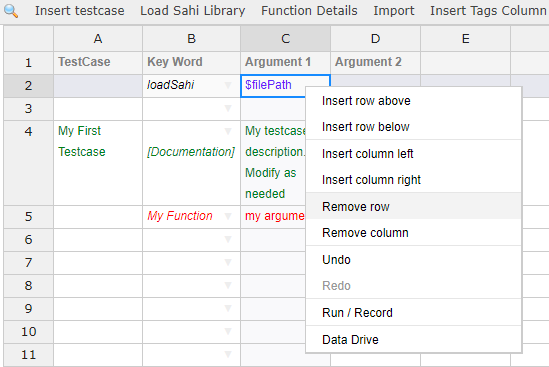
 Refer to sahi/userdata/scripts/sahitests/framework folder for some examples.
Suites - Automating playback of multiple scripts
To playback multiple scripts in batch mode, we need to first create a data driven suite file.- Create another script file
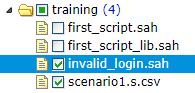
invalid_login.sahwith the following contents._setValue(_textbox("user"), "test"); _setPassword(_password("password"), "badpassword"); _click(_submit("Login")); _assert(_isVisible(_div("errorMessage"))); _assertEqual("Invalid username or password", _getText(_div("errorMessage"))); - Now we have 2 scripts, scenario1.s.csv and invalid_login.sah. Check the checkboxes adjacent to these script names in Editor's File navigator area
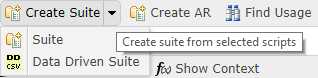
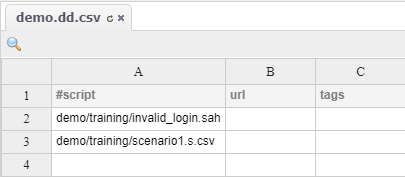
- To create a new data driven suite file, hover over the dropdown adjacent to the 'Create Suite' button in Editor and select the 'Data Driven Suite' option.
- Now the data driven suite file will look like this:
- Save the file.
- To execute the suite file, click on "Playback" button on the Sahi Editor, and then click on "Run" button.
- Play back reports/logs for suite file
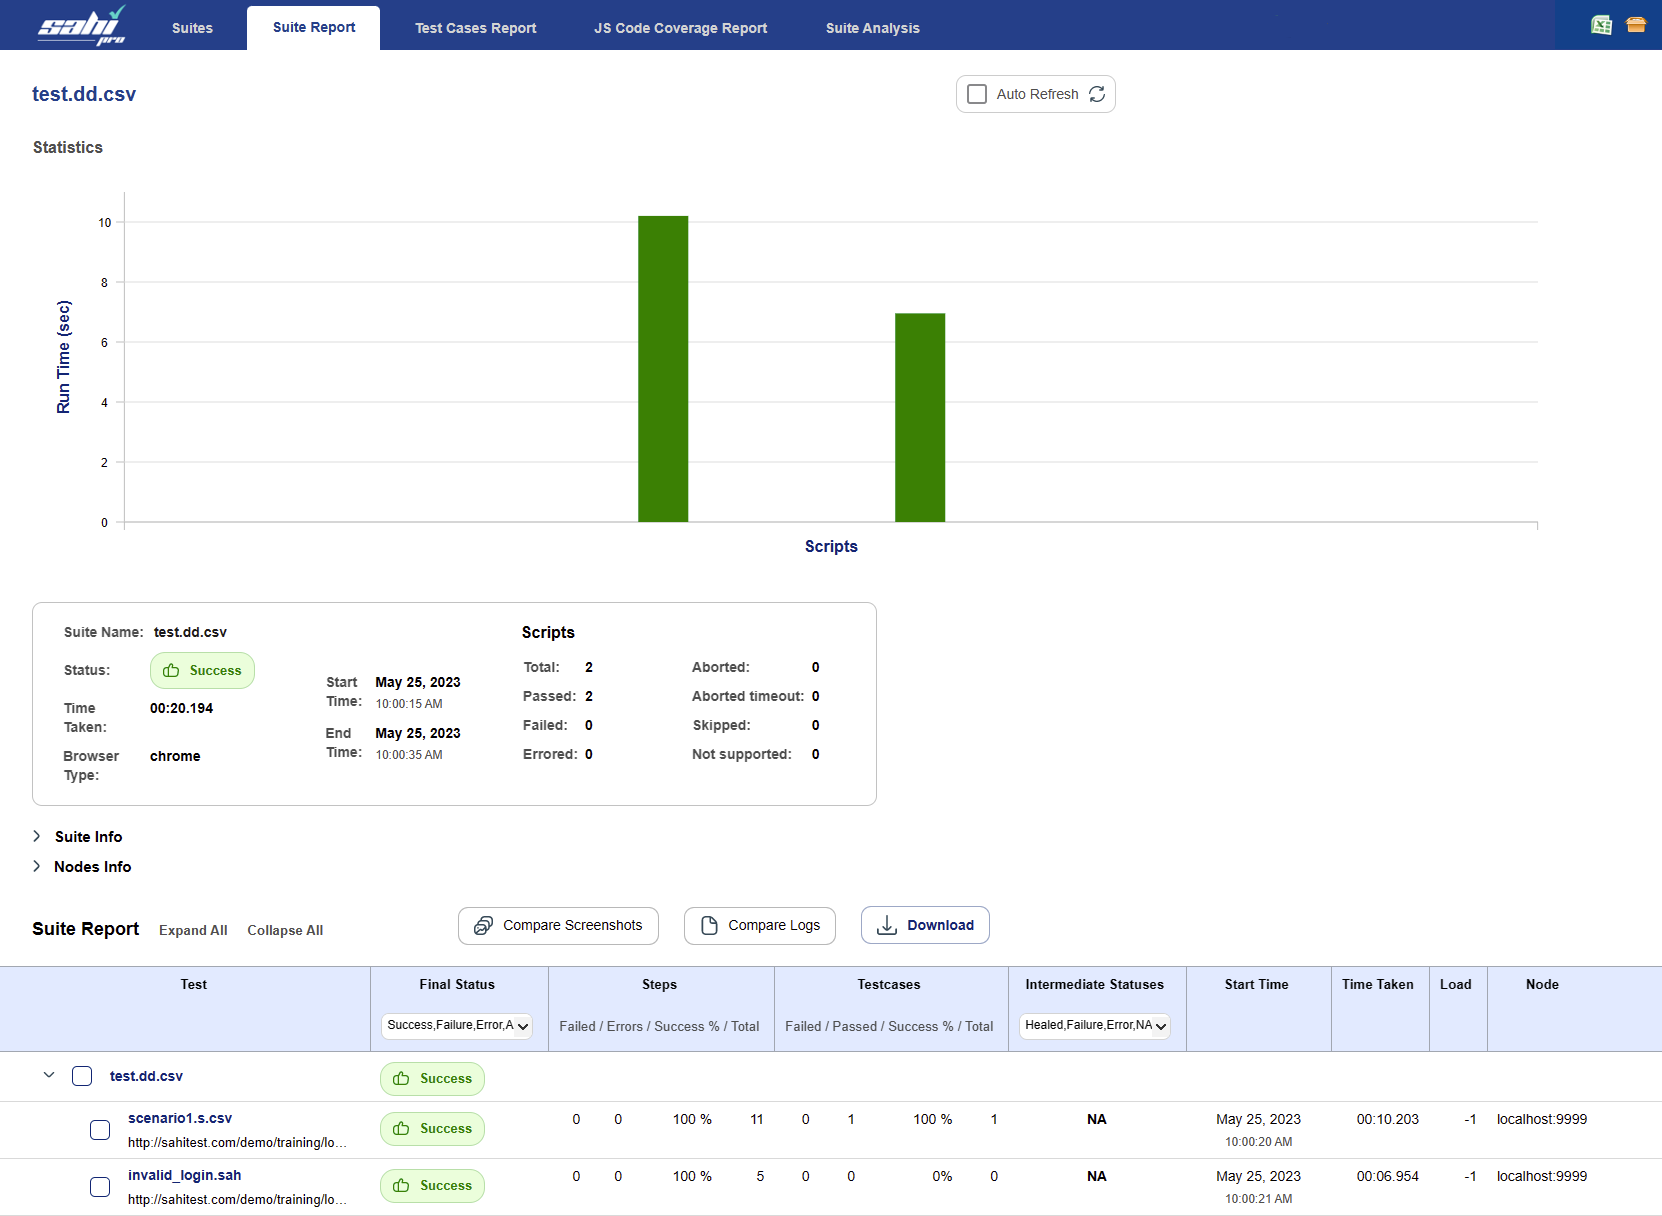
Clicking on any of the script links will take you to the logs of the individual scripts as seen before.