

Sahi Controller
Record a keyword's steps, identify elements, try steps before you add them, and run your test case from the Controller.
The Controller is a small window that works alongside your browser. You use it to record a keyword’s steps, identify elements on the page, try a step before you add it, and run the test case.
Open the Controller
Section titled “Open the Controller”Open the Controller from the keyword you want to record. It then knows where your steps belong: what you record goes into that keyword, and the browser starts at the right page.
From a keyword (the usual way):
- In the No-Code Test Editor, select the keyword and click Automate.
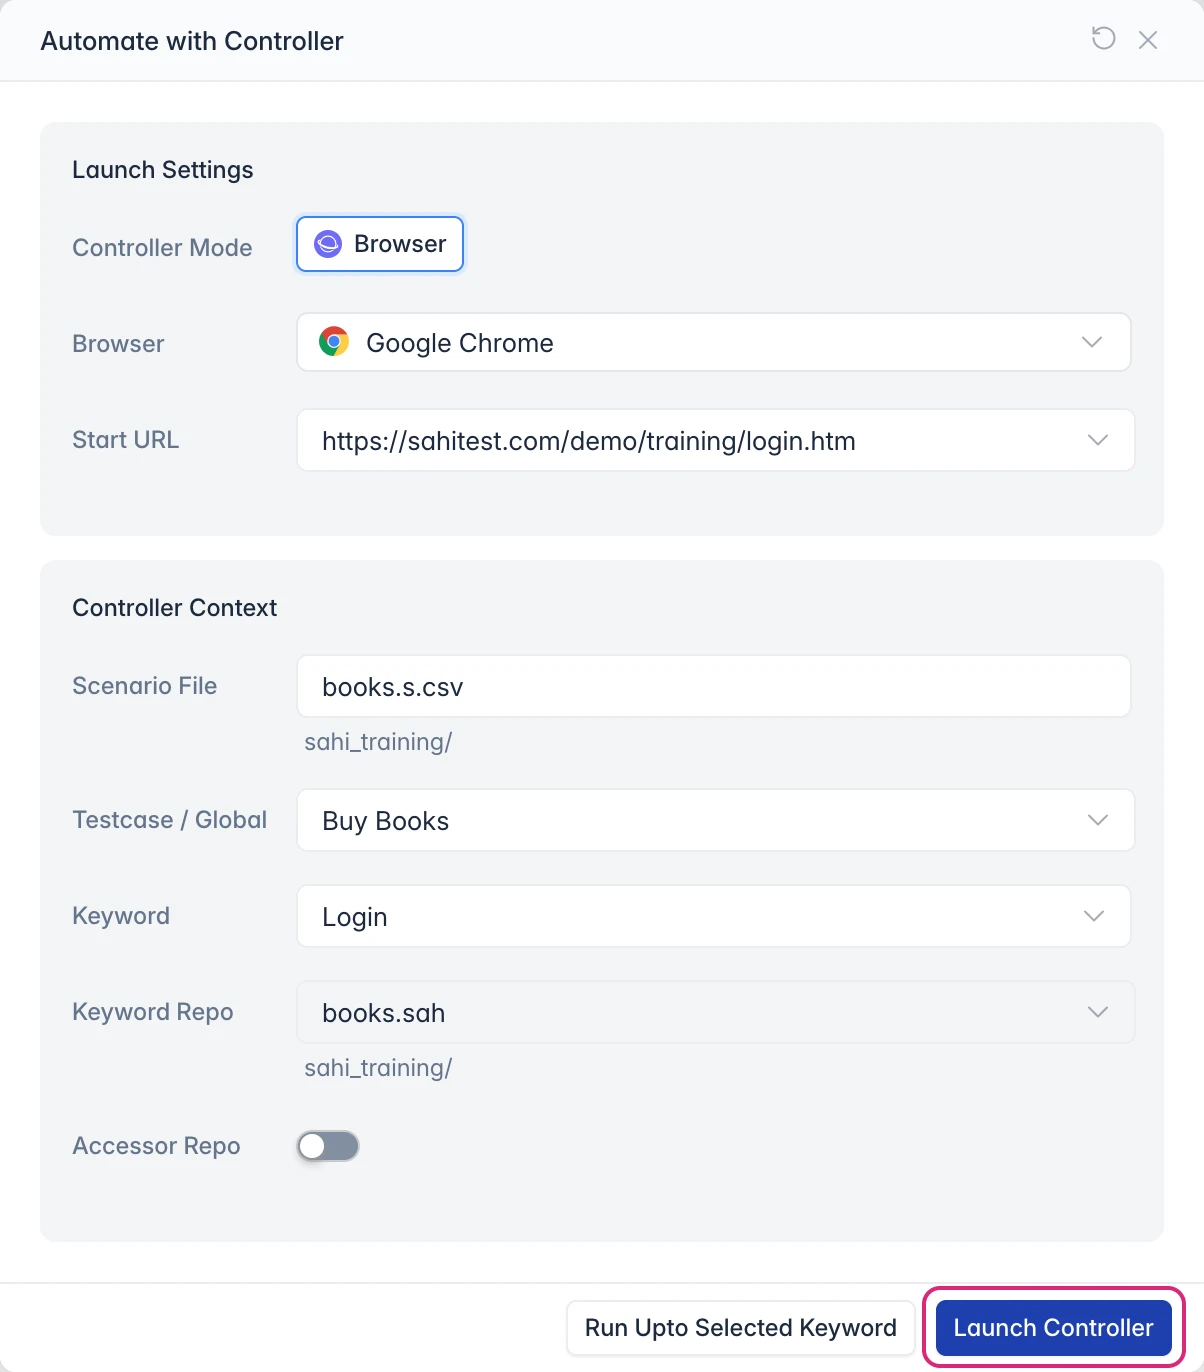
- In the Automate with Controller dialog, choose the browser and set Start URL. Check that Testcase / Global and Keyword show the ones you want.
- Click Launch Controller. The browser opens at the start URL, and the Controller opens on that keyword.
From any page: in a browser opened by Sahi Pro, hold Alt (Option on Mac) and double-click the page. The Controller doesn’t know which keyword you’re working on, so it opens on a Draft Keyword. Steps you record there can be saved to a keyword file later.
The Controller at a Glance
Section titled “The Controller at a Glance”The Controller has two tabs:
- Automate: record, edit, save and run the keyword’s steps.
- Advanced Editor: identify an element on the page and build one step for it.
At the top right are the mode the Controller works in (such as Browser, Java, Android or iOS), Minimize and Exit Controller. The bar at the bottom opens the Sahi Editor, Reports and the Clipboard, and ⋮ holds Diagnose, Controller Info and Help Docs.
Record a Keyword
Section titled “Record a Keyword”
Writing each step of a keyword by hand is slow, and it’s easy to get an element’s accessor wrong. Recording writes the steps for you: you use the application in the browser as a user would, and each action becomes a step with the right accessor.
-
Open the Controller on the keyword.
-
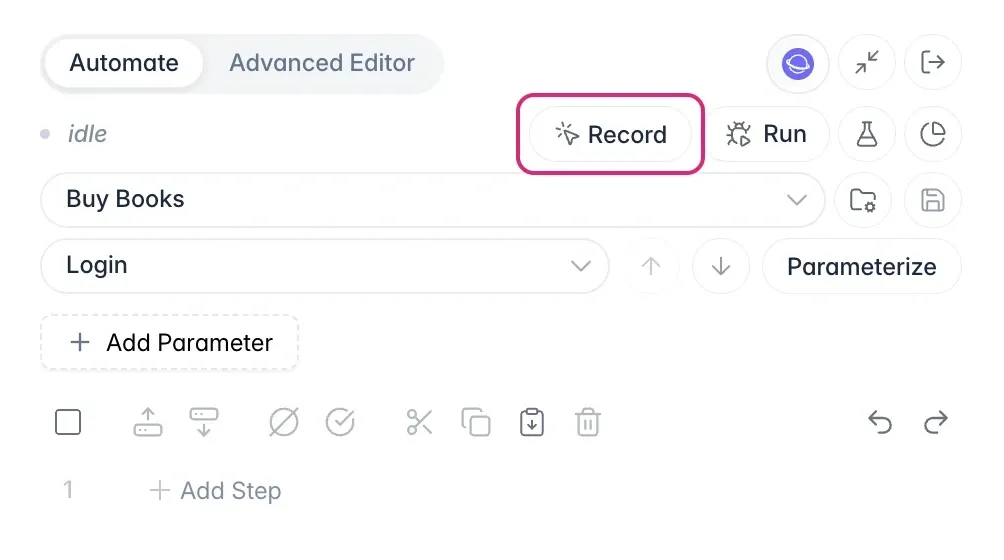
Click Record. The status changes from idle to Recording.
-
Work in the browser. Each action you take appears as a step in the Controller.
-
Click Save. Steps not yet saved are marked with an orange dot, and the Save icon turns orange until you save.
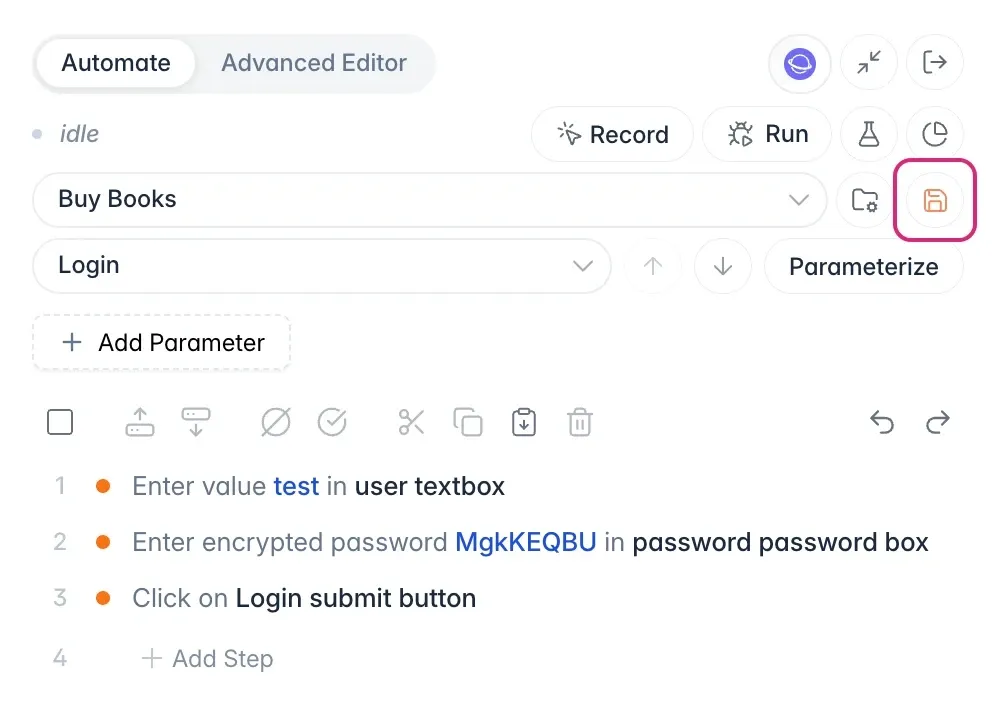
The Controller doesn’t save on its own, so save after you record or edit steps. Actions you take in the Controller itself aren’t recorded, only actions in the browser.
Edit Steps
Section titled “Edit Steps”When a recorded step isn’t quite right, or the application changes, you don’t have to record the whole keyword again. Change just that step:
- Choose the keyword. Use the arrows next to it to go to the previous or next keyword.
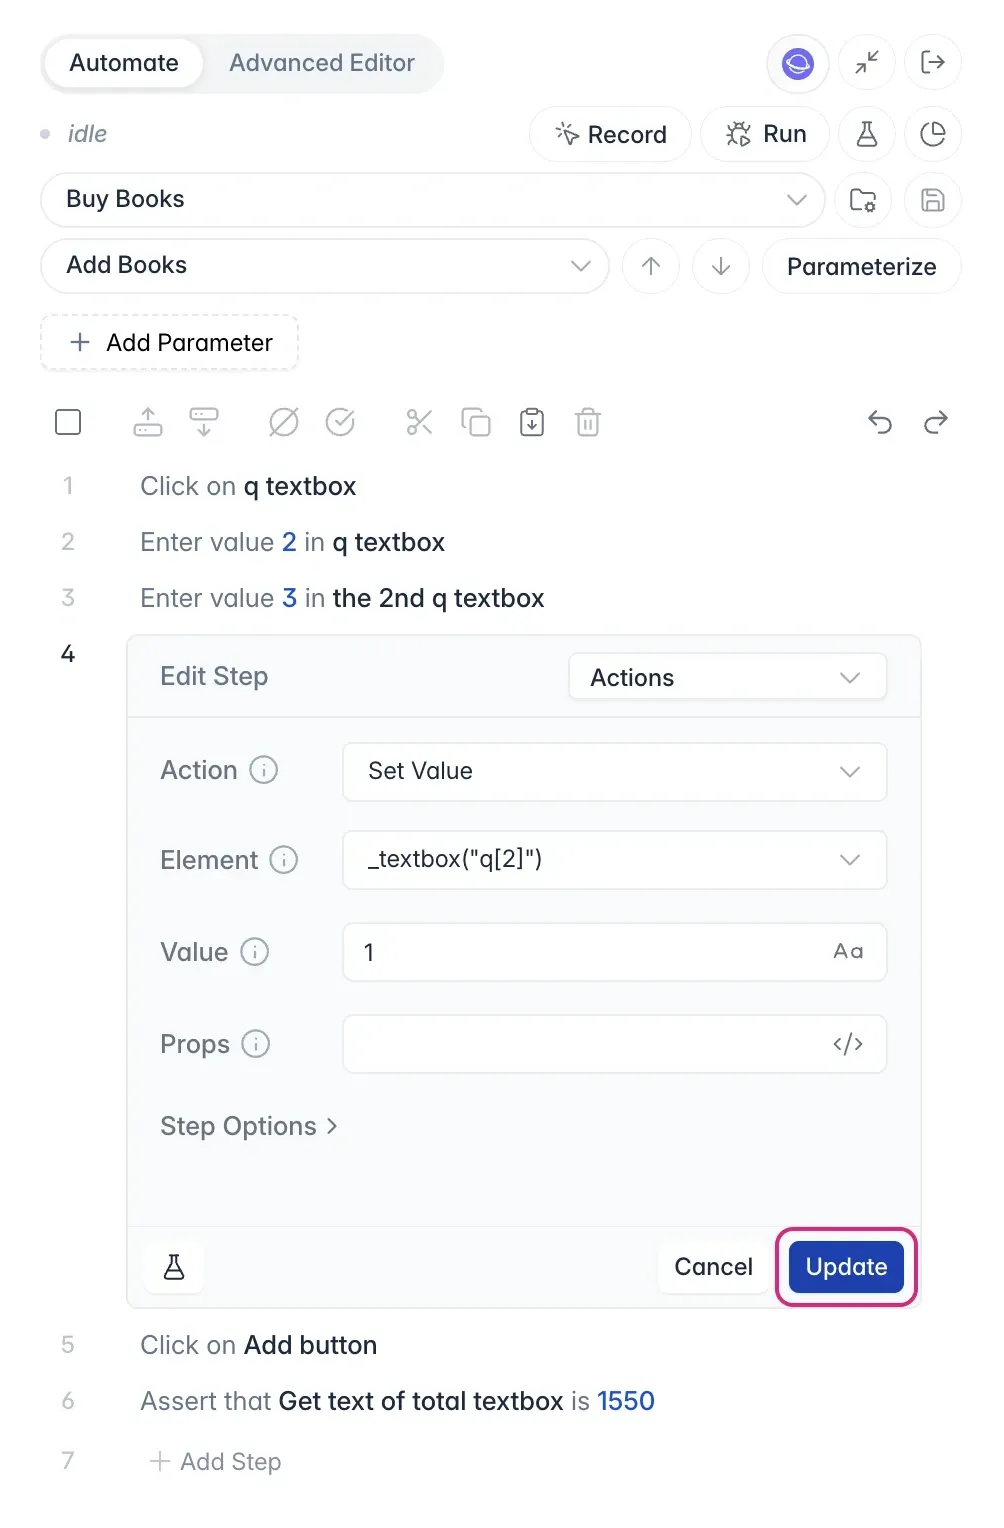
- Click a step. It opens as Edit Step, where you can change its Action, Element and Value.
- Click Update.
- Click Save.
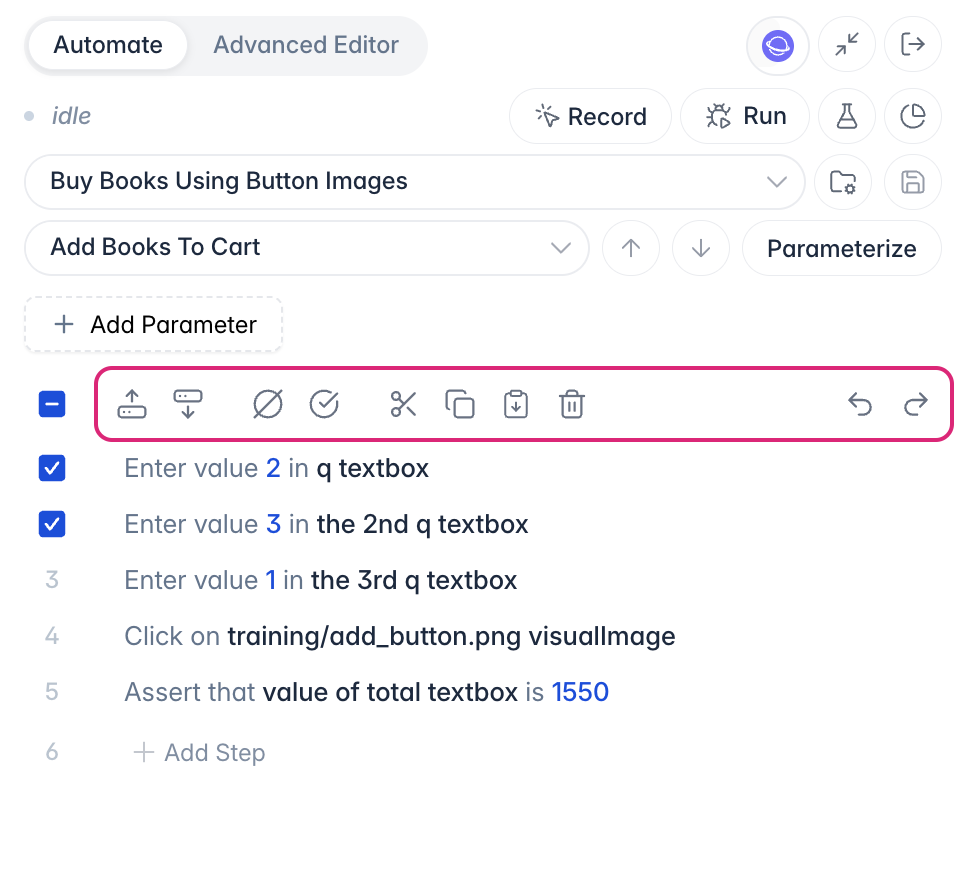
To work on several steps at once, tick them. The toolbar above the steps then moves them up or down, disables or enables them, cuts, copies, pastes or deletes them, and undoes or redoes a change. To try selected steps on the page without running the whole keyword, click Evaluate Selected Steps.
Parameterize a Keyword
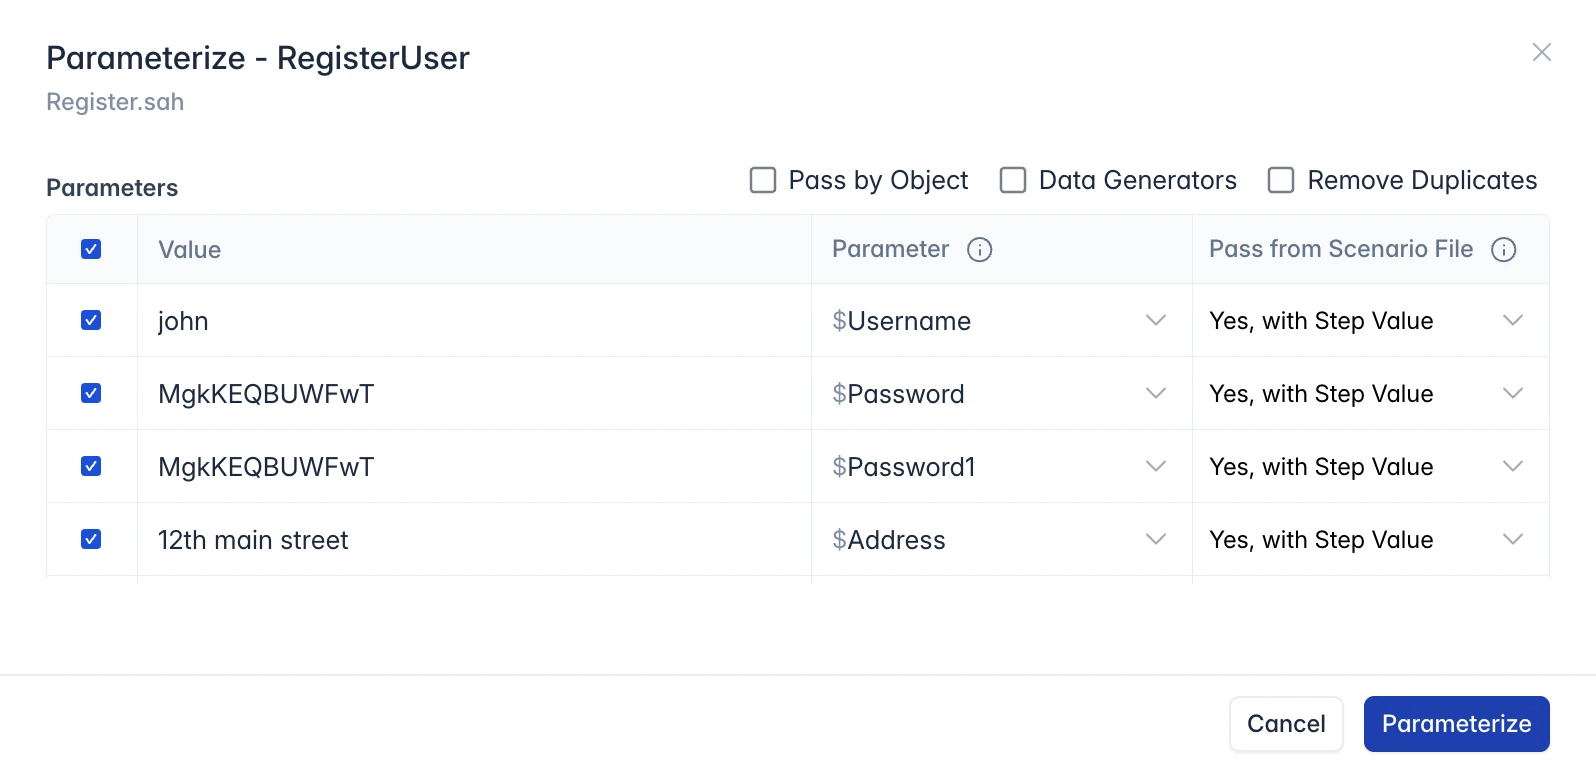
Section titled “Parameterize a Keyword”A recorded keyword keeps the exact values you typed, such as one user name, so every run uses the same data. Parameterize turns those values into parameters, so each test case can pass its own data. The dialog lists the recorded values and the parameters it suggests for them. You can pass parameters as an object, give each one a Data Generator, and remove duplicates.
For a walkthrough, see Parameters and Data Generators.
Identify Elements
Section titled “Identify Elements”Every step needs an accessor, which is how Sahi finds an element on the page, such as _textbox("user"). You identify an element in the Controller’s Advanced Editor to see its accessor, check that Sahi finds the one you mean, and turn it into a step.
Identify an Element and Add a Step
Section titled “Identify an Element and Add a Step”
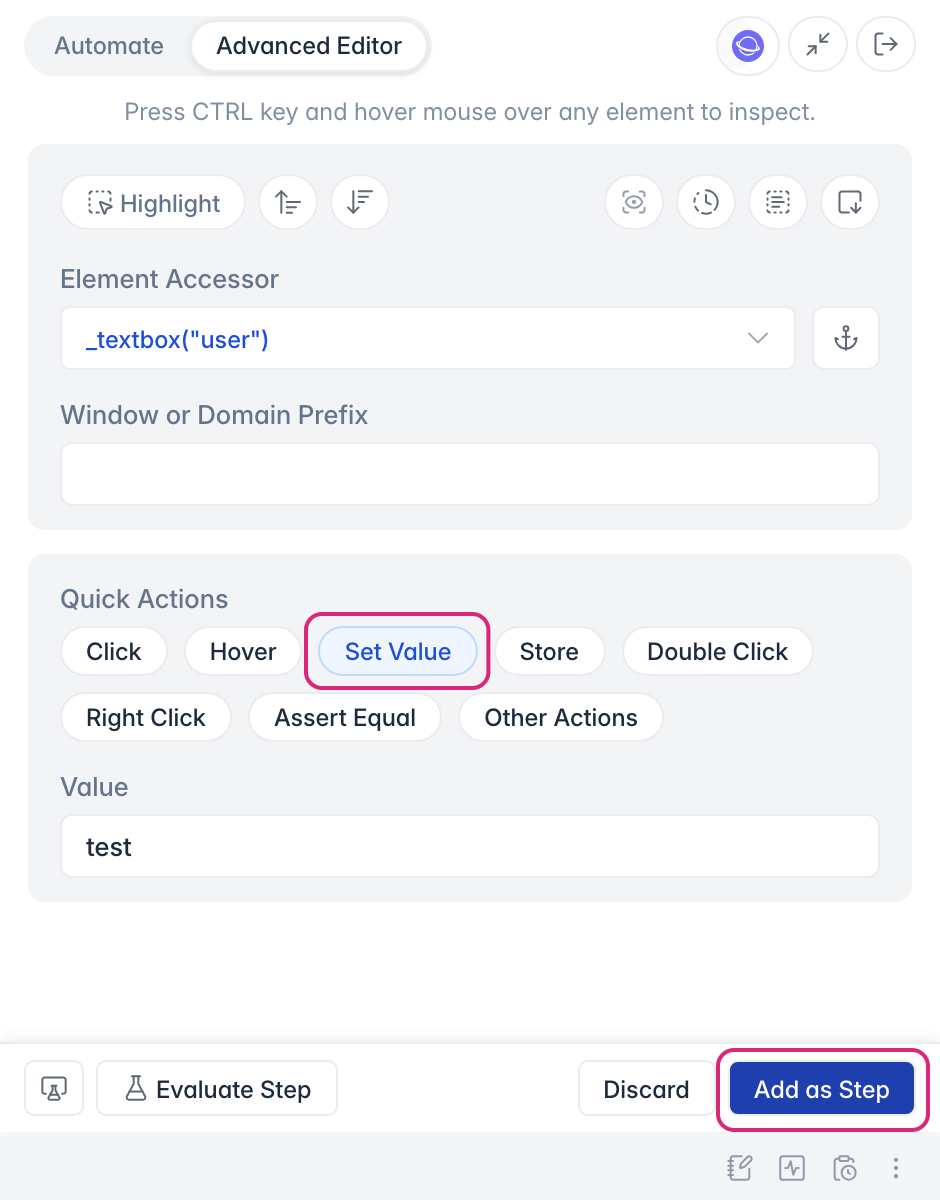
Recording only captures what you do in the browser, so some steps can’t be recorded, such as a check that the total is 1550, or storing a value to use later. Build these in the Advanced Editor:
-
Open the Advanced Editor tab.
-
Hold Ctrl (⌘ on Mac) and hover over the element in the browser. Element Accessor shows its accessor.
-
Under Quick Actions, choose what to do with the element, such as Click, Set Value, Store or Assert Equal. Other Actions has the rest.
-
Enter a Value if the action needs one.
-
Click Evaluate Step to try it on the page, then Add as Step. The step is added to the keyword. Discard clears it instead.
-
Click Save in the Automate tab. Like recorded steps, it isn’t saved until you do.
To check a value, choose Assert Equal and enter the expected value, as in Your First Test Scenario.
The Advanced Editor’s Buttons
Section titled “The Advanced Editor’s Buttons”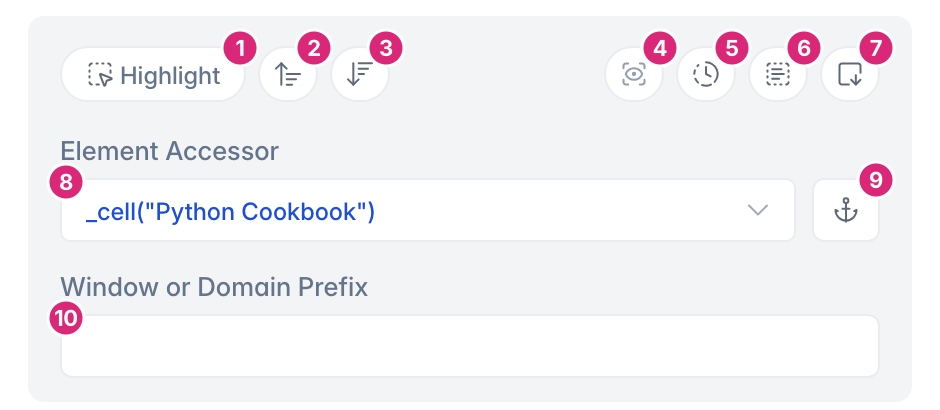
- Highlight: shows the element on the page.
- Identify parent element: moves to the element around it.
- Identify previous child element: moves back to the element inside.
- Visual Assist: turns on Visual Assist identification (see Visual Assist).
- Session info: shows the session the Controller works with.
- View Element Properties: opens the element’s properties and methods.
- Copy accessor to Evaluator: puts the accessor in the Evaluator.
- Element Accessor: the accessor for the element. Its list holds the alternatives.
- Anchor: identifies another element relative to this one.
- Window or Domain Prefix: for popups and pages from other domains.
For Windows applications, start the Desktop Engine first. See Start Windows Desktop Automation.
Identify an Element Relative to Another
Section titled “Identify an Element Relative to Another”
Some elements look the same to Sahi, such as the quantity box in each row of a table. Sahi then tells them apart by position (the third box), which breaks if the rows change. Anchor the element to a unique label next to it, such as the book’s title, instead:
- Hold Ctrl (⌘ on Mac) and hover over the element to anchor to, such as the text Python Cookbook.
- Click Anchor.
- Hold Ctrl (⌘ on Mac) and hover over the element you want. Its accessor is now relative to the anchor, for example
_textbox("q", _near(_cell("Python Cookbook"))).
See an Element’s Properties and Methods
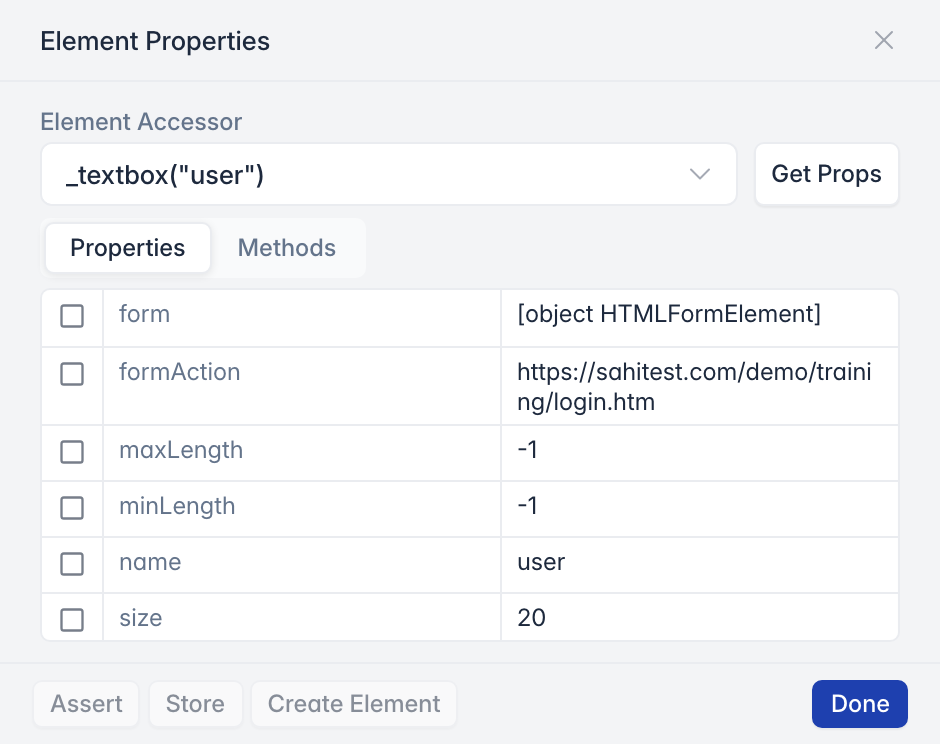
Section titled “See an Element’s Properties and Methods”Sometimes the check you need isn’t an element’s text or value but one of its properties, such as whether a field is disabled or how many characters it allows. Element Properties lists them all. Identify the element, then click View Element Properties, the third of the four icons at the top right of the Advanced Editor (6 in the picture above). The Properties tab lists the element’s properties and their values, and Methods lists what the element supports. Select properties and click Assert or Store to turn them into steps.
Visual Assist
Section titled “Visual Assist”Some elements can’t be found from the page’s code, such as a button that’s only an image, or text inside a picture. Visual Assist finds them by how they look instead. It needs the Visual Assist Engine.
-
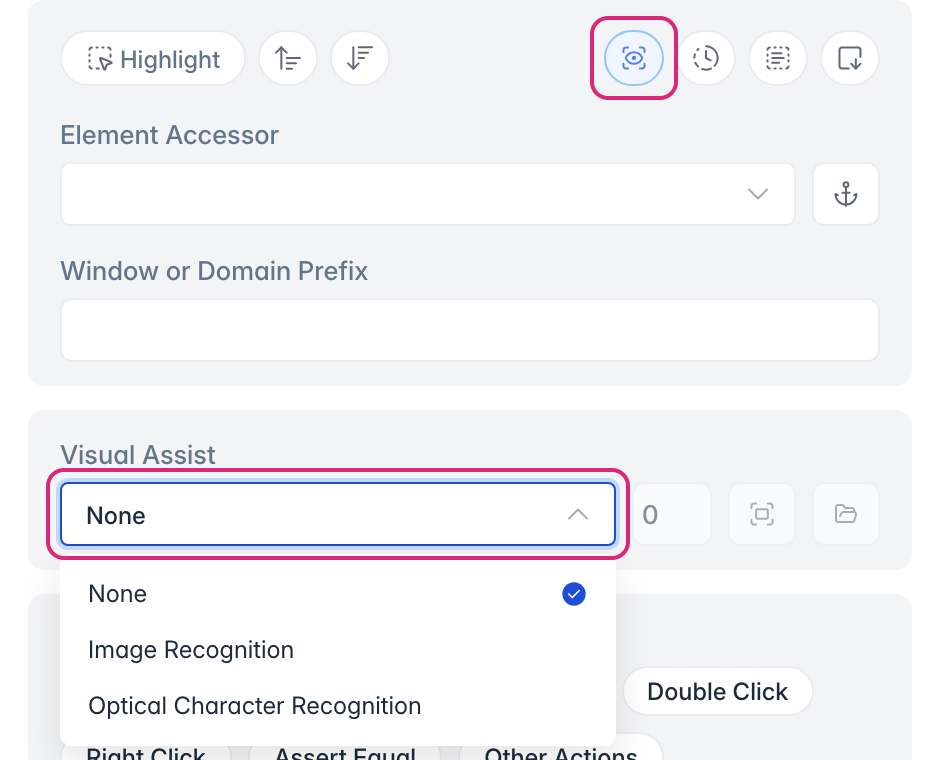
In the Advanced Editor, click Visual Assist (4 in the picture above). The Visual Assist panel appears.
-
Choose how to find the element: Image Recognition finds it by its picture, and Optical Character Recognition finds it by its text.
-
For Image Recognition, click Capture an image to identify to capture the image to look for. The number beside it delays the capture by that many seconds, so you can bring the right window to the front first. Open the images directory shows the images you’ve captured.

For a walkthrough, see Visual Assist Automation - Getting Started.
Evaluate Code in the Evaluator
Section titled “Evaluate Code in the Evaluator”
When a step fails, it’s hard to tell whether the accessor is wrong or the page isn’t ready yet. The Evaluator runs a piece of Sahi code on the page straight away and shows the result, so you can test an idea without running the whole test.
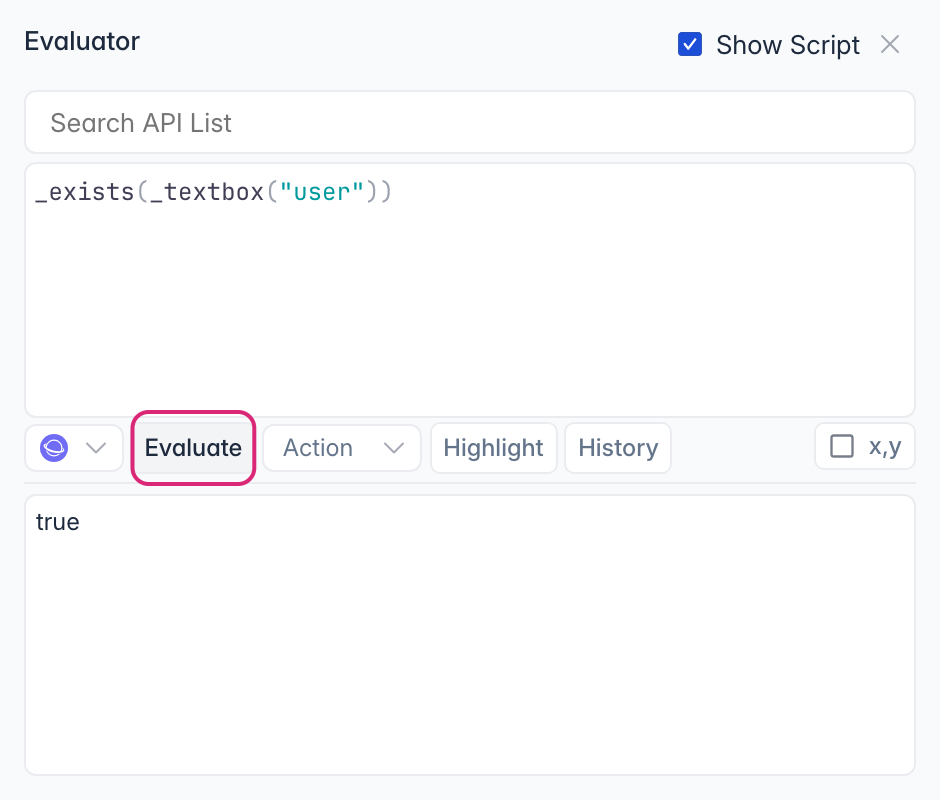
- In the Advanced Editor, click Open Evaluator, and select Show Script.
- Type the code, for example
_exists(_textbox("user")). - Choose the mode, then click Evaluate. The result appears below.
The mode is the kind of application the code runs against, such as Browser, Windows or Java. Choose JS to run plain JavaScript instead of Sahi code.
To run only part of the code, select it before you click Evaluate. The box can hold several statements, so you can keep a few checks there and run one at a time.
-
Search API List: start typing a function name and press Enter. The function is added with its parameters.
-
Action: select part of the code, such as an accessor, and choose an action for it, such as Get Value, Get Text, Exists or Is Visible. The result shows for just that part.
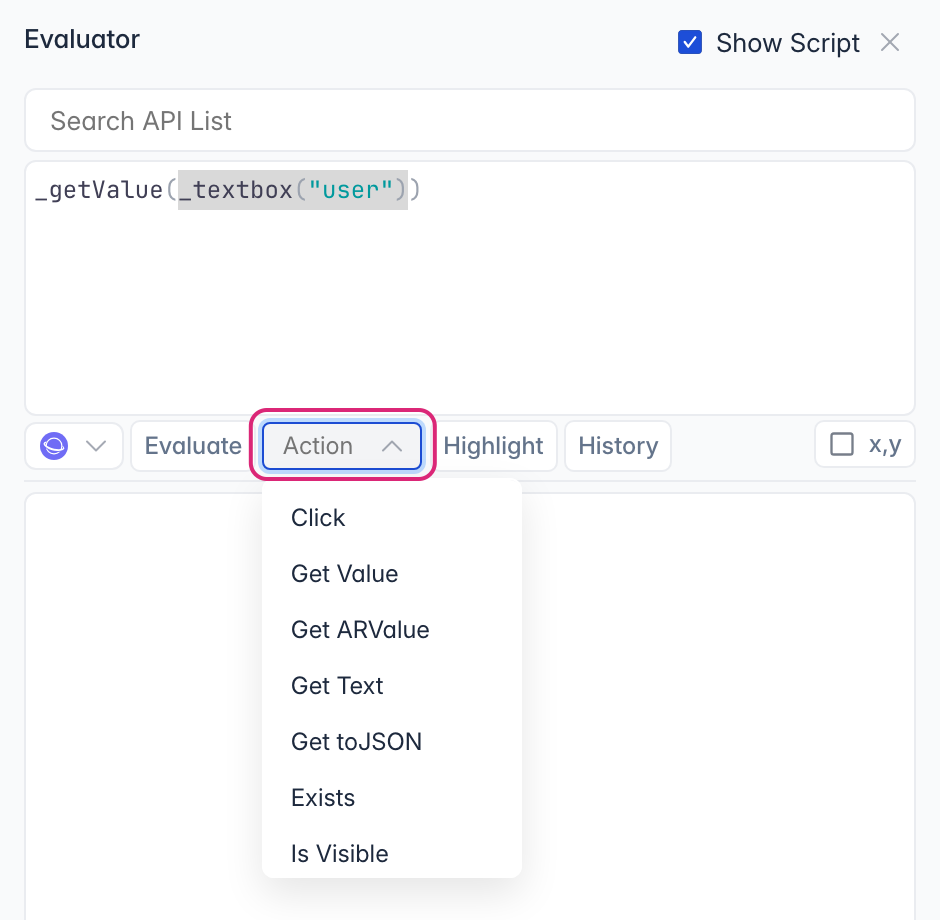
-
Highlight shows the element in the code on the page.
-
History lists your recent recording actions.
-
x,y: select it, then hold Ctrl+Shift (⌘+Shift on Mac) and move the mouse over the page to see the point’s clientX and clientY.
Run and Debug
Section titled “Run and Debug”
Hover over Run to run the keyword, part of the test case or all of it, and use Pause, Play, Step and Stop while it runs. See Run Tests via Controller.
Use an Accessor Repository
Section titled “Use an Accessor Repository”
When an element on the page changes, every script that uses its accessor stops finding it, and you’d have to fix each one. An Accessor Repository (AR) keeps accessors in one place, so you update an accessor once and every script that uses it gets the change. An AR is a Sahi script whose name ends in _AR.sah.
-
In the Automate tab, click File Settings.
-
Turn on Enable AR, and choose the file under Accessor Repo.
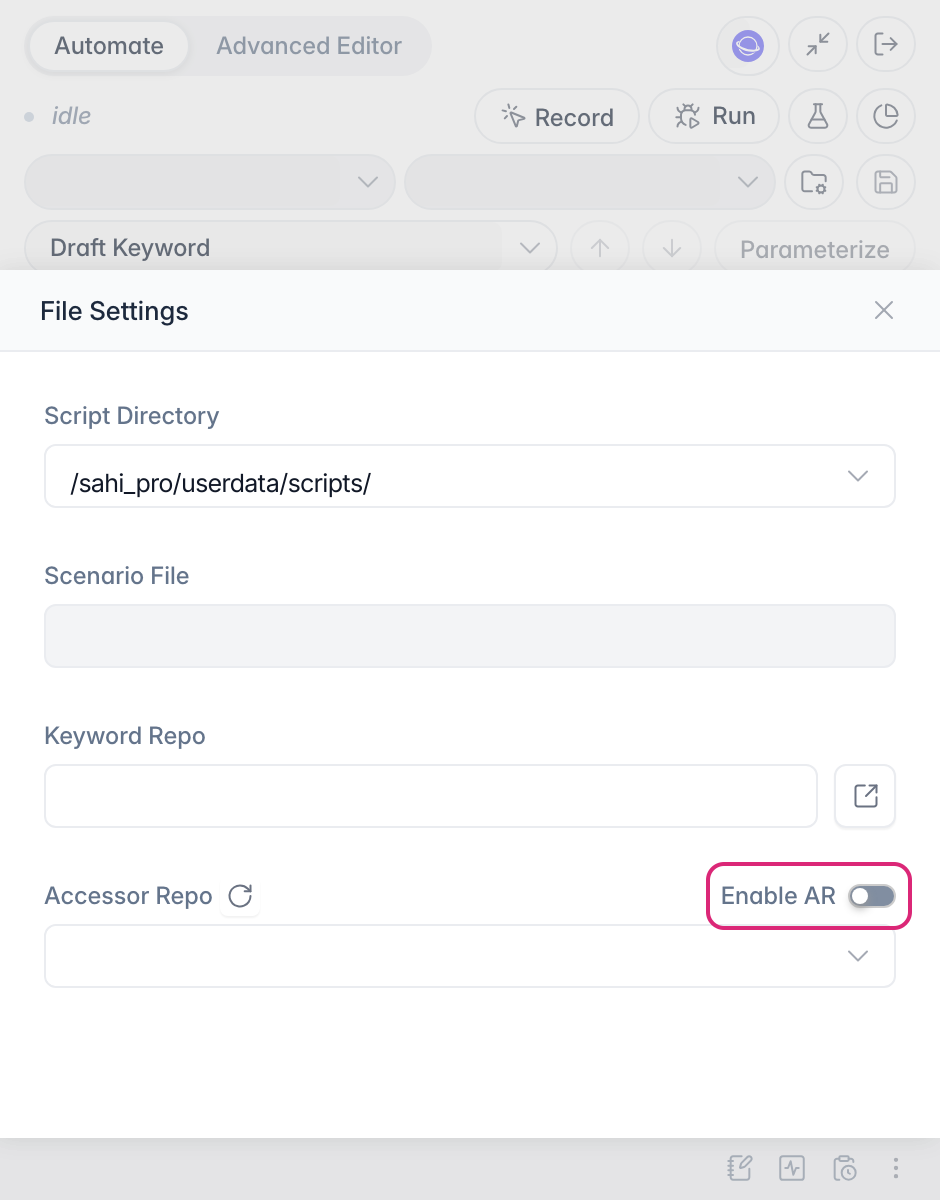
With AR on, the Advanced Editor shows an Accessor Name for the element, and Update in AR saves its accessor to the repository.
Once an element is in the AR, Sahi identifies it by its AR entry first, even when you aren’t recording. So the same element isn’t identified in different ways in different tests, and an element someone already anchored, for example with _near, keeps that accessor for everyone.
File Settings also shows the script directory, the scenario file and the keyword repository the Controller records into. You can’t change them while recording.
The script directories come from scripts.dir in userdata/config/userdata.properties, one per project, separated by semicolons. Relative paths are relative to the userdata directory:
scripts.dir=scripts;D:\my_custom_folderClipboard and Controller Info
Section titled “Clipboard and Controller Info”- Clipboard in the bottom bar keeps small pieces of text while you work.
- Controller Info in the ⋮ menu shows the versions of Sahi Pro and its engines, the Controller mode, and details of the browser, operating system and Java.