Sahi Framework - Scenario File
abstract
The Sahi Framework allows testers to write their testcases in a Spreadsheet (Excel like) interface and run it from Sahi.
Often a testing team consists of a mix of subject matter experts, some manual testers and testers with some automation experience. Writing tests in the language of the business allows all stake holders to participate and derive value out of the automation process.
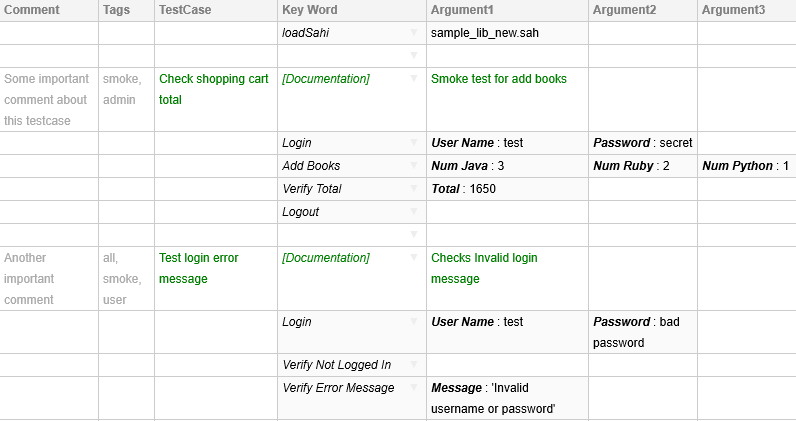
A sample Scenario looks like this:

These tests talk mostly in the language of the business (also called a Domain Specific Language or DSL for that business),
and hide away all the implementation details of clicking buttons and populating textboxes.
The implementation details are moved into an included Sahi script, which is linked to this Scenario via the initial
| loadSahi | sample_lib_new.sah |
statement.
The code in sample_lib_new.sah is given below:
_navigateTo("/demo/training/");

function Login($UserName, $Password){
	_setValue(_textbox("user"), $UserName);
	_setValue(_password("password"), $Password);
	_click(_submit("Login"));
}

function AddBooks($NumJava, $NumRuby, $NumPython){
	_setValue(_textbox("q", _near(_cell("Core Java"))), $NumJava);
	_setValue(_textbox("q", _near(_cell("Ruby for Rails"))), $NumRuby);
	_setValue(_textbox("q", _near(_cell("Python Cookbook"))), $NumPython);
	_click(_button("Add"));
}

function VerifyTotal($Total){
	_assertEqual($Total, _textbox("total").value);
}

function Logout(){
	_click(_button("Logout"));
}

function VerifyNotLoggedIn(){
	_assertExists(_textbox("user"));
}

function VerifyErrorMessage($Message){
	_assert(_isVisible(_div("errorMessage")));
	_assertEqual($Message, _getText(_div("errorMessage")));
}
Executing the Scenario file is no different from executing a Sahi script.
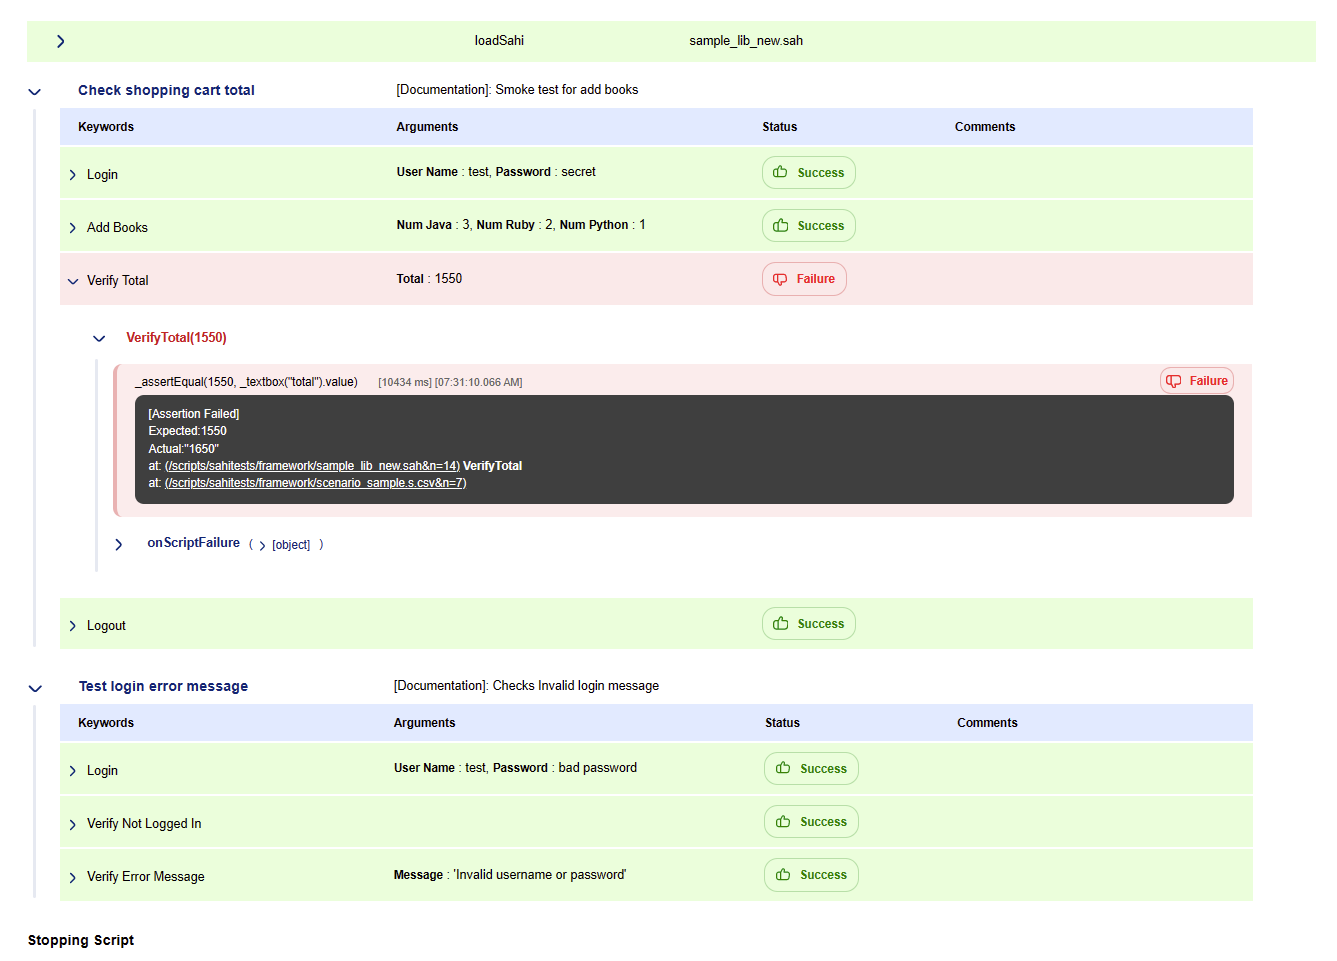
On execution, Sahi generates logs showing success or failure. Logs are visible from the "Logs" link in Playback tab.
Logs can also be accessed via http://localhost:9999/logs
A sample log is shown below. Clicking any step expands to show the underlying Sahi steps.

info
Refer to ]sahi/userdata/scripts/sahitests/framework folder for some examples.
The rules for writing a Scenario file are as follows
-
The first line should be populated with
TestCase | Key word | Argument 1 | Argument 2 | Argument 3
The names of the columns should not be left blank
-
Tags column can appear before TestCase column. It associates tags with testcases. During execution, tags can be provided to filter testcases to run.
-
Any column appearing before
TestCase column will be ignored except Tags column.
-
If the
TestCase column is populated, a new testcase is started.
warningSquare brackets should not be present in the name of testcase. The scenario will fail, if it is present.
-
The column after TestCase is the Key Word column. It holds keywords. Keywords are mapped to functions in the included Sahi script.
They can be user defined functions or Sahi APIs themselves, though calling Sahi APIs directly from Scenario file is not recommended.
Keywords are translated to function names by removing all spaces and removing any text within brackets.
For example,
Given a function:
function Login($UserName, $Password){
	...
}
| Login | test | secret |
in the Scenario file, maps to the javascript call
Login("test", "secret");
-
When using named parameters, the corresponding parameter is passed correctly. Spaces are also removed from Paramater names.
Eg.
| Login | Password: secret | User Name: test |
in the Scenario file, maps to the javascript call
Login("test", "secret");
Note that the order of parameters has been corrected when calling the function.
function Login($UserName, $Password){
	...
}
The Scenario file also supports variables, eg.
| | $amount= | 1000 | | |
| | verifyAmount | $amount | | |
Eg. To get the value returned by function
createUserInGroup:
Using [ReturnValue]
| | createUserInGroup | "My name" | "My group" | |
| | $userId= | [ReturnValue] | | |
| | verifyUserCreated | $userId | "My name" | "My group" |
info[ReturnValue] is a keyword to access return value of function executed in previous step. Added since Sahi Pro 6.1.0
Inline declaration
| | $userId=createUserInGroup | "My name" | "My group" | |
| | verifyUserCreated | $userId | "My name" | "My group" |
Inline as code
| | $msg= | _getText(_cell("msg")) | | |
| | _assertEqual | $msg | "abcd" | |
Different testcases may need the same steps to be executed before and after.
For example, one may need to login before and logout after each testcase.
This can be accomplished through global SetUp and TearDown blocks.
TearDown will be called inspite of any errors or failures in the testcase.
infoThe [Global] keyword is mandatory and defines these [Setup] and [Teardown] methods for all testcase blocks.
| [Global] | [SetUp] | | | |
| | _log | "In Global Setup" | | |
| | login | "test" | "secret" | |
| | | | | |
| | [TearDown] | | | |
| | _click | _button("Logout") | | |
| | _log | "In Global Teardown" | | |
| | | | | |
| Verify books total | [Documentation] | Check once | | |
| addBooks | 3 | 2 | 1 |
| verifyTotal | 1650 | | |
| | | | | |
| Verify books again | [Documentation] | Check again | | |
| | addBooks | 3 | 2 | 2 |
| verifyTotal | 2000 | | |
This will execute as:
| | _log | "In Global Setup" | | |
| | login | "test" | "secret" | |
| addBooks | 3 | 2 | 1 |
| verifyTotal | 1650 | | |
| | _click | _button("Logout") | | |
| | _log | "In Global Teardown" | | |
| | | | | |
| | | | | |
| | _log | "In Global Setup" | | |
| | login | "test" | "secret" | |
| addBooks | 3 | 2 | 2 |
| verifyTotal | 2000 | | |
| | _click | _button("Logout") | | |
| | _log | "In Global Teardown" | | |
| Data Driven Example | [Keyword] | Add Books Check | | | |
| | | | | | |
| | [SetUp] | | | | |
| | login | "test" | "secret" | | |
| | | | | | |
| | [TearDown] | | | | |
| | _click | _button("Logout") | | | |
| | | | | | |
| | [Documentation] | java | ruby | python | total |
| | [Data] | 3 | 2 | 1 | 1650 |
| | | 4 | 5 | 0 | 2100 |
| | | 0 | 1 | 9 | 3350 |
This roughly translates to:
| | login | "test" | "secret" | | |
| | Add Books Check | 3 | 2 | 1 | 1650 |
| | _click | _button("Logout") | | | |
| | | | | | |
| | login | "test" | "secret" | | |
| | Add Books Check | 4 | 5 | 0 | 2100 |
| | _click | _button("Logout") | | | |
| | | | | | |
| | login | "test" | "secret" | | |
| | Add Books Check | 0 | 1 | 9 | 3350 |
| | _click | _button("Logout") | | | |
| | | | | | |
Normally, parameter data is passed inline to keywords/functions in scenario files.
However, one may want to keep the parameter data in a separate file for easier maintenance.
Sahi Pro 6.2 adds the ability to represent data in external files or database and allows an easy way of accessing such externalized data.
There can be three different ways of accessing external data in Sahi's excel framework:
1) Through CSV file by using _readCSVFile api
| D1=_readCSVFile | sample_data.csv | |
2) Through excel file by using _readExcelFile api
| D2=_readExcelFile | sample_data.xls | |
3) Through database by using _getDB api
| $db= | _getDB($jdbcDriver, $jdbcURL, "", "") | |
| $sql= | "SELECT * FROM EXTERNALDATA" | |
| D3= | $db.selectWithHeader($sql) | |
To understand how this data can be used in scenario files.
Consider a situation where a new user is to be created and added to the database. Each user has four properties lets say firstname, lastname, age, gender.
One wants to pass these parameters as data in a function called "addUser()", which takes these four parameters in the same sequence as mentioned above.
function addUser(firstname, lastname, age, gender) {
	...
}
function addUserEmail(firstname, email) {
	...
}
Now, lets have a look at how the external data can look like.
sample_data.csv
| Case 1 |
data1 |
Shyam |
Sundar |
11 |
male |
|
|
|
|
|
|
| Case 2 |
data2 |
firstname |
lastname |
age |
gender |
|
|
Shyam |
Sundar |
11 |
male |
|
|
Jack |
Sparrow |
21 |
male |
|
|
|
|
|
|
| Case 3 |
data3 |
age |
gender |
firstname |
lastname |
|
|
11 |
male |
Shyam |
Sundar |
|
|
21 |
male |
Jack |
Sparrow |
|
|
|
|
|
|
| Case 4 |
data4 |
firstname |
lastname |
age |
gender |
|
|
Jack |
Sparrow |
21 |
male |
|
|
|
|
|
|
|
|
Shyam |
Sundar |
11 |
male |
|
|
|
|
|
|
From database:
| Case 5 |
firstname |
lastname |
age |
gender |
|
|
Jack |
Sparrow |
21 |
male |
|
|
Shyam |
Sundar |
11 |
male |
|
sample_data.xls
|
firstname |
email |
|
|
|
|
Shyam |
shyam@gmail.com |
|
|
|
|
Jack |
jack@gmail.com |
|
|
|
Here data1 is a 1-dimensional array, which can be directly accessed as [D1:data1] and passed to the addUser function.
| TC:addUser |
[Documentation] |
Add User to the database |
|
addUser |
[D1:data1] |
Or
| TC:addUser |
[Keyword] |
addUser |
|
[Data] |
[D1:data1] |
Here data2 is a 2-dimensional array and column sequence is same as that required by the function. So it can either be passed directly as [D1:data2] or each parameter in the same sequence as required.
| TC:addUser |
[Keyword] |
addUser |
|
|
|
|
[Data] |
[D1:data2] |
|
|
|
| // or |
[Data] |
[D1:data2:firstname] |
[D1:data2:lastname] |
[D1:data2:age] |
[D1:data2:gender] |
Here also data3 is a 2-dimensional array but sequence of the columns is not the same as the function. So here we
can not pass it directly as [D1:data3].
| TC:addUser |
[Keyword] |
addUser |
|
|
|
|
[Data] |
[D1:data3:firstname] |
[D1:data3:lastname] |
[D1:data3:age] |
[D1:data3:gender] |
This is same as the Case2. Empty rows will be ignored.
This is the case when we fetch data from any database using _getDB. There is no key like "data1" here so each column can be accessed as [D2::columnName].
| TC:addUser |
[Keyword] |
addUser |
|
|
|
|
[Data] |
[D3::firstname] |
[D3::lastname] |
[D3::age] |
[D3::gender] |
This is the case when we fetch data from any individual row. Each column can be accessed as [D1:data2#Jack:username].
Here
#Jack is the reference to the required row and "username" is the required column's name.
infoReference (for example: here #Jack) should be always from the first column of the required row.
| TC:addUser |
[Documentation] |
Add User to the database |
|
|
|
|
addUser |
[D1:data2#Jack:username] |
[D1:data2#Jack:lastname] |
[D1:data2#Jack:age] |
[D1:data2#Jack:gender] |
Or
| TC:addUser |
[Keyword] |
addUser |
|
[Data] |
[D3:data2#Jack] |
This is the case when we fetch data from two or more files. Here
username is fetched from
sample_data.csv file and email is fetched from
sample_data.xls file.
| TC:addUserEmail |
[Documentation] |
Add User Email to the database |
|
|
addUserEmail |
[D1:data2:username] |
[D2::email] |


