


Android Automation - Getting Started
abstract
This section helps you quickly get started with Android Automation.
To automate an Android Devices/Simulators using Sahi Pro Flowcharts, refer Android Automation - Getting Started.
Pre-requisites
-
Desktop
- The machine needs to have Android Platform Tools installed so that ADB is available in the system. Having a full blown Android SDK is even better.
- Make sure the path to the Android Platform Tools folder is added to the PATH environment variable. To test this, open a command prompt and type adb (or adb.exe). ADB should start up if the Android Platform Tools folder is in the PATH.
-
Device
-
Connect the device. Enable USB debugging from Settings -> Developer options.
- To enable Developer options, go to Setting -> About phone -> scroll to Build number and tap it 7 times.
- If you already have the driver for the device installed, you should now be connected through adb. If not, install the USB driver for the device.
- The device has to be connected through USB cable throughout the duration of the test. Alternatively, you can setup adb over Wi-Fi as well if you do not wish to tether the device.
- Screen lock should be removed and display options should be set such that the device does not sleep throughout the execution of the script.
- When the device is connected for the first time, you may get an alert asking for permission to connect. Set it to always accept the connection.
- To know the device ID which is connected to the machine, type
adb devicesin command prompt.
-
Connect the device. Enable USB debugging from Settings -> Developer options.
Play Protect Warning
On the Android device,Google Play Protect scans for apps that are not known to Play Protect and warns the user during installation.
When running a script on the Android device or connecting to it through the Android Viewer for the first time, Sahi first installs 2 apps on the device to facilitate Android testing. Since these apps are for testing purpose and are not from the Play Store,
Google Play Protect can display the following warning.
Warning: Send app for a security check?
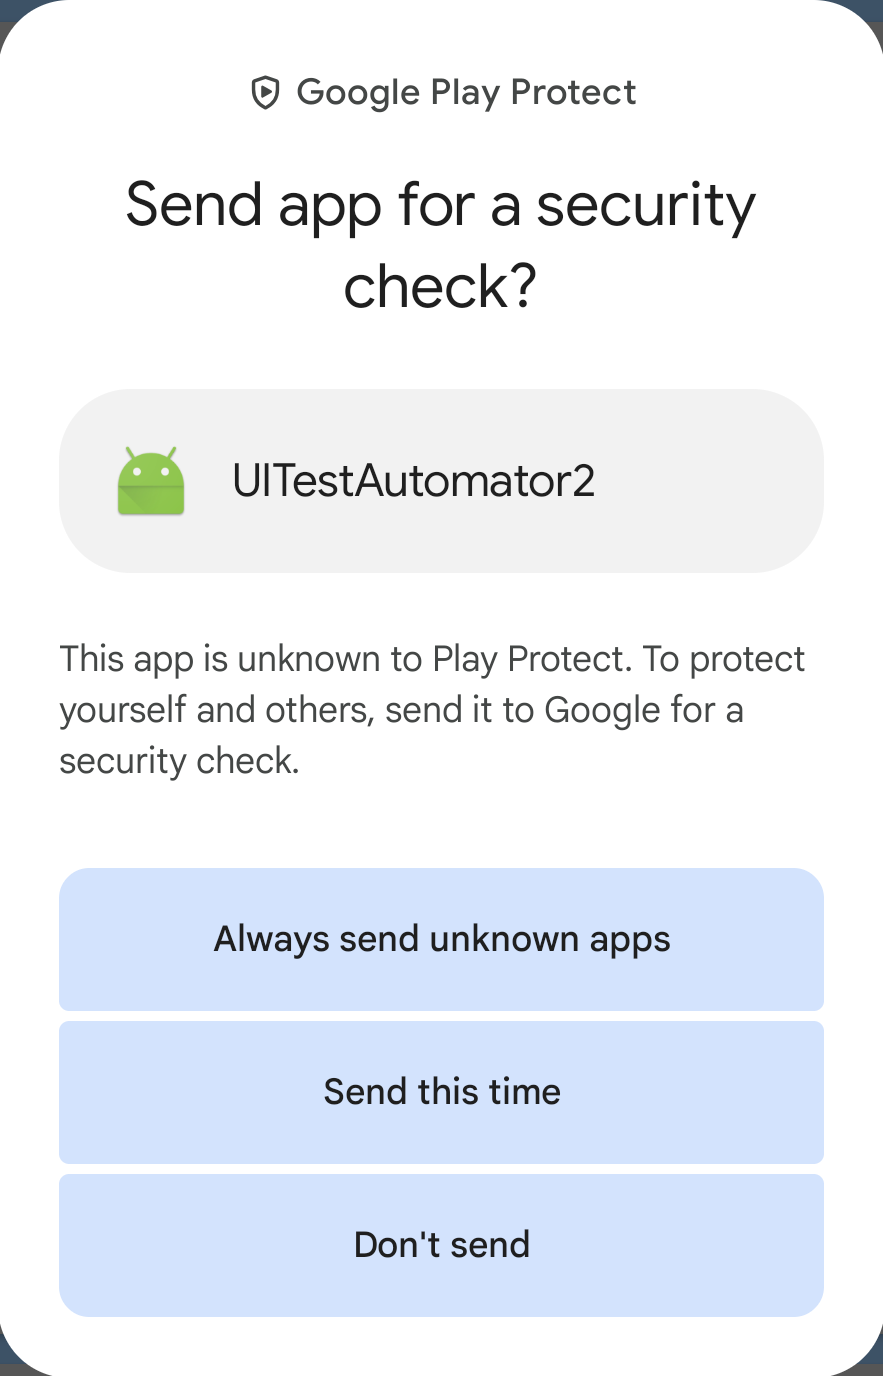
- Click on
Don't sendto dismiss the warning. - You will see a similar warning for the 2nd app -
in.co.sahi.android.test. - Click on
Don't sendagain to dismiss the 2nd warning. The connection will proceed successfully.
- Open the
Play Storeapp on the device. - At the top right, tap the
Profileicon. - Tap
Play Protectfrom the list. Play Protectscreen opens. At the top right, tap theSettingsicon.-
The following screen opens.
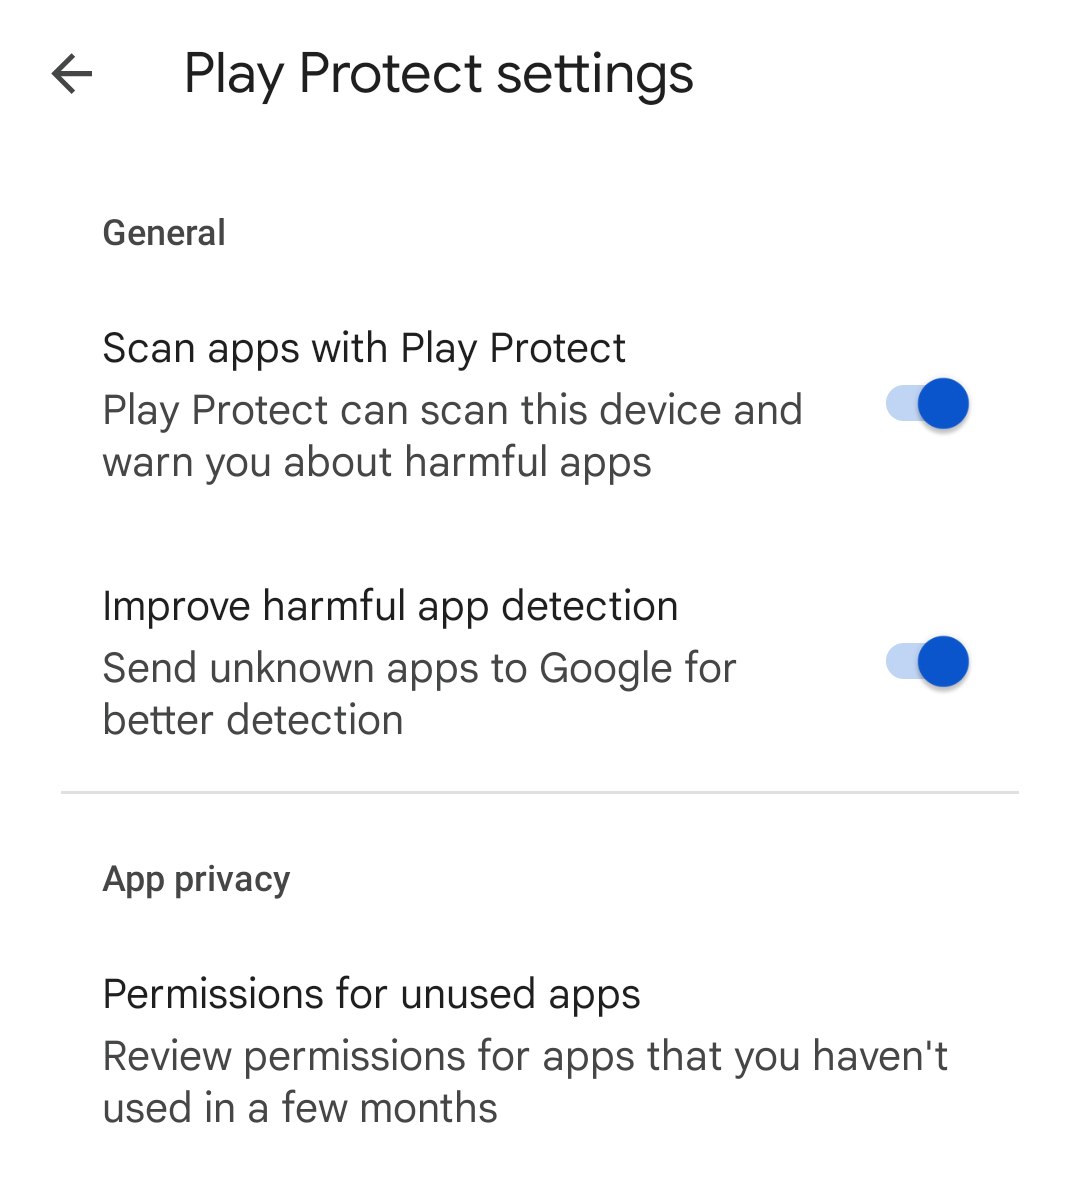
- Tap the second option,
Improve harmful app detectionto switch itOFF. The screen now looks like this.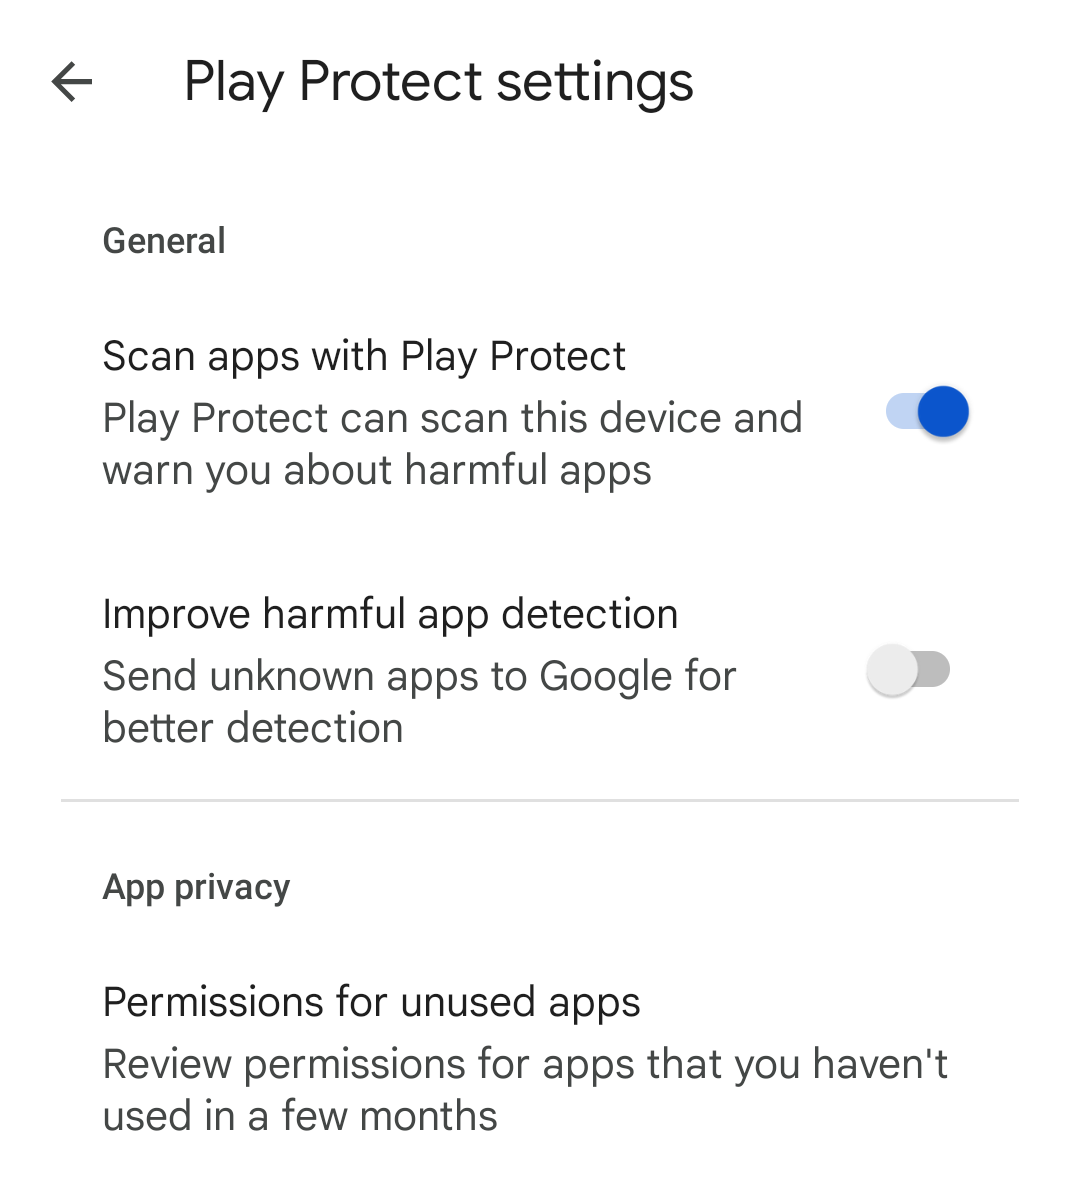
- Connecting the Android Viewer again or running the script will not show the
Play Protectwarning again.
Download and Install Sahi Pro Mobile Add-on
You need to install Sahi Pro Mobile Add-on before you can proceed with the Quick TutorialQuick Tutorial
- Connect the Android Device to the system.
- Install the Sample Application
<SAHI_INSTALLATION_FOLDER>/userdata/android/testapps/AndroidApp.apkon the device.- Open a Command Prompt(Windows) or Terminal Shell(Mac, Linux etc.)
- Type
cd <SAHI_INSTALLATION_FOLDER>/userdata/android/testappsand press enter. - Type
adb install AndroidApp.apkand press enter to install the app.
- Start Sahi Dashboard and click on the
Androidbutton.
- This brings up Android Viewer in system's default browser.
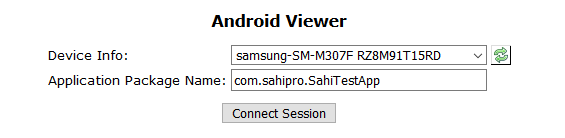
- Now select the device from the
Device Infodropdown
SpecifyApplication Package Name:com.sahipro.SahiTestApp - Now click on
Connect Sessionbutton. - This will start
com.sahipro.SahiTestAppapplication in Android device. The device screen is also visible on the Android Viewer.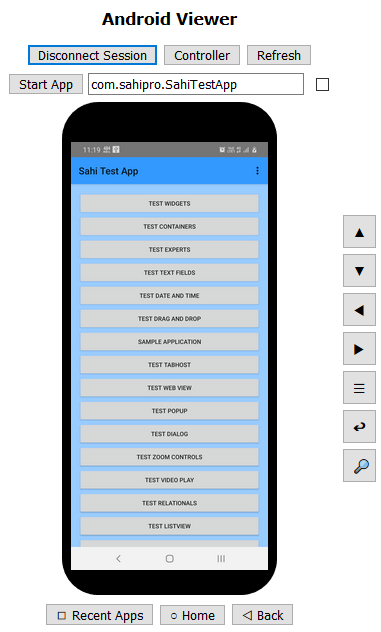
- Launch the Controller by press ALT key and then double click on the Android Viewer window.
- Specify a script name (test_sample_app.sah) in Controller and click on
Recordbutton. - Now on the Android Viewer click the
Sample Applicationbutton.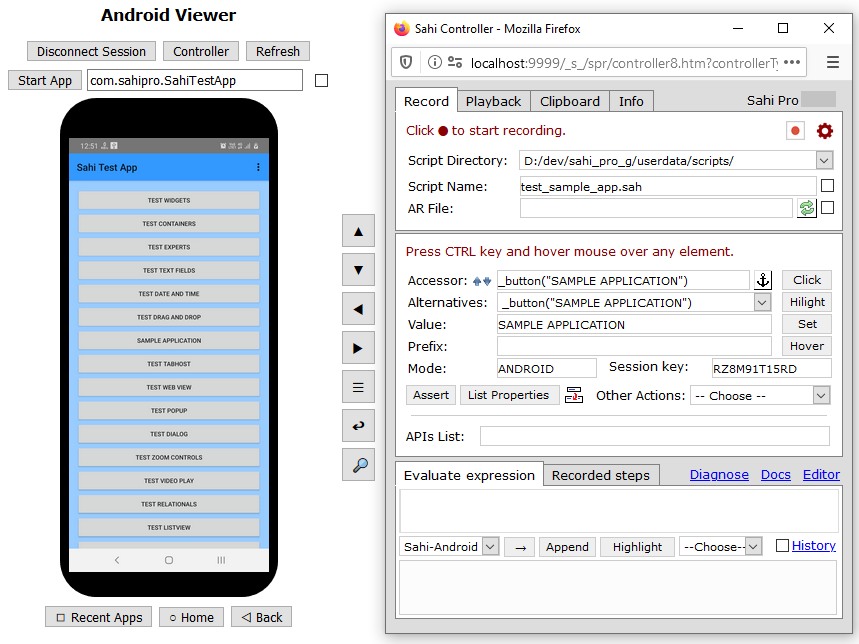
- This will bring up the Login screen.
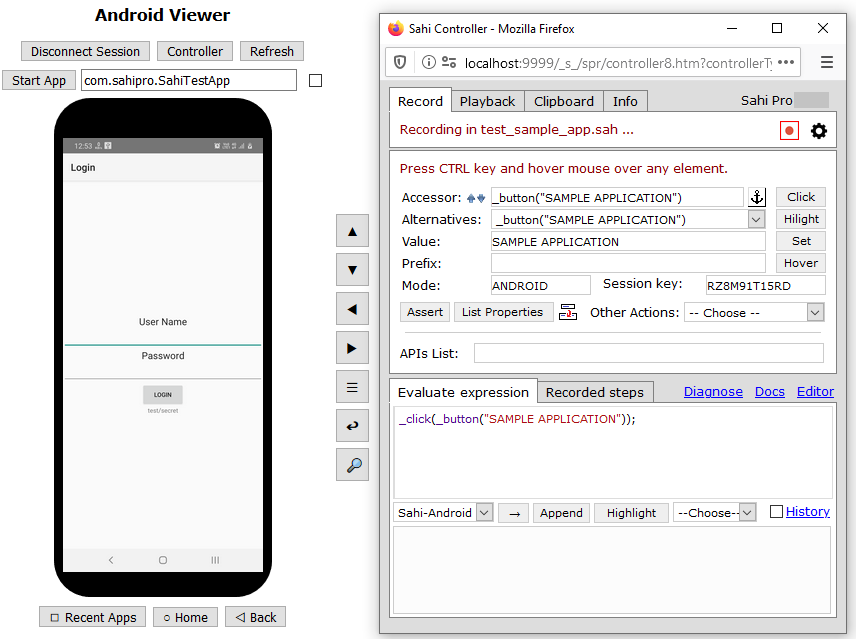
- Click on the textbox below User Name. This makes the element editable in the Viewer.
Type "test" in textbox and press enter.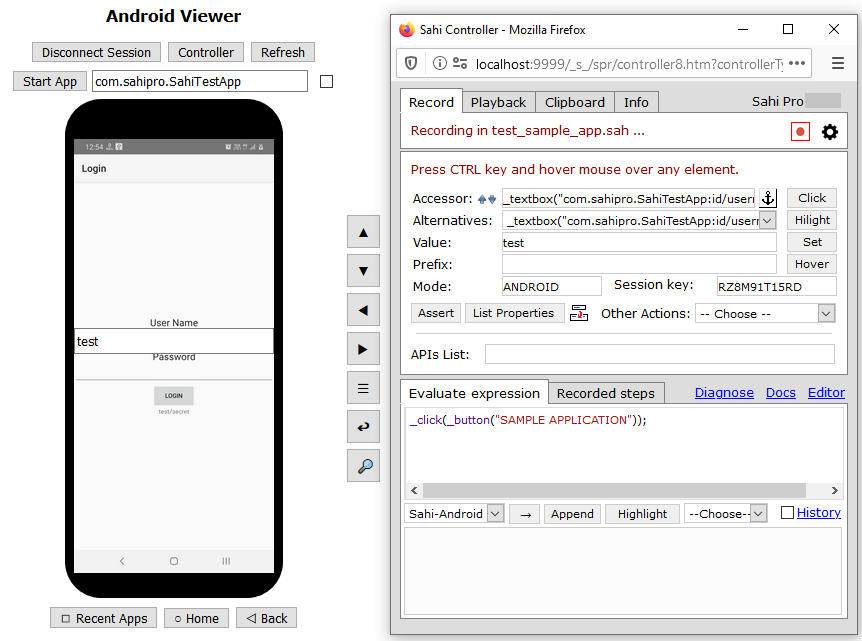
- Click on the textbox below Password. This brings up the textbox on the screenshot where you can specify the Password.
Type "secret" in textbox and press enter.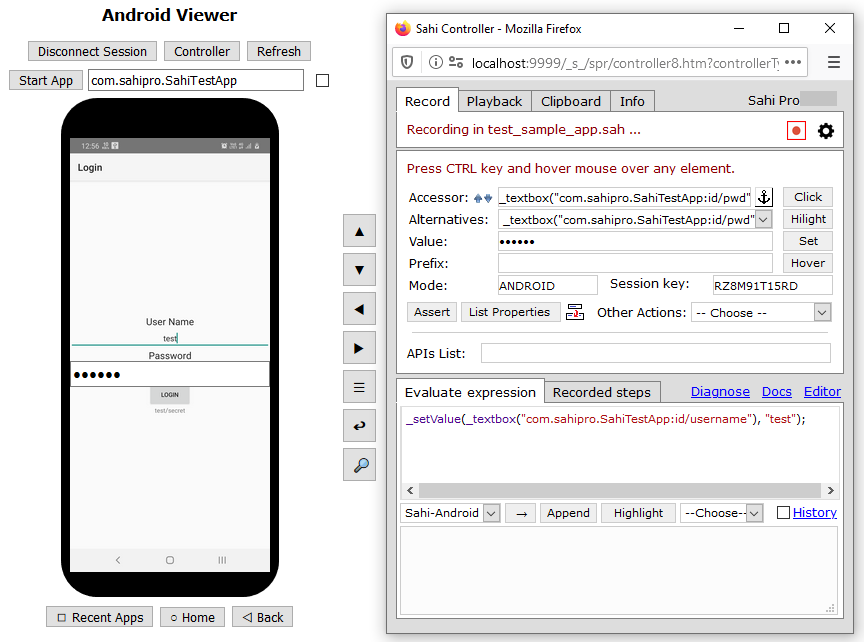
- Click on the
Loginbutton. This will brings up the Add Books screen.
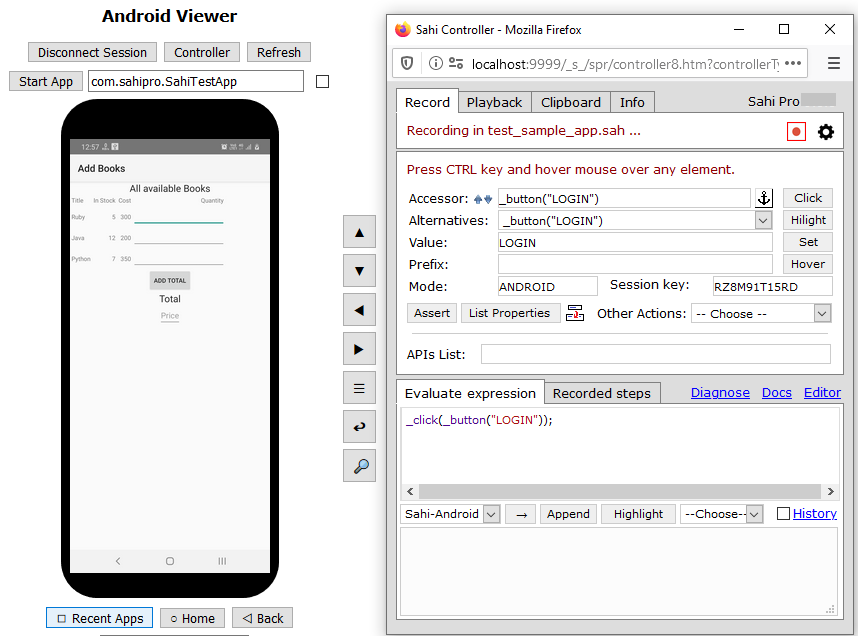
- Click on the textbox right side of
Ruby. This brings the textbox on the screenshot where you can specify the number of books.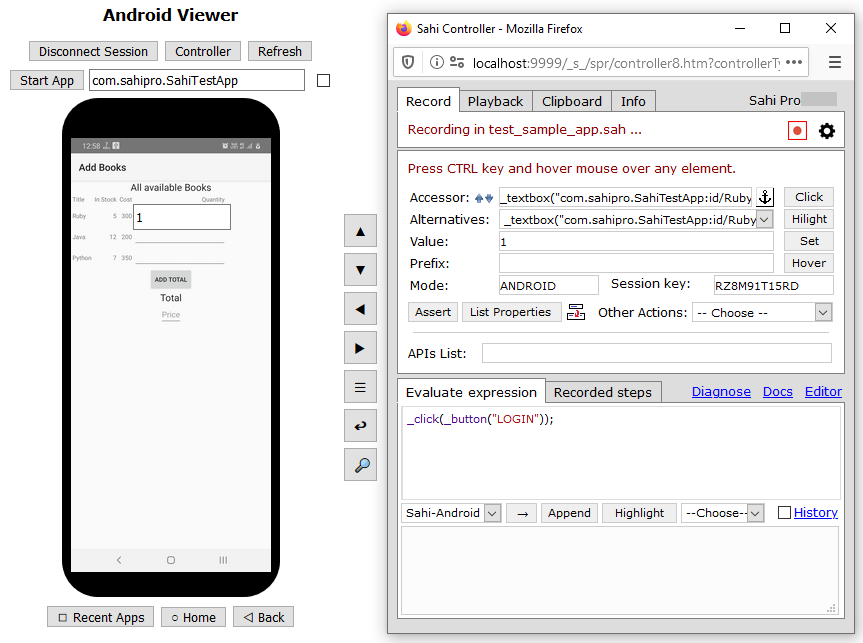
- Click on the textbox right side of
Java. This brings the textbox on the screenshot where you can specify the number of books.
- Click on the textbox right side of
Python. This brings the textbox on the screenshot where you can specify the number of books.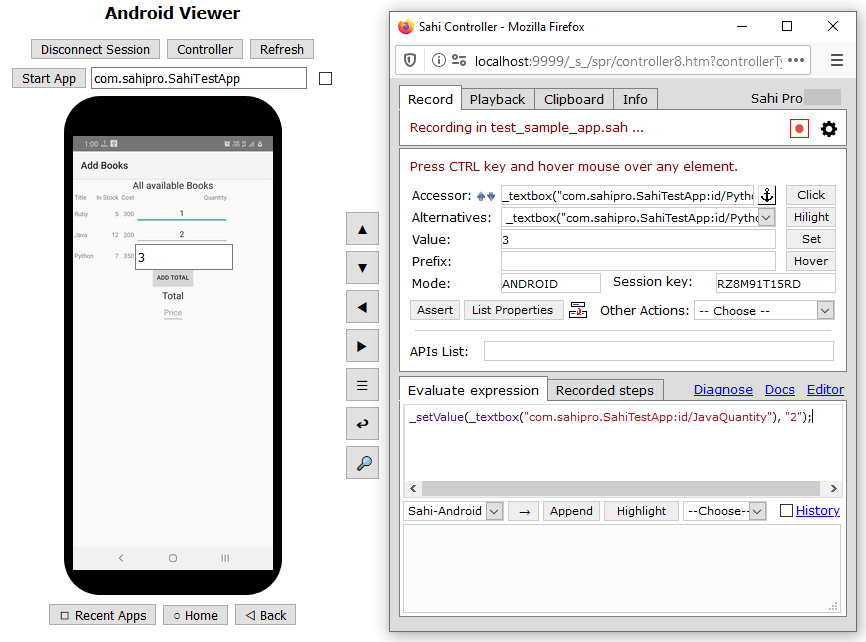
- Click on the
Add Totalbutton. This will sums up the cost of all three books.
- Press the CTRL key and hover the mouse over the textbox below
Total.
Click on theAssertbutton which will generate the valid assertions for that textbox.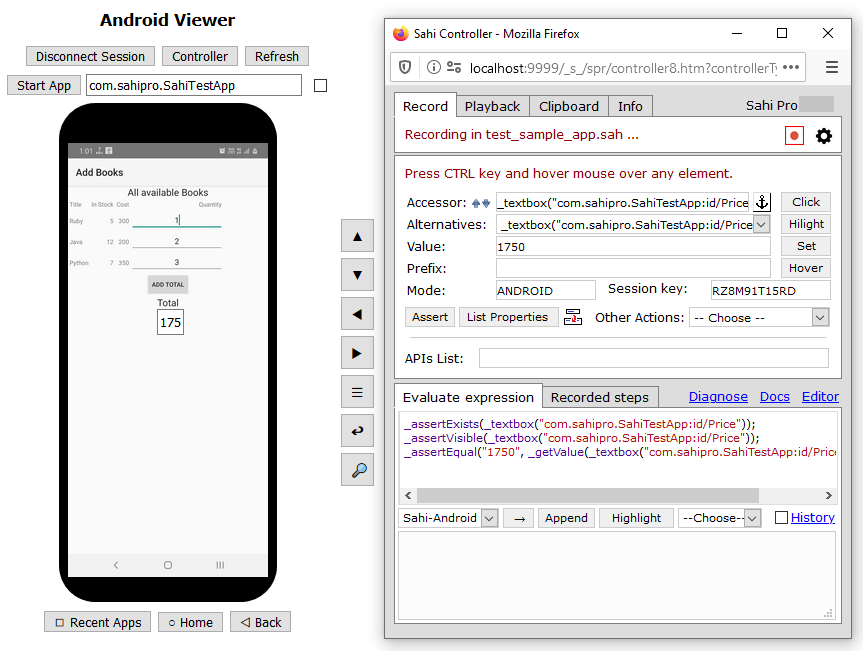
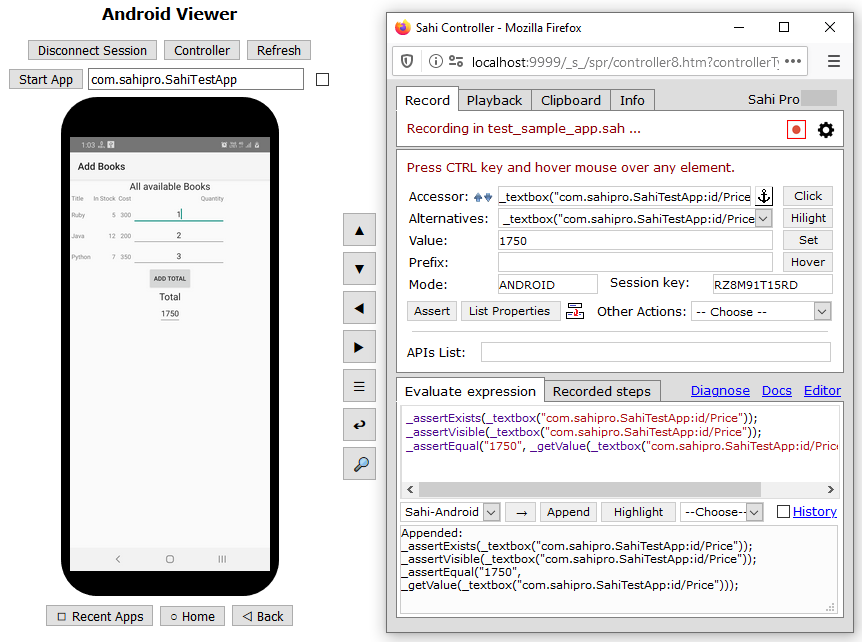
- Click on the
Appendbutton which will append the assertions in the script.
- Stop the recording of the script by clicking on the
Stopbutton from Controller. - Check the recorded script by clicking on
Editorfrom controller. The script looks like this._setMode("ANDROID"); _mActivateApplication("com.sahipro.SahiTestApp", true); _click(_button("Sample Application")); _setValue(_textbox("com.sahipro.SahiTestApp:id/username"), "test"); _setPassword(_textbox("com.sahipro.SahiTestApp:id/pwd"), "MgkKEQBU"); _click(_button("Login")); _setValue(_textbox("com.sahipro.SahiTestApp:id/RubyQuantity"), "1"); _setValue(_textbox("com.sahipro.SahiTestApp:id/JavaQuantity"), "2"); _setValue(_textbox("com.sahipro.SahiTestApp:id/PythonQuantity"), "3"); _click(_button("Add Total")); _assertExists(_textbox("com.sahipro.SahiTestApp:id/Price")); _assertVisible(_textbox("com.sahipro.SahiTestApp:id/Price")); _assertEqual("1750", _getValue(_textbox("com.sahipro.SahiTestApp:id/Price"))); - Now come back to Sahi controller and click on
Playbacktab. Select the recorded script and select theStart Mode:Android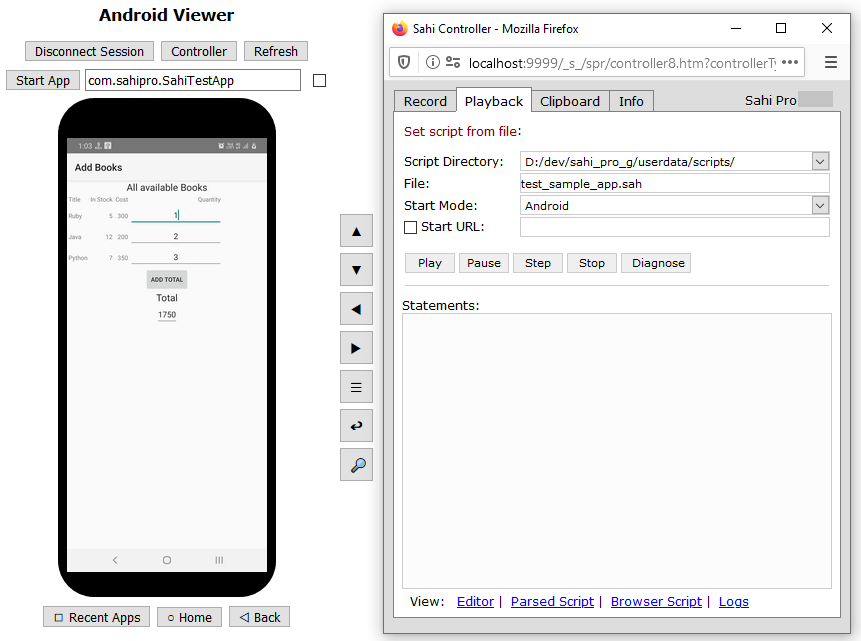
- Now click on the
Playbutton. This will start the script execution. You can see the steps being executed on the actual device/simulator.infoWhen the script is being played back from the Controller, you CANNOT see the playback happening on the Android Viewer. The Android Viewer does not get refreshed during playback.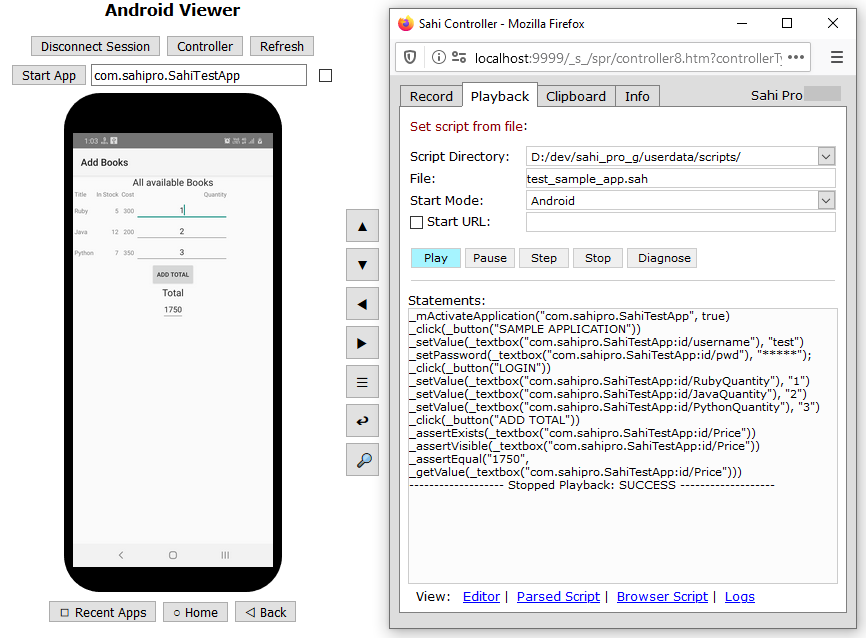
You can see the result of the executed script in the Controller itself. - For checking the logs of the executed script, click on the
Logslink from Controller. This will open a script report of that script.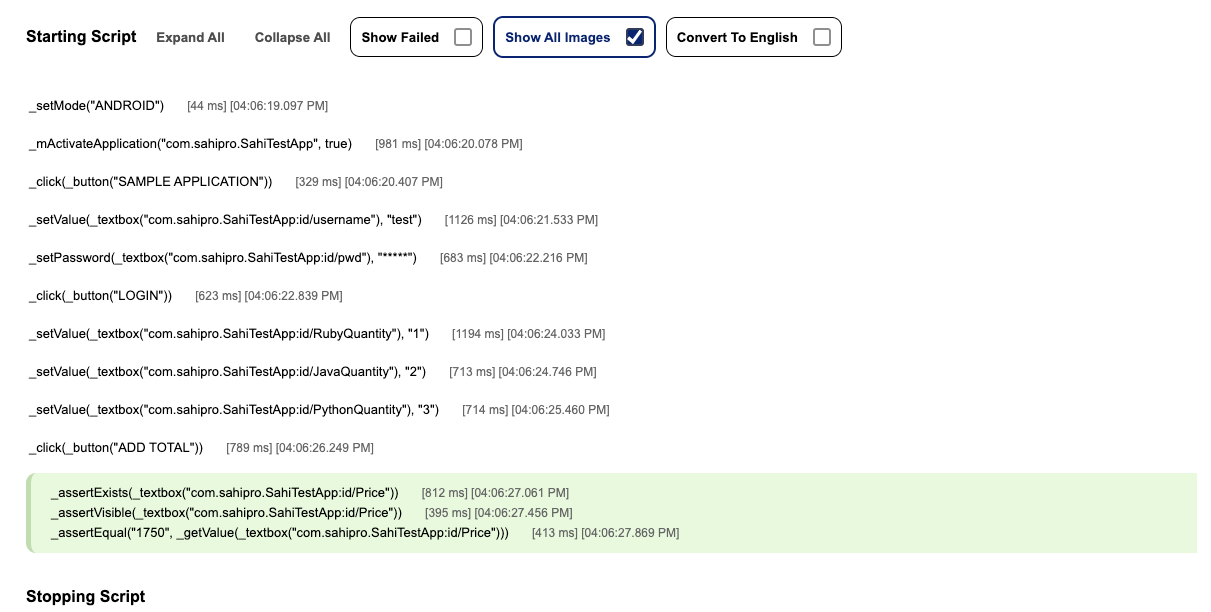
Further Reading
Android Automation in DetailAndroid Accessor APIs
Mobile APIs
Working with Multiple Modes in a Single Script