


Securing Sahi for Enterprise
Using custom domain instead of sahi.example.com
Sahi can run multiple scripts simultaneously on multiple instances of browsers. In order to do this, Sahi tracks sessions across domains by setting cookies in a common domain. The default domain issahi.example.com. This is a dummy domain which
is understood only by the Sahi proxy.
Sometimes, for adhering to security policies of an organization, one may need to change this domain to an internal one like
192.168.1.1.
To do this:
- Open userdata.properties file by either clicking on Sahi Dashboard -> Configure -> userdata.properties, or by opening
sahi/userdata/config/userdata.propertiesin a text editor. - Add
sahi.common_domain=192.168.1.1 - Restart Sahi, clear browser cache.
Now the start page, Controller etc. should be using
192.168.1.1instead ofsahi.example.com
Creating Custom SSL Root Certificates
To be able to inject Sahi related javascript code into web pages, Sahi needs to behave as a man in the middle.Sahi comes with its own SSL root certificate, with which all other website certificates are signed. When the browser sees these certificates, it accepts them because we have already accepted the root certificate once.
This may be a security risk in rare cases of DNS poisoning or if the machine has been hijacked. One way to preempt this is to create your own local root certificate and provide it to Sahi.
Create the root certificate
- Open a command prompt, cd to
sahi_pro/certgenand run create_root.bat. It will ask for a few prompts, you can either just press enter and accept the defaults or change the parameters.C:\> cd C:\sahi_pro\certgen C:\sahi_pro\certgen> create_root.bat...Country Name (2 letter code) [IN]: US State or Province Name (full name) [Karnataka]: Georgia Bangalore []: Atlanta Sahi [Sahi]: MyCompany Organizational Unit Name (eg, section) []: Marketing Sahi []: MyCompany CA sahi@example.com []: x@mycompany.com
This will create 2 filessahi_pro/certgen/X509CA/ca/new_ca.crt sahi_pro/certgen/X509CA/ca/new_ca.derinfo Accepting defaults will make it easier to deploy the solution on other machines. -
Delete
sahi_pro/userdata/certgenfolder. On the next start of Sahi, this folder will be recreated.warning Deletesahi_pro/userdata/certgenand NOTsahi_pro/certgen -
If you change any of the default properties in step 1, search for
in-dname "CN=$DOMAIN_NAME, OU=Sahi, O=Sahi, L=Bangalore, S=Karnataka, C=IN"sahi_pro/certgen/create_certificate.batandsahi_pro/certgen/create_certificate.shand modify it accordingly.
Eg. for the values provided in Step 1, we need to use-dname "CN=$DOMAIN_NAME, OU=Marketing, O=MyCompany, L=Atlanta, S=Georgia, C=US" -
Restart Sahi. The
sahi_pro/userdata/certgenwill be recreated. Now Sahi is ready with the new root certificate.
Accept the root certificate on browsers
Once created, the root certificate needs to be accepted on different browsers. The procedure is the same as specified in Configure SSL. However, firefox needs to be configured additionally.Configuring Firefox template for new root certificate
For cookie isolation, Sahi launches Firefox instances in separate profiles. Profiles are generated insahi_pro/userdata/browser/ff/profiles folder
using sahi_pro/config/ff_profile_template as a template.
To configure Firefox with the new root certificate, do
- Delete all folders in
sahi_pro/userdata/browser/ff/profiles - Restart Sahi Pro
- Launch a Firefox instance from the Dashboard.
This will launch Firefox with profile
sahi_pro/userdata/browser/ff/profiles/sahi0 -
Import the newly created root certificate into firefox.
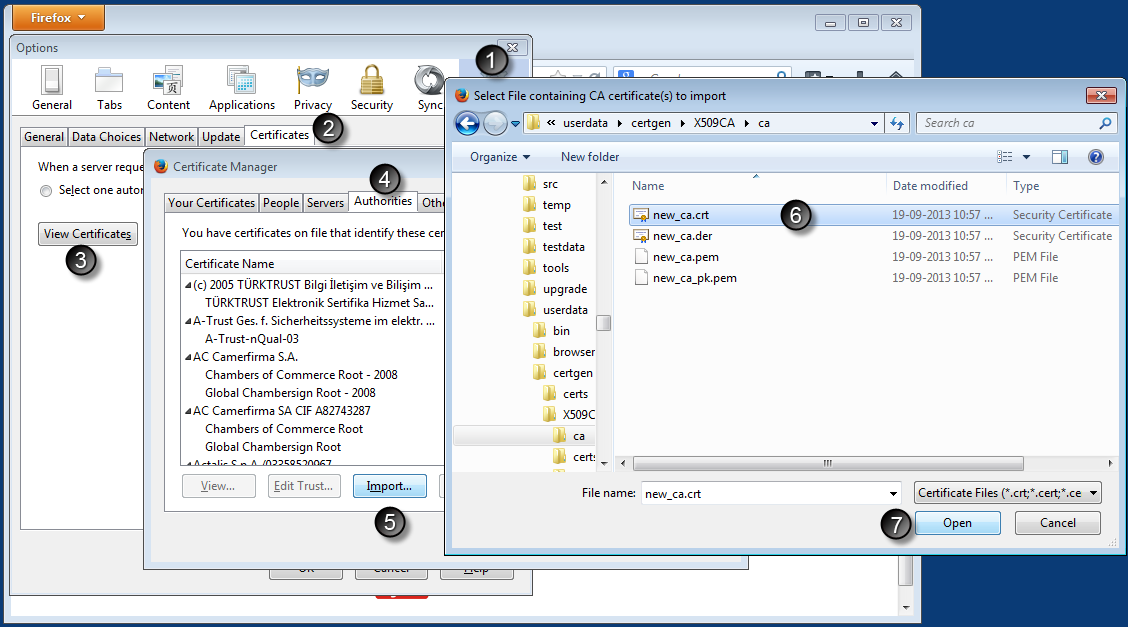
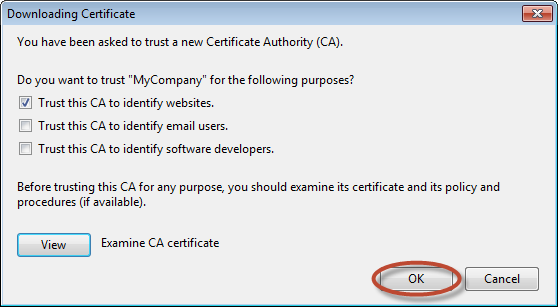
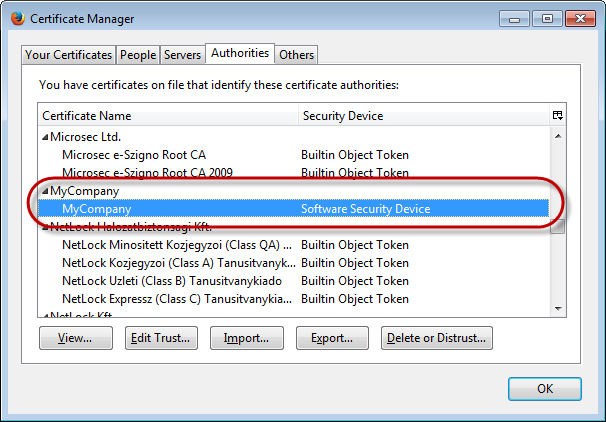 Now this particular Firefox profile has the root certificate installed.
-
To make this certificate work for all profiles, we need to copy the relevant modified files into the template profile.
Copy
tosahi_pro/userdata/browser/ff/profiles/sahi0/cert8.db sahi_pro/userdata/browser/ff/profiles/sahi0/key3.db sahi_pro/userdata/browser/ff/profiles/sahi0/cert9.db sahi_pro/userdata/browser/ff/profiles/sahi0/key4.db
(Take a backup of the older files and overwrite)sahi_pro/config/ff_profile_template - Again delete all folders in
sahi_pro/userdata/browser/ff/profiles - Restart Sahi. Firefox profiles will be recreated.
Deploying the root certificate changes on other Sahi Pro installations
To make other Sahi Pro installations use the created root cert,-
Copy the following folders and files:
sahi_pro/certgen/X509CA/ca/ sahi_pro/certgen/create_certificate.bat sahi_pro/certgen/create_certificate.sh sahi_pro/config/ff_profile_template/ - Restart Sahi Pro. The Sahi Pro installation should now be using the custom root certificate.