


iOS Automation - Getting Started
abstract
This section helps you quickly get started with iOS Automation.
To automate an IOS Devices/Simulators using Sahi Pro Flowcharts, refer iOS Automation - Getting Started.
Introduction
Sahi iOS testing is available as part of theSahi Pro Mobile Add-on module. It allows automation of both iOS devices and simulators having iOS version 9.3 and above.
It provides the familiar Sahi features and API paradigm available for browser testing. This includes the ability to record and playback scripts, edit scripts using the Editor, run suites etc.
Pre-requisites
-
Desktop
- iOS testing requires a Mac machine running macOS 10.12.6 or later. It is not supported on Windows and Linux.
- The machine needs to have Xcode 9.2 or above installed. (Run
xcodebuild -versionto verify.) -
The path to the active Xcode developer directory needs to be set. To check if it is set, do the following.
-
Open a Terminal shell, and run the following command
xcode-select --print-path -
You should see something similar to
/Applications/Xcode.app/Contents/Developerif the active directory has been set. If you have Xcode installed as/Applications/Xcode.app, this would already be set. -
If the active directory is not set, you will see an output similar to the following.
xcode-select: error: unable to get active developer directory, use sudo xcode-select --switch path/to/Xcode.app to set one (or see man xcode-select) -
Run the following command to set the active directory.
sudo xcode-select --switch /Applications/Xcode.app
The above command assumes that Xcode is available as/Applications/Xcode.app. If you have named your Xcode app as Xcode9.2.app, the above command would be
sudo xcode-select --switch /Applications/Xcode9.2.app - Verify that the active directory is set by running
xcode-select --print-pathagain.
-
Open a Terminal shell, and run the following command
-
Simulator
- Xcode will automatically install simulators with version iOS 11 or above. If you wish to test on iOS 9.3 or iOS 10.3, install the simulators through Xcode.
- There are no specific prerequisites required to test on a simulator.
-
Device
- Testing on a device involves a few steps. Refer to Testing on a Device for pre-requisites and details, after going through this quick tutorial.
Download and Install Sahi Pro Mobile Add-on
You need to install Sahi Pro Mobile Add-on before you can proceed with the Quick TutorialQuick Tutorial
This tutorial involves automating a sample app on an iOS simulator.Sahi Pro Mobile Add-on ships with a few iOS Test Apps.
We will use SahiTestApp in this tutorial. We will be running the tutorial on iOS 16.4 - iPhone 14 Pro Max Simulator.
But this can be run on any Simulator having version iOS 9.3 or above.
- Start the Simulator
Start a simulator explicitly using the Simulator app. We can also start it with start_simulator.sh detailed in Testing on a Simulator. But we will just use the Simulator app for now.- Start the Simulator app from the Xcode menu -
Xcode -> Open Developer Tool -> Simulator. - Start the specific simulator from the Simulator app menu -
Hardware->Device->iOS 16.4->iPhone 14 Pro Max - Note down the Simulator UUID. This is needed to install SahiTestApp, in the next step.
- To get the Simulator UUID, open a Terminal shell, and run
xcrun simctl list devices - You should see output similar to the following.
 NOTE that the output will have simulators for different iOS versions, and also different OS types like tvOS, watchOS etc.
NOTE that your Simulator UUIDs will be different. - From the output, locate the
iOS 16.4 - iPhone 14 Pro Maxsimulator entry. It looks like this. As you can see, this shows up as Booted.
- To get the Simulator UUID, open a Terminal shell, and run
- Start the Simulator app from the Xcode menu -
- Install the Test App
SahiTestApp needs to be installed on the booted Simulator, before we can automate it.- Sahi provides a shell script,
install_testapps_on_simulator.sh, to install all Sahi iOS test apps in one go. - Open a Terminal shell and navigate to
<SAHI_INSTALLATION_FOLDER>/userdata/bin/iOS/testappsfolder. - Type
./install_testapps_on_simulator.sh <SIMULATOR_UUID>where<SIMULATOR_UUID>is the Simulator UUID you noted above.
Based on the specific xcrun output above, this will look like./install_testapps_on_simulator.sh 26E1E4C9-70D9-42A2-918E-AD5B21DE5D74
NOTE again that your Simulator UUID will be different. - All the test apps should now get installed on your booted simulator.
- Sahi provides a shell script,
- Now that we have installed SahiTestApp on the Simulator, start up the
Sahi Dashboard, and click on theiOSbutton
- This will bring up the iOS Viewer in the default browser.
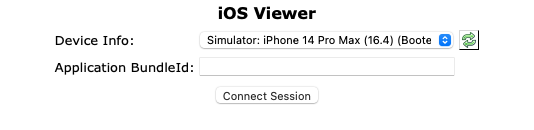
- The
Device Info:dropdown lists all the Simulators installed on the Mac machine. The booted Simulator will have a (Booted) suffix.
IfDevice Infois not populated automatically, choose the booted Simulator from the dropdown. - Type
com.sahipro.ios.test.SahiTestAppin theApplication BundleIdtextbox.
You will notice that a bunch of suggested apps comes up, but Sahi test apps are not part of the suggestions. So, we need to manually type it the first time. Sahi will remember it from the next time onwards.
- Click on
Connect Sessionbutton. - This will start the SahiTestApp application on the Simulator, and the iOS Viewer will display the screenshot of the application.
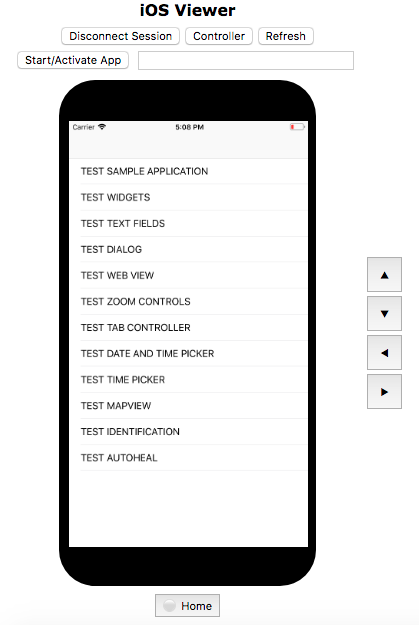
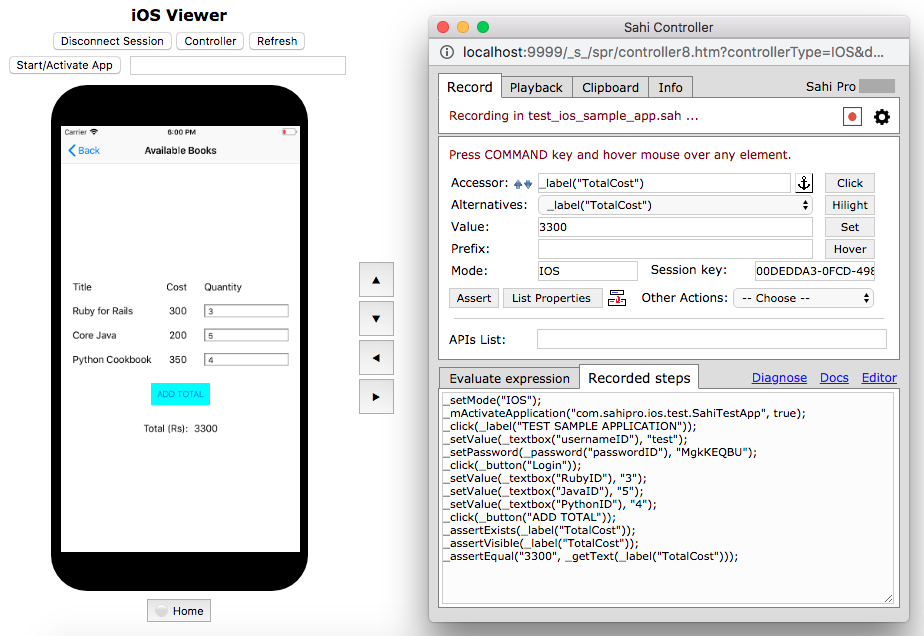
- Launch the Controller by press ALT key and then double click on the iOS Viewer window.
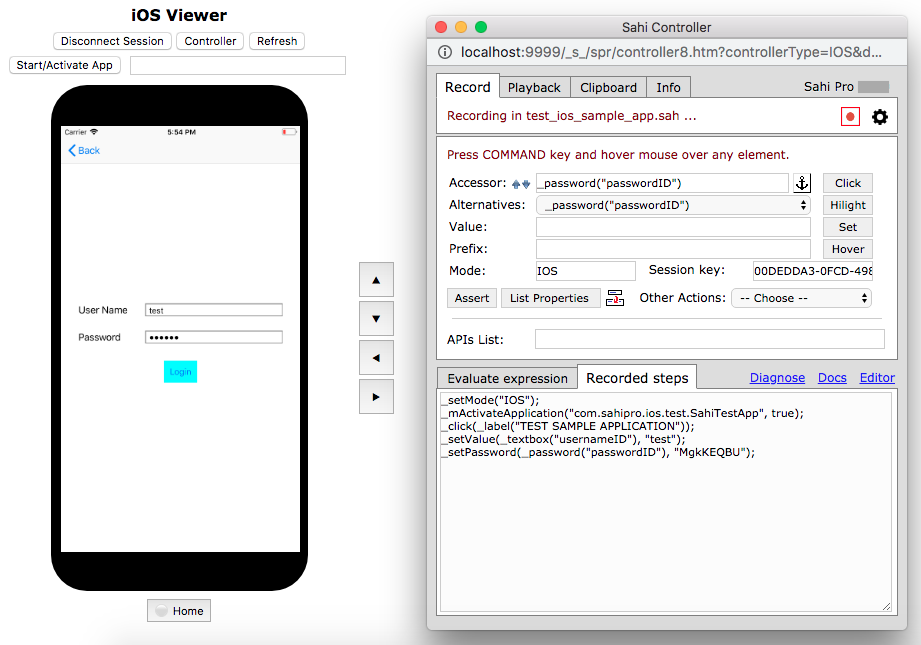
- Specify a script name (test_ios_sample_app.sah) in the Controller and click on
Recordbutton.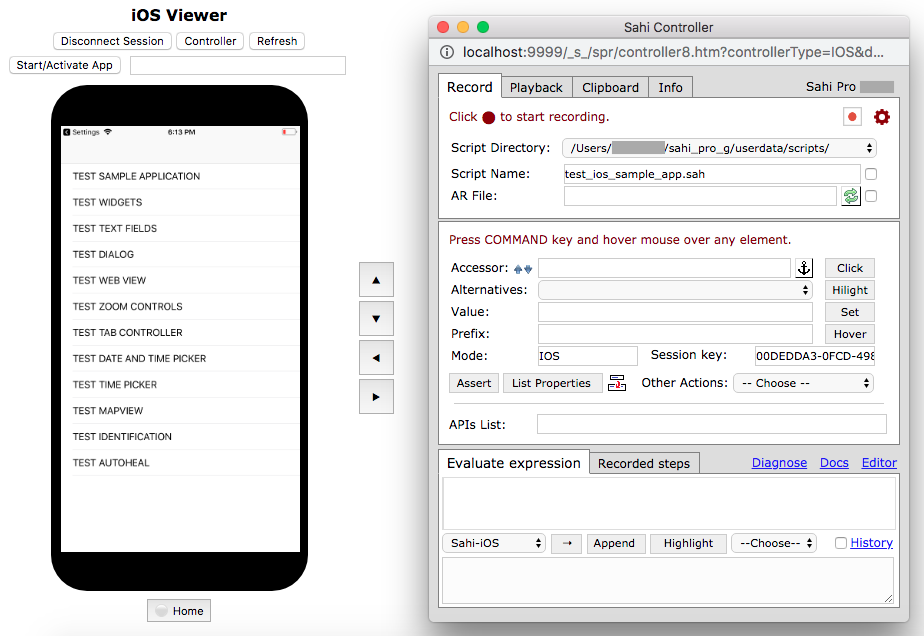 infoNOTE: Throughout this tutorial, we will perform actions on the Viewer which will get recorded in the script.infoNOTE: The Viewer has to be in focus for performing any actions.
 - Click on
TEST SAMPLE APPLICATIONin the iOS Viewer. TheTEST SAMPLE APPLICATIONelement will be clicked on the device, and the Viewer screenshot will be refreshed. The Login screen is now visible.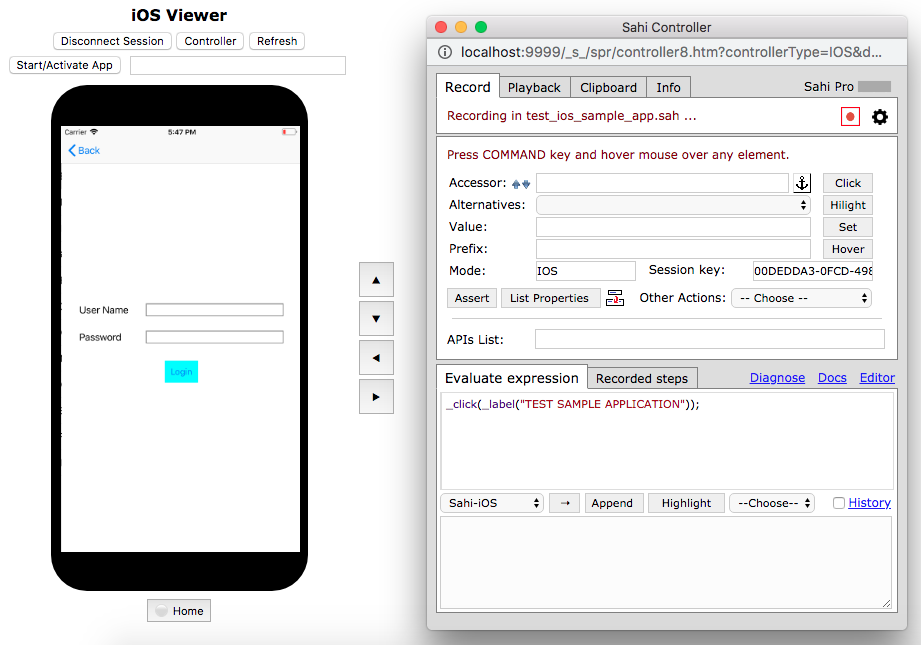
- Click on
Recorded stepstab in the Controller. You can see a bunch of recorded steps.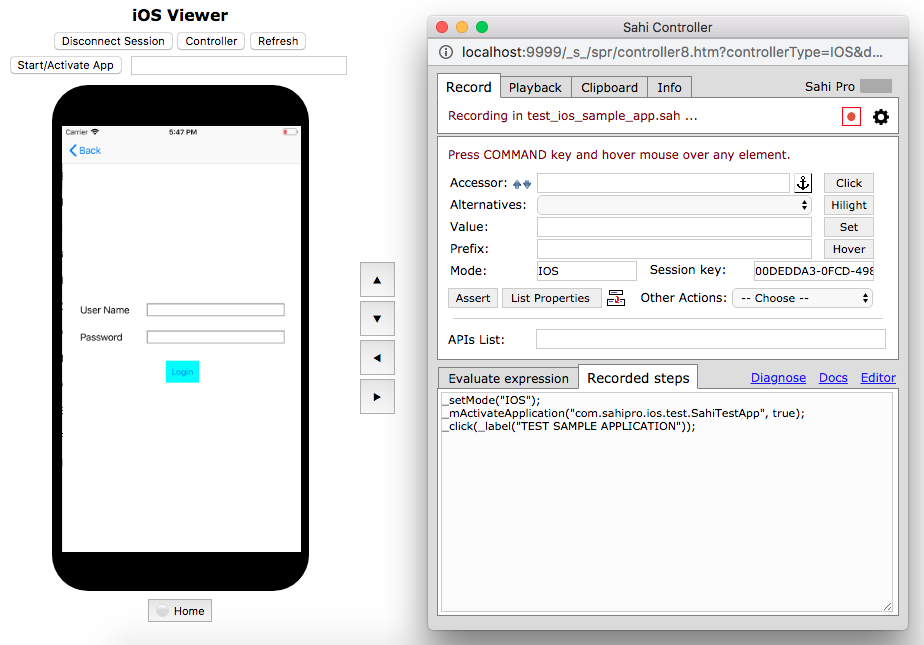 A few steps have been recorded implicitly. Finally the click on
 TEST SAMPLE APPLICATIONhas also been recorded. - We are in the Login screen, and we need to automate the User Name and Password text fields.
IMPORTANT: Automation of text fields needs the Hardware keyboard to be setup correctly. The iOS Simulator sometimes has problems showing the keyboard. To make sure that the keyboard works, click on the User Name textbox in the Simulator (NOT on the Viewer). Check if the keyboard appears.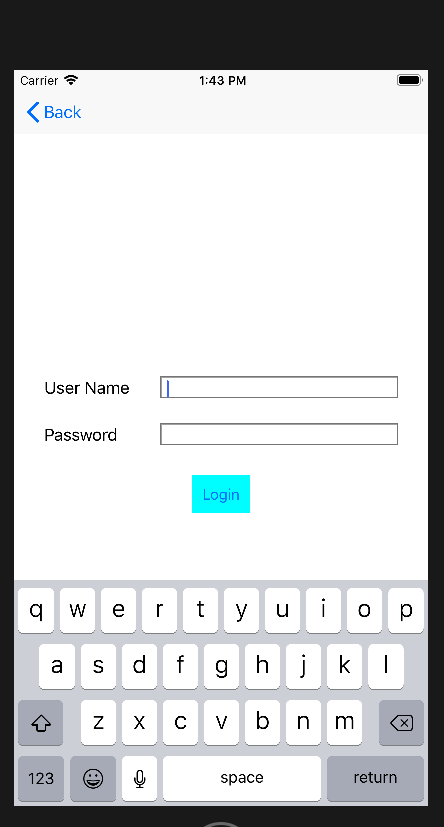 As you can see, the keyboard appears.
info
As you can see, the keyboard appears.
info- If you see the keyboard appearing, toggle the keyboard twice by clicking on [Hardware->Keyboard->Toggle Software Keyboard] from the Simulator app menu twice. This will first hide the keyboard and show it again.
- If you do NOT see the keyboard appearing, toggle the keyboard once by clicking on [Hardware->Keyboard->Toggle Software Keyboard] from the Simulator app menu once. This will simply show the keyboard once.
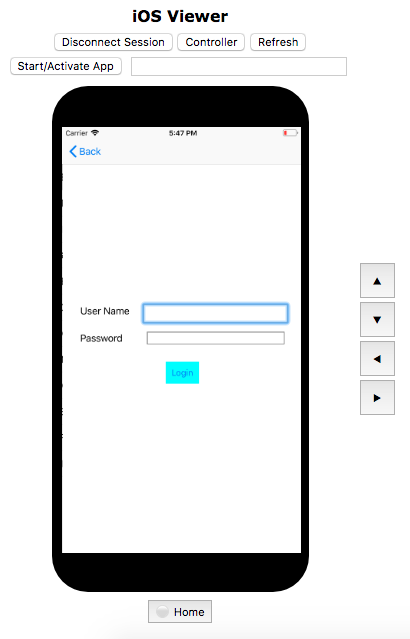
- Proceed with the automation. In the Viewer, click the textbox near the User Name label. You can now see an editable textbox overlaid on the User Name textbox.
- Type "test" in the textbox and press the Enter key on your Mac.
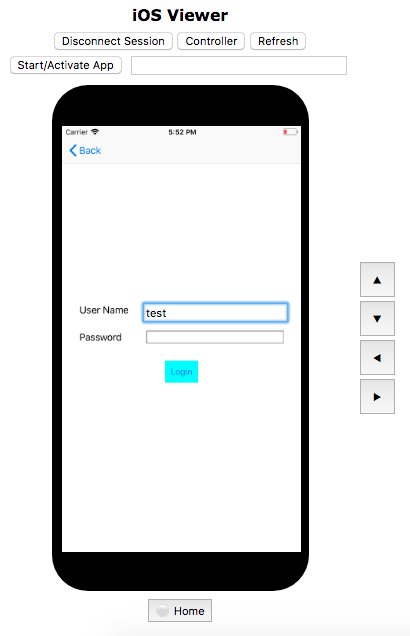
- The "test" string is sent to the device and the Username textbox is populated with "test". This can be seen from the Viewer screenshot.
 Also, you can see that a _setValue step has been recorded for the Username textbox.
- Click on the Password textbox now. You can see an editable textbox overlaid on the Password textbox.

- Type "secret" in the textbox and press the Enter key on your Mac.

- The "secret" string is sent to the device and the Password textbox is populated with masked characters.
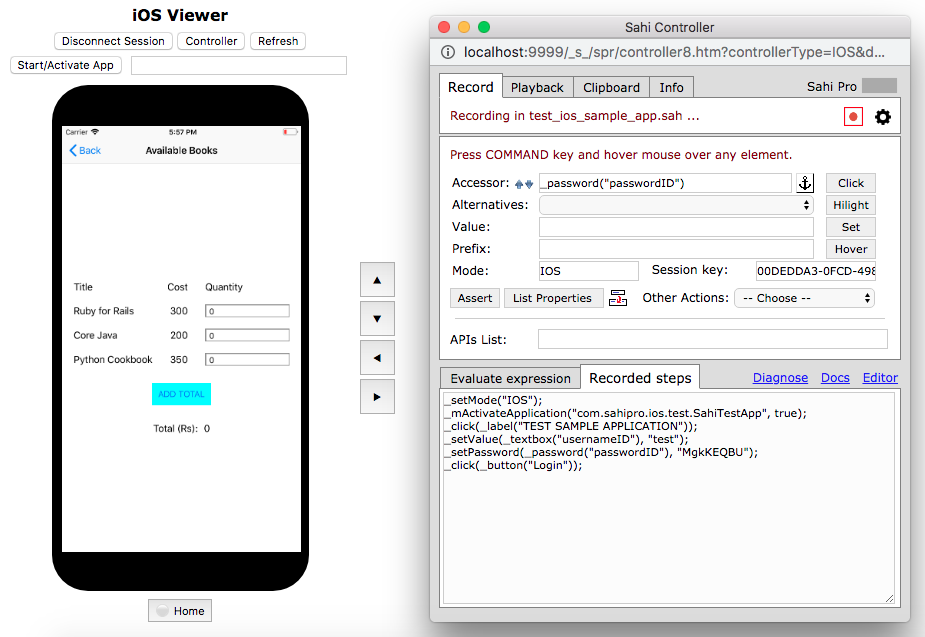
 Also, you can see that a _setPassword step has been recorded for the Password textbox.
- Click the "Login" button. You are now in the Available Books screen.
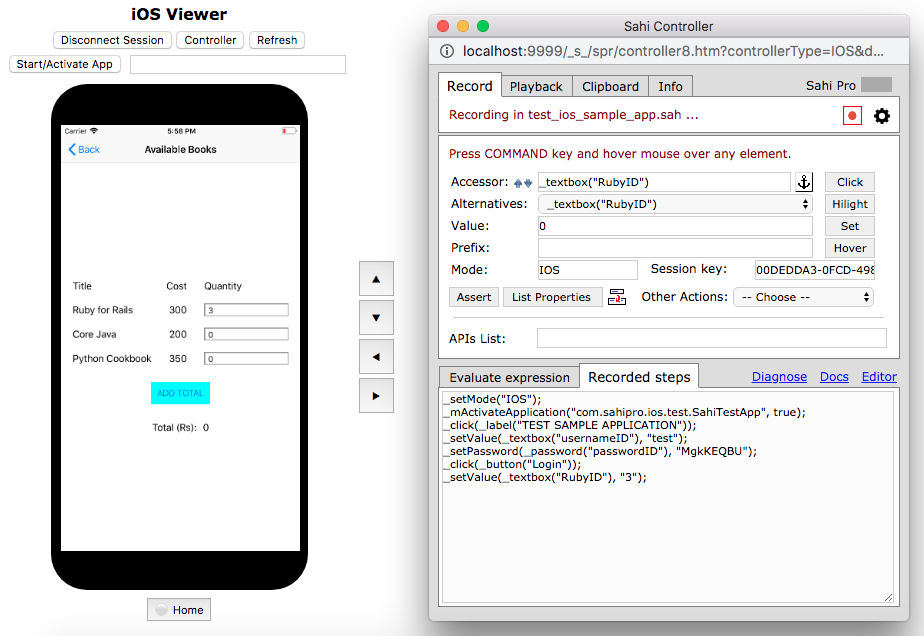
- Click on the "Quantity" textbox for "Ruby for Rails". An editable textbox shows up with 0 in it.
Remove it and enter 3 in the textbox. Press Enter key on your Mac.
On the device, the "Quantity" textbox for "Ruby for Rails" is filled with a value 3, as can be seen from the Viewer screenshot.
- Repeat the steps for the "Quantity" textbox for "Core Java".
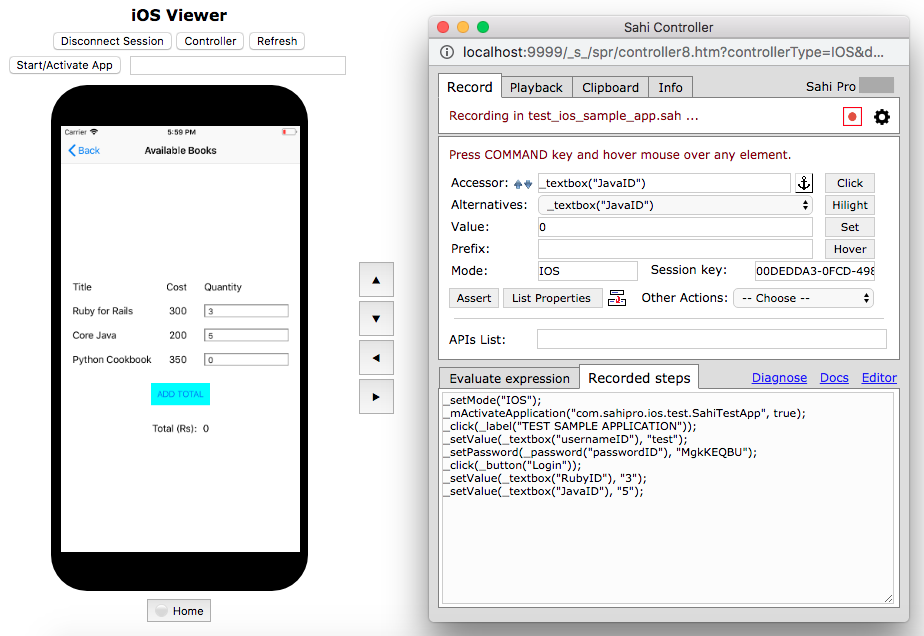
- Click on the "Quantity" textbox for "Core Java". An editable textbox shows up with 0 in it. Remove it and enter 5 in the textbox. Press Enter key on your Mac.
- On the device, the "Quantity" textbox for "Core Java" is filled with a value 5. The Viewer shows the filled value.
- At the end of the above step, the Viewer will look like this. You can see the _setValue step recorded for "Core Java".
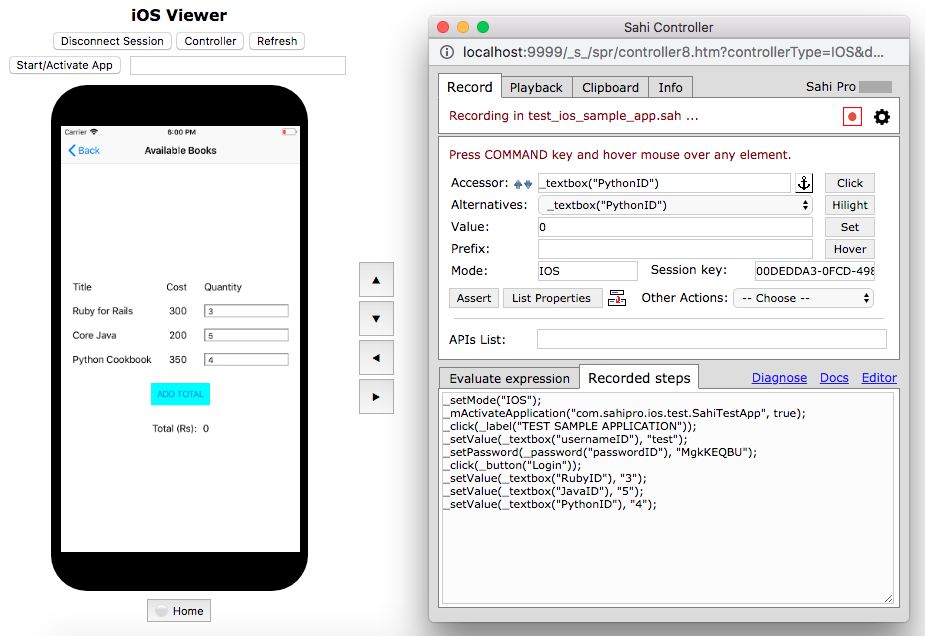
- Repeat the steps for the "Quantity" textbox for "Python Cookbook".
- Click on the "Quantity" textbox for "Python Cookbook". An editable textbox shows up with 0 in it. Remove it and enter 4 in the textbox. Press Enter key on your Mac.
- On the device, the "Quantity" textbox for "Python Cookbook" is filled with a value 4. The Viewer shows the filled value.
- At the end of the above step, the Viewer will look like this. You can see the _setValue step recorded for "Python Cookbook".
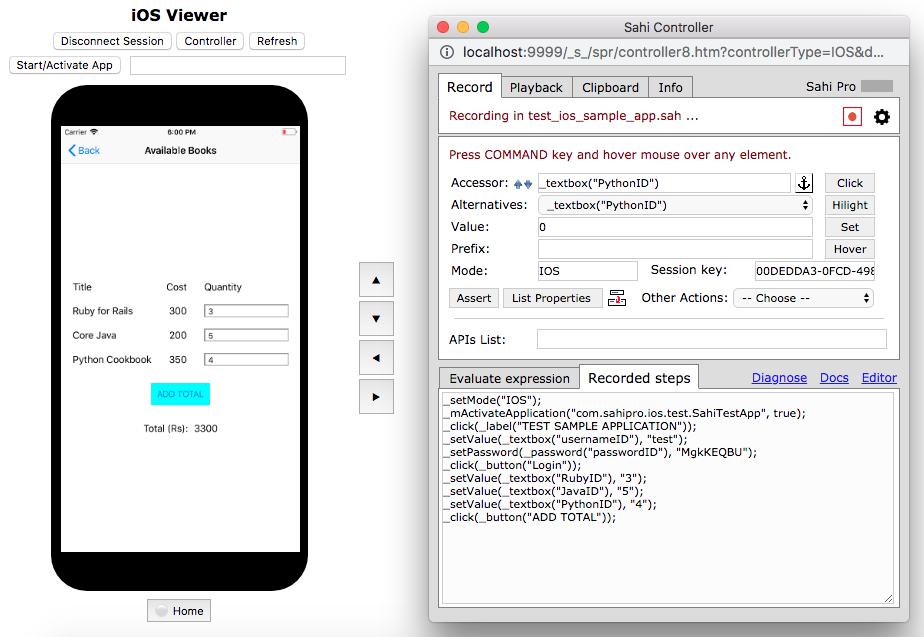
- Click on the "ADD TOTAL" button. The Viewer shows the calculated total.
- It is time to add assertions on the total. Press the "Ctrl" key and hover your mouse over the calculated total (3300).
You will see the appropriate accessor in the Controller -
_label("TotalCost")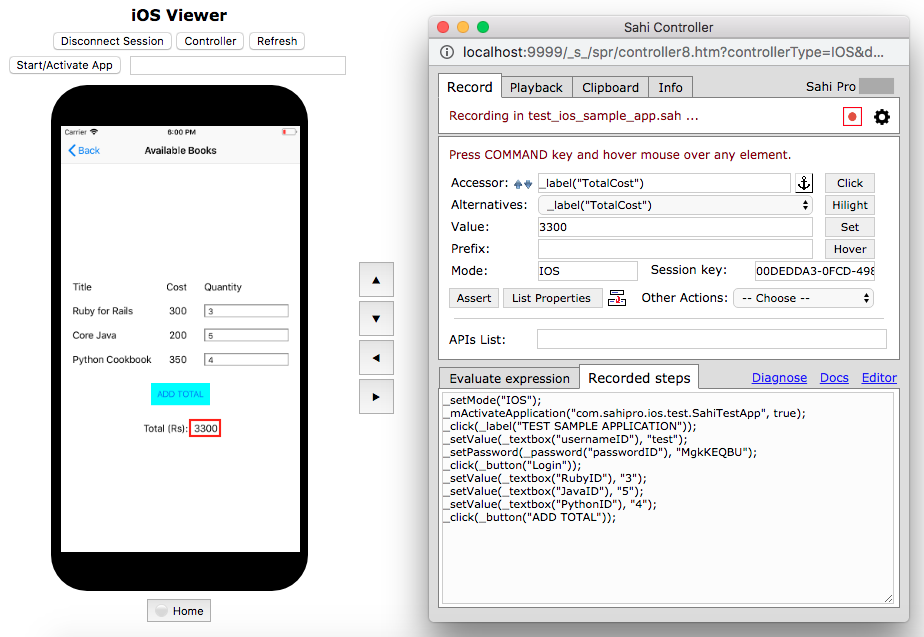
- Click on
Assertbutton in the Controller. The Controller adds a few assertions for_label("TotalCost").
- Click on
Appendbutton in the Controller. The assertions are appended to the script.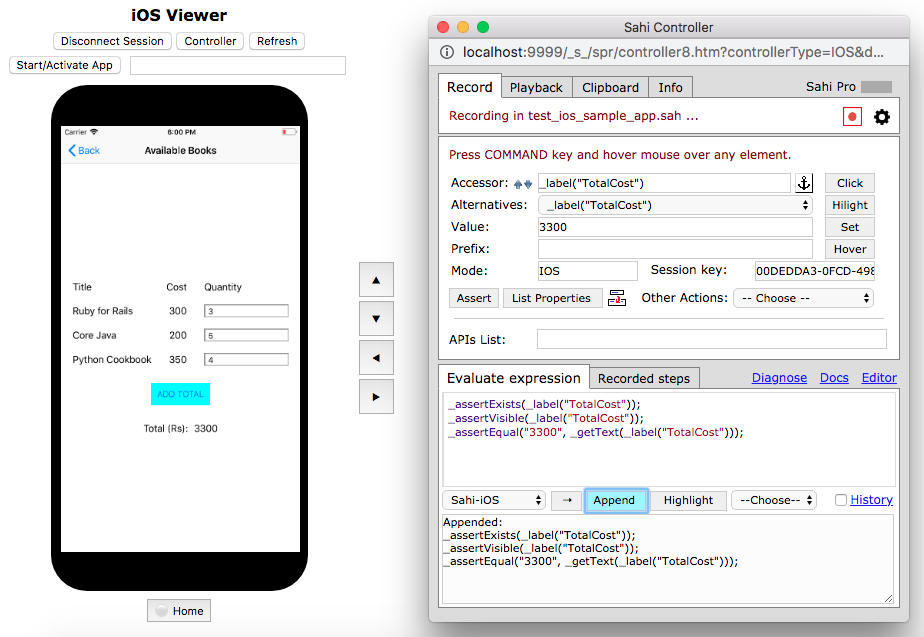
- Stop the recording of the script by clicking on the
Stopbutton from Controller. - Check the recorded script by clicking on
Editorfrom controller. The script looks like this._setMode("IOS"); _mActivateApplication("com.sahipro.ios.test.SahiTestApp", true); _click(_label("TEST SAMPLE APPLICATION")); _setValue(_textbox("usernameID"), "test"); _setPassword(_password("passwordID"), "MgkKEQBU"); _click(_button("Login")); _setValue(_textbox("RubyID"), "3"); _setValue(_textbox("JavaID"), "5"); _setValue(_textbox("PythonID"), "4"); _click(_button("ADD TOTAL")); _assertExists(_label("TotalCost")); _assertVisible(_label("TotalCost")); _assertEqual("3300", _getText(_label("TotalCost"))); - It is time to playback the script. Click on
Playbacktab in the Controller. Select the recorded script and selectStart Mode:IOS
- Click on the
Playbutton. This will start the script execution.infoWhen the script is being played back from the Controller, you CANNOT see the playback happening on the iOS Viewer. The iOS Viewer does not get refreshed during playback.You can see the result of the executed script in the Controller itself.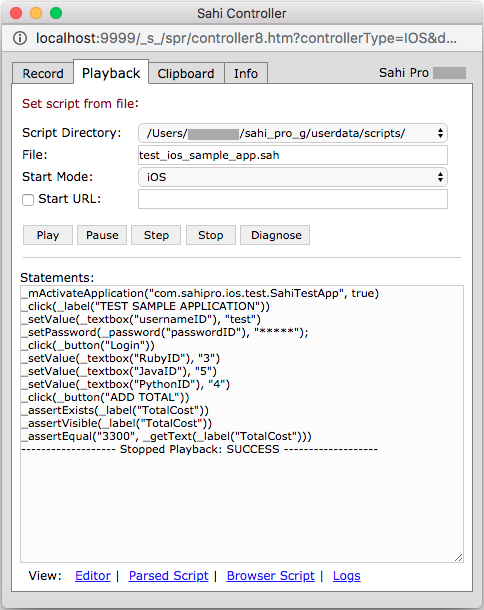
- Click the
Logslink from Controller Playback tab. This shows the script log report for the playback.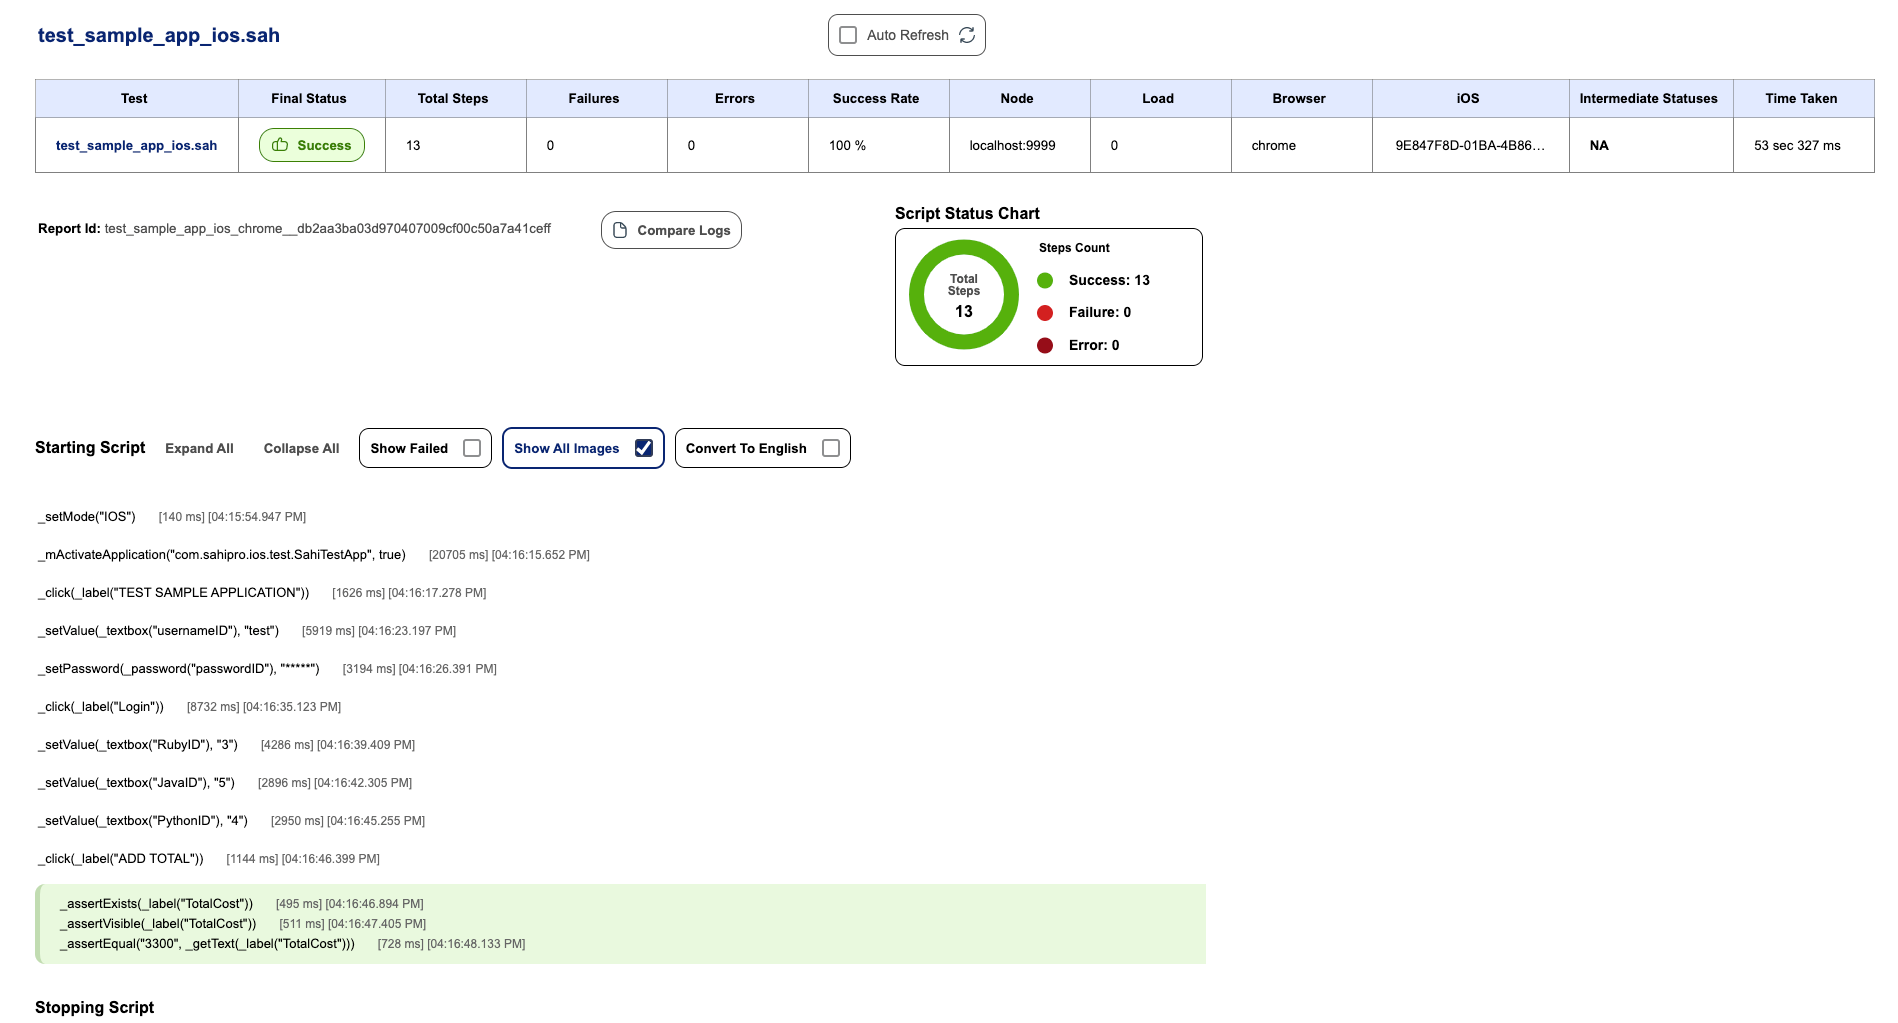
- Close the Controller.
- Click on
Disconnect Sessionbutton in the Viewer to disconnect the session.
Further Reading
iOS Automation in DetailiOS Accessor APIs
Mobile APIs
Working with Multiple Modes in a Single Script