


Automating Android Apps - Details
abstract
This page describes Android Automation in detail. If you wish to get a quick start, read Android Automation - Getting Started.
Features
- Supports running scripts against a connected Android device or emulator using SDK 18 and above.
- Android Viewer and Controller allow easy interaction with the connected device.
- Scripts can be recorded from the Android Viewer and Object spy features are also available.
- Android API syntax is similar to Sahi Pro APIs for browser testing.
- Single script can interact with different modes like Browser, Desktop, Mobile etc.
warning
Note: From Sahi Pro v9.0.1,
To execute these APIs explicitly from the script, pass
_connectDevice and _selectDevice executes implicitly if the start mode is Android. No need to write these APIs in the script.
To execute these APIs explicitly from the script, pass
connectDeviceInternal=false as extra parameter in Playback settings. Refer here for more details.
Limitations
- Does not support testing Android device or emulator below SDK 18. (Run
adb shell getprop ro.build.version.sdkto verify) - Does not support run in parallel from the editor, if only one device is connected.
Android Viewer
Android Viewer allows an end user to view the Android device/emulator screen on a Desktop browser. The user can launch the Controller and then identify Android elements by pressing the CTRL key and hovering the mouse over the element.This section details how to use the Android Viewer.
- A User can launch Android Viewer directly from Sahi Dashboard by clicking
Androidbutton. This brings up Android Viewer in system's default browser. If the user wants to launch Android Viewer in a specific browser then, open that Sahi browser and then click on the
 Android Viewerlink from the start page, this brings up Android Viewer in that browser.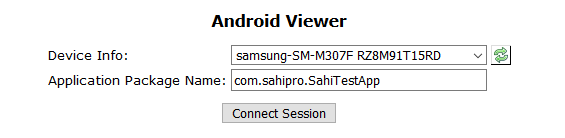
Device Info:shows the list of the connected device to the system
Application Package Name:allows an end user to start an application by it's package name which is already installed in that device. Leave it blank if you wants to start the device session in its current state of the screen.infoNote: if device list doesn't contains the connected device, then click on the refresh button next to devices dropdown.- Make sure that the device is connected through a USB cable or over Wi-Fi. Click on
Connect Session. If the connection is successful, you will see the device screenshot in a short while.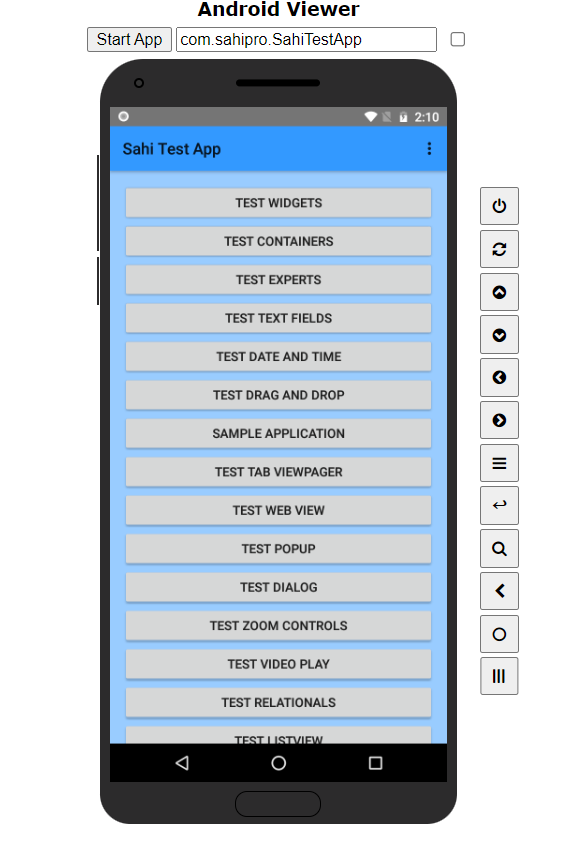
- When some action is performed from the Android Viewer or from the Controller, the screenshot will be refreshed a few times, to display the latest device state.
However, if actions are performed on the device manually, the screenshot will not get refreshed. Click on the
Refreshbutton manually to refresh the screenshot. - One can interact with the device from the Android Viewer itself without launching the Controller.
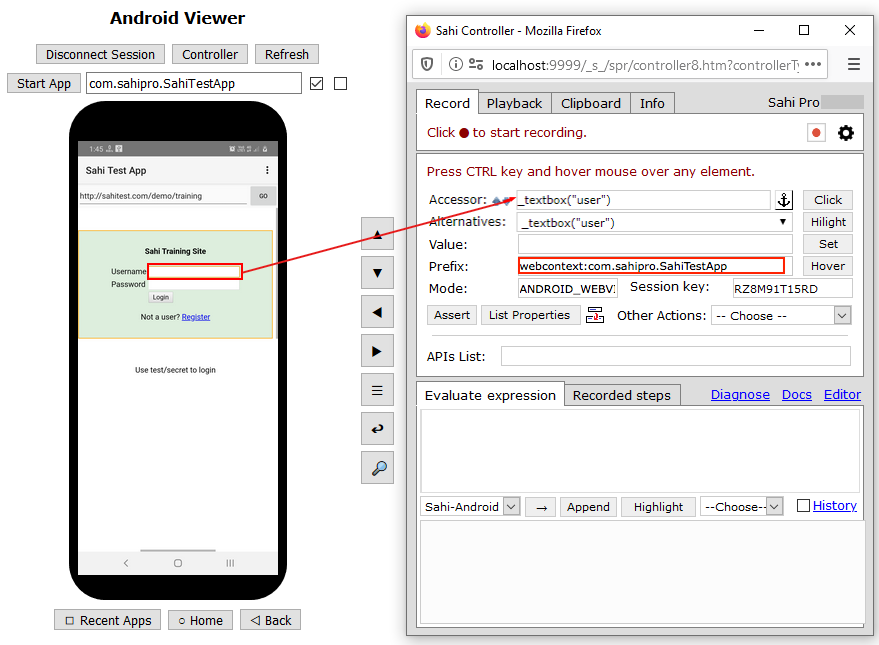
- Launch the Controller by clicking on the
Controllerbutton. - You can now start identifying elements by pressing the CTRL key and hovering the mouse over elements on the Desktop screenshot. You will notice the Accessor textbox on the Controller, showing the accessor for the element. The Alternatives dropdown displays the alternatives for the accessor.
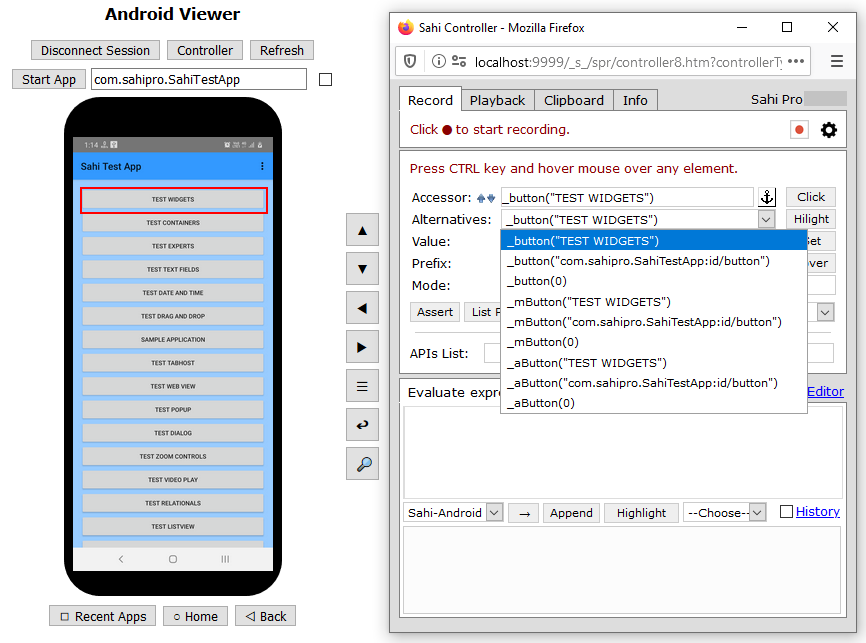 infoNote: While evaluating any line of code from
Evaluate expression, make sure Sahi-Android is selected on Controller.
Android Viewer Actions:
These buttons perform various actions on the Android device and these actions are recorded while recording a script.
These will give quick access to Android assist functions during debugging/script recording.
 is used to swipe up on the screen.
 is used to swipe down on the screen.
 is used to swipe left on the screen.
 is used to swipe right on the screen.
 is used to call up the menu of the app on the display.
 will press enter in the text field.
 is used to open search field (if present) within an application.
 will show all recent open apps.
 is used for navigating to the home screen.
 simulates the back action.
Screenshot Outline View
Security restrictions may prohibit Android Viewer from capturing the screen shot to be displayed. In such a case, you can use the Screenshot Outline View feature to toggle the outline view.For example, lets assume that for the below screen, Android Viewer is unable to take the screenshot. To enable the outline view, check the highlighted checkbox in Android Viewer.
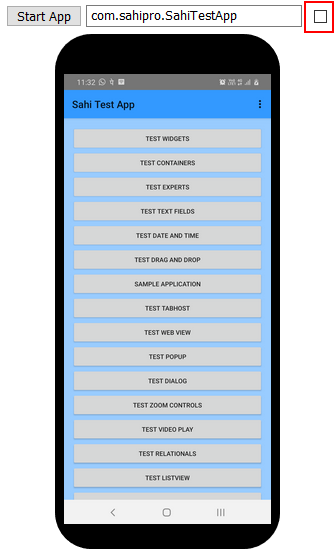 After checking it, the Android Viewer will display the outline view like this.
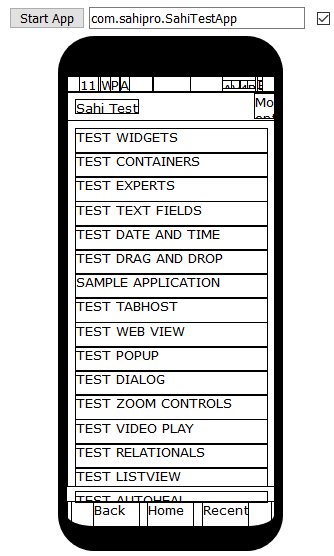 Now you will be able to identify the elements in controller.
info
A few things to note...
- If the app orientation changes from portrait to landscape or vice versa, do a manual refresh by clicking on the Refresh button, to view the screenshot correctly.
- If you resize the Android Viewer page, do a manual refresh by clicking on the Refresh button, to view the screenshot correctly.
- Do not disconnect (physically or via wifi) the device before disconnecting the session. In case you do so and on reconnecting you find that
Connect Sessiondoes not seem to connect the device, please have a look at the Sahi console. If the Sahi console indicates that you should reconnect the device, please do so. - Closing the Android Viewer browser does NOT disconnect the session. So always disconnect the session before closing the browser. If you fail to do so and open the Android Viewer again, it will show the session to be in a connected state.
- As of now, Android Viewer supports only one device at a time. The device has to be connected to the machine that runs Sahi.
Configure Android Devices/Emulators
For configuring the Android devices/emulators, do the following:- Click on the
All Settingsbutton on the Dashboard. It will open up all Settings dialog. - Click on the
Sahi Pro Settingsbutton. It will open up Configure Sahi Pro page.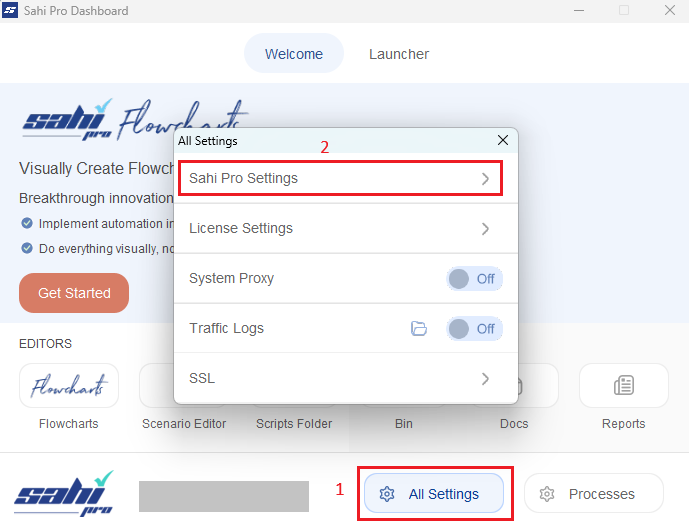
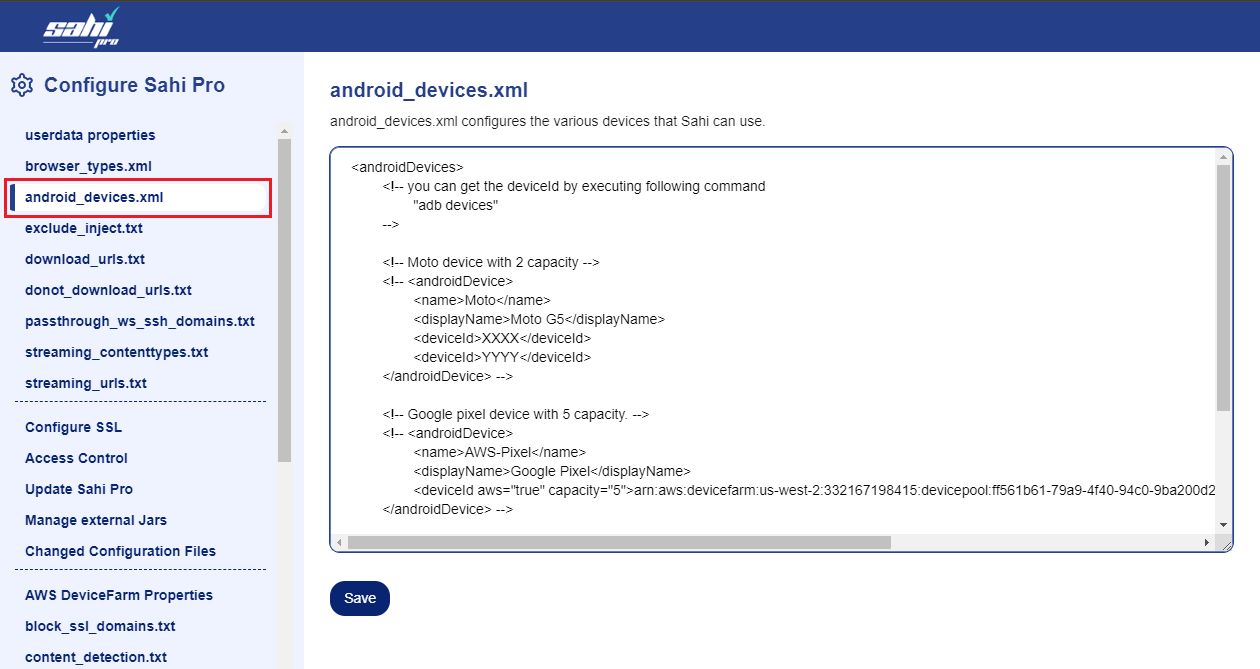
android_devices.xml on the left. This will open page similar to image given below.
androidDevice Node
<androidDevices>
	<!-- Moto device with 2 capacity -->

	<androidDevice>
		<name>Moto</name>
		<displayName>Moto G5</displayName>
		<deviceId>XXXX</deviceId>
		<deviceId>YYYY</deviceId>
	</androidDevice>
</androidDevices>| Element | Value |
| name | Key by which this androidDevice will be referred. This can be any value without spaces. |
| displayName | Better name displayed in Android Viewer. |
| deviceId | Id of the device, multiple Id can be added under same name.
you can get the Device Id by executing this command |
infoFor example, Two devices are configured under
Moto. For parallel playback of data driven suite on this two devices, select Moto as Android Device from editor (or specify Moto as Android Device in ANT target).
Scripts will be distributed in two devices.
Recording a Script
This is similar to recording a Sahi script for normal browser testing.- To record a script, launch the Controller from the Android Viewer page, choose a script to record and press Record.
- Actions done from the Android Viewer page are recorded automatically.
- Hovering the mouse over an editable element will overlay a textbox where you can type text. After entering the text, press Enter or click outside the textbox. This will cause the text content to be sent to the device. The relevant step (_setValue, _setPassword etc.) will get recorded automatically.
- The user can click on any non-editable element on the Viewer. This will click the element on the device. The _click step will get recorded automatically.
- Steps can also be recorded from the Controller. You can use Click, Set, Assert, choose Other Actions, Test an expression from Evaluate Expression to perform an action on the Device.
But you will need to record these steps explicitly by clicking on
Append. - Since the device screenshot gets refreshed after a Controller action is performed, the user can continue to interact with the changing screen from the Android Viewer itself. If the device screenshot is not refreshed correctly, click on the Refresh button manually to reflect the current screenshot.
infoFor better understanding refer Sahi Controller and Java Controller.
Recording Hybrid App
Pre-requisites
- Android Device must be connected on the same network in which Sahi Pro is running.
- Configure the proxy in Android Device.
If the screen is displaying hybrid contents then there will be one checkbox visible below
Refresh button. - Check the checkbox to identify/record hybrid elements as Web.
- Press the CTRL key and mouse over the hybrid element.
- Element's accessor will be displayed in Sahi Controller.
- To record the hybrid app, perform the actions directly from Android Device.
- Sample script will look like this
_setMode("ANDROID");
_mActivateApplication("com.sahipro.SahiTestApp", true);
_setAccessorIgnoreCase(true);
_click(_button("Test Web View"));
_setValue(_textbox("com.sahipro.SahiTestApp:id/editText"), "http://sahitest.com/demo/training");
_click(_button("GO"));

// _aStartWebContext will change the mode to ANDROID_WEBVIEW
_aStartWebContext("com.sahipro.SahiTestApp");
_setValue(_textbox("user"), "test");
_setValue(_password("password"), "secret");
_click(_submit("Login"));
// _aStopWebContext will revert back the mode to ANDROID
_aStopWebContext();
info
NOTE: To identify/record the hybrid element as native, uncheck the checkbox in Android Viewer.
Playback
From the Controller
Once a script is recorded, it can be played back from the Controller Playback tab itself.- Choose the script.
- Select the
Start Mode:Android. - You can leave the Start URL blank. This is not used.
- Click on Play to execute the script.
- Click on Logs to view the logs of the executed script.
infoNote: When the script is being played back from the Controller, you cannot see the playback happening on the Android Viewer. The AndroidViewer does not get refreshed during playback.
From the Editor
User can playback the script/suite/scenario from the Editor as well.- Choose the script/suite/scenario from the Editor and click on the Playback button.
- Select the
Start Mode:Android. - No need to choose any browser.
- Choose a device to execute a script from
Android Devicedropdown. - You can leave the Start URL blank. This is not used.
- Press
Runto playback the script.
infoFor better understanding refer Editor Playback.
Via ANT target
User can generate an ANT target from the Editor for a script/suite/scenario and playback using ANT.- Choose the script/suite/scenario from the Editor and click on the Playback button.
- Select the
Start Mode:Android. - You do not need to choose any browser.
- Choose a device to execute a script from
Android Device:dropdown. - You can leave the Start URL blank. This is not used.
- Press
Create ANT Targetto generate the ANT target.
infoFor better understanding refer to Playback via ANT.
More Info
Android Accessor APIsMobile APIs