

Test Scenario Editor
Build and organise tests in the Test Scenario Editor: projects, the Navigator, scenario files in the No-Code Test Editor, running a scenario file, the Sheet View, scenarios with Java, and the Tools menu.
A test suite grows into hundreds of files: scenario files, the keyword files behind them, test data, suites and accessor repositories. The Test Scenario Editor keeps them in one place. You build test cases without code in the No-Code Test Editor, write keyword code in the script view when you need it, and run anything from the same window. It replaces the Scenario Editor of older Sahi Pro versions.
Open the Editor
Section titled “Open the Editor”- From the Dashboard: click Test Editor.
- From the Controller: click Sahi Editor in the Controller’s bottom bar.
The Editor opens in one browser tab at a time. If it’s already open somewhere, Sahi Pro asks before it opens another tab.
The Editor at a Glance
Section titled “The Editor at a Glance”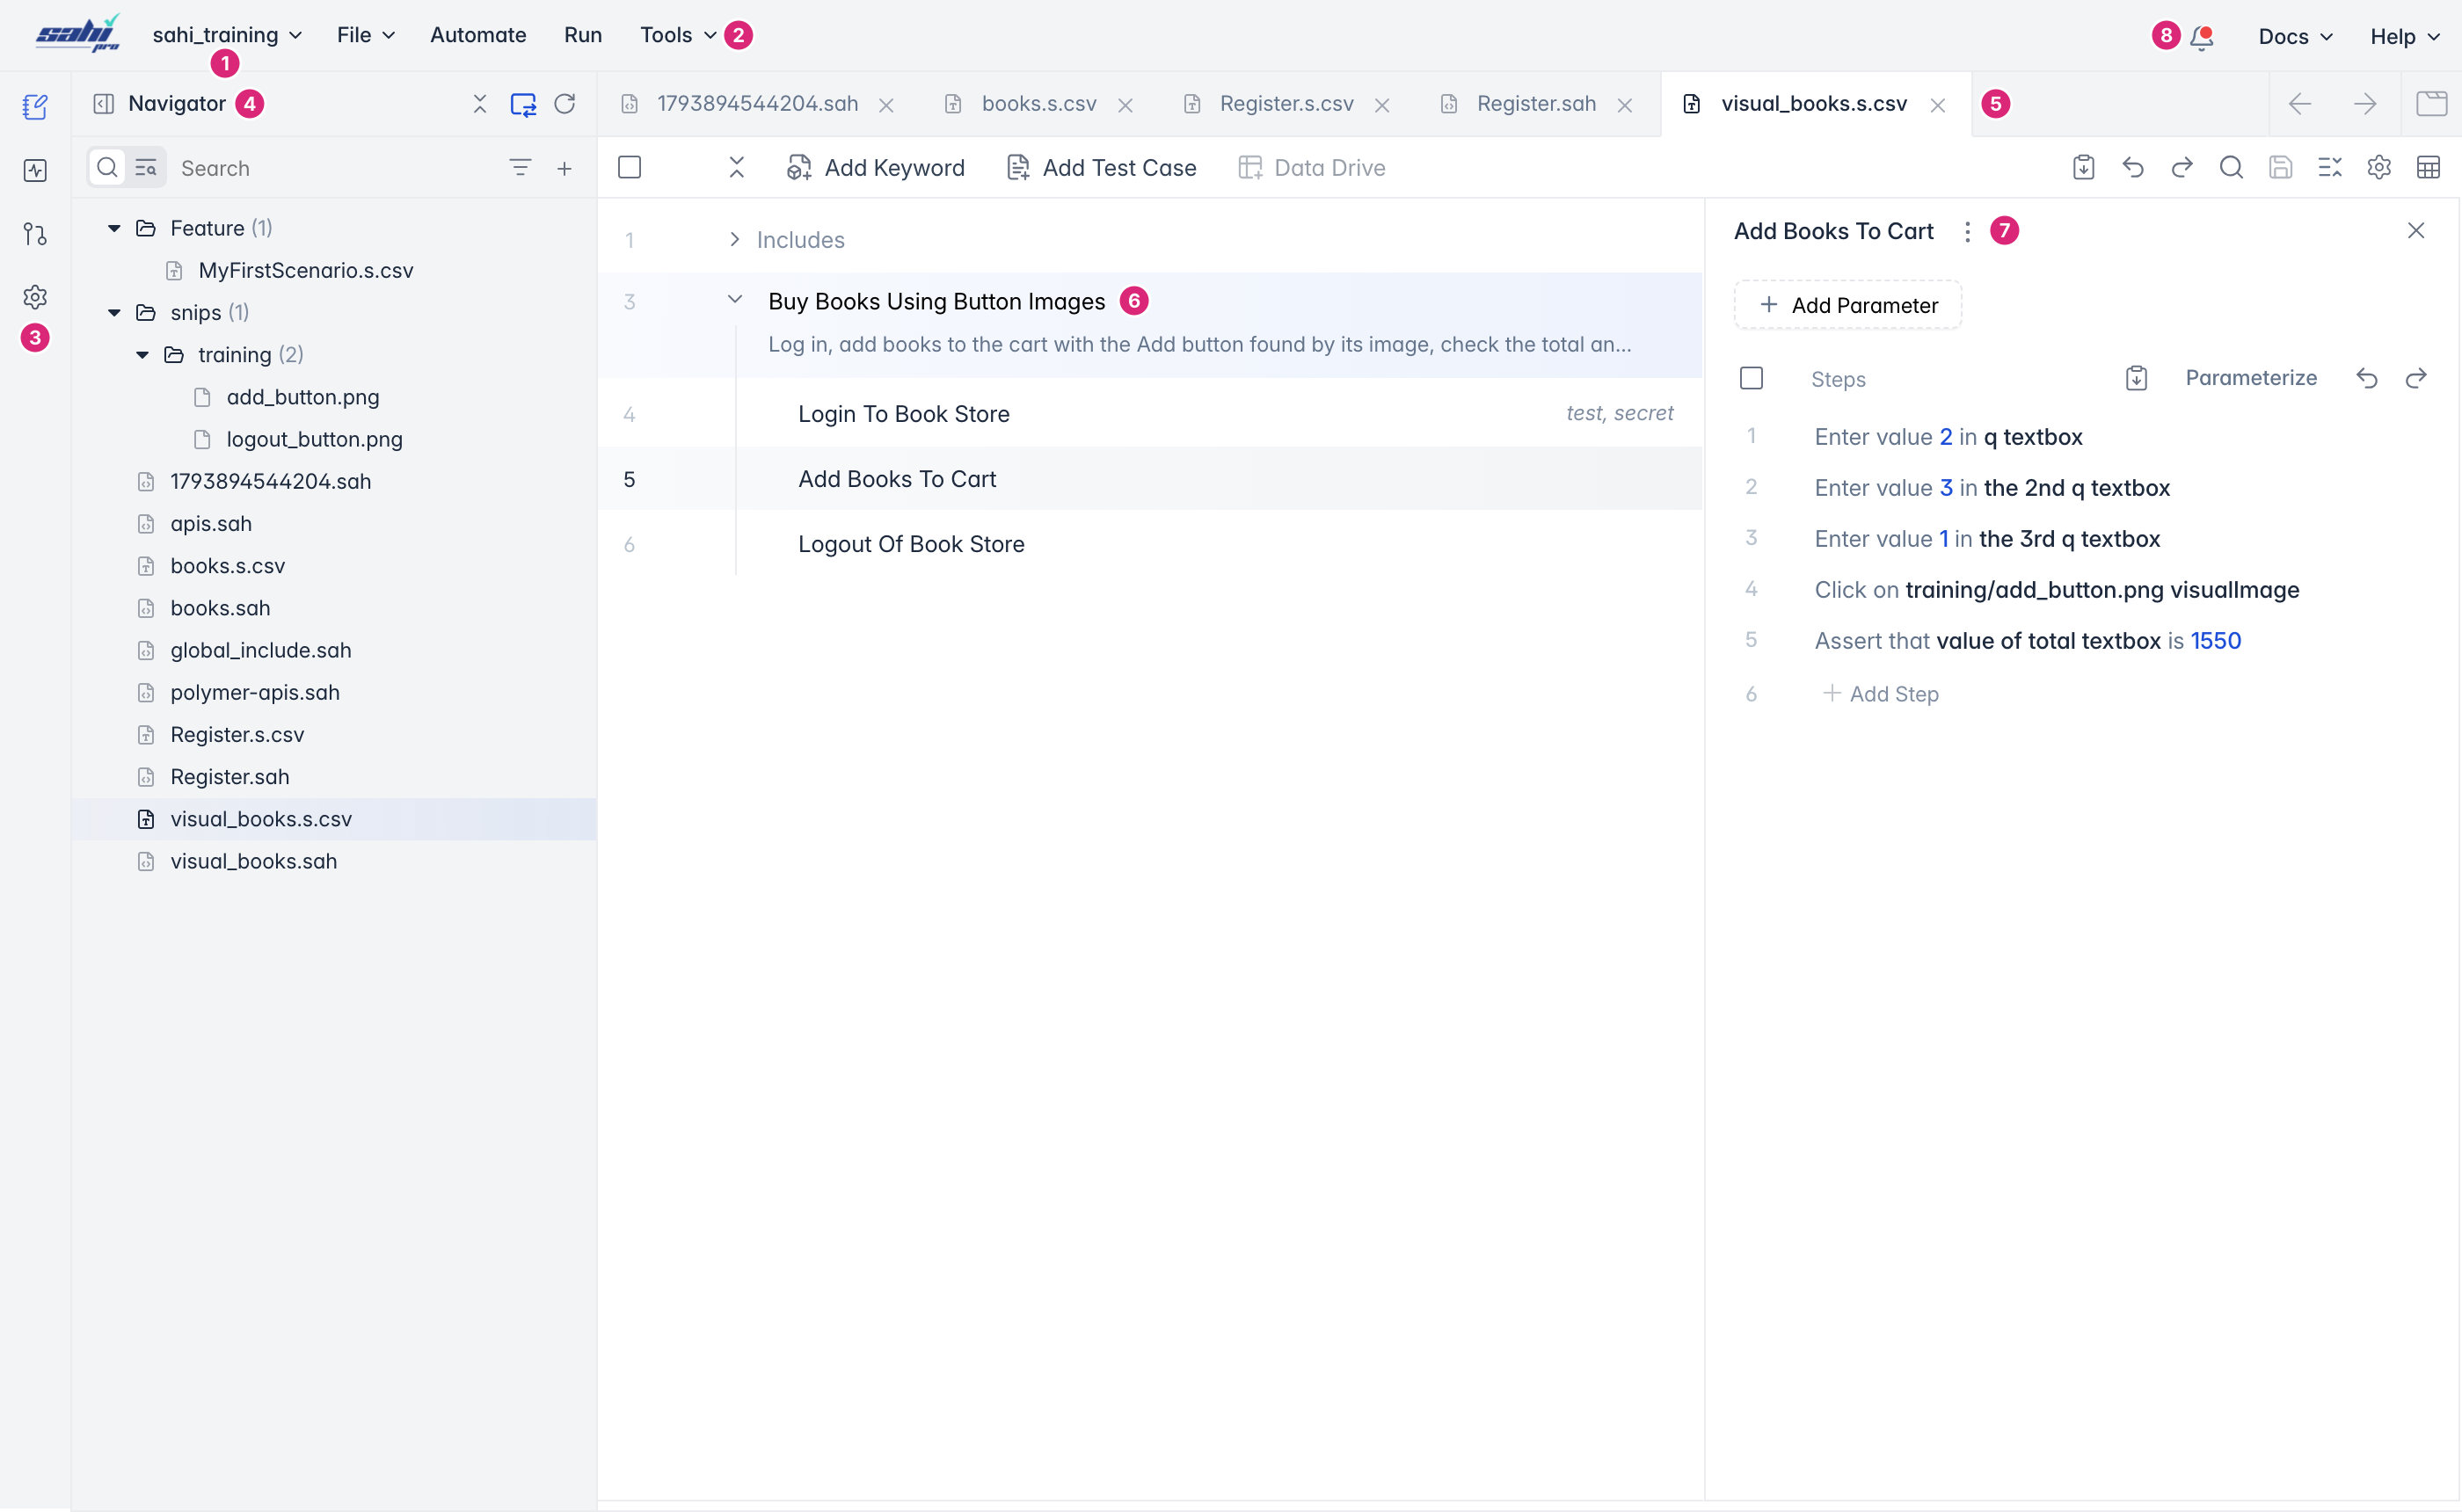
- Project picker: the project you’re working in. See Projects.
- Menus: File creates and saves files, Automate opens the Controller on the selected keyword, Run opens the Run Configuration, and Tools holds the utilities.
- Left bar: Scripts (the Navigator), Logs (test run reports), Git Configuration and Settings.
- Navigator: the files in the project. See Navigator.
- Tabs: the files you have open. See Tabs.
- No-Code Test Editor: the open scenario file, with its test cases and keywords.
- Keyword steps: the steps of the selected keyword.
- Notifications, Docs and Help.
Projects
Section titled “Projects”Tests for different applications, or from different teams, get in each other’s way when they share one folder. A project keeps each set of tests, data and reports on its own.
Click the project name at the top left to switch projects. Type in Search to find one, or click New to create a project.
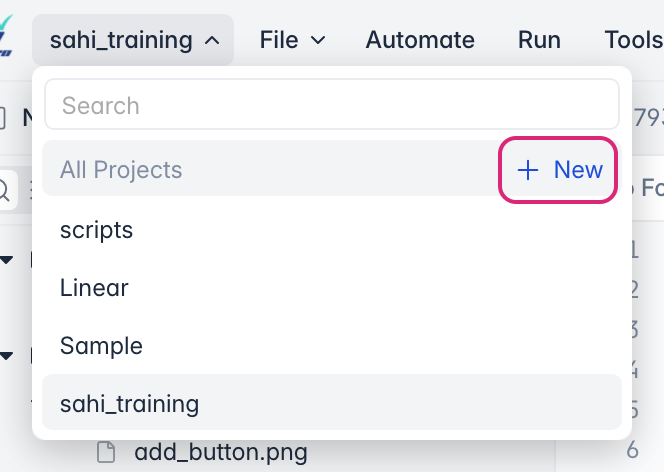
Sahi Pro comes with a default project, scripts, which holds example tests. For a walkthrough, see Create a Project.
Navigator
Section titled “Navigator”The Navigator lists the files and folders in the project. Click a file to open it.
- Search filters the list as you type.
- Collapse All, Link with Editor and Refresh Navigator sit at the top. Link with Editor keeps the open file selected in the list, and Refresh Navigator shows files added outside the Editor.
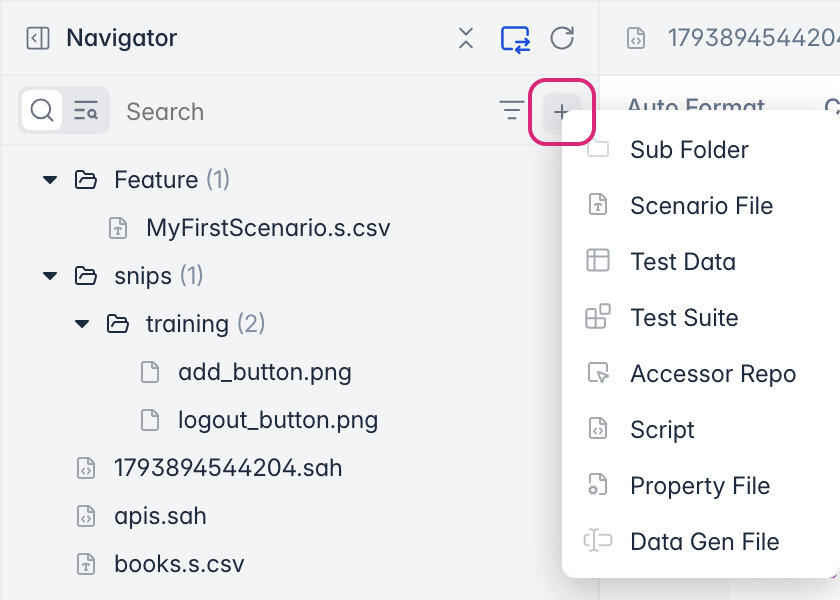
- + adds a Sub Folder, Scenario File, Test Data file, Test Suite, Accessor Repo, Script, Property File or Data Gen File.
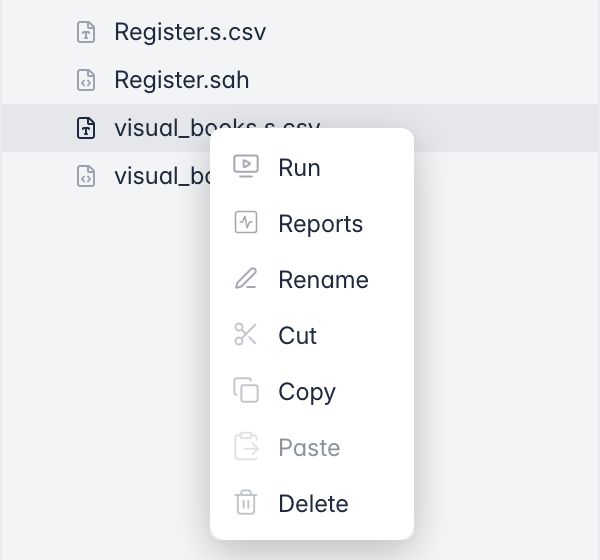
Right-click a file to Run it, open its Reports, or Rename, Cut, Copy, Paste or Delete it. Select several files to create a Test Suite or an Accessor Repo from them, or to cut, copy or delete them together.
Each open file has a tab. Right-click a tab for Refresh tab, Close tab, Close other tabs, Close tabs to the left and Close all tabs.
When you move between files, such as by Ctrl-clicking (⌘-clicking on Mac) a keyword to open its file, it’s easy to lose your place. The left and right arrows at the right of the tabs, Previous Location and Next Location, take you back and forward through the places you’ve been, like a browser’s back and forward buttons.

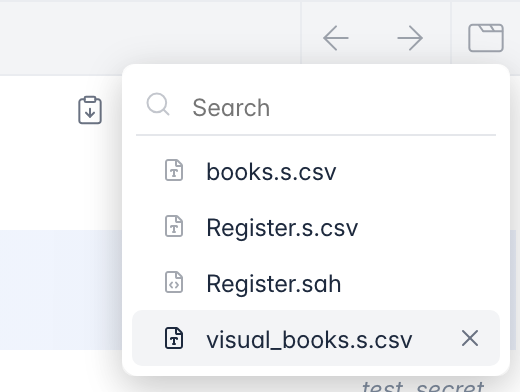
With many files open, the tabs don’t all fit. Click the button in the corner, after the arrows, to list all open tabs. Type in Search to find one, click it to switch to it, or hover over it and click × to close it.
Create and Save Files
Section titled “Create and Save Files”File > New creates a Scenario File (Alt + N), a Test Data file or a Test Suite. To create one inside a folder, use + in the Navigator instead. File also has Save (Ctrl + S, or ⌘ + S on Mac), Save As (Alt + F2) and Save All (Ctrl + Shift + S, or ⌘ + Shift + S on Mac).
A test suite is a .dd.csv file that lists scenario files to run together. See Test Suites.
Build Tests in the No-Code Test Editor
Section titled “Build Tests in the No-Code Test Editor”A scenario file opens in the No-Code Test Editor. Each test case is a list of keywords, written in business terms such as Add Books To Cart, and each keyword holds the steps that do the work. Select a keyword to see its steps beside the test case.
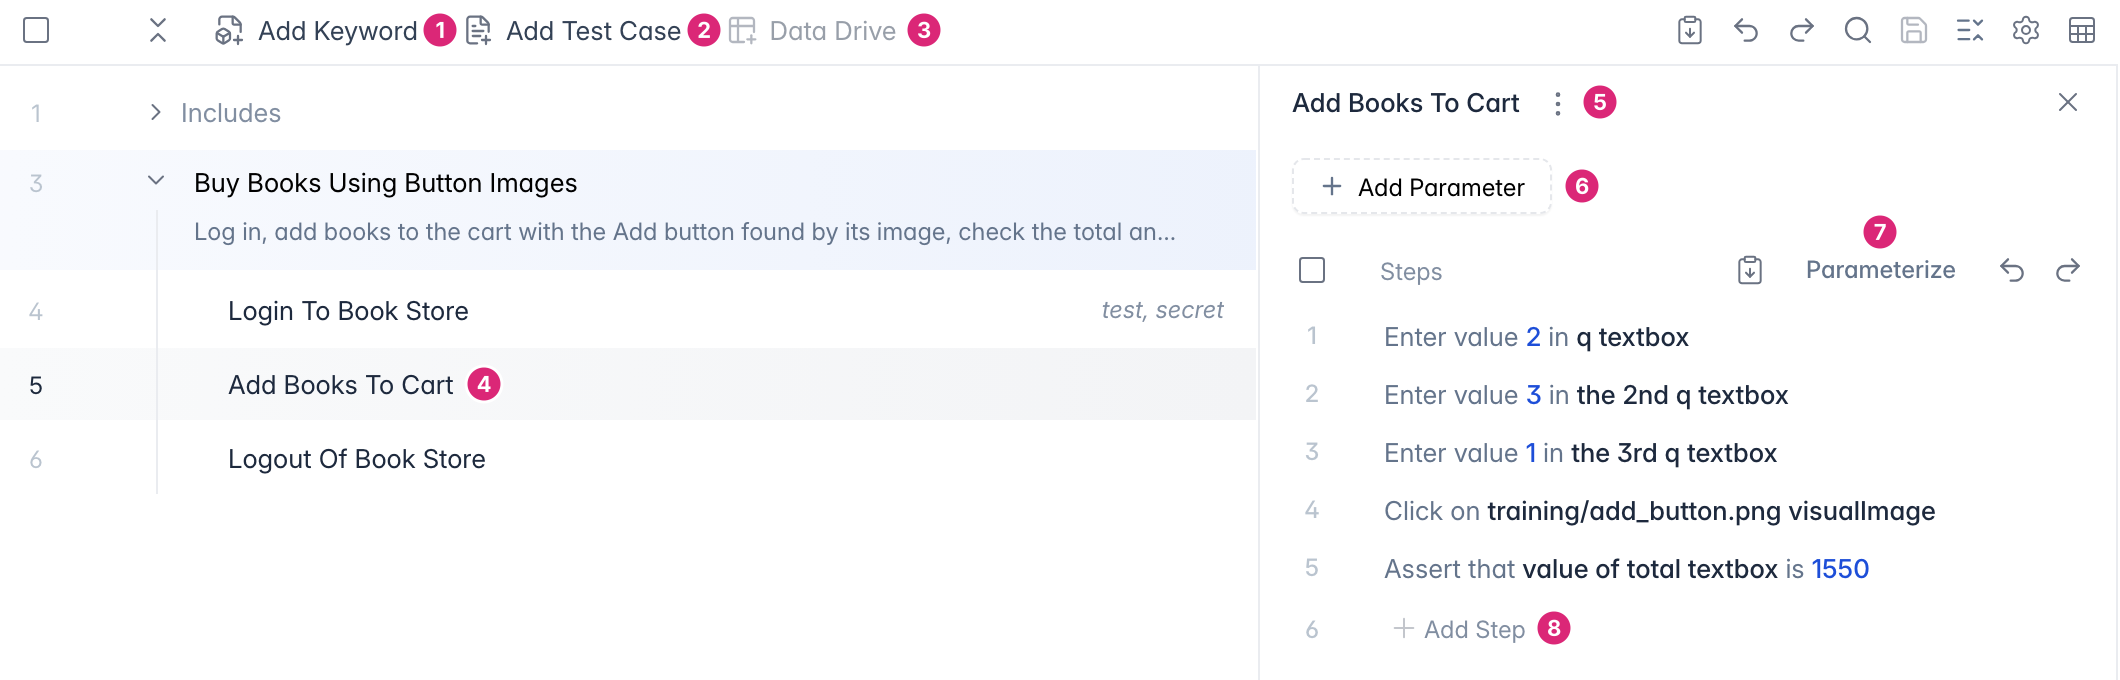
- Add Keyword: adds a keyword to the test case.
- Add Test Case: adds a test case to the scenario file.
- Data Drive: attaches a test data file, to run the test case with several sets of data. See Test Data Files.
- A keyword in the test case. Values it passes to the keyword’s parameters show at the right, such as
test, secret. They’re passed by name (Username:test), so their order doesn’t matter. - The selected keyword’s steps.
- Add Parameter: adds a parameter to the keyword.
- Parameterize: turns recorded values into parameters. See Parameters and Data Generators.
- Add Step: adds a step to the keyword.
Write a Keyword
Section titled “Write a Keyword”- Click Add Keyword and type its name, such as
Add Books To Cart. - Add its steps. To record them, select the keyword and click Automate: the Controller opens on the keyword, and each action you take in the browser becomes a step. To add a step by hand, click Add Step.
- In the Add Step panel, choose the Action, such as Set Value or Click, and the Element it acts on. Enter a Value if the action needs one. Step Options has more settings for the step. The dropdown at the top right switches the step type: Actions, Rest Client for a call to a Rest API (see REST Client - Getting Started), or Sahi Script / JS Code for a line of code.
- Click Add Step, then save with Ctrl + S (⌘ + S on Mac).
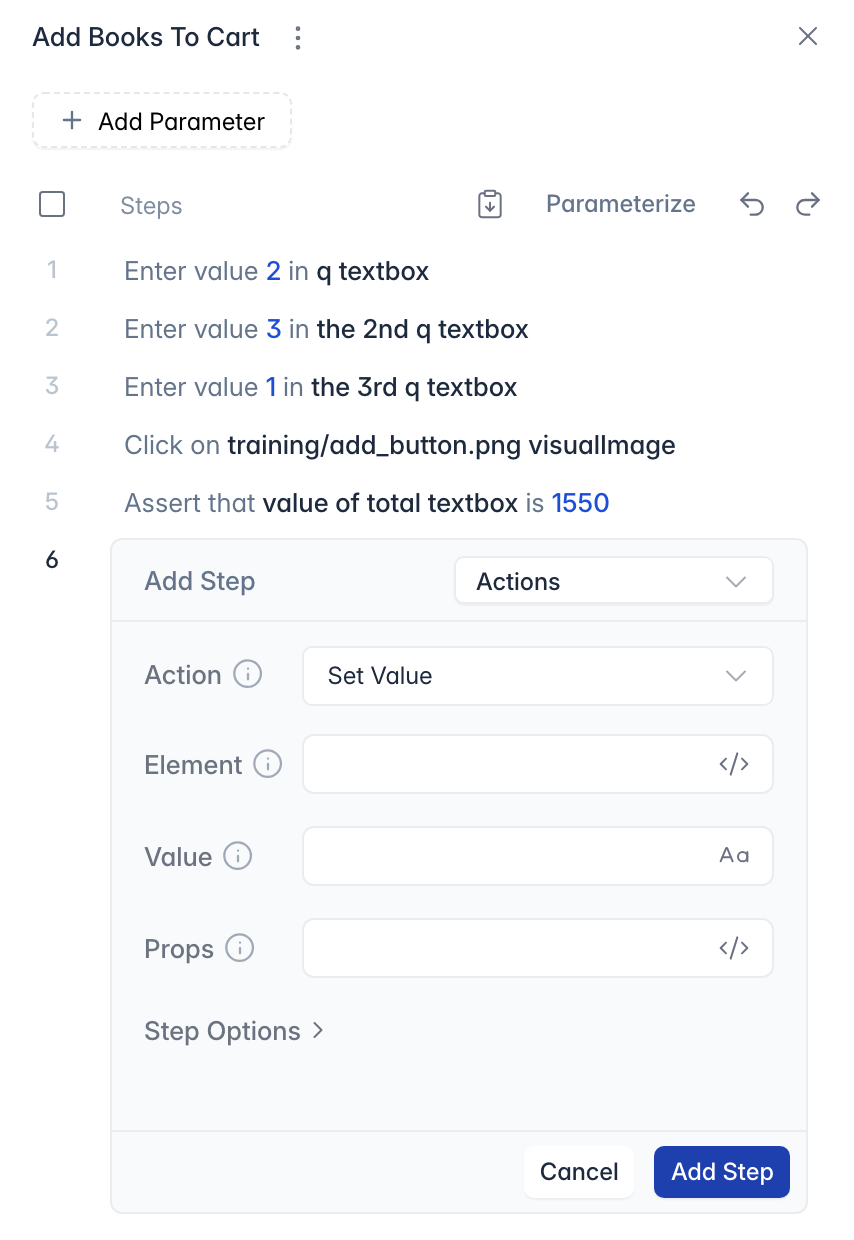
To change a step, double-click it: it opens in Edit Step, with the same fields. For a full walkthrough, see Your First Test Scenario.
Keyword Code
Section titled “Keyword Code”Behind every keyword is a Sahi Script function in a keyword file (.sah). When a keyword needs logic that no-code can’t express, open its file and write the code in the script view. See Write Keywords in Sahi Script.
Test Data, Suites and Runs
Section titled “Test Data, Suites and Runs”- Test Data Files: run a test case with many sets of data.
- Test Suites: run many scenario files together.
- Run Tests via Editor: the Run Configuration, distributed suite runs, scheduling and debugging.
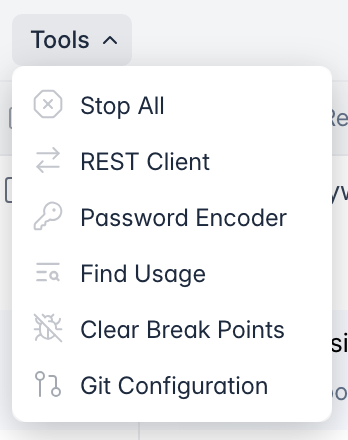
The Tools menu holds utilities you need now and then while working on tests.
Stop All
Section titled “Stop All”A suite started by mistake, or a run that hangs, keeps browsers busy until it ends. Stop All stops every test running from the Editor straight away.
REST Client
Section titled “REST Client”Many applications have Rest APIs behind their screens, and checking them directly is faster and more stable than going through the user interface. Tools › REST Client opens the REST Client to build a request, send it, and check its response with assertions and variables. From here it ends with Generate Sahi Script, which writes the request and its checks as Sahi Script, for keywords written in code.
To add a REST step to a keyword in the No-Code Test Editor instead, open the REST Client from Add Step. See REST Client - Getting Started.
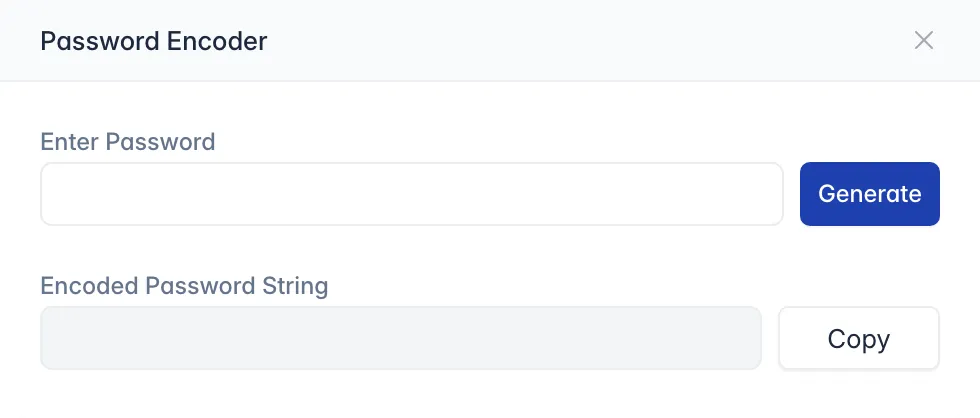
Password Encoder
Section titled “Password Encoder”A password typed into a test is readable by anyone who opens the file. Encode it, and use the encoded string with _setPassword instead:
- Choose Tools > Password Encoder.
- Type the password under Enter Password and click Generate.
- Click Copy to copy the Encoded Password String.
Find Usage
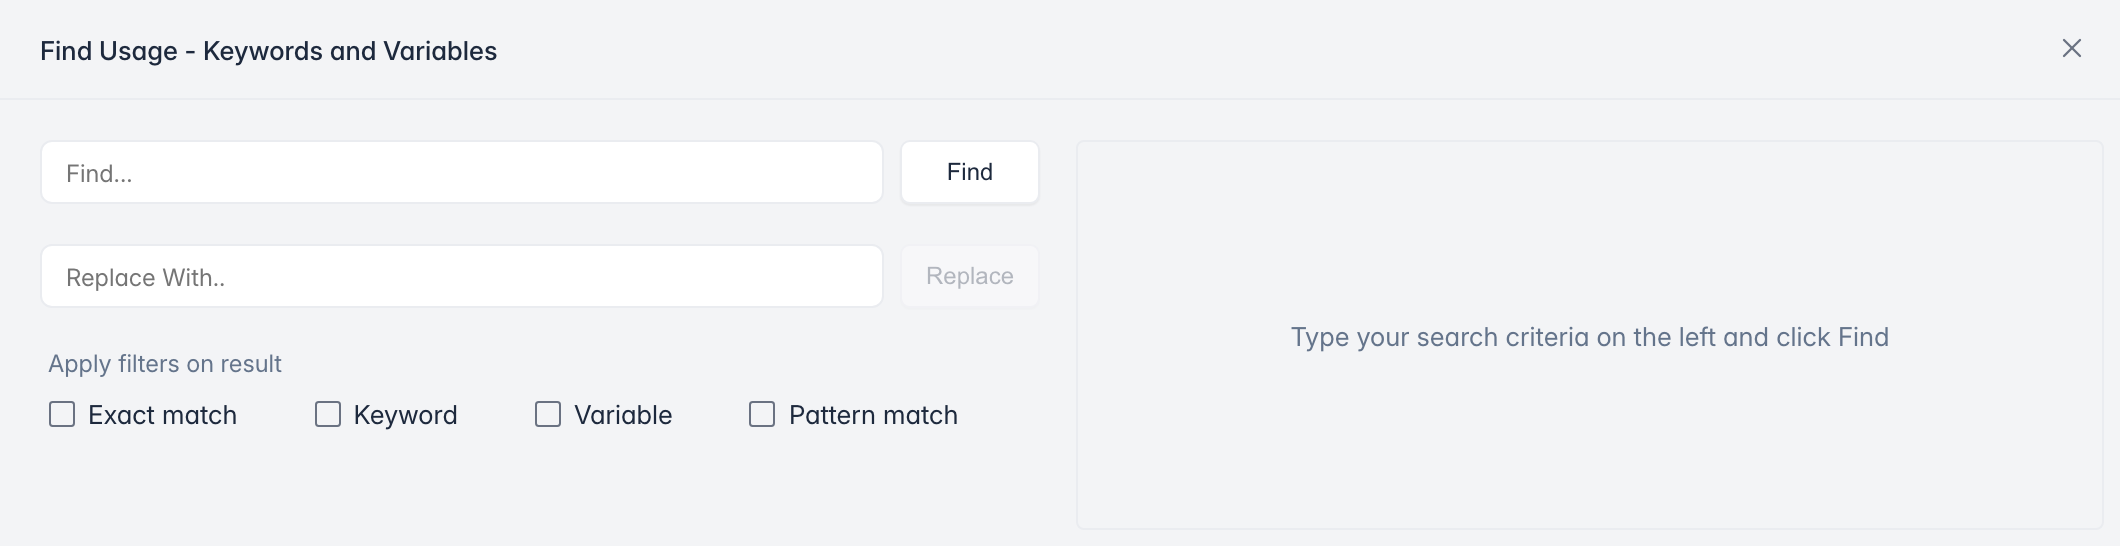
Section titled “Find Usage”When you rename a keyword or a variable, every file that uses it has to change too. Find Usage searches all the files in the project and can replace the name everywhere at once. See Find Usage Across Files.
Clear Break Points
Section titled “Clear Break Points”Breakpoints left behind in keyword files stop a later debug run where you don’t expect it. Clear Break Points removes every breakpoint in every file. See Debug a Test.
Git Configuration
Section titled “Git Configuration”To share tests with your team and keep their history, connect the project to a Git repository. Git Configuration sets:
- Remote Path and Branch: the repository and the branch to clone.
- Author Name and Author Email: the name and email used for your commits.
- Authentication Type: how Sahi Pro signs in to the repository, such as HTTPS Authentication with a User Name and Password.
- Git Directory: the folder the repository is cloned into.
- Git Log Integration: Enable adds Git details, such as the commit, to reports.
Click Save. For staging, committing and viewing history, see Integration with Git.
Editor Shortcuts
Section titled “Editor Shortcuts”| Shortcut | Explanation |
|---|---|
| Ctrl + S (⌘ + S on Mac) | Save the current file |
| Ctrl + Shift + S (⌘ + Shift + S on Mac) | Save all files |
| Alt + F2 | Save As |
| Alt + N | New scenario file |
For shortcuts while editing keyword code, see Write Keywords in Sahi Script.
Run a Scenario File
Section titled “Run a Scenario File”Run a scenario file like any other test. See Run Tests via Editor. Its report lists each test case with its keywords, and you can expand a keyword to see the Sahi steps it ran. Reports open from Reports in the Controller’s bottom bar, or at http://localhost:9999/logs.
Sheet View
Section titled “Sheet View”Users moving from older Sahi Pro versions may be used to editing scenario files as a sheet, with a row for each step. The Sheet View shows the file that way. To open scenario files in the Sheet View by default, add this line to userdata/config/userdata.properties:
scenario.grid.view.default=trueIt applies to scenario files that haven’t been opened in a view before.
The Sheet View’s toolbar has:
- Insert: a Testcase (Alt + Insert), a Tags Column (Alt + T) or a Comment Column (Alt + C).
- Load Sahi Library (Alt + S): adds a
loadSahirow for a keyword file. Its functions are then listed as you type in the Key Word column. - Function Details: shows the selected keyword’s function and its parameters, so you can see how many values it takes.
- Import: imports functions as CSV.
- Find and Replace, Save File, more options (Keyboard Shortcuts, Shift + F10) and Script Information.
Cells with a mistake turn red: a loadSahi path that doesn’t exist, a keyword that isn’t defined in the loaded files, or more values than the function takes.
Sheet View shortcuts
If one of these shortcuts is taken by your operating system, turn it off there. For example, on Ubuntu, go to System Settings › Keyboard › Shortcuts › Navigation.
Ctrl (⌘ on Mac) combination shortcut keys
Section titled “Ctrl (⌘ on Mac) combination shortcut keys”| Shortcut | Action |
|---|---|
| Ctrl + A (⌘ + A on Mac) | Select all contents of the worksheet. |
| Ctrl + HOME (⌘ + HOME on Mac) | Move to column header cell. |
| Ctrl + C (⌘ + C on Mac) | Copies the selected cells. |
| Ctrl + X (⌘ + X on Mac) | Cuts the selected cells. |
| Ctrl + V (⌘ + V on Mac) | Pastes in the selected cell. |
| Ctrl + Y (⌘ + Y on Mac) | Repeats the last command or action, if possible. |
| Ctrl + Z (⌘ + Z on Mac) | Uses the Undo command to reverse the last command or to delete the last entry you typed. |
| Ctrl + / (⌘ + / on Mac) | Comment/ Un-comment the selected row/s. |
| Ctrl + DELETE (⌘ + DELETE on Mac) | Deletes the selected row/s. |
ALT combination shortcut keys
Section titled “ALT combination shortcut keys”| Shortcut | Action |
|---|---|
| ALT + ENTER | While typing text in a cell pressing Alt + Enter will move to the next line allowing for multiple lines of text in one cell. |
| ALT + N | Loads the new worksheet. |
| ALT + O | Opens the dialog to load existing scenario. |
| ALT + F2 | Displays the Save As dialog box. |
| ALT + SHIFT + E | Displays the names of the feature developers. |
| ALT + INSERT | Insert Testcase shortcut. |
| ALT + S | Load Sahi library shortcut. |
| ALT + 1 | Insert new row above the current row. |
| ALT + 2 | Insert new row below the current row. |
| ALT + T | Inserts Tag column shortcut. |
| ALT + C | Insert Comment column shorcut. |
Function keys
Section titled “Function keys”| Shortcut | Action |
|---|---|
| F2 | Edit the selected cell. |
| ALT + F2 | Displays the Save As dialog box. |
| SHIFT + F10 | Displays the shortcut information pop-up. |
Other useful shortcut keys
Section titled “Other useful shortcut keys”| Shortcut | Action |
|---|---|
| ARROW KEYS | Move one cell up, down, left, or right in a worksheet. |
| SHIFT + ARROW KEY | Extends the selection of cells by one cell. |
| DOWN ARROW | Selects the next command when a context menu or Auto-complete option is open. |
| UP ARROW | Selects the previous command when a context menu or Auto-complete option is open. |
| BACKSPACE | Deletes one character to the left in the Formula Bar. Also clears the content of the active cell. |
| DELETE | Removes the cell contents from selected cells. In cell editing mode, it deletes the character to the right of the insertion point. |
| Ctrl + DELETE (⌘ + DELETE on Mac) | Deletes the selected row/s. |
| END | Moves to the last cell in the same row. Also selects the last command on the menu when a menu is visible. |
| Ctrl + END (⌘ + END on Mac) | Moves to the last cell in same column |
| Ctrl + SHIFT + END (⌘ + SHIFT + END on Mac) | Extends the selection of cells to the last used cell on the worksheet (lower-right corner). |
| ENTER | Completes a cell entry from the cell, and selects the cell below (by default). Edits the selected cell. Selects the selected command when a context menu or Auto-complete option is open. In a dialog box, it performs the action for the default command button in the dialog box (the button with the bold outline, ofte |
| Alt + Enter | While typing text in a cell pressing Alt + Enter will move to the next line allowing for multiple lines of text in one cell. |
| ESC | Cancels an entry in the cell or Formula Bar. It also closes an open menu dialog box or message window. |
| HOME | Moves to the beginning of a row in a worksheet. Selects the first command on the menu when a context menu is visible. |
| Ctrl + HOME (⌘ + HOME on Mac) | Move to column header cell. |
| PAGE DOWN | Moves to the last cell in the same column. |
| PAGE UP | Moves to the first cell in the same column. |
| TAB | Moves one cell to the right in a worksheet. Moves to the next option in the context menu. |
| SHIFT + TAB | Moves to the previous cell in a worksheet. |
Scenarios with Java
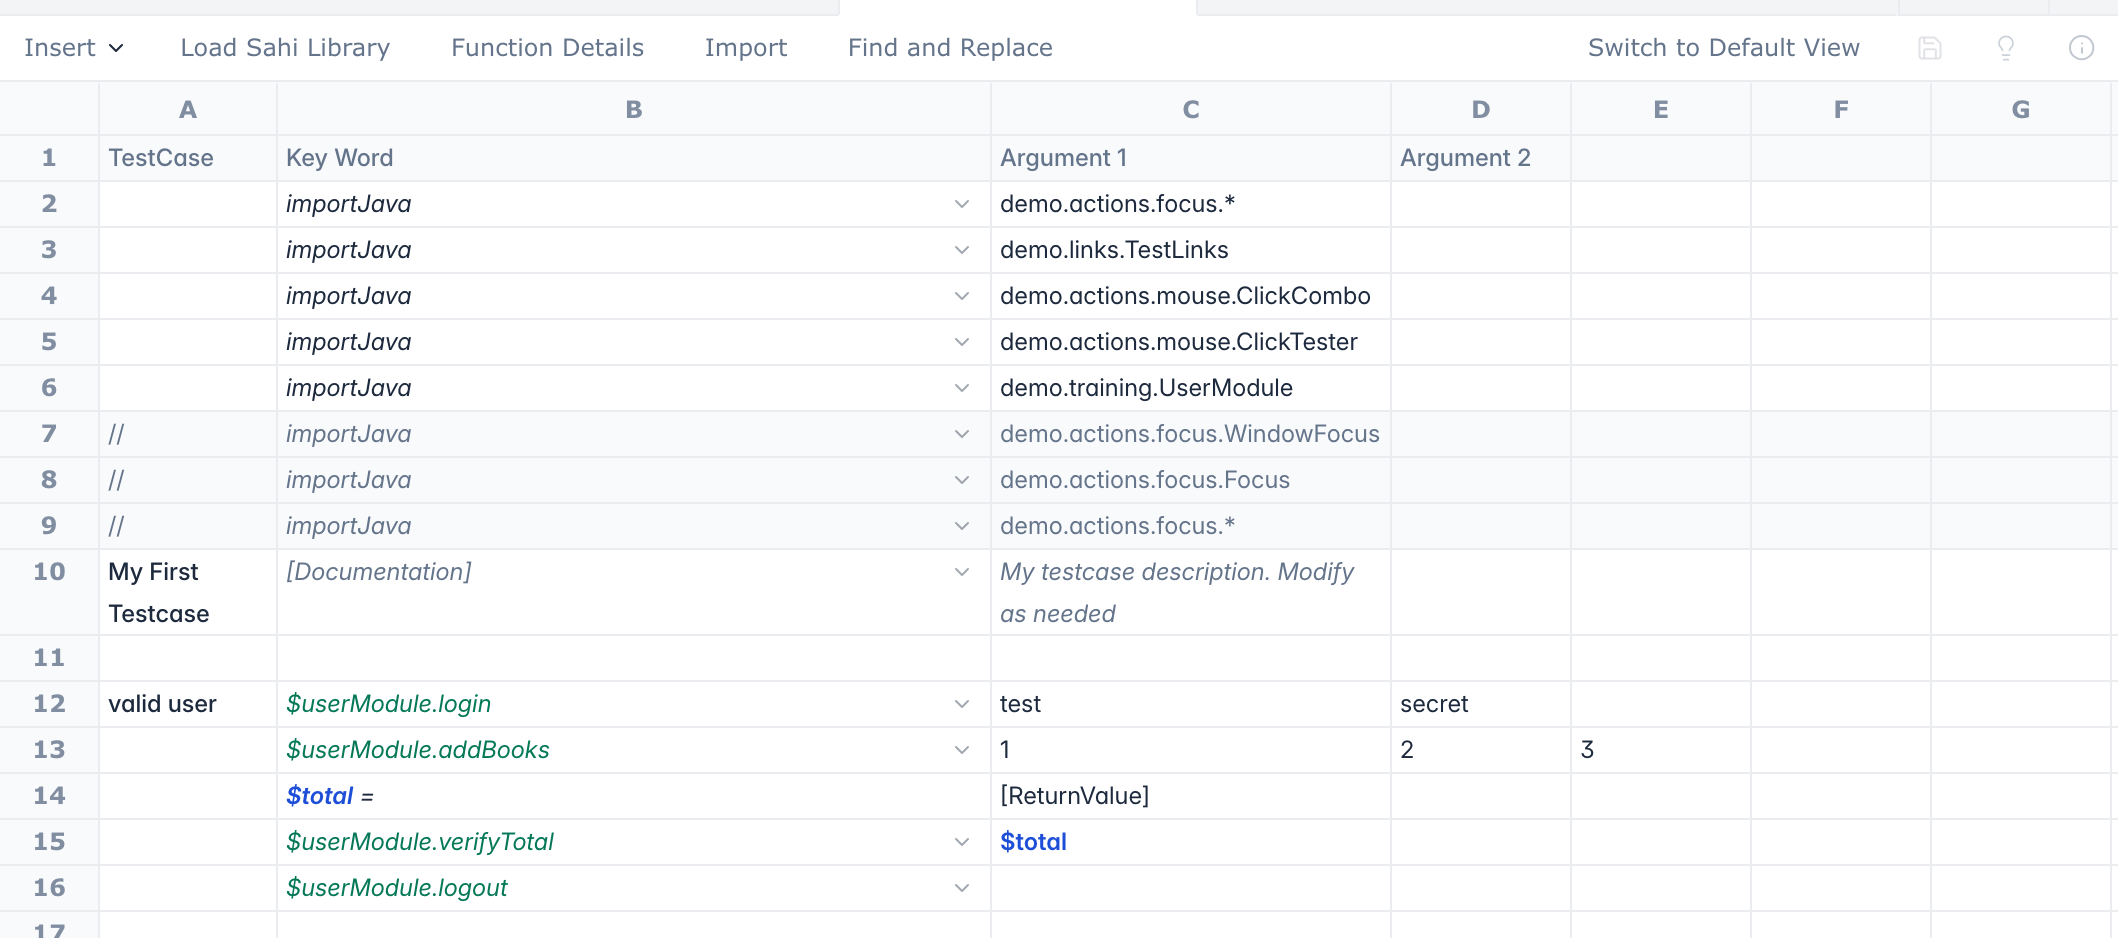
Section titled “Scenarios with Java”The keywords in a scenario file can also be methods of Java classes, for teams that write their automation code in Java. In the scenario file, importJava takes the place of loadSahi, and each keyword calls a method as $className.methodName.
Set Up the Java Directory
Section titled “Set Up the Java Directory”Keep your Java code in userdata/scripts/java:
Folder structure: |- Sahi |- userdata |-scripts |-java |- src |- classes |- lib | | | |With this structure, Sahi Pro picks up the methods when you run tests, and sends them to the nodes in distributed suite runs. In your Java project:
- Add
sahi.jar, fromsahi/lib, to the classpath. - Name the source directory
src. - Name the default output directory
classes. - Name the library directory
lib.
Write a Java Class
Section titled “Write a Java Class”-
To list a class’s
publicmethods as you type a keyword, do one of these:- Make the class implement
SahiMarkerInterface, withimport com.sahipro.lang.java.client.SahiMarkerInterface;. - Add the class’s fully qualified name to
userdata/scripts/java/exposed_classes.txt, one per line. Lines starting with#or//are comments.
- Make the class implement
-
Declare instance variables for the Sahi capabilities the class needs, such as
com.sahipro.lang.java.client.Browser,Windows,AppletandJavaApplication, and a constructor that sets them. For example, for a classUserModule:Browser browser = null;Windows window = null;JavaApplication javaApplication = null;public UserModule(SahiCapabilities sahiCapabilities) {this.b = sahiCapabilities.getBrowser(); //to retrieve Browser instancethis.window = sahiCapabilities.getWindows(); //to retrieve Windows instancethis.javaApplication = sahiCapabilities.getJavaApplication(); //to retrieve JavaApplication instance}
A template:
package demo.training;
import com.sahipro.lang.java.client.Applet;import com.sahipro.lang.java.client.Browser;import com.sahipro.lang.java.client.JavaApplication;import com.sahipro.lang.java.client.SahiCapabilities;import com.sahipro.lang.java.client.SahiMarkerInterface;import com.sahipro.lang.java.client.Windows;
public class UserModule implements SahiMarkerInterface {  Browser b = null;  Windows w = null;  JavaApplication javaApplication = null;
  public UserModule(SahiCapabilities sahiCapabilities) {    this.b = sahiCapabilities.getBrowser();    this.w = sahiCapabilities.getWindows();    this.javaApplication = sahiCapabilities.getJavaApplication();  }}
A class for the training book store:
package demo.training;
import com.sahipro.lang.java.client.Browser;
import com.sahipro.lang.java.client.SahiCapabilities;
import com.sahipro.lang.java.client.SahiMarkerInterface;
public class UserModule implements SahiMarkerInterface {  Browser b = null;
  public UserModule(SahiCapabilities sahiCapabilities) {    this.b = sahiCapabilities.getBrowser();  }
  public void login(String username, String password) {    String baseURL = "https://sahitest.com/";    b.navigateTo(baseURL + "/demo/training/login.htm");
    b.textbox("user").setValue(username);    b.password("password").setValue(password);
    b.click(b.submit("Login"));  }
  public void addBooks(int java, int ruby, int python) {    b.setValue(b.textbox("q").near(b.cell("Core Java")), java+"");    b.setValue(b.textbox("q").near(b.cell("Ruby for Rails")), ruby+"");    b.setValue(b.textbox("q").near(b.cell("Python Cookbook")), python+"");    b.click(b.button("Add"));  }
  public void verifyTotal(int total) {    b.areEqual(total+"", b.textbox("total").getValue());  }
  public void logout() {    b.click(b.button("Logout"));  }
  public void verifyNotLoggedIn() {    b.assertExists(b.textbox("user"));  }
  public void verifyErrorMessage(String message) {    b.assertVisible(b.div("errorMessage"));    b.assertText(b.div("errorMessage"), message);  }
  public void addBooksAndVerifyTotal(int java, int ruby, int python, int total){      addBooks(java, ruby, python);      verifyTotal(total);  }}
Call Java Methods
Section titled “Call Java Methods”importJava creates an instance of the class and keeps it in a variable named after the class, with a lowercase first letter. Call its methods as $className.methodName. For example, importJava "demo.training.UserModule" sets $userModule, and $userModule.login calls login(String userName, String password):
| TestCase | Key Word | Argument1 | Argument2 | Argument3 |
| importJava | "demo.training.UserModule" | |||
| Check shopping cart total | [Documentation] | Smoke test for add books | ||
| $userModule.login | "test" | "secret" | ||
| $userModule.addBooks | 3 | 2 | 1 | |
| $userModule.verifyTotal | 1640 | |||
| $userModule.logout | ||||
| Test login error message | [Documentation] | Checks Invalid login message | ||
| $userModule.login | "test" | "bad password" | ||
| $userModule.verifyNotLoggedIn | ||||
| $userModule.verifyErrorMessage | "Invalid username or password" | |||
A Comments and a Tags column can come before TestCase, as in any scenario file. To run only some test cases, filter by tags when you run, such as admin || user:
| Comments | Tags | TestCase | Key Word | Argument1 | Argument2 | Argument3 |
| Load the function library file | importJava | "demo.training.UserModule" | ||||
| First Testcase | smoke, admin | Check shopping cart total | [Documentation] | Smoke test for add books | ||
| $userModule.login | "test" | "secret" | ||||
| $userModule.addBooks | 3 | 2 | 1 | |||
| $userModule.verifyTotal | 1640 | |||||
| $userModule.logout | ||||||
| Second Testcase | all, smoke, user | Test login error message | [Documentation] | Checks Invalid login message | ||
| $userModule.login | "test" | "bad password" | ||||
| $userModule.verifyNotLoggedIn | ||||||
| $userModule.verifyErrorMessage | "Invalid username or password" | |||||
The rules, with a note on each row:
| Test Case | Key word | Argument 1 | Argument 2 | Argument 3 | Very first line of sheet |
|---|---|---|---|---|---|
| Blank lines are ignored | |||||
| importJava | “demo.training.UserModule” | Creats a new instance of the java class and sets it into a presumed variable name ($userModule in this case). | |||
| Test Case One | Step One | Param1 | Param2 | New test case started.StepOne(Param1, Param2) is called. | |
| Step Two | Param3 | StepTwo(Param3) is called | |||
| Test Case Two | Step One | 25 | “age” | New test case started.String values are quoted | |
| Step Two | Param5 | ||||
| Test Case Three | [Documentation] | Some description about the test case | [Documentation] is useful for, well, documentation | ||
| Step One | 25 | “age” | New test case started.String values are quoted | ||
| // | Step Two | Param5 | Commented step using // | ||
| Step Two | Param6 | ||||
What to Know
Section titled “What to Know”- Reports log the Java code that ran in the browser. Click a step in the report to see its stack trace.
- Java methods can run across machines in distributed suite runs.
- One scenario file or keyword file can call Sahi functions and Java methods together.
- You don’t need to restart Sahi Pro when classes or JAR files change. It runs the changed code.
- Assertions in Java work like those in Sahi Script, with the same automatic wait and retry. A failed assertion doesn’t stop the run.
- Not supported: Java classes with the same name in different packages, and running a test that calls Java methods from a URL.